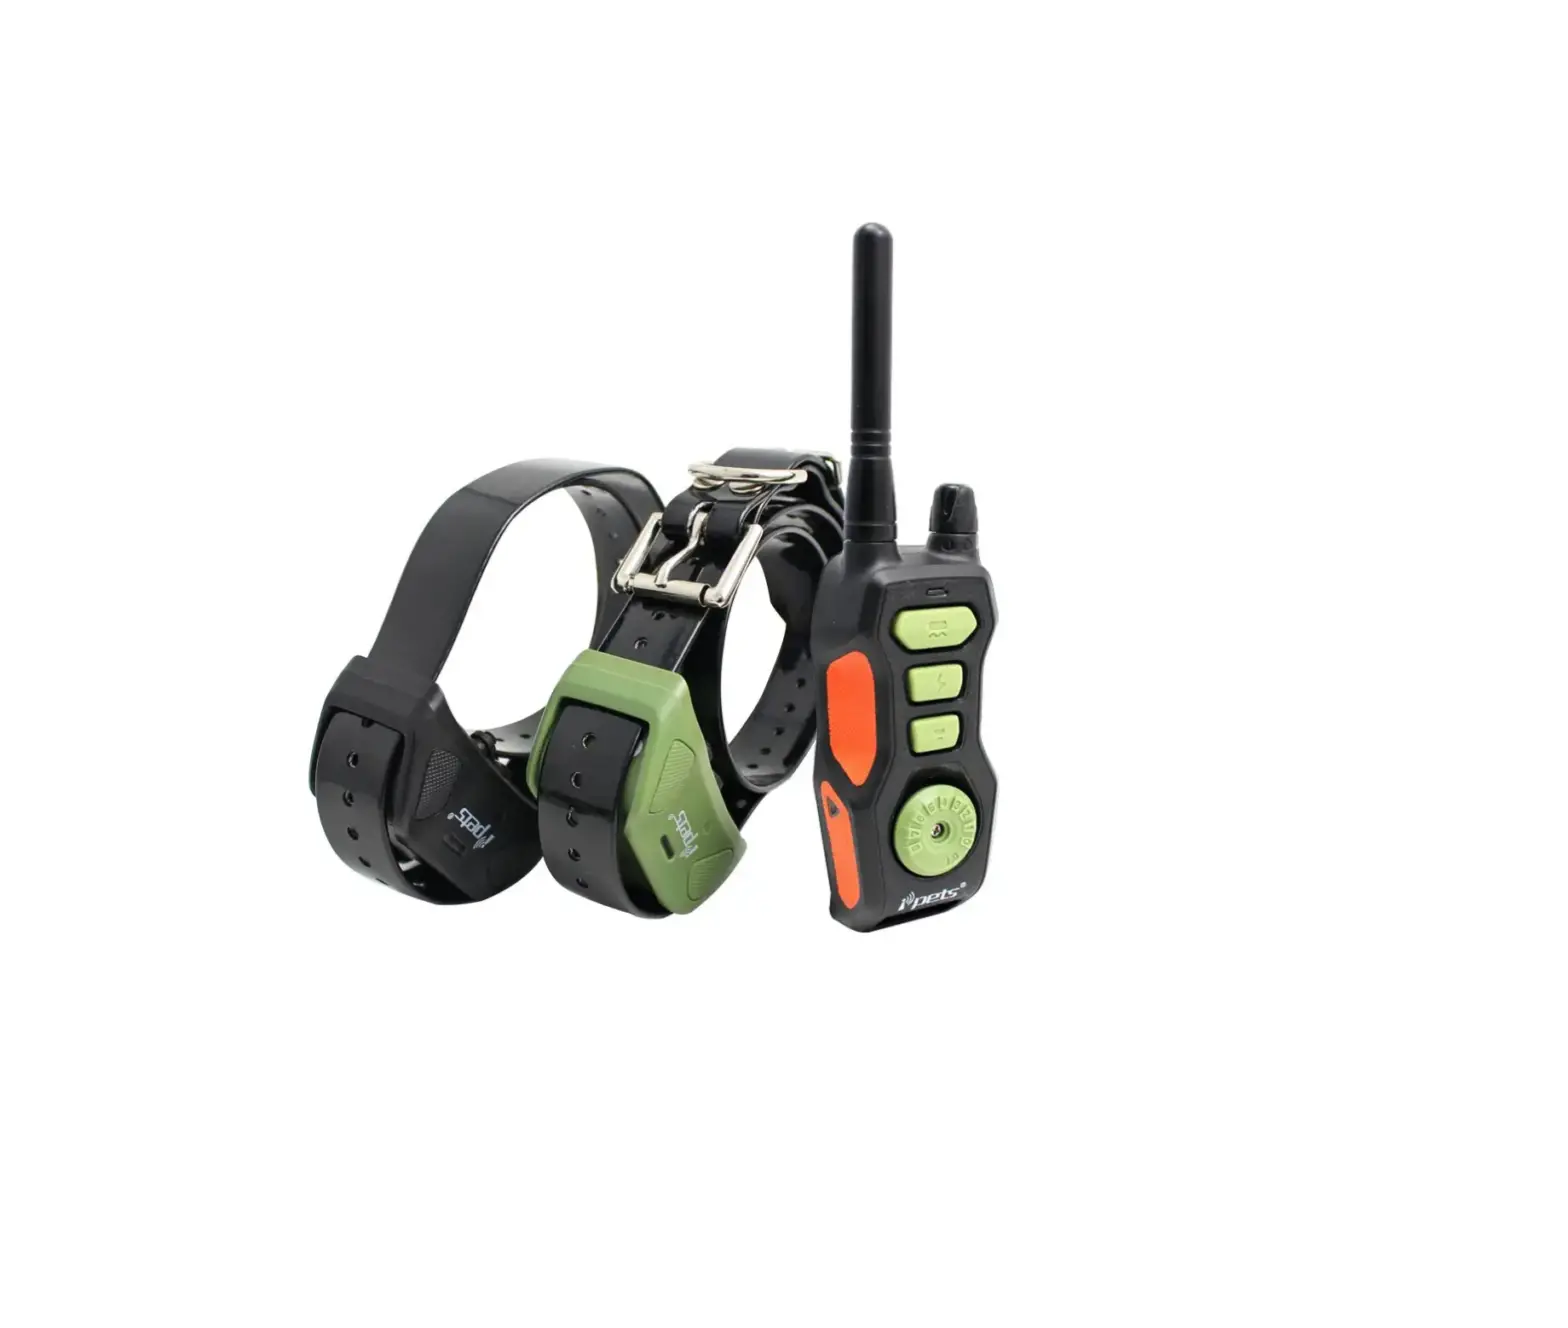
 iPets PET618 2700ft Remote Dog Training Collar
SPECIFICATION
- MATERIAL: Metal, Thermoplastic Polyurethane
- BRAND: PETS
- CLOSURE TYPE: Button
- ITEM DIMENSIONS LXWXH: 9 x 7.5 x 2.1 inches
- TARGET SPECIES: DogFREQUENCY: 915 MHz
- COLLAR SIZE: Able to fit small, medium and large dogs; 15 lbs. or Larger.
- REMOTE RANGE: Up to 880 yards/2700 feet.
- WATER CAPABILITIES: IPX7 Waterproof Remote
- BATTERY TYPE: Rechargeable Lithium Batteries for Collar Receiver and Remote Transmitter.
- TRAINING MODE OPTIONS: Standard Tone; 8 Levels of Vibration and Static Shock.
- PRODUCT DIMENSIONS: 9 x 7.5 x 2.1 inches; 1.46 Pounds
- BATTERIES: 2 Lithium Polymer batteries
An electric dog collar with 915Mhz wireless technology and a remote range of up to 880 yards makes it simple to train your dog in a long-distance setting. Dog training collar featuring distinct sound, vibration, and shock buttons that enable quicker corrections rather than requiring many button clicks to change modes. The adjustable intensity dial on the remote collar allows you to rapidly and precisely change the stimulation level for Vibration/Static Shock and Standard Tone, which makes it ideal for addressing your dog’s undesirable behavior. E-collars for dogs with a transmitter and receiver that are completely waterproof let your dog enjoy any aquatic experience, train in the rain, or by the sea! You may charge both the collar and remote for your dog’s electronic collar at once to save time.
COMPONENTS
PET618-1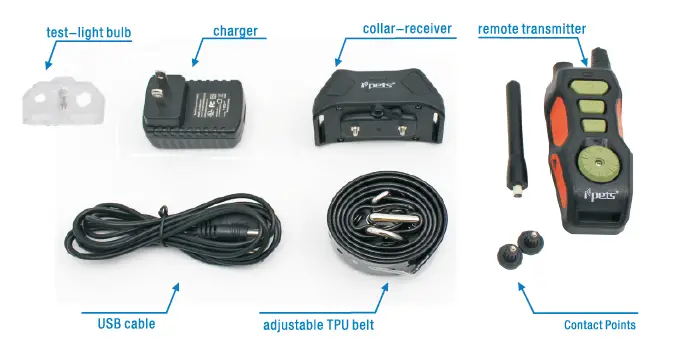
HOW THE DOG TRAINING SYSTEM WORKS?
iPets products are reliable, effective, and comfortable for large or small dogs. The system assists in controlling your dog without a leash in a range up to 880 yards away! Instantly send a signal from the Remote Transmitter, which activates your dog’s Collar Receiver. The dog will receive an annoying but safe, harmless stimulation. With correct, consistent use of this product, the dog will associate his misbehavior with your corrections, and soon enough, you will have a well- trained dog. This particular model features adjustable levels of stimulation and multiple types of stimulation, enabling the user to tweak accordingly to the dog’s temperament, removing the risk of overstimulation or incorrect usage of stimulation.
FEATURES
- Rechargeable Remote Transmitter and Collar Receiver.
- Waterproof Remote Transmitter and Collar Receiver.
- 8 intensity levels of Vibration.
- 8 intensity levels of Static Shock.
- Easy to use, adjustable Intensity Dial.
- Trouble free Receiver Selector Dial.
- Simple, ergonomic design layout.
- Belt Clip.
- Quick and straightforward pairing process.
- Range of 880 Yards.
- Capable of simultaneous control of three dogs (extra receivers are purchasable).
- Adjustable, thick TPU strap to accommodate any size of dog.
- Auto-off feature to conserve power when not in use to extend battery life.
- Remotely turn on/off Collar Receiver.
- 3 modes: Tone, Vibration and Static Shock.
KEY DEFINITIONS
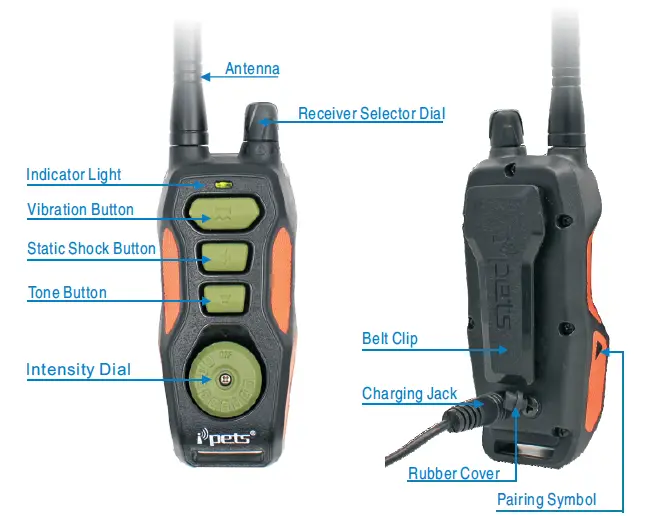
REMOTE TRANSMITTER
- ANTENNA: Transmits signal from Remote Transmitter to the Collar Receiver.
- TRANSMITTER INDICATOR LIGHT: When pressing stimulation buttons the Transmitter Indicator Light flashes green and solid red when charging the battery.
- INTENSITY DIAL: Rotate the dial to adjust the level of stimulation from 0 – 8. In addition, powers on and off the Remote Transmitter.
- RECEIVER SELECTOR DIAL: Rotate the dial to select a receiver. Up to three receivers can pair to the Remote Transmitter.
- VIBRATION BUTTON: Delivers vibration stimulation to the selected receiver.
- STATIC SHOCK BUTTON: Deliver static shock stimulation to the selected receiver.
- TONE BUTTON: Sends a tone signal to the selected receiver, which then emits a tone.
- TRANSMITTER CHARGING JACK: Charges the battery of the Remote Transmitter when connected to a power source.
- BELT CLIP: Allows for the possibility of hands-free training.
- REMOTE TRANSMITTER PAIRING SYMBOL: Pairs the Remote Transmitter to the Collar Receiver(s) or powers off the Collar Receiver when properly aligned.
- RUBBER COVER: Protects the internal components of the Remote Transmitter from dust and water. Always remember to replace after charging is complete.
COLLAR RECEIVER
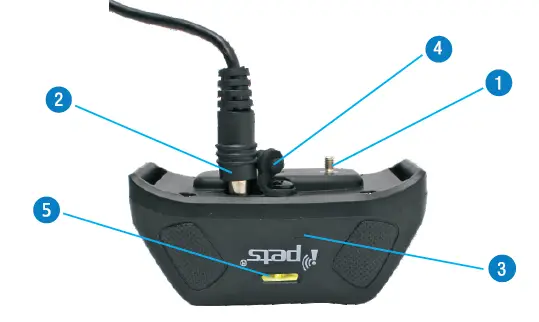
- CONTACT POINTS: Contact points cover the metal screws, and through them static shock stimulation is delivered.
- COLLAR RECEIVER CHARGING JACK: Charges the battery of the Collar Receiver when connected to a power source.
- COLLAR RECEIVER PAIRING RECEPTACLE: Pairs the Collar Receiver to the Remote Transmitter or powers off the Collar Receiver.
- RUBBER COVER: Protects the internal components of the Collar Receiver from dust and water. Always remember to replace after charging is complete.
RECEIVER INDICATOR LIGHT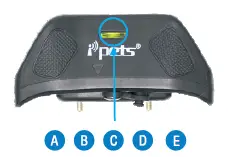
- When the Collar Receiver is charging the light will be a solid red; it switches to green when fully charged.
- In standby status, the Receiver Indicator Light will flash green periodically.
- Stimulation Buttons pressed on the Remote Transmitter will cause a green light to appear on the Collar Receiver.
- Initiating the pairing process of the Remote Transmitter and Receiver Collar will produce a solid green light.
- Powering off the Collar Receiver will give off a red light.
OPERATING GUIDE
PREPARE THE REMOTE TRANSMITTER
CHARGE THE REMOTE TRANSMITTER
- Uncover the Transmitter Charging Jack by lifting the Rubber Cover.
- Insert the charging connector into the Charging Jack.
- Plug the charger into a standard wall outlet.
- A solid red light will appear on the Transmitter Indicator Light, indicating charging is occurring.
- Once charging is complete, the solid red light will turn to a solid green light.
- Replace the Rubber Cover to protect the Transmitter Charging Jack.
NOTE: Before first use, charge the Remote Transmitter until completion of the charging process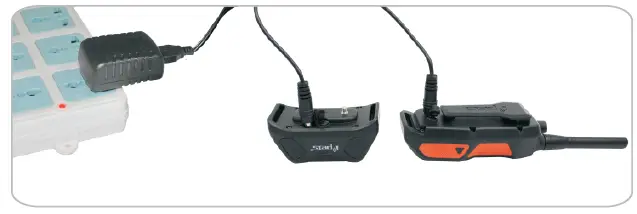
POWERING ON AND OFF THE REMOTE TRANSMITTER (FIGURE1-1)
To power on the Remote Transmitter rotate the Intensity Dial so it’s no longer selecting “off.” If done correctly, the Transmitter Indicator Light will be flashing green.
To power off the Remote Transmitter rotate the Intensity Dial to select “off,” the Transmitter Indicator light will cease flashing.
PREPARE THE COLLAR RECEIVER
CHARGE THE COLLAR RECEIVER
- Uncover the Collar Receiver Charging Jack by lifting the Rubber Cover.
- Insert the charging connector into the Charging Jack
- Plug the charger into a standard wall outlet.
- A solid red light will appear on the Receiver Indicator Light, indicating charging is in progress.
- Once charging is complete, the solid red light will turn to a solid green light.
- Replace the Rubber Cover to protect the Collar Receiver Charging Jack.
POWERING ON AND OFF THE COLLAR RECEIVER
There are two ways to power on and off the Remote Collar Receiver:
- OPTION 1
If the Collar Receiver is off, hold Vibration Button 1 first and then press and hold Beep Button 1 for 5 seconds to turn on the Collar Receiver; If the Collar Receiver is ON, hold Vibration Button 1 first and then press and hold Beep Button 1 for 3 seconds to turn off the Collar Receiver; - OPTION 2
Align the Remote Transmitter Pairing Symbol with the corresponding Collar Receiver Pairing Symbol, once the Receiver Indicator Light is green separate the two Pairing Symbols. The Collar Receiver is now on. Align the Remote Transmitter Pairing Symbol Transmitter with the corresponding Collar Receiver Pairing Symbol, once the Receiver Indicator Light goes red separate the two Pairing Symbols. The Collar Receiver is now off. The Collar Receiver also comes with an auto-off feature: if the Collar Receiver does not receive any signal from the Transmitter or any operation within one hour, the Collar Receiver will automatically be turned off to save the battery power. You need to turn on the Collar Receiver by either way of the above mentioned in order to operate the unit.
PAIRING COLLAR RECEIVER TO TRANSMITTER
- Rotate the Intensity Dial so it’s no longer selecting “off,” the Remote Transmitter will now be powered on.
- Rotate the Receiver Selector Dial to 1, indicating the first receiver for pairing.
- Ensure the Collar Receiver is off.
- Align and the Remote Transmitter Pairing Symbol with the corresponding Collar Receiver Pairing Symbol, hold until the Receiver Indicator Light is a steady green, once the steady green light begins to flash, press any of the stimulation buttons. Pairing is now complete.
- If needing to pair a second or third Collar Receiver, repeat these steps but rotate the Receiver Selector Dial to 2 or 3, depending on what Receiver Collar you’re pairing.
TEST THE TRAINING SYSTEM FUNCTIONS
The testing methods will help determine whether the training system is functioning as intended. Please ensure that the pairing process is complete before attempting to test the functionality.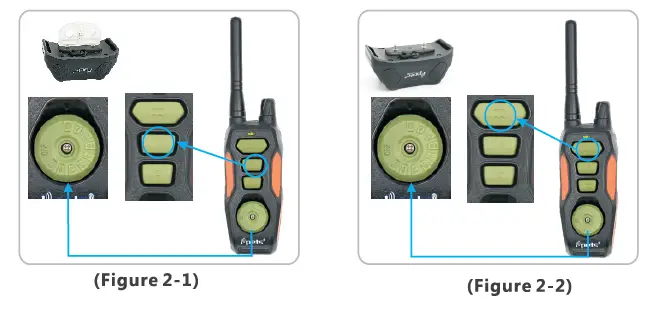
TESTING THE STATIC SHOCK FUNCTION (FIGURE2-1)
- Put the test bulb over the Contact Points of the Collar Receiver.
- Power on the Remote Transmitter and adjust the Intensity Dial off 0.
- Select the correct Collar Receiver with the Receiver Selector Dial.
- Press the Static Shock Button and the test bulb will flash orange, indicating the static shock function is operating correctly.
NOTE: If wanting to test the shock function on yourself, please ensure your finger or hand is across on contact points to ensure the connection is complete. Otherwise, user will feel no stimulation.
TESTING THE VIBRATION FUNCTION (FIGURE2-2)
- Power on the Remote Transmitter, and adjust the Intensity Dial off 0.
- Select the correct Collar Receiver with the Receiver Selector Dial.
- Press the Vibration Button and the Collar Receiver will respond appropriately.
TESTING THE TONE FUNCTION
- To power on the Remote Transmitter move the Intensity Dial from the “off” position.
- Select the correct Collar Receiver with the Receiver Selector Dial.
- Press the Tone Button, the Collar Receiver will emit a tone.
FIT THE COLLAR RECEIVER
IMPORTANT: The proper fit and placement of the Collar Receiver is essential for effective training. The contact points must have direct contact with the dog’s skin.
- To fit the Collar Receiver, attach the Collar Strap to the Receiver.
- With the dog standing in front of you, place the Collar Receiver around the dog’s neck, so the receiver box and Contact Points are on the underside of your dog’s neck, making direct contact with the dog’s skin. If direct contact is not possible, shaving some fur away, ensuring good contact is recommended.
- Fasten the collar strap. The fit should be snug, but not taut. A finger should be able to be placed beneath the collar strap when around the dog’s neck.
- Allow the dog to wear the Collar Receiver for several minutes and check the strap again. The dog will soon become more familiar with the Collar Receiver, so it is crucial to ensure the fit comfortable and flattering.


CAUTION: RISK OF SKIN DAMAGE
For comfort, safety and effectiveness of this product please check the fit of the dog’s collar frequently. If observing any skin irritation, immediately discontinue use of the collar for a few days. If the skin condition persists beyond 48 hours, consult a veterinarian. These collars can cause pressure necrosis, commonly known as bed sores, if used incorrectly and is often misidentified as burns. Do not attach a leash to the collar, which can result in squeezing the Contact Points too tightly against your dog’s neck. The design of the Collar Receiver discourages constantly wearing the device. iPets recommends the collar not wearing for more than 12 hours out of every 24-hour period. Most dogs feel uncomfortable when wearing the collar for the very first time. Do not use any functions until the dog is accustomed to the collar. iPets suggests giving the dog, the vibration stimulation before following it with a static shock. After training for a while using this method, the dog will be aware that after vibration comes a static shock. The vibration will act as a warning, and static shock only acts as a menace that might be necessary sometimes.
RE-THREAD THE COLLAR
REGULAR MAINTENANCE
Ensure Contact Points are not too tight on a weekly basis. Rinse the Contact Points with alcohol on a weekly basis. Check the dog’s neck for irritation and wash the dog’s neck on a weekly basis.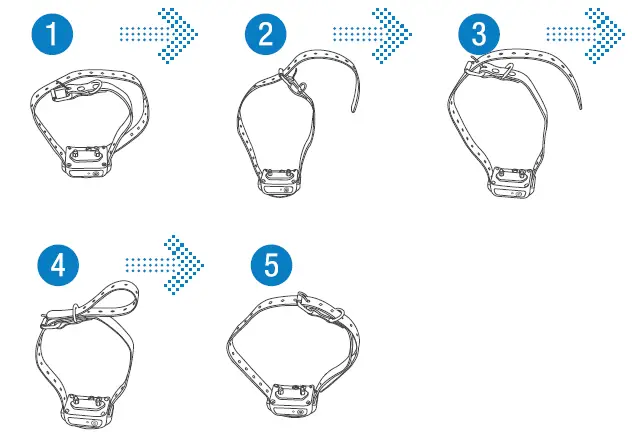
TROUBLESHOOTING
MY DOG IS NOT RESPONDING AFTER THE TRAINING SYSTEM INSTALLED SUCCESSFULLY.
- Charge the Remote Transmitter and Collar Receiver for 6 hours, separately before first use.
- Ensure if the Remote Transmitter and Collar Receiver power is on.
- Check the intensity levels of vibration and static shock, making sure it is not set to 0. Ensure the Collar Receiver has sufficient power to operate.
- Check the collar to ensure it fits snugly against your dog’s neck.
- If tested for all of the above and the dog is still not responding, please try re-pairing the Remote Transmitter and Receiver Collar.
THE REMOTE TRANSMITTER DOES NOT WORK.
- Check the battery status of the Remote Transmitter.
- Press and hold the Right Side Button for a few seconds to power on the Remote Transmitter.
I WANT TO TEST THE COLLAR RECEIVER ON MYSELF, BUT IT DOES NOT WORK.
When testing the Collar Receiver with your hands, please touch the two electrodes simultaneously, as touching one electrode will not work.
FREQUENTLY ASKED QUESTIONS
How old does the dog have to be before using the system?
Your dog should have learned basic obedience commands such as, “sit” or “stay.” The Collar Receiver might be too large for dogs under 15lbs.
Once my dog completes training and is been obeying my commands, will he have to wear the collar?
Probably not, but you may try to reinforce training with the collar.
Can I use the iPets rechargeable training collar with more than one dog?
Yes, you just need to purchase another Collar Receiver for the system.
Is the Collar Receiver waterproof?
Yes, but always ensure that the Rubber Cover seals the Charging Jack.
Can I replace the Collar receiver with another kind of collar?
No.
Can I attach a leash to the Collar Receiver?
No, this can result in pulling the Contact Points too tightly against the dog’s neck. Attach a leash to a separate, nonmetallic collar or a harness. Ensure the extra collar does not put pressure on the Contact Points.
How long can I leave the Collar Receiver on my dog?
The design of the collar discourages constant wearing. We recommend not having the dog wear the collar for more than 12 hours out of every 24-hour period.
Is the training system suitable for all dogs?
The collar Is adjustable from length 5.9”(15cm) to 19.6”(50cm), if the dog’s neck circumference is smaller than 5.9”, you will be forced to rethread the collar, if the dog’s neck circumference is larger than 22”, this collar may not be suitable for the dog. This collar is not suitable for dogs under 15lbs.
1 x Collar Receiver more, how much?
I’m sorry, but we are not selling additional dog collars. I will look into this and post if we get them available.
Can I purchase a black collar instead of green, or get an orange collar loop instead of black?
The base PET618 model includes a green receiver and black collar. Additional collars and receivers of different colors can be purchased through our Amazon store.
Do you have to pair it every time you turn it on?
There is an arrow on the collar and an arrow on the handheld transmitter. In order to turn the collar on or off you’ll need to touch and hold the two arrows together for approximately three to five seconds. It’s no big deal, but personally, I’d prefer just pushing a button or something to turn the collar on. To turn the handheld transmitter on you just turn the round dial.
Is there a way to order just the remote? Our button that changes collars broke.
I believe I had found just the remote, but it was cheaper to buy the kit again. Check your warranty.
Do any of your collars have an automatic anti-bark function in addition to the training remote?
We don’t make a training collar that features both functions. Automatic bark collars can be found on our website.
Can you charge all 3 receivers at once?
With one more charger yes without no.
Will it work from inside, through walls, or while under a roof?
Yes. I can be inside even with the door closed and tone my dogs and they respond.


