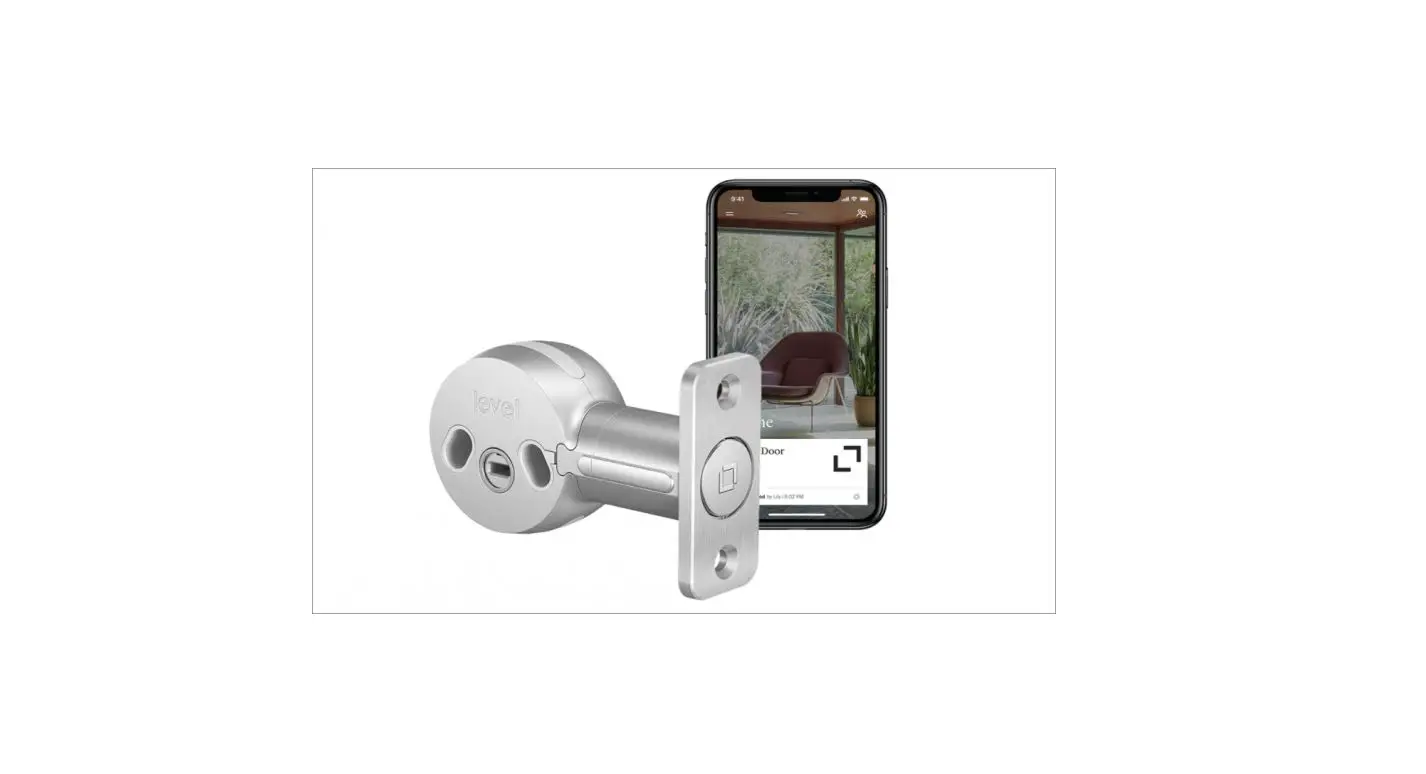
Shenzhen Yitequ Technology ET912 Smart Lock
Note:
There is a removable protective film on the keypad. Not scratches! If you like, you can peel it off after installation.
Below are some how-to videos.
- Video about how to install the handle and tumbler:
https://youtu.be/HsGX5VQmpKk - Video about how to install the lockset to the door:
https://youtu.be/nNBn5E4efV0 - Video about how to set up RFID cards to unlock:
https://youtu.be/DzwHWsh5hkU - Video about how to set up passwords to unlock:
https://youtu.be/8SmId2pEpUY
If you have problem in use/installation, please feel free to contact us for assistance by email: [email protected]
Quick Guide
There are 3 ways to reset the lock.
- Method: Press the Reset
- Method: Read the admin card 7 times (Swipe 7
- Method: Input codes: admin password, #, 7.
Examples of password settings
Change default admin password 12345678 to new admin password 87654321.
Input: 12345678, #, 1, 87654321, #, 87654321, #, *
Set up a new user password 13579
Input: admin password, #, 8, 13579, #, 13579, #, *
Set up admin card
At the very beginning or after resetting, the first and second configured card are admin cards. You can set up only one admin card or two admin cards max. For example, after resetting, swipe a card in the RFID sensing area. T his card will be configured as admin card. Set up user card(s) Read cards as the following: admin card, new user card(s)
Set up user card(s)
Read cards as the following: admin card, new user card(s)
ETEKJOY 3-in-1 Electronic Interior Door Lock for Home & Office
The lock has powerful functions and is convenience for use. It can be unlocked by password, RFID card and mechanical key. Passwords and cards are set up by users to ensure max safety. It fits home and office interior doors.
Main Features:
- Card management: 2 admin cards and 200 user cards max.
- Emergency mechanical key
- Touch screen password input
- Password can be set freely:1 admin password and 50 user passwords max.
- Support garbled input: 12 digits max (add random code before and/or after true code).
- Low power alarm
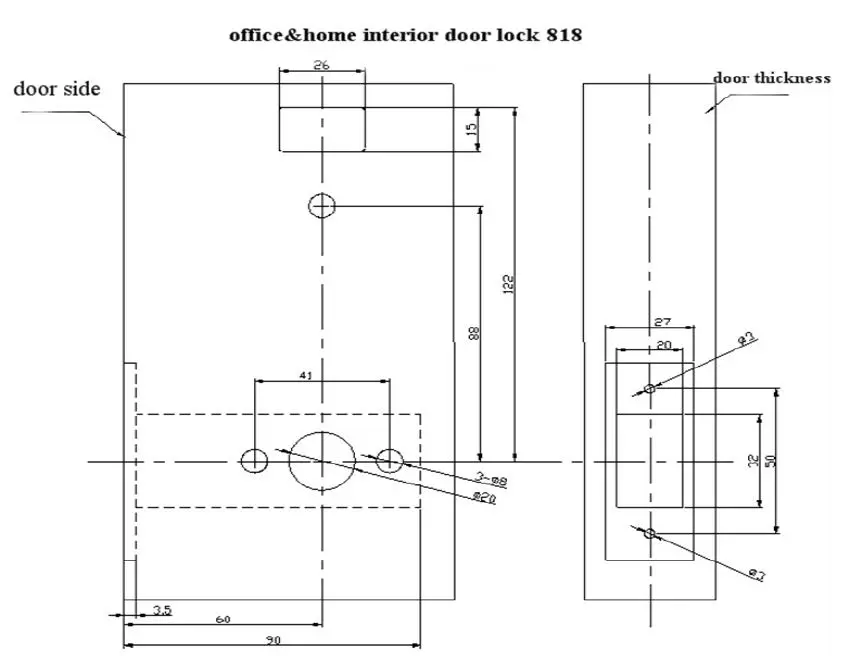
- Easy to install: hole dig diagram (found in the end of the manual)
- 1,
Reset Door Lock
Press Reset Button about 3 seconds, one long beep, and release the button. Resetting succeeds. All admin and user cards, admin and user passwords are removed and the lock is reset to default. The default admin password after resetting is 12345678
Set Up Admin Card
The first configured card after resetting is the admin card. There is one long beep after setting the first admin card, and two long beeps after setting the second admin card. You can use 1 or 2 admin card(s).
| Admin Card Instruction | ||
| Times for swiping admin card | function | Phenomenon |
| 1 time | Unlock & Set user cards | One short beep. Green light blinks. |
| 2 times | Delete user card | One long beep. Red light blinks. |
| 3 times | Delete lost user card | Two long beeps. Red light blinks. |
| 4 times | — | One short beep. Red light blinks. |
| 5 times | Delete all user cards | Three long beeps. Red light blinks. Buzzer beeping twice quickly means deletion completes. |
| 6 times | N/A | One short beep. Red light blinks. |
| 7 times | Reset the lock to default | One long beep. Red light links. Buzzer beeping twice quickly means resetting completes. |
Set Up User Card
- Swipe admin card. One beep. Motor turns (unlock). Green light blinks. Enter the mode of setting up user card.
- Swipe a new card. One long beep means setting successfully. Repeat this step to set another user card.
There will be 2 short beeps if this card already exists (set up before) Up to 200 user cards can be set up. - If the lock doesn’t detect an effective card, it will exit user-card-set mode.
Delete User Card
| Setting | Operation | Sound/Light |
| Delete single user card | Swipe an admin card twice | 1 long beep, green light blinks |
| Swipe the card you want to delete | 1 short beep | |
| Deletion succeeds | ||
| Repeat steps above can delete other cards. | ||
| If the card doesn’t exist, there will be 2 short beeps | ||
| Delete single lost user card | swipe admin card 3 times | 2 long beep, green light blinks quickly |
| Swipe the card set before the lost one | 1 short beep | |
| Deletion succeeds | ||
| Repeat steps above can delete other cards | ||
| If you lose the first user card, swipe the last user card to delete it in this mode. | ||
| Delete all user cards | Swipe admin card 5 times | 3 long beep, green light blinks, 2 beep |
| Deletion succeeds | ||
Touch Screen Usage
Touch screen panel is under dormancy mode to extend battery life. Touch “5” to activate the screen. Back light on means that screen is activated. The screen will go back to dormancy mode if no input within 5 seconds.
Set Up Password
The default admin password is 12345678. Input admin password and press # button. Buzzer beeps one time. Unlock. Green light blinks. Choose the corresponding functions.
| Password Instruction | ||
| Function Button | Function | Sound/Light |
| 1 | Change admin password | One long beep, green light and red light blink alternately |
| 8 | Set up user password | One long beep, green light blinks |
| 4 | Delete next user password | one long beep, red light blinks |
| 0 | Delete all user passwords | Three beeps, red light blinks |
| 9 | Set up passage mode (unlock always) | Red light on, one long beep, unlock, enter passage mode; Green light on, one long beep, lock, cancel passage mode |
| 7 | Reset the lock to default | One long beeps, red light blinks, buzzer beeps twice quickly means resetting completes. |
| Settings | Operations | Sound/Light |
| Change admin password | Input the old admin password and # | 1 short beep, red and green light blink alternately |
| Press button “1” |
| Input new 8-digit admin password | 1 long beep | |
| Press button # | ||
| Re-input the new admin password | Green light on, 3 long beeps | |
| Press button # | ||
| Setting done | ||
| If inputting wrong admin password at the second time (Two times’ don’t match) | ||
| 5 beeps | ||
| Re-input new admin password | Green light on, 3 long beeps | |
| Press button # | ||
| Setting done | ||
| Or press button * to exit. | ||
| Set up user password | Input the admin password | motor turns |
| Press button # | ||
| Press button “8” | 1 long beep, green light blinks | |
| Input a 4-6 digit user password | 1 long beep | |
| Press button # | ||
| Re-input the user password | 2 long beep | |
| Press button # | ||
| Setting done | ||
| If inputting wrong user password at the second time (Two times’ don’t match) | ||
| after 5 beeps | ||
| Re-input correct user password | ||
| Setting done | ||
| If the user password already exists | 2 short beeps | |
| Up to 50 user passwords can be set | ||
| Press button * to exit. | ||
| Delete single user password | Input the admin password and # | 1 long beep, red light blinks |
| Press button “4” | ||
| Input the user password set before the one you want to delete. (Input the last password to delete the first password) | 1 short beep | |
| Deletion done | ||
| Press button * to exit. | ||
| Delete all user passwords | Input the admin password and # | 3 long beeps, red light blinks, final two beeps means that deletion completes |
| Press button “0” | ||
| Deletion done | ||
| Press button * to exit | ||
| Change user password | Input the old user password and # | 1 short beep, red light and green light blink alternately |
| Press button “1” | ||
| Input new 4-6 digit user password | long beep | |
| Press button # | ||
| Re-input the new user password | 3 long beeps, green light on | |
| Press button # | ||
| Changing user password done. Old password is invalid. New password works. | ||
| If input the wrong password at the second time | ||
| press button # | after 5 beeps | |
| Re-input password | ||
| Done | ||
| Press button * to exit |
Unlock
By RFID Card
Swipe a card in the sensing area, motor turns after 1 beep, green light on. Unlock. The lock will re-lock automatically if it detects the action of opening door by the handle. If no action, 3 seconds later, green light off, it will re-lock automatically.
By Admin Password
Input admin password and #, 1 beep, motor turns, green light on, unlock. The lock will re-lock automatically if it detects the action of opening door by the handle. If no action, 5 seconds later, green light off, it will re-lock automatically.
By User Password
Input password and #, 1 beep, the motor turns, green light on, unlock. The lock will re-lock automatically if it detects the action of the opening the door by the handle. If no action, 5 seconds later, the green light is off, and it will re-lock automatically.
By mechanical Key
You can use the metal key to un-lock anytime. (Tips: You can put a sticky tape on the keyhole cover, and move it off quickly
Remarks
- I f p assword or card is invalid, there will be 3 short beeps, the red light turns on.
- if the power is low, there will be 5 continuous beeps, red light turns on. After the low power alarm alerts for the first time the lock can unlock about 200 times at least To enusre the normal use, ple ase replace the batteries ASAP
- The keypad will be locked for 5 minutes after 5 consecutive wrong inputs
Technical Parameter
- Working Voltage: 6.0 V(4x AA alkaline batteries)
- Static below 100uA
- Dynamic below 300uA
- Battery over 10 months (4x AA quality alkaline batteries)
- Low power alarm voltage 4.5V
- Card Max Sensing Distance: above 25mm (125KHz RFID card/tag
FCC Statement
Changes or modifications not expressly approved by the party responsible for compliance could void the user’s authority to operate the equipment.
This equipment has been tested and found to comply with the limits for a Class B digital device, pursuant to Part 15 of the FCC Rules. These limits are designed to provide reasonable protection against harmful interference in a residential installation. This equipment generates uses and can radiate radio frequency energy and, if not installed and used in accordance with the instructions, may cause harmful interference to radio communications. However, there is no guarantee that interference will not occur in a particular installation. If this equipment does cause harmful interference to radio or television reception, which can be determined by turning the equipment off and on, the user is encouraged to try to correct the interference by one or more of the following measures:
- Reorient or relocate the receiving antenna.
- Increase the separation between the equipment and receiver.
- Connect the equipment into an outlet on a circuit different from that to which the receiver is connected.
- Consult the dealer or an experienced radio/TV technician for help
This device complies with part 15 of the FCC rules. Operation is subject to the following two conditions
- this device may not cause harmful interference, and
- this device must accept any interference received, including interference that may cause undesired operation.
This equipment complies with FCC radiation exposure limits set forth for an uncontrolled environment.
References
 How to set up passwords to unlock, ETEKJOY 3-in-1 door lock # ET912 - YouTube
-
How to set up RFID cards to unlock, ETEKJOY 3-in-1 door lock # ET912 - YouTube
-
How to install the handle and tumbler of ETEKJOY 3-in-1 door lock # ET912 - YouTube
-
How to install the lockset to the door, ETEKJOY 3-in-1 door lock # ET912 - YouTube


