![]() Wi-Fi TRAIL CAMERA
Wi-Fi TRAIL CAMERA
MODEL#: W600 INSTRUCTION MANUAL
V1.0
IN THE BOX
1 x Camera, 1 x Mount Strap, 1 x Instruction Manual, 1 x Mini USB Cord
Note: Memory card and batteries are not included (user supplied).
IMPORTANT NOTE
About Batteries
Require eight (8) 1.5V AA Alkaline or Lithium batteries. We recommend the use of Energizer AA Lithium batteries in this camera to obtain maximum battery life.
Do not mix old and new batteries.
Do not mix battery type.
Rechargeable AA batteries are NOT recommended as the lower voltage they produce can cause operational issues.
Remove batteries when the camera is NOT in use.
About SD Card
Require a regular SD memory card (max capacity 256GB, Class 10). We recommend using SanDisk 32GB SDHC/Class10 memory cards in the camera to obtain the best cost-performance. Before use, please format your SD card in the camera.
About APP Wi-Fi Connection
Please refer to Section 8 for details.
For better performance, we recommend that your phone is within 15 meters (45 feet) of your camera. Since there may be interference around, if the signal is not good, please move closer to the camera gradually.
Legal attribution: Apple and the Apple logo are trademarks of Apple Inc., registered in the U.S. and other countries. Google Play and the Google Play logo are trademarks of Google LLC.
INTRODUCTION
ABOUT THE CAMERA
The W600 is a new generation of Wi-Fi trail cameras. The camera has a built-in Wi-Fi and Bluetooth module so that you can connect and operate the camera through a dedicated APP (“TrailCam Mobile”). The Bluetooth module, operating in low power, is used for device discovery, and Wi-Fi is used for preview, image transmission and settings. The camera features the all-new innovative and ultra-clear imaging technology, which encompasses smart night vision, blur reduction, and noise reduction technology to deliver high-resolution image quality.
MAIN FEATURES
- Bluetooth connection for device discovery
- Wi-Fi connection for preview, playback, and settings
- High-quality pictures (24MP still photos), 1296P 20fps or 1080P 30fps H.264 video clips with audio
- Clear night vision, flash range 75ft, equipped with no glow 940nm LEDs
- Wide view angle – 110°
- Easy to use with well-designed operation buttons and built-in 2.4-inch color screen, easy to program, review pictures and videos on the screen
- Two working modes – Motion detection and Time-lapse
- Fast trigger time – approx. 0.5s, Fast recovery time – 0.5s, Long trigger distance up to 75ft, Detection Angle – 70°
- Info strip on each capture: Date, Time, Temperature & Moon phase
- Operation hours, Loop recording, Password protected
- Built for any climate – 1P66, Operation Temperature: -4-140°F
- Support SD/SDHC/SDXC memory card, max capacity 256GB (user supplied)
- Extremely long in-field battery life up to 8 months in a stand-by state with 8 AA 1.5V batteries (user-supplied)
APPLICATIONS
The camera can be used as follows:
- For hunting and tracking animals’ trace or habits
- For wildlife observing and researching, captures pictures and videos of wild animals
- As a sports camera, for riding, driving, camping, or exploring
- As a motion-triggered security camera, for home, farm, office, and community
- All other indoor & outdoor surveillance where invasion evidence needed
PARTS AND CONTROLS
The camera is equipped with 36pcs high-efficiency infrared LEDs, LED Indicators, Lens, PIR Sensors, Lock Holes in front view (Figure 1). TIP: During use, if the black PIR Lens is found to be dirty, it does not affect the performance. If you must clean it, please try to blow it off or pick out the dirt very lightly. Do not try to wipe it, which may cause more scratches. Due to the reliable design of the PIR lens, scratches do not reduce the PIR detection performance.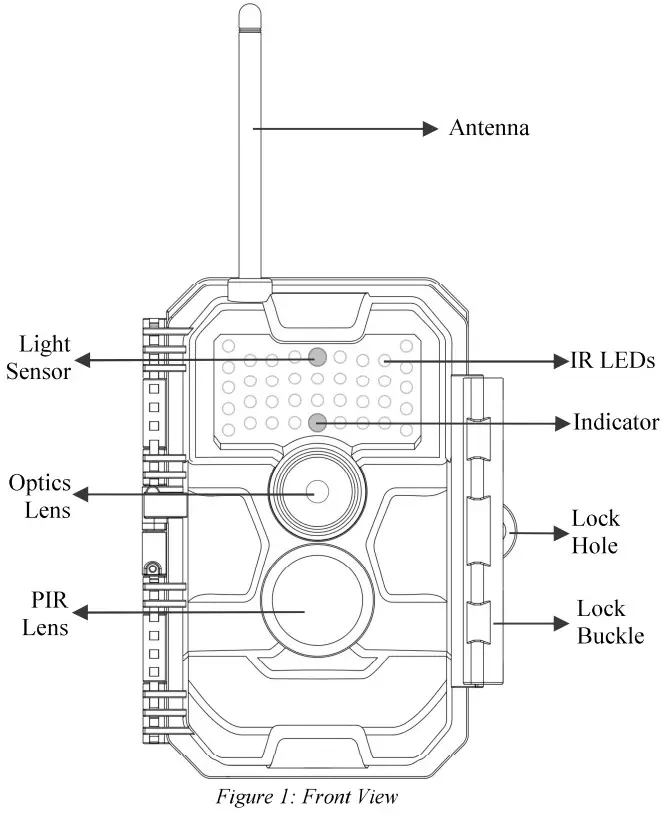
The camera provides the following connections for external devices: Mini USB port and SD card slot etc. (Figure 2). 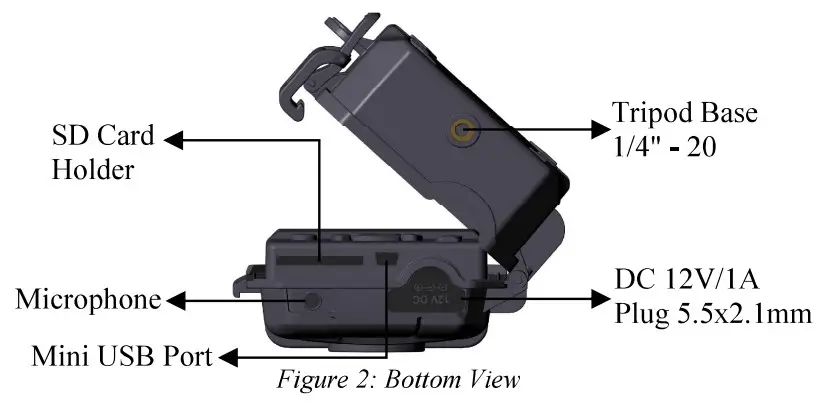
The camera has one security cable hole and two strap holes on the back. The strap can be put through the strap holes and fastened securely around a tree trunk by pulling the end of the strap firmly (Figure 3).
The camera has a 2.4-inch built-in LCD screen, which can be used for reviewing pictures or videos and menu 
displaying, and exclusive keypad design for easy program and operation, 8 AA batteries slot supported (Figure 4). 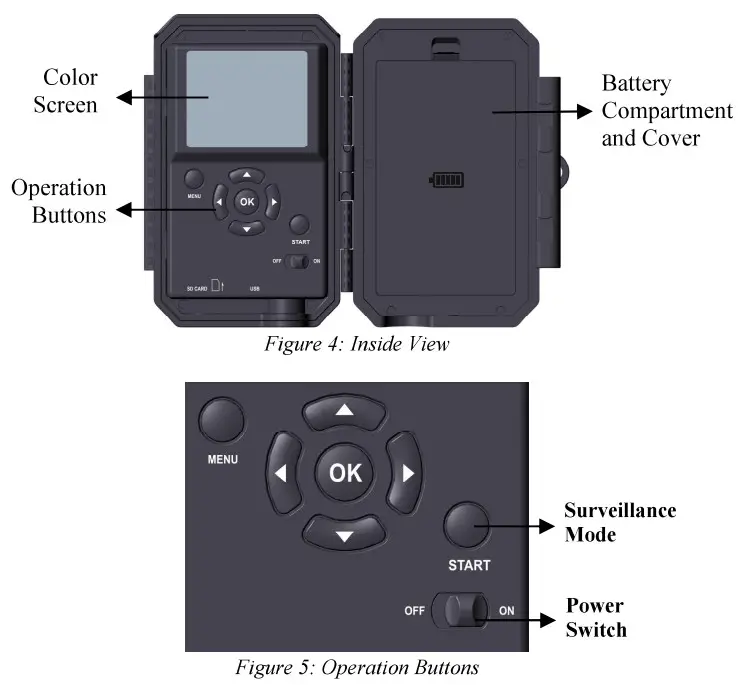
A power switch is used to power on (ON mode) or of the camera (OFF mode). A START button is used to quickly make the camera into the surveillance mode (motion detection or time-lapse per your settings (Figure 5). When the camera is in surveillance mode, press the START button to wake up the camera.
INSTALLING THE BATTERIES AND SD CARD
Before you begin learning how to use your camera, you will first need to install a set of batteries and insert an SD card. Although that may only take you a minute, there are some important notes about both batteries and SD cards you should be aware of, so please take the time to read the following directions and cautions:
LOADING BATTERIES
After opening the cover of the battery compartment, you will see that the camera has eight battery slots (Figure 6). A full eight batteries must be installed for the camera to operate. Be sure to insert each battery with correct polarity (negative or “flat” end against the long spring of each battery slot). In ON mode when the battery power level gets low, the message “Low Battery” will show on the screen, please replace the batteries. If the message “Night vision is unavailable at low voltage” shows on the screen, the batteries still work at daytime until “Low Batteries”, but this does mean the batteries are not able to drive IR LEDs flash at night, if you want to continue night vision, please replace the batteries. 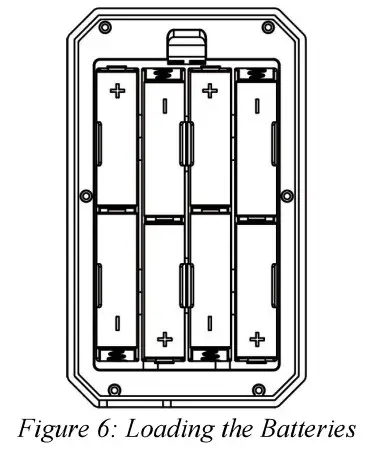
INSERTING THE SD CARD
Insert the SD card (with the camera powered off), before beginning to operate the camera. Don’t insert or remove the SD card when the camera is powered on or in the surveillance mode. (Figure 7). 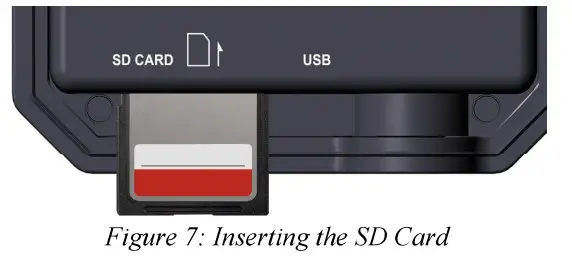
The following describes how to insert and remove the SD card:
- Insert the SD card into the card slot with its label side upwards. A “click” sound indicates that the card is installed successfully. If the wrong side of the card is facing up, you will not be able to insert it without force, there is only one correct way to insert cards. If the SD card is not installed correctly, the device will not display an SD card icon on the screen in ON mode. Formatting the SD card by using the camera’s “Format SD Card” menu option before first use is recommended, especially when a card has been used in other devices.
- To take out the SD card, just gently push in the card (do not try to pull it out without pushing in first). The card is released from the slot and ready to be removed when you hear the click. Be sure the camera’s power is switched OFF before inserting or removing SD cards or batteries.
USING THE CAMERA
Once you’ve prepared your camera by properly installing batteries and an SD card, you could simply take it outside, strap it to a tree (or not – according to your application scenario), switch it ON, press the START button and leave-and you might get some great photos that are exactly what you wanted. However, we highly recommend that you first spend some additional time indoors with this manual and your camera until you know a bit more about what those control keys do. If nothing else, you’ll probably want to at least set the date and time so the camera will imprint them (or not-it’s your option) on your photos as they are taken, learn how to set the camera to shoot video clips instead of still photos if you like, and read some tips about mounting it on a tree.
THE OFF, ON, AND SURVEILLANCE MODES
The camera has three basic operational modes:
- OFF mode: Power switch in the OFF position (The camera is powered off).
- ON mode: Power switch in the ON position (The camera is powered on and its screen is on).
- SURVEILLANCE mode: When the camera is powered on, press the START button to enter the surveillance mode. When the screen is off, the camera enters standby and will perform according to your settings.
APP & Wi-Fi Connection:
You can use the APP to connect the camera when the camera is operating in the ON or SURVEILLANCE mode.
OFF MODE
The OFF mode is the “safe” mode when any actions must be taken, e.g., replacing the SD card or batteries, or transporting the device. And of course, when you are storing or not using the camera, you will switch it to OFF. Please note that in the OFF mode the camera still consumes a little power. It’s a good idea to take the batteries out of the battery compartment if the camera will not be used for a long time.
ON MODE
In the ON mode, you can check and change the settings of the camera with the help of its built-in screen. These settings, found in the menu by pressing MENU key, let you change the photo or video resolution, the interval between photos, switch the time imprint on, etc. (See more in Section 9 ADVANCED SETTINGS). On the screen display, you will see an information screen that shows how many images have been taken, the battery level, camera or video mode, etc. Attention please: In the ON mode, the camera will automatically enter SURVEILLANCE mode if there is no operation (key pressing) within 5 minutes. Then the camera will perform as your settings in the menu. In the ON mode, you can connect the camera to a computer’s USB port to download your images.
SURVEILLANCE MODE
Anytime after the batteries and SD card have been inserted, you can switch on the camera. When the START button is pressed, the camera will enter into the SURVEILLANCE mode. If the Mode in the settings is set as “Motion Detection”, the camera will countdown 30-second delay and then be ready to capture images. If the Mode is set as “Time Lapse”, there will be no 30-second counting down, and the camera will be ready to enter Time Lapse. Once in the SURVEILLANCE mode, no manual controls are needed or possible (the control keys have no effect). The camera will take photos or videos automatically (according to its current parameter settings). TIP: You can press the START button again to wake up the camera and reprogram your camera if required.
Wi-H CONNECTION
Download TrailCam Mobile APP
Before using the Wi-Fi functionality, please download the “TrailCam Mobile” APP.
NOTES:
The screenshot shown in this section are indicative only. The actual diagram on different versions of APP, iOS, and Android may differ. During the use of the “TrailCam Mobile” APP (Referred to as APP), please grant the APP access to Wi-Fi, Bluetooth, storage, location, and camera of your device, taking pictures or recording video is needed.
Enable Wi-Fi and Bluetooth
Enable Wi-Fi and Bluetooth on your mobile phone before opening the APP. This step is optional, however, it can speed up the connection between APP and camera. 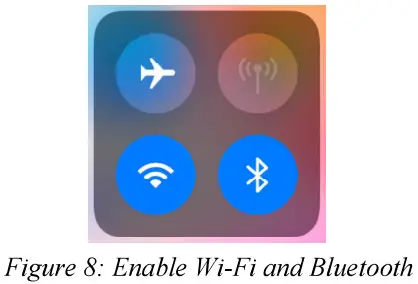
. Add Your Camera
Make sure your camera is in ON mode, and that it is near you. To get a stable connection, please get close to your camera no farther than 45ft away with no obstacles between you and the camera, such as walls, glass doors etc. Open the APP, tap the orange stripe on the top to add your camera: 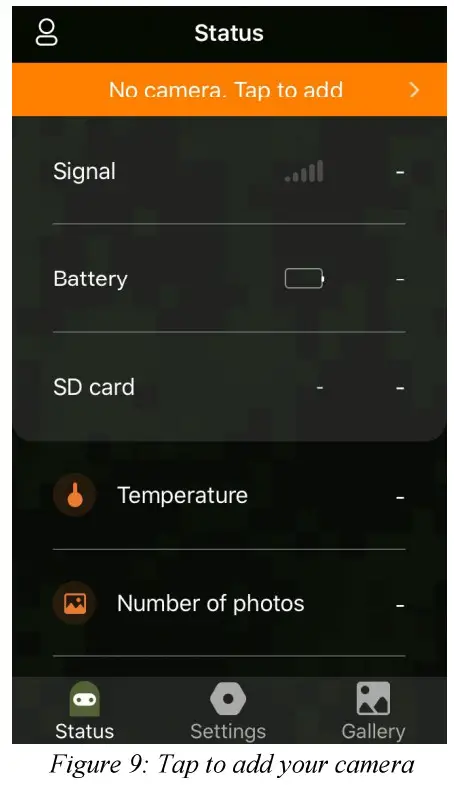
Select Camera Type
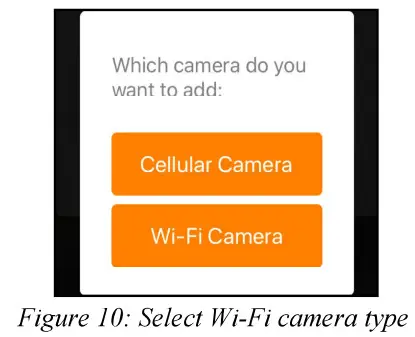
Please tap the Wi-Fi camera. The APP only supports a Wi-Fi camera at the moment and will be enhanced to support cellular cameras in the future (sold separately).
Search Your Camera and Link
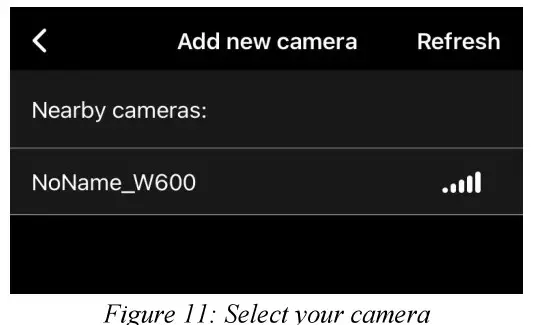
By default, in the list, the camera will be indicated as ID “NoName_W600” if the camera name is not assigned. After you set the camera name in settings, the camera ID will be updated as “XXXX_W600” (XXXX is a 4-character choice, you can set your camera name). The APP automatically searches for all Wi-Fi trail cameras nearby, please make sure your camera is within the Wi-Fi range. This process may take up to 15 seconds. If there is no device shown in the list, please click the Refresh button on the top-right corner.
Tap the one you want to add (Figure 11). The APP starts connecting to your camera. It might take up to 15 seconds to build the Bluetooth and Wi-Fi connection between the APP and camera. There are 4 steps (Illustration omitted):
Step — Connecting through Bluetooth…
Step2 — Activating the camera…
Step3 — Searching Wi-Fi…
Step4 — Connecting through lVi-Fi…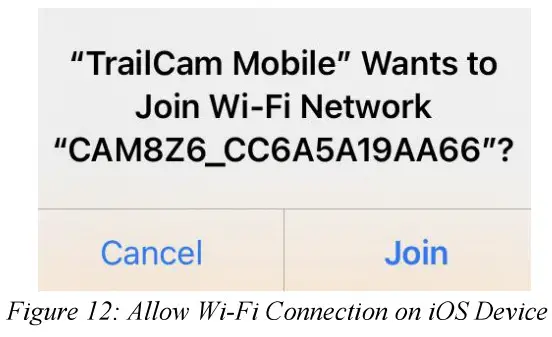
A system pop-up message will show (Figure 12). Please tap ‘Join’ to allow a Wi-Fi connection. The string “CAM8Z6_CC6A5A19AA66” is the name of the Wi-Fi hotspot on the camera to allow Wi-Fi connection. Among cameras, the prefix CAM8Z6 is fixed, CC6A5A19AA66 is the internal camera identifier which may vary from different cameras. NOTE: On Android devices, there might be different system pop-up messages that ask for allowing APP connection to the camera since different mobile phone manufacturers may mod& and customize this system message.
After connected, a pop-up message would show as below:
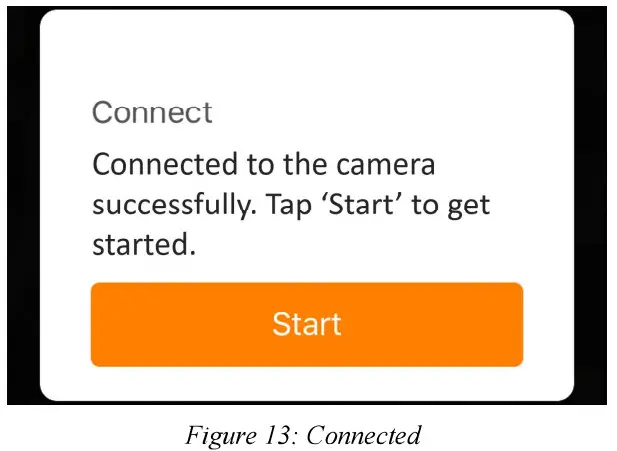
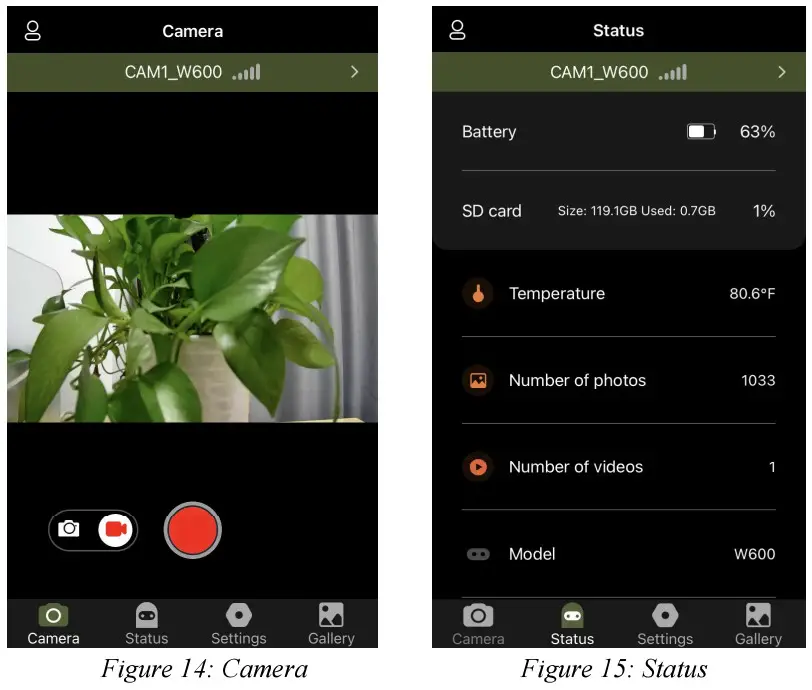
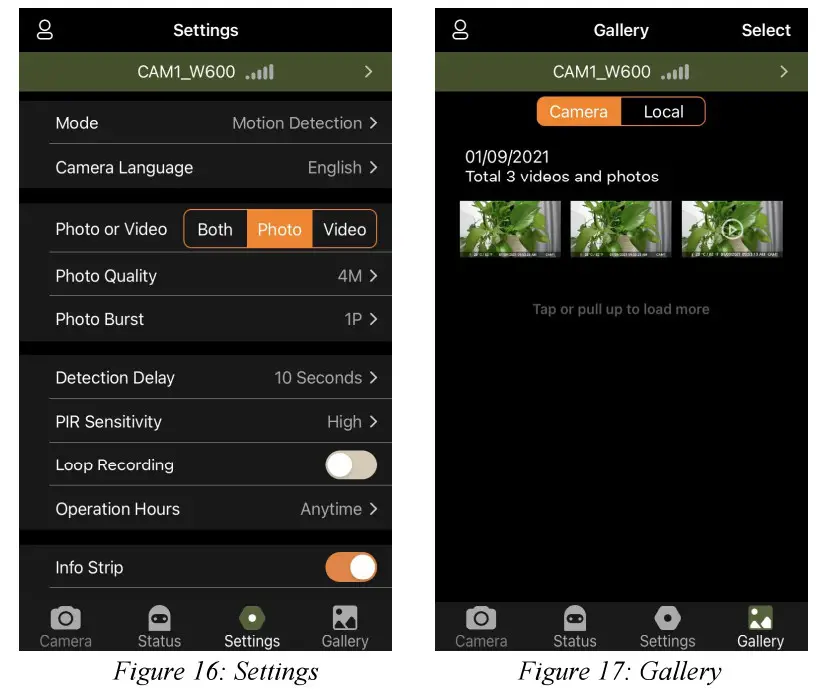
Tap “Start” to enjoy your APP journey (Figure 13). 8.6. APP Navigation The APP supplies 4 main features: Camera, Status, Settings, and Gallery. See Table 1 and Figure 14-17 for more details.
Table 1 APP Navigation
| Features | Details | Refer to |
| Camera | Preview, manual taking pictures or videos. | Figure 14 |
| Status | Camera status, including battery level, SD Card capacity and used size, the internal temperature of the camera, number of pictures and | Figure 15 |
| videos stored on the SD Card, camera model, firmware version number, etc. | ||
| Settings | Display or program camera settings, such as mode, picture quality, etc. | Figure 16 |
| Gallery | Review or download the pictures or videos the camera has taken. | Figure 17 |
 |  |
Important Notes on APP Wi-Fi Connection
| No. | Notes |
| 1 | When the camera’s Wi-Fi is connected, the camera will stop SURVEILLANCE (motion detecting or time-lapse). Disconnect Wi-Fi to enable the camera to go back to SURVEILLANCE mode. TIP: How to re-enable the Caine!?! start motion detection? Tap the camera ID “CAM 1_W600” to disconnect, connect or delete your camera (refer to the following figures). |
| 2 | On the phone device, when the APP is closed or runs in the background, there is a maximum of 90- the second timeout of the Wi-Fi connection between the APP and camera, you can re-open and operate on the APP without connecting again. However, the camera will not work until the Wi-Fi timeout is done. You must disconnect Wi-Fi manually to enable the camera to capture motions. |
| 3 | When the APP connects to the camera, the RED indicator will flash once. |
ADVANCED SETTINGS
The trail camera comes with preset manufacturer settings.
You can change the settings to meet your requirements. Once the camera screen is on, press the MENU key to enter/exit the menu. Press the UP/DOWN key to move the marker, press the LEFT/RIGHT key to change the setting, and press the OK key to confirm the change. Always remember to press the OK to save the change. Otherwise, you will lose your new setting.
Table 2 — Camera Settings
| Parameter | Settings (Bold = default) | Description |
| Mode | Motion Detection, Time Lapse | In Motion Detection mode, the camera will take photos or videos once triggered. In Time Lapse mode, the camera will take photos or videos periodically according to your preset “Timelapse Interval” parameter. |
| Photo or Video | Photo Video | Select whether still photos or video clips are taken. |
| Photo Quality | 24MP 16MP 12MP 8MP 4MP 2MP | Select desired resolution for still photos. Higher resolution produces better quality photos but creates larger files that take more of the SD card capacity. Larger files require a longer time to write to the SD card, which will slightly slow the shutter speed. |
| Photo Burst | 01, 02, 03004, 5 | Select the number of photos taken in sequence per trigger. |
| Video Quality | 1296P 1080P 720P | Select video resolution (pixels per frame). Higher resolution produces better quality videos, but creates larger files that take more of the SD card capacity. |
| Video Length | 10 seconds, Optional from 3s to 5m | Videos are in MP4 format that can be played back on most video players. Note: Night videos are limited to a maximum of 30 seconds to conserve the batteries. If the video length is set to more than 30 seconds, e.g. 60 seconds, the max recording length at night will stay at 30 seconds. |
| Video Sound | On Off | Selecting On will record video with sound. |
| Video Format | MP4 MOV | MP4 is the mainstream format in the video industry, more compatible with any player. Select MOV in case some legacy digital camera software must be working with videos in MOV format. |
| Frame Rate | 30fps 25fps | When the light works at 50HZ and video flickering occurs, please select 25fps. |
| Detection Delay | 10 seconds, optional from Os | Select the shortest length of time that the camera will wait until it responds to any subsequent triggers from the PIR sensor after a game is first |
| to 60m | detected. During the selected interval, the camera will not take pictures/videos. This prevents the SD card from filling up with too many redundant images. Note: If the camera is set to capture videos, the detection delay is limited to a minimum of 10 seconds to conserve the batteries and lower the SD card storage consumption. This option is invalid if Mode is set as “Time Lapse”. | |
| PIR Sensitivity | High, Medium Low | Select the sensitivity of the PIR sensor. Temperature affects the sensitivity. The High setting is suitable when the ambient temperature is warm or you want to capture distant objects or capture more, and the Medium/Low setting is helpful in cold weather. Note: this option is invalid if Mode is set as “Time Lapse”. |
| Motion Test | This feature helps you aim the camera at your target area. Please refer to the details in Section 10.2. | |
| Timelapse Interval | 1 hour, optional from 2s to 24h | Setting time-lapse interval. It takes effect ONLY when Mode is set as Time Lapse, the camera will automatically take photos/videos according to the set interval, regardless of whether the PIR sensor |


