
![]() HOLIDAY LIVING and logo design are trademarks or
HOLIDAY LIVING and logo design are trademarks or
registered trademarks of LF, LLC. All rights reserved.
ITEM # 5280913
6-FT ANIMATED SANTA
MODEL # 4124156 
BEFORE ASSEMBLY
- Remove all parts and hardware from the box. Place all items on a carpeted or scratch-free work surface, as this will avoid damaging parts during assembly.
- The shipping box can provide an ideal work surface if none is available.
- Use the components and hardware lists below to identify, inventory and separate each of the hardware and components included.
- To avoid accidentally discarding small components or hardware, do not dispose of any packaging or contents of the shipping carton until assembly is complete.
- DO NOT USE power tools unless it is explicitly identified in this manual as required for use during assembly. Power tools can damage the fasteners, hardware and/or components.
- Do not fully tighten all fasteners / screws until all parts are in place. Failure to follow these instructions may cause the fasteners / screws to misalign during assembly.
CARE INSTRUCTIONS
- Use a soft, clean cloth that will not scratch the surface when cleaning.
- Do not wash, do not bleach, do not dry, do not iron, do not dry clean.
- Colours, style and contents may vary slightly from those shown on the package.
![]() SAFETY INFORMATION
SAFETY INFORMATION
Please read and understand this entire manual before attempting to assemble, operate or install the product.
DANGER
The item should not be grabbed, as it becomes a tipping hazard. Keep away from the adapter, as it heats up during operation.
PREPARATION
Before you begin with assembly of the product, make sure all parts are present. Compare parts with package contents list. If any part is missing or damaged, do not attempt to assemble the product.
Estimated Assembly Time: 15 minutes
NO TOOLS REQUIRED
PACKAGE CONTENTS
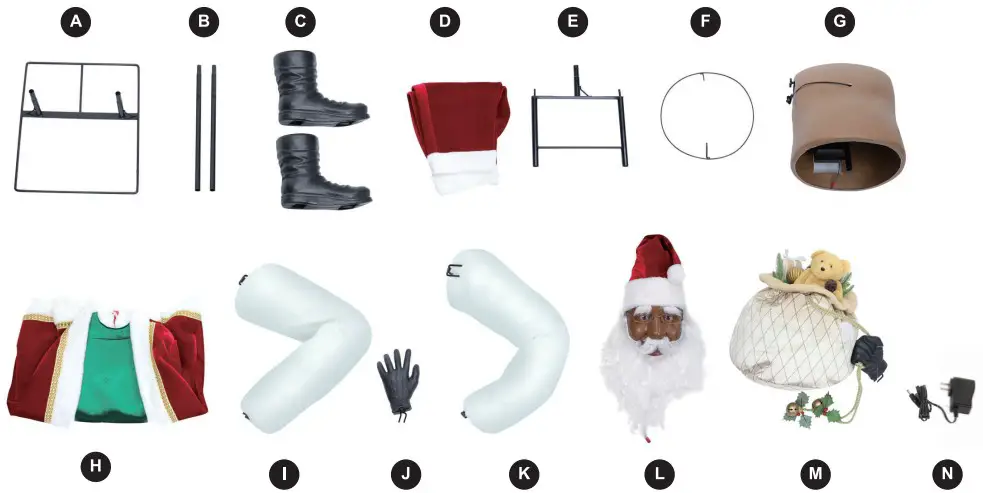
| PART | DESCRIPTION | QUANTITY |
| A | Base | 1 |
| B | Lower Support Poles | 2 |
| C | Boots | 2 |
| D | Pants | 1 |
| E | Hip Frame | 1 |
| F | Hip Hoop | 1 |
| G | Body Frame | 1 |
| H | Costume | 1 |
| I | Left Arm | 1 |
| J | Left Hand | 1 |
| K | Right Arm | 1 |
| L | Head | 1 |
| M | Right Hand and Gift Sack | 1 |
| N | Adapter | 1 |
ASSEMBLY INSTRUCTIONS
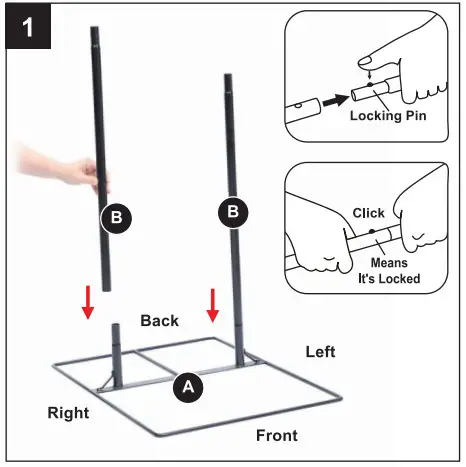
Note: The longer end of the (A) Base goes towards the front. Left and right are from the character’s point of view.
- Connect the (B) Lower Support Poles to the poles available on the (A) Base using the available quick connect push buttons and pre-drilled holes as shown in Figure 1.
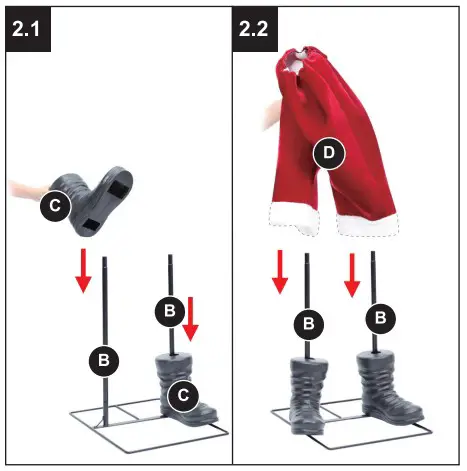
- Slide the (C) Boots over the (B) Lower Support Poles and set them on the (A) Base as shown in Figure 2.1. Slide the (D) Pants over (B) Lower Support Poles as shown in Figure 2.2. Make sure that the (B) Lower Support Poles emerge from the top of the (D) Pants.
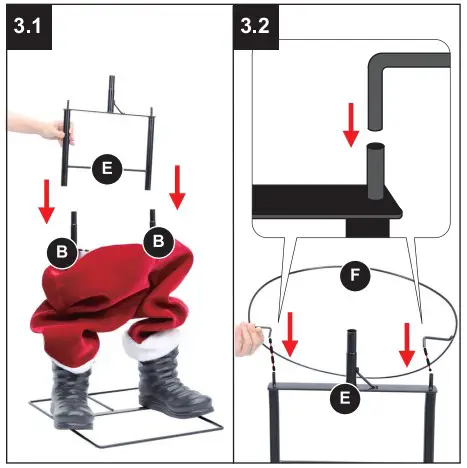
- Connect the (E) Hip Frame to the (B) Lower Support Poles using the available quick connect push buttons and pre-drilled holes as shown in Figure 3.1. Connect (F) Hip Hoop to the (E) Hip Frame by inserting the prongs to the slot as shown in Figure 3.2.
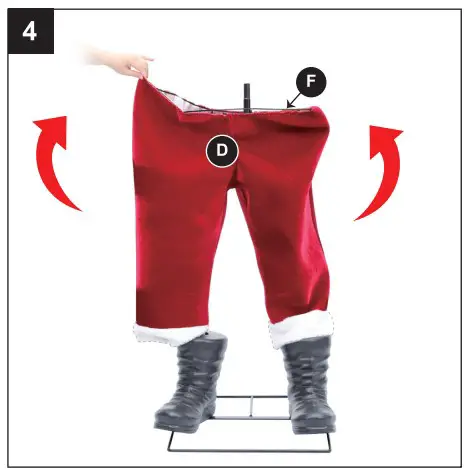
- Bring the (D) Pants up and secure on the (F) Hip Hoop as shown in Figure 4.
- Connect the (G) Body Frame to the (E) Hip Frame using the quick connect push button and pre drilled hole as shown in Figure 5.
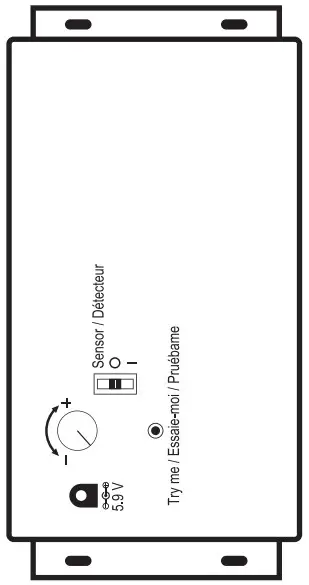
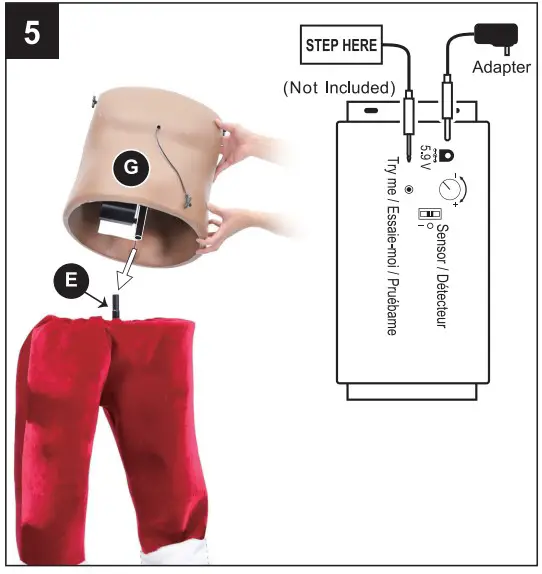 OPTIONAL: Ifyou choose o use the Step Activation Pad, plug the connector into the input receiving jack marked “TRY ME” on the Function Control Box and set the Step pad in front of the character when ready to display.
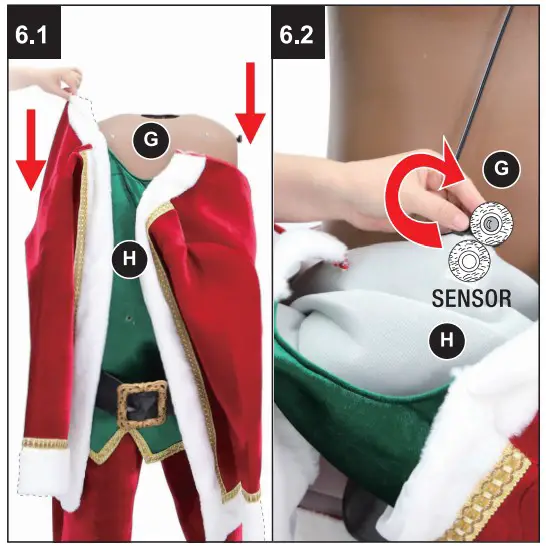
Note: Do not plug the Power Adapter into power outlet until item assembly is completed. - Slide the (H) Costume over the (G) Body Frame as shown in Figure 6.1. Secure the Sensor to the sensor hole of the (H) Costume using the hook and loop closure as shown in Figure 6.2.
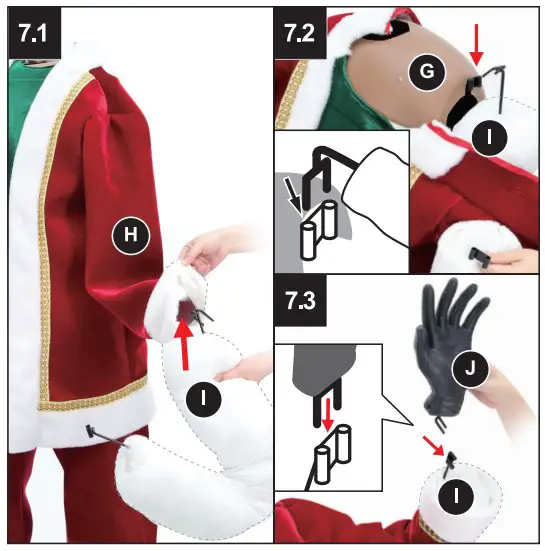
- Slide the (1) Left Arm up the left sleeve of the (H) Costume as shown in Figure 7.1. Then set the forked hook of the (I) Left Arm into the forked hook housing available on the left side of the (G) Body Frame as shown in Figure 7.2. Set the forked hook of the (J) Left Hand into the forked hook housing available at the (1) Left Arm as shown in Figure 7.3.
- Slide the (K) Right Arm up the left sleeve of the (H) Costume as shown in Figure 8.1. Then set the forked hook of the (K) Right Arm into the forked hook housing available on the right side of the (G) Body Frame as shown in Figure 8.2.

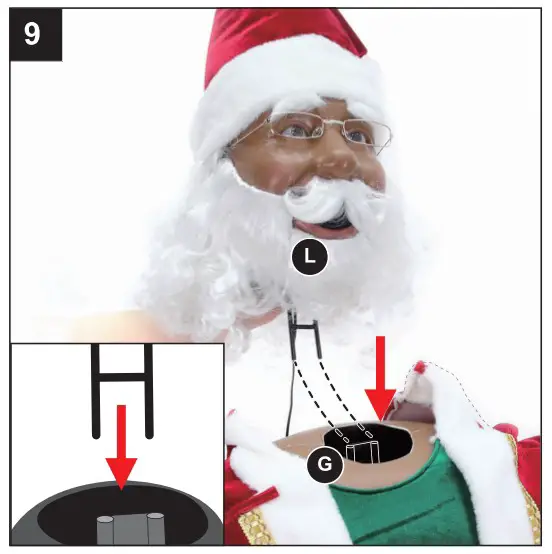
- Set the forked hook of the (L) Head into the forked hook housing available at the top of the (G) Body Frame as shown in Figure 9.
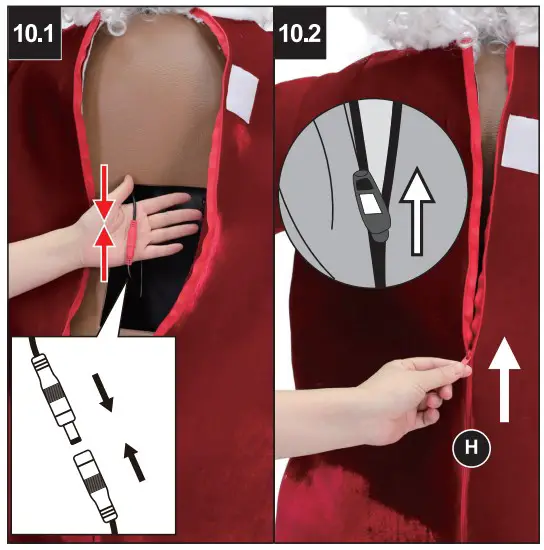
- Connect the available wire coming from the (L) Head to the wire from the Function Control Box as shown in Figure 10.1. Close the back of the (H) Costume using the available zipper as shown in Figure 10.2.
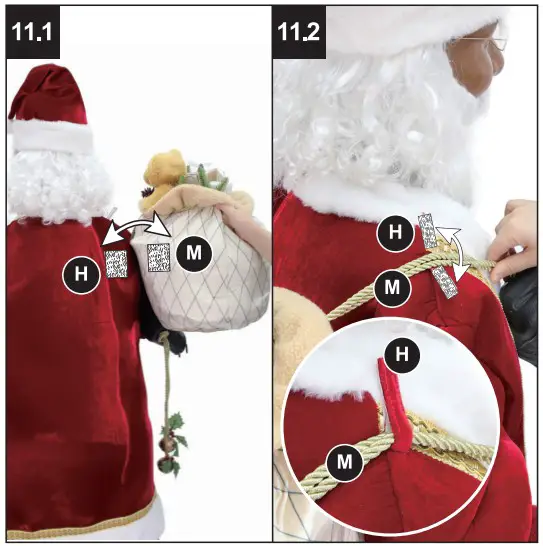
- Secure the (M) Right Hand and Gift Sack at the back of the (H) Costume using the hook and loop closure as shown in Figure 11.1. Take the rope from the (M) Right Hand and Gift Sack and secure it on top of the (H) Costume using the hook and loop as shown in Figure 11.2.
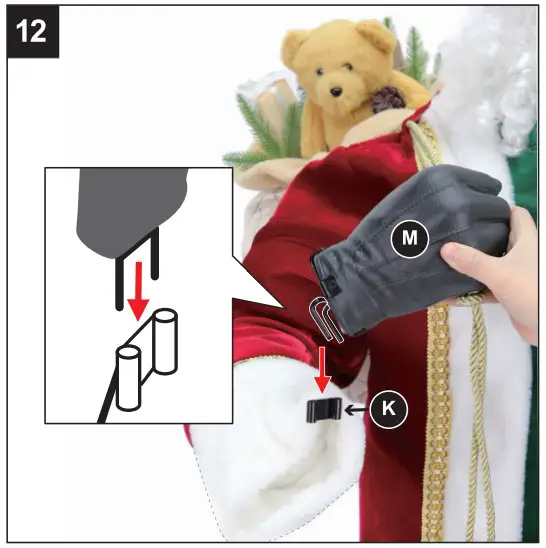
- Set the forked hook of the (M) Right Hand and Gift Sack into the forked hook housing available at the (K) Right Arm as shown in Figure 12.
Your Animated Santa is fully assembled. Plug in and turn on to let the fun begin!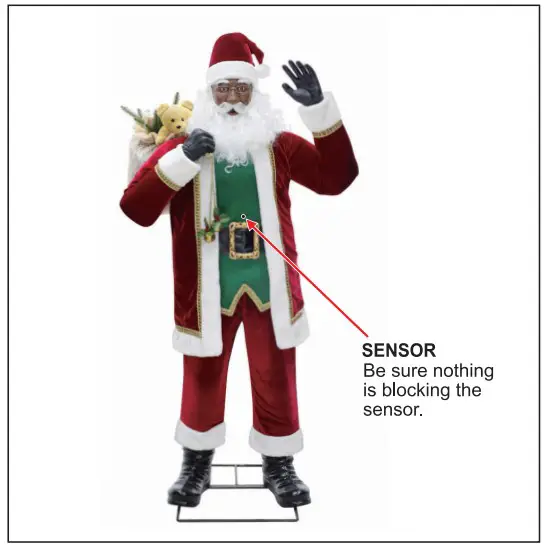
OPERATION INSTRUCTIONS
- Plug the power adapter into a standard power outlet and adjust the settings on the Function Control Box, located on the (G) Body Frame, as desired.
- Settings:
| Sensor | This switch mode will activate sound, and animation when the Infra-red (IR) sensor is activated and will operate for 1 audio-cycle with each activation. The Infra-red (IR) sensor has a range of up to 2 m/6.5 ft. and will activate when someone comes within an 80-degree angle from left-to-right, as well as from above and below. |
| This switch mode allows the item to be activated only if triggered by using a Step Here Try Me Activation Pad (Not Included). The item will operate for one audio cycle with each Try Me activation. | |
| This switch mode will continuously operate the sound, and animation of the item. | |
| Raise or lower the volume using the volume control turn dial, turn all the way down to turn the volume off. |
WARNING
This item is not a toy and should be used for decoration only. This item contains small parts that can be a choking hazard.
Keep all plastic and wire parts away from children. For indoor use only.
- Please use the adapter supplied by the manufacturer.
- Please assemble the item according to the instructions. Connect all wires according to their matching color.
- Usage near children should be supervised by adults.
- Keep away from open flame.
- Do not expose this product to any liquids, vapor or rain.
- Don’t climb or pull on product.
- Don’t add to or modify product.
- Assemble and place the product on level surfaces only.
- Don’t push or tilt product.
This device complies with Part 15 of the FCC Rules. Operation is subject to the following two conditions: (1) This device may not cause harmful interference, and (2) this device must accept any interference received, including interference that may cause undesired operation.
CAUTION
Changes or modifications not expressly approved by the party responsible for compliance could void the user’s authority to operate the equipment.
NOTE
This equipment has been tested and found to comply with the limits for a Class B digital device, pursuant to Part 15 of the FCC Rules. These limits are designed to provide reasonable protection against harmful interference in a residential installation. This equipment generates, uses and can radiate radio frequency energy and, if not installed and used in accordance with the instructions, may cause harmful interference to radio communications. However, there is no guarantee that interference will not occur in a particular installation. If this equipment does cause harmful interference to radio or television reception, which can be determined by turning the equipment off and on, the user is encouraged to try to correct the interference by one or more of the following measures: Reorient or relocate the receiving antenna, Increase the separation between the equipment and receiver, Connect the equipment into an outlet on a circuit different from that to which the receiver is connected. Consult the dealer or experienced radio/TV technician for help. Seasonal Visions International, Berkeley, CA 94710 USA (855) 428-3921.
TROUBLESHOOTING
| Problem | Possible Cause | Prevention & Solution |
| 1. Item is not functioning. | 1. Adapter is not plugged in to the wall and/or function control box. | 1. Plug the adapter into the wall and function control box when assembly is complete. |
| 2. Item is not functioning in the way anticipated. | 2. The function control box switch may not be on the desired setting. | 2.Toggle switch to desired setting. For example, if you only want the item to trigger by sensor, ensure that the switch is toggled to SENSOR. |
| 3.Some of the item is functioning, but not all of it. For example, animated head is not turning, but everything else is working. | 3. The cable for the non-functioning part of the item may not be connected. | 3. Ensure all cables are connected before operating the item. |
| 4. Sensor is not working. | 4. Something may be blocking the sensor. | 4. Adjust the sensor so that it is facing forward and that nothing is covering it. Refer to instructions for assistance. |
| 5. Movement is slowing down, appears jerky and/or there’s unwanted noise from the moving parts. | 5. Something may be obstructing the moving parts such as the costume. | 5. Remove the item that is stuck in the moving parts and adjust the item so this is less likely to happen again. |
| 6. Item is wobbling in place. | 6. The item may be placed on a surface that is rough, not flat or not level. | 6. Be sure to place your item on a hard, flat surface. |
| 7. The item does not make any sound. | 7. The volume may be turned all the way down. | 7. Turn up the volume to see if this is the issue. |
CARE & USE INSTRUCTIONS
| Care | For best performance operate your item indoors. When not in use, store this product in its original packing. |
| Use | Keep away from heat and moisture. |
STORAGE INSTRUCTIONS
- Carefully place all components into shipping box and/or provided container tape it shut.
- When not in use, please store your item in a cool, dry place away from sunlight.
- Exposing your item to excessive heat or humidity may damage your item.
TECHNICAL DATA
Input: 100-240V AC 50/60Hz
Output: 5.9V DC 1.5A
WARRANTY INFORMATION
Please remove all parts from the box to check them against this list before attempting to assemble.
If any part is missing or unsatisfactory, please call our toll-free number 888-251-1006 or email us at [email protected].
Thank you!
Serial Number ………………………………
Purchase Date ………………………………
![]()
![]() Questions, problems, missing parts? Before returning to your retailer, call our customer service department at
Questions, problems, missing parts? Before returning to your retailer, call our customer service department at
888-251-1006, 8 a.m. – 8 p.m., EST, Monday – Sunday.
You could also contact us at [email protected].
§523356
Printed in China


