Multifunctional Laser Measure
Multifunctional Laser Measure
English | | | | Deutsch | Español | Italiano | Français |
– hozodesign.com/meazor – QR
MEAZOR APP
1
The MEAZOR
82inch (25m) 4096- Android iOS / /
2
(>40°C) (<0°C)
2
: :
C 650mAh5V-1A 2 *: C
1 : 2
2 :
3
3 /
– 3
ON / OFF
4 C 5
6
90°
ON / OFF
3
ON / OFF 1
4
30 OFF
: : : :
( ()+ (M, cm, mm.) M, cm, mm.
5
: MEAZOR : : :
:
:
6
: (()+
()+ m, cm, mm. KM
:
1:1
() MEAZOR MEAZOR
MEAZOR App
7
MEAZOR 1 1 2 3,4,5
MEAZOR APP
8
OFF: 2 2
ON:
MEAZOR *: MEAZOR
9
MEAZOR
MEAZOR 1) MEAZOR A B 2) MEAZOR 3) A B MEAZOR MEAZOR 4) *: MEAZOR
MEAZOR MEAZOR
MEAZOR App
10
Current scanning plot
MEAZOR 1 1 MEAZOR 2
MEAZOR APP
:
1
11
1. ()A()Bab 3 ()
2. A B
2
< : > : :
12
: MEAZOR : : :
3
MEAZOR App
MEAZOR MEAZOR MEAZOR The MEAZOR ()
MEAZORMEAZOR APP
HOZODESIGNJAPAN
13
: : /
MEAZOR MEAZOR 0° (< ± 1°)
14
: / :
ON
ON
ON
12
ON
MEAZOR Bluetooth
MEAZOR
MEAZOR
15
MEAZOR APP
Bluetooth
MEAZOR APP MEAZOR Bluetooth
MEAZOR APP
0000
HOZO DESIGN JAPAN https://hozodesign.jp/
HOZO DESIGN JAPAN 1
16
1) 2) 3) 4)
5) 6) 7) 8) 9)
:
17
HOZO DESIGN CO. HOZO DESIGN CO.,Limited
18
Multifunctional Laser Measure
USER INSTRUCTIONS
Access to multilingual instruction manuals in English | Simplified Chinese
Traditional Chinese | Japanese | German | Spanish | Italian | French | Arabic
19
– Download at hozodesign.com/meazor – Scan the QR code to download the
MEAZOR APP to view
OVERVIEW
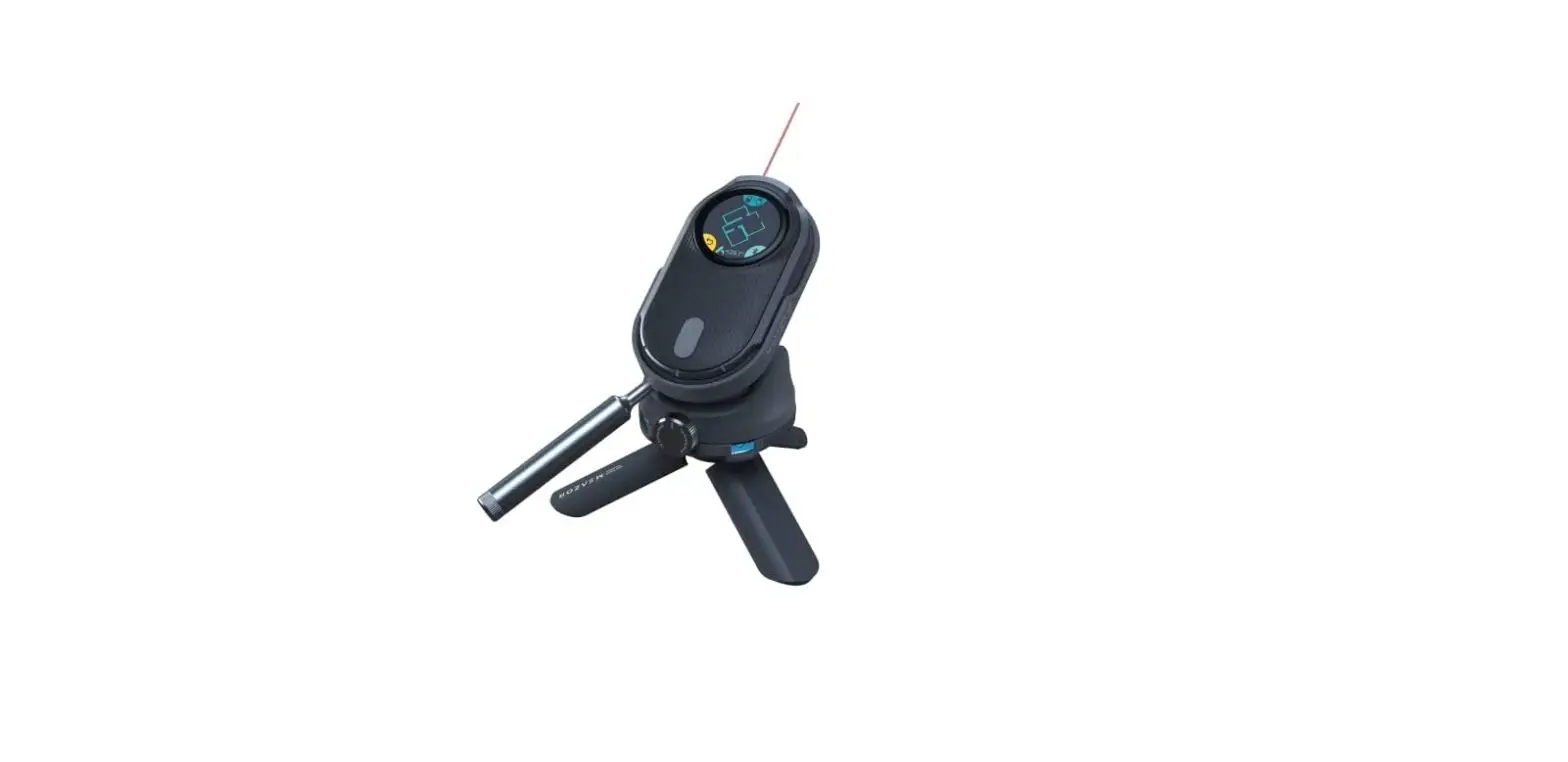
The MEAZOR is a portable and multifunctional measuring device. It has an 82inch (25m) laser distance module and a 4096-grade rolling ruler module with high accuracy, as well as the ability to measure straight lines, curves, and compound shapes. It is equipped with a plotting app available for both Android and iOS, which allows data collection, floor plan drawing and editing, document receiving and sharing. The standard edition of the device has the following measuring functions. Look out for more new features in the cloud update package.
SAFETY INSTRUCTIONS
For the safe use of this multifunctional measure, please read below instructions carefully. The device is categorized into Class 2 laser product. DO NOT stare at laser directly or shoot the laser at other people or animals, or it will cause damage to eyes. This product is in accordance with strict standards and testing regulations through the development and manufacturing, but this does not preclude the
20
product from being subjected to external environmental influences and interference. Please DO NOT use this product in
extremely hot (>40°C) or extremely cold (<0°C) environments. Please DO NOT use this product under explosive or corrosive environment. Please DO NOT use this product near medical devices. Please DO NOT use the product on the plane.
Disposal: This product contains a rechargeable lithium battery, which must NOT be disposed of with household waste. Please dispose of the product in accordance with the national regulations in force in your country/region. Scope of Responsibility: We will not be responsible for any damage caused by improper use below: Using the product without instruction; Use of accessories from other
manufacturers without approval from us; Carrying out modification or conversion of
the product.
POWER SUPPLY
Type-C charging port is used. The battery has a rated capacity of 650mAh. 5V-1A charger is supported. Charging time is approximately 2 hours. *Note: This product does not support dual-ended Type-C charging cables or chargers for fast charging.
BASIC OPERATION
21
1 Laser distance measuring module Class 2 laser product. DO NOT stare at laser directly
2 Screen Touch screen that allows you to select and use each function on the screen by tapping, swiping left and right
and swiping up and down
.
3 Power/HOME Button
– Long press
the button for 3 seconds to switch on/off the device. Short press the button to return to the main menu.
4 Type C charging port 5 Tripod Hole – The hole is mounted on the
back of the roller, and you can tighten the tripod by turning the product’s rollers clockwise.
6 The wheel module Roll the product
cross a surface and measure the length of straight and curved lines. See the description of the wheel scale function for details of how to use.
22
Stand – Flip the back flap, the flap is attached to the product’s frame at an angle of 90°.
BASIC OPERATION AND SETTINGS
Switching on/off
Long press the power button
for 3 seconds
to switch on/off the device. If the device remains inactivity up to 1 minute, it will automatically go into sleep mode. If the device remains inactivity up to 30 minutes, the device will automatically be switched off.
Selecting functions
You can swipe left and right
on the main
menu to switch between functions or toggle the
wheel
to quickly switch between functions.
Tap on the selected function icon to enter function page.
23
LASER MEASURE
Middle: Tap on the number to record data Top: Measurement Units Bottom: Align Mode Setting of the measurement units: set at
initialization or In the setup page , the user can select
between imperial or metric units. When measuring, the user can also switch between units by taping on the top area. Imperial units include Yard, Feet, Inch, Inch fraction, Feet+inch. Metric units include M, cm, mm. Settings of Align Mode Rear Align: measure along the bottom of the MEAZOR’s roller as a starting point Stand Align: with the stand open, measure from the bottom of the stand Tripod Align: measure from the center of the tripod hole Front Align: measure from the top of the product.
24
SCALE RULER
Middle : Tap on the number to record data
Top
: Measurement Units
Bottom Switch Scales
When the wheel is used for measurement, the reference points at the bottom lights up. The user can select the start/end point to be used for reference by selecting the position in which it is customarily held. Setting of the measurement units:
In the initial setup and settings page, the user can choose from imperial or metric units. The user can switch between units by
taping on the top
during measurement.
Imperial units include Yard, Feet, Inch, Inch(fraction), Feet+Inch (Mile unit is included in scale mode). Metric units include meter, cm, mm (KM unit is included in scale mode.)
25
Setting for scale
Bottom
: Return to scale measuring
Top Return to 1:1 scale
Middle swipe up and down to switch between scales POINT SCANNER (FLOOR PLAN SCANNER) The Point Scanner is a patented function of MEAZOR. Place MEAZOR on a tripod or flat surface, the user can scan floor plans precisely by following the steps as follow: Aim laser to the corners/reference points – take the point – turn – repeat the operation. The scanning results can then be transferred to the MEAZOR
App for further editing. Please read these instructions carefully to get the most accurate scanning results.
Middle
current scanning plot, tap to record
reference points
Undo
Save Data
Tilt Mode
Displacement Mode
26
Basic Operations
As shown in the diagram, place the MEAZOR in the middle of the room. Align the laser beam with point 1 and tap on it to record the first reference point, turn and aligns it with point 2 and take record, rotate and aligns it with point 3,4,5 and take record. After completing the above steps, all the reference points of the room are captured.
After taping on Save , the data will be sent
to
the MEAZOR APP.
Tilt mode
As shown in the diagram, an obstacle is placed on the line towards a reference point. In this case, Tilt Mode could be used to complete scanning.
Tilt Mode Off: The user is unable to capture reference point 2, with Tilt Mode Off, and can only infer the approximate position of point 2.
27
Tilt Mode On:
Tilt the MEAZOR vertically to avoid obstacles in order to measure the reference point of the wall corners. *Note: When the MEAZOR is tilted vertically, the product should be tilted as slowly as possible. The user should avoid the product being rotated. The user can then move the turntable and tripod to obtain the best possible measurement accuracy.
Displacement Mode
When you are scanning a complex room with the MEAZOR and the obstruction of the walls stops the laser beam from measuring the full extent of the room, you can turn on the Displacement
Mode
to measure more space by moving
the MEAZOR around. Please read carefully the steps for using this function. 1) Before the MEAZOR is displaced, identify the reference point A and the reference point B. 2) Displace MEAZOR to a new position. 3) Confirm the new position of MEAZOR by rotating the MEAZOR to reposition points A and B. 4) Continue to complete the scanning.
28
*Note: After the MEAZOR has been displaced, the system will continue scanning along the last endpoint of the previous measurement. CURVE SCANNER The Curve Scanner is a patented function of MEAZOR. Place MEAZOR on a tripod or flat surface, the user rotates the product to capture the outline of the object through which the laser passes, in order to complete an accurate scan of the curve’s outline. The user can then transfer the scanning result to the MEAZOR App for further edit. Please read the following instructions carefully in order to obtain the most accurate scanning results.
Middle Current scanning plot Top Save Data Bottom Undo Basic operations
As shown in the diagram, place the MEAZOR in the middle of the room. Align the laser beam with point 1 and tap on it to record the first reference
29
point, slowly rotating MEAZOR to point 2. Tap on
to save and send data to APP.
the MEAZOR
Undo : restart scanning
PRO LASER Step 1 – Select function
Middle Slide to switch between functions
Top Measurement Units 3. Pythagorean Measurement Measure side
A, side B and the angle ab. The length of the third side is automatically calculated.
4. Rectangular Area Measurement Measure the length A and the width B. The area is automatically calculated.
Look out for more functions in the update package.
30
Step 2 – Measure Middle Measuring Dimensions Top Switch between Align Modes Bottom left < : last step Bottom right > : next step Middle bottom: current measurement
Settings of Align Mode
Rear Align: measure along the bottom of the MEAZOR’s roller as a starting point
Stand Align: with the stand open, measure from the bottom of the stand
Tripod Align: measure from the center of the tripod hole
Front Align: measure from the top of the product.
Step 3 – Save and send
Middle The calculation result in green
Bottom Go back to the last step to edit the measured data
Top Tap on
to save and send
*Pro Laser data shown as graphical result on MEAZOR App.
31
PROTRACTOR Place MEAZOR on a flat surface, rotate MEAZOR to measure the horizontal angle. While the angle is being measured, MEAZOR’s laser module can be used to locate the start/end point of the angle. The MEAZOR Expert Protractor Accessory (sold separately) can also be used for more accurate angle measurement. More accessories of MEAZOR is available in MEAZOR APP or HOZODESIGN.com/meazor.
32
Middle Angular dimension Top Back to zero Bottom left: Laser-assisted positioning Bottom right: Degree/Index Mode LEVEL Place MEAZOR on a flat surface, to use the electronic level function of MEAZOR. When the level is close to 0° (< ± 1°), the light point turns blue.
Horizontal axis: Tumble angle / Vertical axis: Tilt
angle
TROUBLESHOOTING
Description
Solution
Unable to charge. No sign of charging after switching on, or the charger is plugged in and still unable to switch on The screen does not display normally (splash screen, garbled code, broken)
Try a different charging cable and charging plug. Or please contact your distributor.
Please contact your distributor for customer support services. Please refer to the warranty
33
policy for details.
The product does not
Short circuit, water
switch on normally, the
ingress. Please leave
vibration motor vibrates
the product to stand for
continuously
12 hours and then try to
switch it back on. Or
contact your distributor
for customer support
services.
MEAZOR cannot be found Please ensure that no
by smartphone Bluetooth other devices are
connected to the
MEAZOR.
ONLY use the MEAZOR
APP to connect
MEAZOR to your
smartphone, DO NOT
connect directly through
your smartphone
Bluetooth setting.
MEAZOR Bluetooth
Please update the
cannot connect to the
MEAZOR APP to the
MEAZOR APP
latest version. Or try a
different portable device
for connection.
Laser distance
Please try restarting the
measurement malfunction, product and using it in
length continues to display an environment without
0000
over-bright light. Or
contact your distributor
for customer support
services.
Roller distance
Do not use the function
measurement is faulty.
of the roller wheel while
When measuring with the charging. Try restarting
rolloer, it is unresponsive the product. Or contact
or does not correspond to your distributor for
the actual roll length.
customer support
services.
CONTACT US HOZO DESIGN CO.,Limited (HK)
34
www.hozodesign.com/contact
WARRANTY POLICY Warranty period
HOZO Design. CO. – One-year Limited Consumer Warranty covers your product against manufacturing defects for one year from the date you bought your product. Special cases During the warranty period, the following cases are not covered by the warranty policy and will be repaired at extra cost. 1) Damage caused by improper use, maintenance or storage by the user. 2) Dismantling of parts under unauthorized circumstances. 3) No proof of purchase. 4) The serial number does not correspond to the product sent for repair or has been altered 5) Damage to the body caused by force majeure 6) Normal wear and tear of the parts, which need to be replaced 7) Damage caused by abnormalities in the temperature/humidity of use or storage 8) Damage to the battery caused by not charging in accordance with the instructions 9) Any damage caused by not following the instructions.
How to send it for repair If the product needs to be repaired, please contact the distributor and send the product accordingly, and provide a valid serial number with proof of purchase.
Serial Number
35
Please refer to the diagram below for the serial number. Products. Device without a serial number means it is a test or demonstration unit and are not covered by the warranty.
COPYRIGHT NOTICE The above product specifications are subject to change without notice. All rights of interpretation are reserved by HOZO DESIGN CO. All trademarks, images, technical data and intellectual property rights are the properties of HOZO DESIGN CO.,Limited and are subject to copyright infringement.
36
FCC WARNING This device complies with part 15 of the FCC Rules. Operation is subject to the following two conditions: (1) this device may not cause harmful interference, and (2) this device must accept any interference received, including interference that may cause undesired operation. Any changes or modifications not expressly approved by the party responsible for compliance could void the user’s authority to operate the equipment. NOTE: This equipment has been tested and found to comply with the limits for a Class B digital device, pursuant to Part 15 of the FCC Rules. These limits are designed to provide reasonable protection against harmful interference in a residential installation. This equipment generates, uses and can radiate radio frequency energy and, if not installed and used in accordance with the instructions, may cause harmful interference to radio communications. However, there is no guarantee that interference will not occur in a particular installation. If this equipment does cause harmful interference to radio or television reception, which can be determined by turning the equipment off and on, the user is encouraged to try to correct the interference by one or more of the following measures: — Reorient or relocate the receiving antenna. — Increase the separation between the equipment and receiver. — Connect the equipment into an outlet on a circuit different
from that to which the receiver is connected. — Consult the dealer or an experienced radio/TV technician for help. To maintain compliance with FCC’s RF Exposure guidelines, This equipment should be installed and operated with minimum distance between 20cm the radiator your body: Use only the supplied antenna.


