
![]() 6851 6 Inch Orbital Polisher Owner’s Manual
6851 6 Inch Orbital Polisher Owner’s Manual

![]()
General Safety Warnings:
![]() WARNING: The instructions and warnings contained in this manual should be read and understood before using or operating this tool. Do not allow anyone to use or operate this tool until they have read this manual and have developed a thorough understanding of how this tool works. Failure to observe any of the following instructions could result in severe personal injury to tool users and bystanders, or cause damage to the tool and property. Keep this manual for future reference.
WARNING: The instructions and warnings contained in this manual should be read and understood before using or operating this tool. Do not allow anyone to use or operate this tool until they have read this manual and have developed a thorough understanding of how this tool works. Failure to observe any of the following instructions could result in severe personal injury to tool users and bystanders, or cause damage to the tool and property. Keep this manual for future reference.
![]() Note: The warnings and cautions discussed in this instruction manual cannot cover all possible conditions and situations that may occur.
Note: The warnings and cautions discussed in this instruction manual cannot cover all possible conditions and situations that may occur.
It must be understood by the operator that common sense and caution are factors that cannot be built into this product but must be supplied by the operator.
![]() WARNING: Use safety equipment. Users and bystanders should use safety goggles or safety glasses with side shields that comply with current national standards, or when needed, a face shield. Use an ANSI-approved dust mask or respirator when working around metal, wood, and chemical dust and mists. This applies to all persons in the work area. Also use non-skid safety shoes, hardhat, gloves, dust collection systems, and hearing protection when appropriate.
WARNING: Use safety equipment. Users and bystanders should use safety goggles or safety glasses with side shields that comply with current national standards, or when needed, a face shield. Use an ANSI-approved dust mask or respirator when working around metal, wood, and chemical dust and mists. This applies to all persons in the work area. Also use non-skid safety shoes, hardhat, gloves, dust collection systems, and hearing protection when appropriate.
![]() WARNING: Keep bystanders and children out of the work area while operating this tool.
WARNING: Keep bystanders and children out of the work area while operating this tool.![]() WARNING: Always keep your work area clean, uncluttered, and well-lit. Cluttered or dark areas invite accidents and injuries. DO NOT work on floor surfaces that are slippery.
WARNING: Always keep your work area clean, uncluttered, and well-lit. Cluttered or dark areas invite accidents and injuries. DO NOT work on floor surfaces that are slippery.![]() WARNING: Do not operate this tool if you are tired or under the influence of alcohol, drugs, or medications that could affect your ability to use the tool properly.
WARNING: Do not operate this tool if you are tired or under the influence of alcohol, drugs, or medications that could affect your ability to use the tool properly.![]() WARNING: Dress properly. Do not wear loose clothing or jewelry as they can be caught in moving parts. Wear restrictive hair covering to contain long hair.
WARNING: Dress properly. Do not wear loose clothing or jewelry as they can be caught in moving parts. Wear restrictive hair covering to contain long hair.![]() WARNING: Do not reach over or across running machines. Keep proper footing and balance at all times. Non-skid footwear is recommended when working.
WARNING: Do not reach over or across running machines. Keep proper footing and balance at all times. Non-skid footwear is recommended when working.
Electrical Safety Warnings:
![]() WARNING: Read all safety warnings and instructions. Failure to follow all warnings and
WARNING: Read all safety warnings and instructions. Failure to follow all warnings and
instructions may result in electric shock, fire, and/or serious injury or death.
![]() WARNING: Before connecting a tool to a power supply, always check to ensure the power supply corresponds to the voltage on the nameplate of the tool. A power supply with a voltage greater than that specified for the tool can result in serious injury to the user, as well as damage to the tool. Using a power supply with a voltage less than the nameplate rating is harmful to the motor. If in doubt, do not plug in the tool.
WARNING: Before connecting a tool to a power supply, always check to ensure the power supply corresponds to the voltage on the nameplate of the tool. A power supply with a voltage greater than that specified for the tool can result in serious injury to the user, as well as damage to the tool. Using a power supply with a voltage less than the nameplate rating is harmful to the motor. If in doubt, do not plug in the tool.
![]() NOTE: Double insulated tools are equipped with a polarized plug (one blade is wider than the other). This plug will fit in a polarized outlet only one way.
NOTE: Double insulated tools are equipped with a polarized plug (one blade is wider than the other). This plug will fit in a polarized outlet only one way.
If the plug does not fit fully in the outlet, reverse the plug. If it still doesn’t fit, contact a qualified electrician to install a polarized outlet. Do not change the plugin anyway.
![]() WARNING: To reduce the risk of electric shock, DO NOT use in damp conditions, on wet surfaces, or exposed it to rain. Do not plug in this tool or operate it with wet hands or while standing in water.
WARNING: To reduce the risk of electric shock, DO NOT use in damp conditions, on wet surfaces, or exposed it to rain. Do not plug in this tool or operate it with wet hands or while standing in water.
![]() WARNING: Never use the cord for carrying, pulling, or unplugging the power tool. Grasp plug and pull to disconnect from outlet. Keep cord away from heat, oil, sharp edges, or moving parts. Replace damaged cords immediately.
WARNING: Never use the cord for carrying, pulling, or unplugging the power tool. Grasp plug and pull to disconnect from outlet. Keep cord away from heat, oil, sharp edges, or moving parts. Replace damaged cords immediately.
![]() WARNING: Do not carry the power tool with your finger on the switch. Ensure the switch is in the off position before plugging the tool into the power outlet. In the event of a power failure while a tool is being used, turn the switch off to prevent surprise from starting when the power is restored.
WARNING: Do not carry the power tool with your finger on the switch. Ensure the switch is in the off position before plugging the tool into the power outlet. In the event of a power failure while a tool is being used, turn the switch off to prevent surprise from starting when the power is restored.
![]() WARNING: Always remove the power cord from the electric outlet when making adjustments, changing parts, cleaning, or working on the tool.
WARNING: Always remove the power cord from the electric outlet when making adjustments, changing parts, cleaning, or working on the tool.
![]() WARNING: Care should be taken to arrange the cord so it will not be stepped on, tripped over, or otherwise subjected to damage or stress.
WARNING: Care should be taken to arrange the cord so it will not be stepped on, tripped over, or otherwise subjected to damage or stress.
![]() WARNING: Never attempt to plug in or operate equipment with defective or damaged wires, power cord,s or power cord plug. Have any defective or damaged parts replaced immediately by qualified personnel.
WARNING: Never attempt to plug in or operate equipment with defective or damaged wires, power cord,s or power cord plug. Have any defective or damaged parts replaced immediately by qualified personnel.
![]() WARNING: Avoid body contact with electrically grounded surfaces. There is an increased risk of electric shock if your body is grounded.
WARNING: Avoid body contact with electrically grounded surfaces. There is an increased risk of electric shock if your body is grounded.
![]() WARNING: If the work area is not equipped with a permanently installed Ground Fault Circuit Interrupter outlet (GFCI), use a plug-in GFCI between the power tool or extension cord and the power receptacle.
WARNING: If the work area is not equipped with a permanently installed Ground Fault Circuit Interrupter outlet (GFCI), use a plug-in GFCI between the power tool or extension cord and the power receptacle.
![]() WARNING: If an extension cord is necessary, use only ‘Listed’ extension cords. If used outdoors, they must be marked “For Outdoor Use”.
WARNING: If an extension cord is necessary, use only ‘Listed’ extension cords. If used outdoors, they must be marked “For Outdoor Use”.
![]() WARNING: Use of improper size or gauge of extension cord may cause unsafe or inefficient operation of your tool, or cause damage to your tool. Be sure your extension cord is rated to allow sufficient current flow to the motor. If in doubt, always use a larger gauge cord. Be sure to check the voltage requirements of the tool to your incoming power source.
WARNING: Use of improper size or gauge of extension cord may cause unsafe or inefficient operation of your tool, or cause damage to your tool. Be sure your extension cord is rated to allow sufficient current flow to the motor. If in doubt, always use a larger gauge cord. Be sure to check the voltage requirements of the tool to your incoming power source.
![]() NOTE: The table below shows the correct size to use according to cord length and the amperage draw of the tool (specified on the nameplate). When in doubt, use the next heavier gauge. The smaller the gauge number, the heavier the cord. (AWG = American Wire Gauge).
NOTE: The table below shows the correct size to use according to cord length and the amperage draw of the tool (specified on the nameplate). When in doubt, use the next heavier gauge. The smaller the gauge number, the heavier the cord. (AWG = American Wire Gauge).
Minimum Gauge for Extension Cords (AWG) [when using 120 volts only)
| Ampere Rating | Total Length of Cord in Feet (meters) | ||||
| More Than | Not More Than | 25′ (7.6m) | 50′ (15m) | 100′ (30.4m) | 150′ (45.7m) |
| 0 | 6 | 18 | 16 | 16 | 14 |
| 6 | 10 | 18 | 16 | 14 | 12 |
| 10 | 12 | 16 | 16 | 14 | 12 |
| 12 | 16 | 14 | 12 | Not Recommended | |
Power Tool Use and Care:
![]() NOTE: The term “power tool” in the warnings refers to your electrically operated (corded) power tool or battery-operated (cordless) power tool.
NOTE: The term “power tool” in the warnings refers to your electrically operated (corded) power tool or battery-operated (cordless) power tool.
![]() WARNING: Beware of all power lines, electrical circuits, water pipes, and other mechanical hazards in your work area, particularly those below the work surface hidden from the operator’s view. Unintentional contact with these hazards may cause personal injury or property damage.
WARNING: Beware of all power lines, electrical circuits, water pipes, and other mechanical hazards in your work area, particularly those below the work surface hidden from the operator’s view. Unintentional contact with these hazards may cause personal injury or property damage.
![]() WARNING: Do not force the power tool. Use the correct power tool for your application. The correct power tool will do the job better and safer at the rote for which it was designed.
WARNING: Do not force the power tool. Use the correct power tool for your application. The correct power tool will do the job better and safer at the rote for which it was designed.
![]() WARNING: Do not use the power tool if the switch loses its function. Any power tool that cannot be controlled with the switch is dangerous and must be repaired.
WARNING: Do not use the power tool if the switch loses its function. Any power tool that cannot be controlled with the switch is dangerous and must be repaired.
![]() WARNING: Do not operate power tools in explosive atmospheres, such as in the presence of flammable liquids, gases, or dust. Power tools create sparks that may ignite dust or fumes.
WARNING: Do not operate power tools in explosive atmospheres, such as in the presence of flammable liquids, gases, or dust. Power tools create sparks that may ignite dust or fumes.
![]() WARNING: Make sure that stored or idle power tools are out of the reach of children and do not allow persons unfamiliar with the power tool or these instructions to operate the power tool. Power tools are dangerous in the hands of untrained users.
WARNING: Make sure that stored or idle power tools are out of the reach of children and do not allow persons unfamiliar with the power tool or these instructions to operate the power tool. Power tools are dangerous in the hands of untrained users.
![]() WARNING: Maintain power tools. Check for misalignment or binding of moving parts, breakage of parts, and any other conditions that may affect the power tools’ operation. If damaged, have the power tool repaired before using it. Many accidents are caused by poorly maintained power tools.
WARNING: Maintain power tools. Check for misalignment or binding of moving parts, breakage of parts, and any other conditions that may affect the power tools’ operation. If damaged, have the power tool repaired before using it. Many accidents are caused by poorly maintained power tools.
![]() WARNING: If devices are provided for the connection of dust extraction and collection facilities, ensure that these are connected and properly used.
WARNING: If devices are provided for the connection of dust extraction and collection facilities, ensure that these are connected and properly used.
![]() WARNING: Remove adjusting keys or wrenches before turning the tool on. A wrench or a key that is left attached to o rotating port of the tool may result in personal injury.
WARNING: Remove adjusting keys or wrenches before turning the tool on. A wrench or a key that is left attached to o rotating port of the tool may result in personal injury.
![]() WARNING: Have your power tool serviced by a qualified repair person using only identical replacement parts. This will ensure that the power tool is safe.
WARNING: Have your power tool serviced by a qualified repair person using only identical replacement parts. This will ensure that the power tool is safe.
REPETITIVE MOTION/ VIBRATION HAZARDS:
![]() WARNING: Avoid prolonged exposure to vibration. Vibration, repetitive motions, or uncomfortable positions over extended periods of time may be harmful to your hands and arms. Do not ignore symptoms or persistent or recurring discomfort, pain, throbbing, aching, tingling, numbness, burning sensation, or stiffness. Discontinue use of the tool and seek medical advice before resuming use.
WARNING: Avoid prolonged exposure to vibration. Vibration, repetitive motions, or uncomfortable positions over extended periods of time may be harmful to your hands and arms. Do not ignore symptoms or persistent or recurring discomfort, pain, throbbing, aching, tingling, numbness, burning sensation, or stiffness. Discontinue use of the tool and seek medical advice before resuming use.
![]() WARNING: Adopt a comfortable posture while maintaining secure footing and avoiding awkward or off-balance postures. Changing posture during extended tasks can help avoid discomfort and fatigue.
WARNING: Adopt a comfortable posture while maintaining secure footing and avoiding awkward or off-balance postures. Changing posture during extended tasks can help avoid discomfort and fatigue.
Operating Instructions
![]() Read the ENTIRE IMPORTANT SAFETY INFORMATION section at the beginning of this m manual including all text under subheadings therein before set up or use of this power tool.
Read the ENTIRE IMPORTANT SAFETY INFORMATION section at the beginning of this m manual including all text under subheadings therein before set up or use of this power tool.
![]() WARNING:
WARNING:
TO PREVENT SERIOUS INJURY FROM ACCIDENTAL OPERATION:
Make sure that the Power Switch is in the off position and unplug the tool from its electrical outlet before performing any procedure in this section.
Note: For additional information regarding the parts listed in the following pages, refer to the Assembly Diagram near the end of this manual.
ASSEMBLY
Installing the Side Handle
WARNING:
TO PREVENT SERIOUS INJURY:
Do not operate this tool with one hand only or without one of the two handles properly installed.
- The Side Handle may be installed in one of two positions, on either side of the Gear Housing
- Screw the threaded end of the Side Handle into the selected position Tighten securely before beginning work.
Functions

Installing the “D” Shaped Handle
WARNING:
TO PREVENT SERIOUS INJURY:
Do not operate this tool with one hand only or without one of the two handles properly installed.
- The “D” Shaped Handle may be installed in place of the Side Handle
- Use the two hex socket cap screws provided to screw the “D” Shaped Handle into the selected position.
Once screw on each side of the gear housing. Tighten securely before beginning work.
Operating Instructions
![]() Read the ENTIRE IMPORTANT SAFETY INFORMATION section at the beginning of this mama including all text under subheadings therein before set up or use of this product.
Read the ENTIRE IMPORTANT SAFETY INFORMATION section at the beginning of this mama including all text under subheadings therein before set up or use of this product.
TOOL SET UP
WARNING:
TO PREVENT SERIOUS INJURY FROM ACCIDENTAL OPERATION:
Make sure that the power switch is in the off position and unplug the tool from its electrical outlet before performing any procedure in this section.
Installing a Threaded Accessory
- The accessory MUST be:
• Rated to at least 6.500 OPM.
• No larger than 6 (150mm) in diameter
• Fitted with a threaded opening of 5/16″ – 24 UNF
• Undamaged
• A sanding disc, polishing bonnet or foam pad (sold separately), and backing pad. - Use the included wrench to prevent the spindle from turning.
- Thread disc accessory firmly onto the spindle.
- Remove the wrench before use.
WORKPIECE AND WORK AREA SET UP
- Designate a work area that is clean and well-fit.
The work area must not allow access by children or pets to prevent distraction and injury. - Route the power cord along a safe route to reach the work area without creating a tripping hazard or exposing the power cord to possible damage. The power cord must reach the work area with enough extra length to allow free movement while working.
- Secure loose workpieces using a vise or clamps (not included) to prevent movement while working.
- There must not be hazardous objects, such as utility lines or foreign objects, nearby that will present a hazard while working.
- You must use personal safety equipment including, but not limited to. ANSI-approved eye and hearing protection, as well as heavy-duty work gloves.
Polishing Instructions
![]() WARNING:
WARNING:
TO PREVENT SERIOUS INJURY: Grip the tool firmly in both hands.
- Wash the work surface thoroughly, and make sure it is free of dust, dirt, oil, grease, etc.
- Place a clean foam pad (sold separately) securely onto the backing pad.
- Apply about two tablespoons of wax (not included) evenly on the clean foam pad.
NOTICE: Do not apply the wax directly to the surface of the vehicle. The amount of wax needed will vary according to the size of the vehicle being waxed.
NOTICE: Only use slower speeds for polishing.
Otherwise, damage may occur to the paint being polished. TDIJL//J/JN Tools, Inc. is not responsible for damage to the vehicle’s finish due to improper use of this tool. - Make sure that the switch is in the off position, then plug in the tool.
WARNING! To prevent electric shock, keep electrical connections off ground.
CAUTION! Start and stop the tool only while ii is held firmly against the surface of the vehicle.
Failure to do so may result in the foam pad or polishing bonnet being thrown from the polishing pad.
4. To start, position the unit on the area to be polished, grip the tool firmly with both hands and press the Trigger. Release the trigger to stop.
5. Keep pressure off of the tool when operating.
The foam pad should LIGHTLY contact the polishing surface.
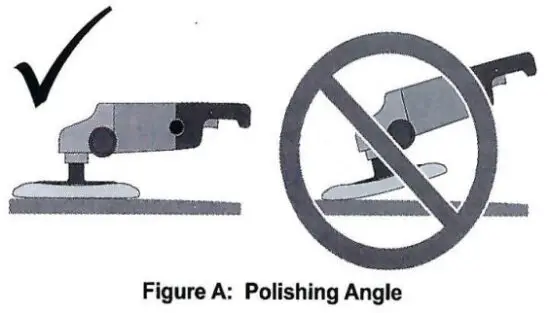
NOTICE: To prevent damage to the foam pad, polishing bonnet, and vehicle finish: Only apply the pad/bonnet flat against the surface, see below.
- Begin using the tool to apply wax to the vehicle.
Apply the wax to all flat surfaces with broad, sweeping strokes in a crisscross pattern.
Apply the wax evenly over the surface of the vehicle. - Add additional wax to the polishing pad as needed.
To add additional wax:
a. Stop the tool and allow the tool to come to a complete stop.
b. Add a small amount of wax evenly over the pad surface.
c. Avoid using too much wax. For additional applications of wax to the foam pad, reduce the amount of wax. The foam pad will not absorb as much wax in subsequent applications.
d. Resume operation.
Note: The most common error when waxing/polishing a vehicle is applying too much wax. If the foam pad becomes saturated with wax, applying wax will be more difficult and will take longer. Applying too much wax may also reduce the life of the foam pad. If the foam pad continually comes off the backing pad during use, too much wax may have been applied. - After the wax has been applied to the vehicle’s surface, turn off the tool.
Unplug the power cord from the extension cord. - Remove the foam pad from the backing pad and with your hand and the foam pad, apply wax to any hard-to-reach areas of the vehicle such as around lights, door handles, under bumpers, etc.
- Allow sufficient time for the wax to dry.
- Place a clean polishing bonnet (sold separately) securely onto the backing pad.
CAUTION! Tightly pull the string to secure the polishing bonnet. Secure the string and keep it out of the way by tying several knots.
CAUTION! Start and stop the tool only while it is held firmly against the surface of the vehicle.
Failure to do so may result in the bonnet being thrown from the backing pad. - Start the tool and begin buffing off the dried wax.
- When as much wax as possible has been removed with the tool, turn off the tool. Unplug the tool.
- WARNING! Allow the tool to come to a complete stop before setting it down.
- Remove the polishing bonnet from the backing pad.
Using the polishing bonnet, remove the wax from all hard-to-reach areas of the vehicle. - Clean, then store the tool indoors out of children’s reach.
Sanding Instructions
![]() WARNING:
WARNING:
TO PREVENT SERIOUS INJURY: Grip the tool firmly in both hands.
- Wipe the work surface clean of all dirt and debris, especially that of previous coarser sanding sessions, which will scratch the surface of a finer grit sanding session.
- Attach the desired grit sanding disk (sold separately) onto the backing pad.
- Make sure that the switch is in the off position. then plug in the tool.
- To start, grip the tool firmly with both hands and press the trigger. Release the trigger to stop.
- Wait until the tool has reached full speed, then gently contact the surface.
- Keep heavy pressure off of the tool when operating.
Allow the tool to do the work. - Move the tool in a uniform pattern up and down or side to side while sanding to ensure even sanding.
- Periodically, stop the tool and check for disc wear.
Replace worn sanding discs as needed. - TO PREVENT ACCIDENTS, AFTER USE: Turn off the tool.
WARNING! Allow the tool to come to a complete stop before setting it down.
Unplug the tool. Clean, then store the tool indoors out of children’s reach.
Maintenance and Servicing
![]() Procedures not specifically explained in this manual must be performed only by a qualified technician.
Procedures not specifically explained in this manual must be performed only by a qualified technician.
WARNING:
TO PREVENT SERIOUS INJURY FROM ACCIDENTAL OPERATION:
Make sure that the power switch is in the off position and unplug the tool from its electrical outlet before performing any procedure in this section.
TO PREVENT SERIOUS INJURY FROM TOOL FAILURE: Do not use damaged equipment. If abnormal noise or vibration occurs, have the problem corrected before further use.
CLEANING, MAINTENANCE, AND LUBRICATION
- BEFORE EACH USE, inspect the general condition of the tool. Check for:
• loose hardware,
• misalignment or binding of moving, parts,
• damaged cord/electrical wiring,
• cracked or broken parts, and
• any other condition that may affect its safe operation. - AFTER USE, wipe external surfaces of the tool with a clean cloth.
- Periodically, wear ANSI-approved safety goggles and NIOSH-approved breathing protection and blow dust and grit out of the motor vents using dry compressed air.
 WARNING! If the supply cord of this power tool is damaged, it must be replaced
only by a qualified service technician.
Troubleshooting
| Problem | Possible Causes | Likely Solutions |
| The tool will not start. | 1. Cord not connected. 2. No power at outlet. 3. Tool’s thermal reset breaker tripped (if equipped). 4. Internal damage or wear. (Carbon brushes or switches, for example.) | 1. Check that cord is plugged in. 2. Check power at outlet. If the outlet is unpowered, turn off the tool and check the circuit breaker. If the breaker is tripped, make sure the circuit is the right capacity for the tool and the circuit has no other loads. 3. Turn off the tool and allow to cool. Press the reset button on the tool. 4. Have a technician service tool. |
| The tool operates slowly. | 1. Excess pressure applied to the workpiece. 2. Power being reduced by long or small diameter extension cord. | 1. Decrease pressure, and allow the tool to do the work. 2. Eliminate the use of extension cord. If an extension cord is needed, use one with the proper diameter for its length and load. See Extension Cords in the GROUNDING section. |
| Performance decreases over time. | Carbon brushes are worn or damaged. | Have a qualified technician replace brushes. |
| Excessive noise or rattling. | Internal damage or wear. (Carbon brushes or bearings, for example.) | Have technician service tool. |
| Overheating. | 1. Forcing tool to work too fast. 2. Blocked motor housing vents. 3. Motor being strained by a long or small diameter extension cord. | 1. Allow the tool to work at its own rate. 2. Wear ANSI-approved safety goggles and NIOSH-approved dust mask/respirator while blowing dust out of the motor using compressed air. 3. Eliminate the use of extension cord. If an extension cord is needed, use one with the proper diameter for its length and load. See Extension Cords in the GROUNDING section. |
| The tool does not sand effectively. | 1. Accessory loose. 2. Accessory damaged, worn or wrong type for the material. | 1. Confirm accessory arbor is correct and tight. 2. Check the condition and type of disc accessory. Use only the proper type of disc accessory in good condition. |
TOOL NAN
MODEL:6851
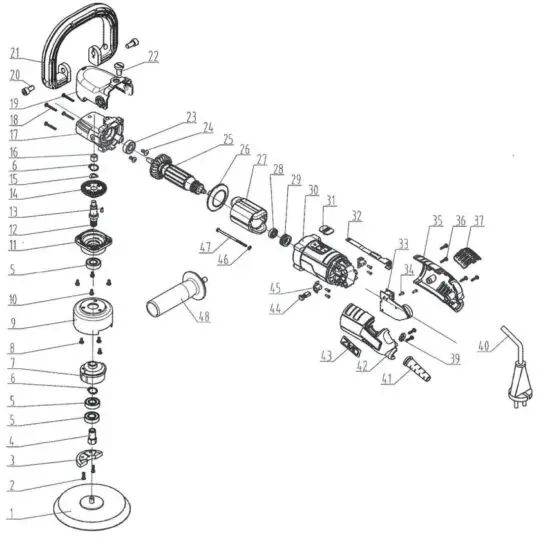
ITEM# | ORDERING PART# | PART DESCRIPTION |
| 1 | PRT10506-01 | BACKING PAD |
| 2 | PRT10506-02 | SCREW M4X12 |
| 3 | PRT10506-03 | COUNTERWEIGHT |
| 4 | PRT10506-04 | SPINDLE 01 |
| 5 | PRT10506-05 | BEARING 6001 |
| 6 | PRT10506-06 | RING 12 |
| 7 | PRT10506-07 | ECCENTRIC WHEEL |
| 8 | PRT10506-08 | SCREW M4X10 |
| 9 | PRT10506-09 | ECCENTRIC PLATE |
| 10 | PRT10506-10 | SCREW M4X14 |
| 11 | PRT10506-11 | GEARBOX CAP |
| 12 | PRT10506-12 | SPINDLE 02 |
| 13 | PRT10506-13 | WOODRUFF KEY 3X3.7X10 |
| 14 | PRT10506-14 | BIG GEAR |
| 15 | PRT10506-15 | GEAR RETAINING RING |
| 16 | PRT10506-16 | BEARING 12X8X10 |
| 17 | PRT10506-17 | GEARBOX |
| 18 | PRT10506-18 | SCREW ST4.2X22 |
| 19 | PRT10506-19 | GEARBOX COVER |
| 20 | PRT10506-20 | SCREW M8X15 |
| 21 | PRT10506-21 | D-HANDLE |
| 22 | PRT10506-22 | SCREW M8X12 |
| 23 | PRT10506-23 | BEARING 6000 |
| 24 | PRT10506-24 | SCREW M5X10 |
| 25 | PRT10506-25 | ROTOR |
| 26 | PRT10506-26 | FAN SHROUD |
| 27 | PRT10506-27 | STATOR |
| 28 | PRT10506-28 | BEARING 607 |
| 29 | PRT10506-29 | BEARING BUSHING 607 |
| 30 | PRT10506-30 | HOUSING |
| 31 | PRT10506-31 | PUSH-BUTTON |
| 32 | PRT10506-32 | TIE ROD |
| 33 | PRT10506-33 | PC BOARD AND SWITCH |
| 34 | PRT10506-34 | SCREW ST2.9X10 |
| 35 | PRT10506-35 | RIGHT REAR HOUSING |
| 36 | PRT10506-36 | SCREW ST4.2X14 |
| 37 | PRT10506-37 | AIR INTAKE FASTENER |
| 39 | PRT10506-39 | CORD CLAMP |
| 40 | PRT10506-40 | POWER CORD |
| 41 | PRT10506-41 | CORD SLEEVE |
| 42 | PRT10506-42 | LEFT REAR HOUSING |
| 43 | PRT10506-43 | LABEL |
| 44 | PRT10506-44 | CARBON BRUSH |
| 45 | PRT10506-45 | BRUSH HOLDER |
| 46 | PRT10506-46 | CARRIER RING |
| 47 | PRT10506-47 | SCREW ST4.2X60 |
| 48 | PT10506-48 | SIDE HANDLE |
ALWAYS wear helmets, dust masks, protective gloves, protective glasses, protective clothing And safety shoes to protect the skin from injury


