![]()
High Definition Digital Receiver
SRT 5437
User Manual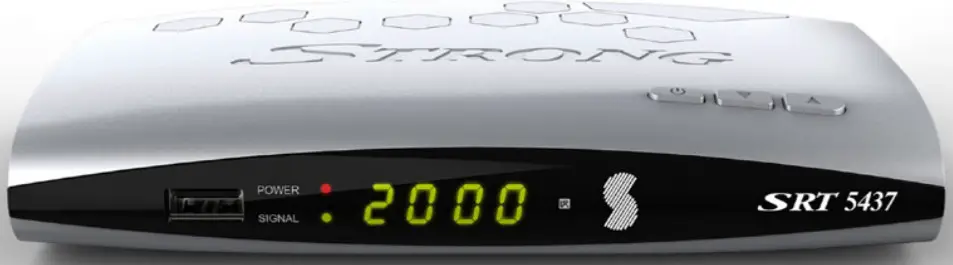
Warranty Information
This product comes with a 12-month manufacturer’s warranty from the date of purchase.
This unit has a 30 days replacement warranty for manufacturing faults. Within this period please return the faulty product with all its supplied accessories to either the place of purchase or STRONG Australia accompanied by the original purchase receipt.
After this 30 day period, the unit must be returned to STRONG Australia for testing, and if deemed faulty, it will be repaired or replaced at the discretion of STRONG Australia Pty Ltd. The faulty product can either be sent to STRONG Australia directly or via your place of purchase for evaluation.
STRONG Australia will cover any reasonable costs incurred in returning the faulty product for evaluation should the product be deemed as genuinely faulty. If the product is found to have no-fault, the costs incurred in delivering the unit to and from STRONG Australia need to be covered by the customer.
Our goods come with guarantees that cannot be excluded under Australian Consumer Law. You are entitled to a replacement or refund for a major failure and for compensation for any reasonably foreseeable loss or damage. You are also entitled to have goods repaired or replaced if the goods fail to be of acceptable quality and the failure does not amount to a major failure.
STRONG Australia Pty Ltd
60 Wedgewood Rd, Hallam. VIC. 3803
Ph: +61 3 8795 7990 FAX: +61 3 8795 7991
Safety Instructions
Safety Precaution
This STB has been designed and manufactured to satisfy the international safety standards, please read the following safety precautions carefully before operating this receiver.
Main Supply:
Before operating, please check the unit operating voltage is 100-240V AC 50/60Hz.
Overload:
Do not overload a wall outlet with an extension cord or adapter, do not use damaged power cords or touch it with wet hands as this may result in electric shock.
Liquid:
The receiver should not be exposed to dripping or splashing water, and that no objects filled with liquids, such as vases, should be placed on or near the unit.
Ventilation:
Keep the slots on the sides & top of the receiver uncovered to allow sufficient airflow to the unit. Do not put the receiver on soft furnishings or carpets. Do not expose the receiver to direct sunlight, do not place it near a heater or in humid conditions. Do not stack other electronic equipment on top of the receiver.
Cleaning:
Unplug the receiver from the wall outlet before cleaning. Clean the receiver with a soft cloth and a mild solution of washing-up liquid (no solvents).
Connection:
Disconnect the receiver from the mains when you connect it to Antenna or disconnect it from Antenna. Failure to do so could possibly cause damage to the Antenna.
Location:
Keep the receiver indoors in order to avoid lightning, rain, or direct sunlight.
Do not remove the cover:
Do not remove the cover, to reduce the risk of electric shock.
Contact qualified and licensed service personnel to repair the receiver, or contact your dealer.
Reference
Auto-Search
Manual Search
PAL/NTSC Conversion
True full Color (32 bits) on-screen display (OSD)
Menu language supported: English
Multi-language audio supported
Multi-language DVB Subtitle output
7 days Electronic Program Guide (EPG)
USB 2.0 Interface
Software-update:
If new software becomes available for this model, it can be downloaded from our website (www.strong.com.au) and then placed onto a USB. Plugin the USB into the USB port on the unit and then go to:
Menu > Expansion > USB > Software > Click on the file.
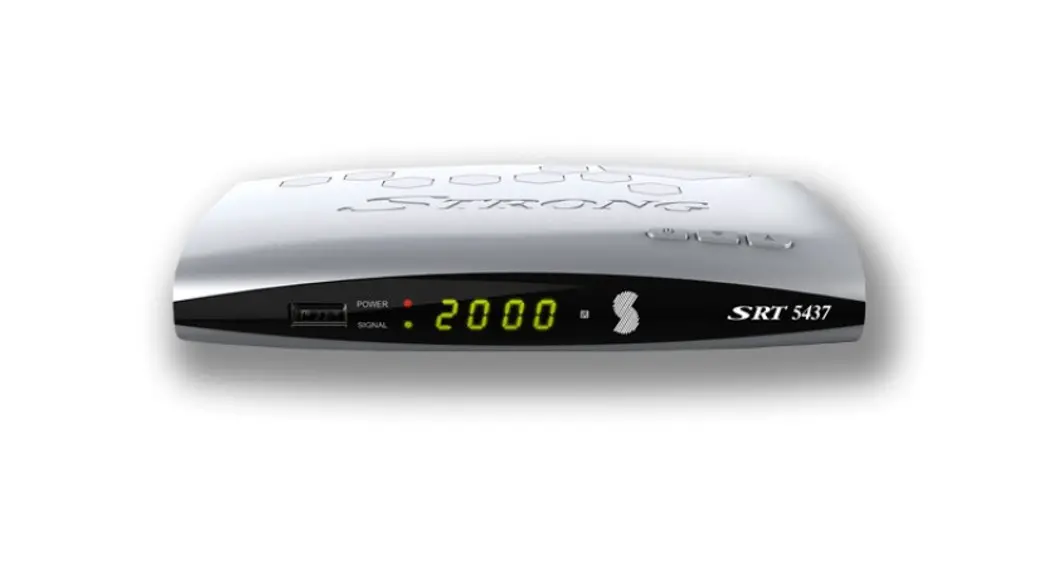
Product Overview
2.1 Front Panel
- Power button: Switch between operation and standby modes.
- Up & Down Channel: Change the channel in viewing modes.
- USB2.0: Single USB 2.0 Host Port.
- Power / Signal light: Power / signal indicator.
- Display: It displays channel information in normal mode and local time in standby mode.
2.2 Rear Panel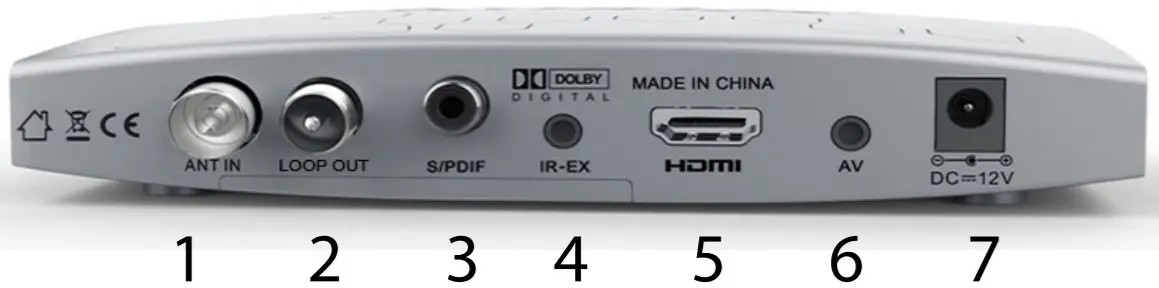
- ANT IN: Connect the antenna cable.
- Loop Out: Antenna loop out
- S/PDIF: COAXIAL: Digital Audio Output (Optical).
- IR Extender Plug: IR Cable (optional).
- HDMI: Connect to the TV using an HDMI cable (supplied).
- A/V- AUDIO R/L / VIDEO: Connect to the TV using RCA Jack cable (not supplied).
- DC-12V: Connect to the power using the power adapter.
*Note: For best results, use HDMI cable and RG6 Quad Shielded antenna cabling
2.3 Remote Control Functions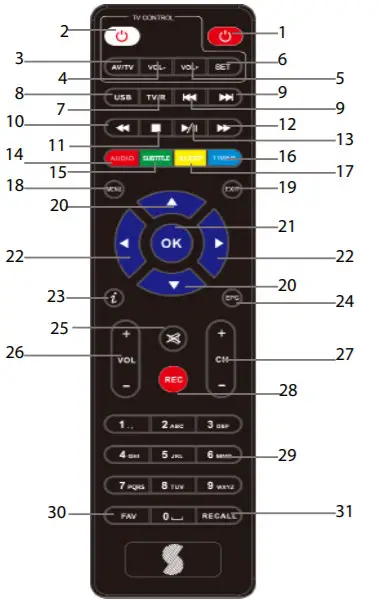
| 1. POWER: Turns the receiver On 2- 6. TV Control buttons (refer page 10) 7. TV/RADIO: Toggles between TV or RADIO mode 8. USB: Access USB Menu & Recorded Files 9. USB: Previous and Next 10. USB: Fast rewind 11. USB: Stop 12. USB: Fast forward 13. USB: Play/Pause 14. AUDIO: Speaker Selection | 15. SUB: Subtitles On/Off 16. Timer17. Set Screen resolution 18. Menu 19. Exit 20. Alter channel or change selection in Menu Page 21. OK / Enter 22. Alter volume or change selection in Menu Page 23. INFO: Shows the current channel information 24. EPG: Shows the EPG (Electronic Program Guide) in TV mode | 25. MUTE: Mutes audio output of the set-top box 26. V+/V-: Increases/decreases the volume level 27. CH+/CH-: Channel up/down in channel list mode 28. Records the TV program to the connected storage device 29. 0~9: Channel selection or the value input 30. FAV: Displays Favourite Channel List 31. RECALL: To select from the list of previously viewed channels |
2.4 Activate the learning remote function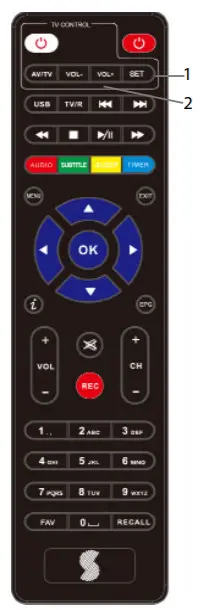
- Press and hold SET button (1) in the TV CONTROL area for 3 seconds. The red LED light on the TV CONTROL POWER button will glow brighter, confirming the remote is in learning mode.
- Then press any one of the learning buttons, within 10 seconds, on this remote (2) (AV/TV, Vol+ Vol- or Power), the LED light will flicker, confirming readiness to accept codes from the TV remote.
- Aim the TV remote (top end) against this remote, as close as possible, and press and hold the corresponding button on the TV remote. (AV/TV, Vol+, Vol- or Power).
- If the copy is successful, the LED light on the TV control POWER Button will flash three times before staying lit.
- Repeat 2,3 and 4 for every other key you wish to copy, (AV/TV, Vol+, Vol- or Power).
- Once copying is complete, press the SET key again, to exit the learning mode. The LED light will go out.
Installation
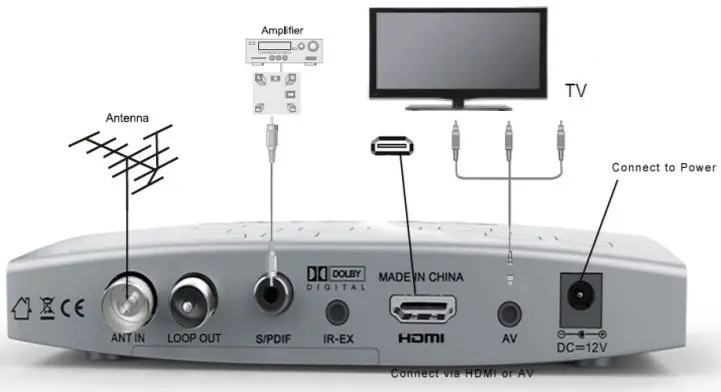
3.1 Connecting to a TV
- Connect antenna cable from wall socket to unit.
- Connect antenna cable from Loop Outback to TV (optional).
- Connect Coaxial cable to Amplifier to S/PDIF (optional).
- Connect IR Extender (optional).
- Connect to TV via HDMI or AV Jack, no need to use both.
- Connect the unit to power.
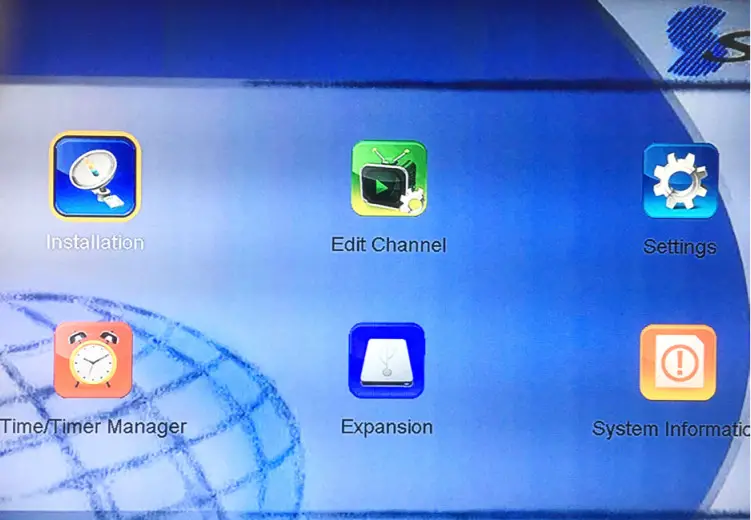
3.2 First time installation
If you are using the unit for the first time or have restored the unit to factory default, the installation guide menu will appear on your TV screen. (after the factory reset: Select LANGUAGE, NO CHANNEL appears, then press MENU, select Installation, input Password, then select auto/manual search)
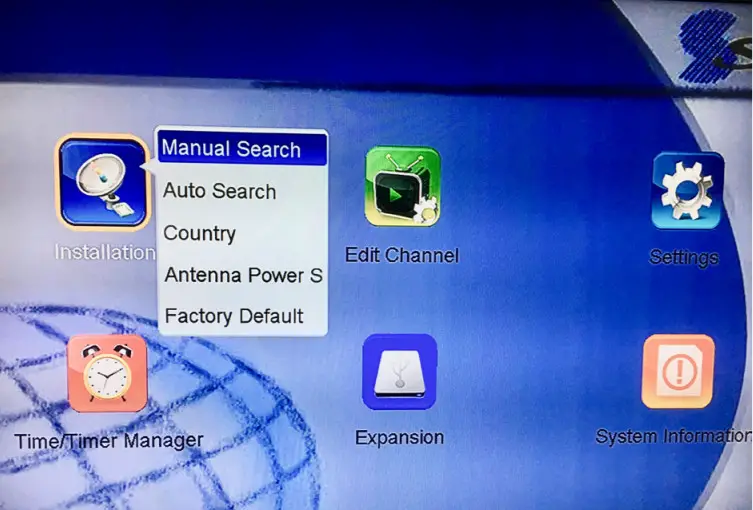
- Select Installation and Press ‘OK’.
- Please input PASSWORD (0000).
- Then select Auto Search or Manual Search.
- Select ‘On’ in Power Antenna Setting, if you’re using Active Antenna.
- Select ‘Auto Channel Search’, a warning may appear “Network search YES/NO” (Default is NO). Leave it as NO.
- Press ‘OK’ to start to do channel searching.
- If you prefer you can do a Manual Channel Search.
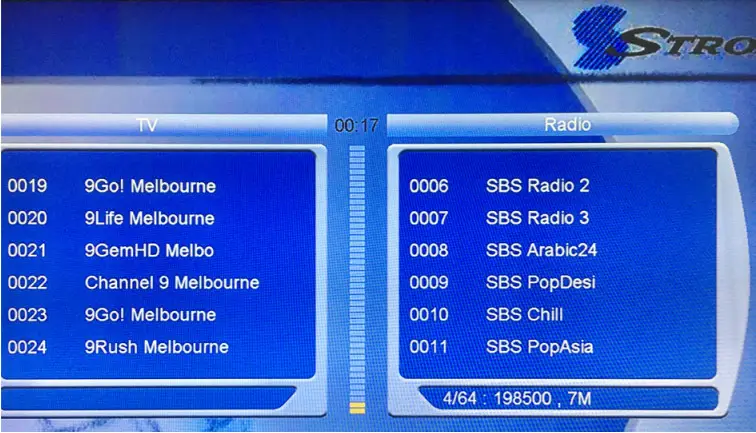
 | 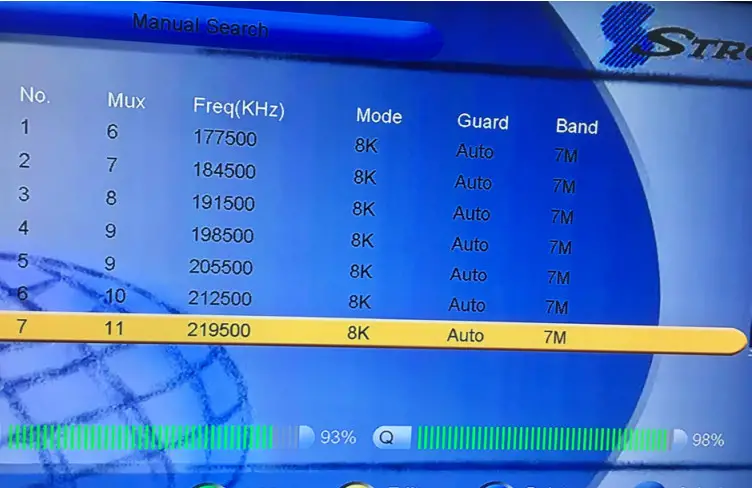 |
Unit will then begin searching for channels. Basic Unit Operation
 Basic Unit Operation
4.1. Program Management Settings
- Channel Edit (Menu > Edit Channel > Password> TV Channels/ Radio Channels )
To edit your channel preferences, use the left and right arrows to select different options ie. Move, delete, lock, rename or swap and press OK. Default password 0000. - EPG (Electronic Programming Guide) Press EPG Button
This feature shows the TV program listings for each channel for the following 7 days. The display shows the buttons to press to go forward or backward in the program listing. - Sort Channels (Menu > Edit Channel > Input Password> Sort channels
Sort your channels from different options given (ie;)
[By LCN] – Sort the channels in ascending order.
[By Service Name] – Sort the channels in alphabetical order.
[By Service ID] – Sort the channels according to the station
(You can select more options to Sort: such as Transponder, Favourites, etc). - Creating a favourite list: (TV) Menu > Edit channel > Input Password (0000) > TV Favourites
Select the channel.
Select the Favourite type by pressing the left & right arrow on Remote (NEWS, SPORTS, etc ).
4.2. Picture Setting (Menu > Settings > Input Password > OSD setup)
(a)Screen Mode
Change the aspect ratio of Video. [Auto], [16:9 Pillar Box], [16:9 Pan&Scan], [4:3 Letter Box], [4:3 Pan&Scan], [4:3 Full], [16:9 Wide Screen].
(b)Display Mode (576i, 720p & 1080i/p)
You can change this setting to match the most common setting for HDMI; 576i/50Hz, 576P/50Hz, 720P/50Hz, 1080i/50Hz, 1080P/24Hz, 1080P/25Hz, 1080P/50Hz.
(c)TV Type (PAL, NTSC, AUTO)
If the picture does not appear to be correct you can change this setting. This should match the most common setting for TVs in your country.
(d)Menu Transparency
Change On-screen display (OSD) Transparency, (1-10).
4.3 Colour Settings Menu > Settings > Input Password (0000)> Colour Settings
To adjust brightness, contrast, hue and sharpness:
4.4 Channel Search (Menu > Installation> Input Password)
(a)Auto Search > Network Search (No/Yes) Default is ‘NO’, leave it as’N0.
This option will automatically search for channels and save them once the scanning is complete.
(b)Manual Search (OK to select, Red button to start the search)
This option allows you to scan for new channels without deleting previously saved channels and settings.
4.5 Restore Factory Default (Menu > Installation > Password ‘0000’ > Factory Default)
This option will delete all preset channels and settings.
4.6 USB
This model will support up to 1TB External USB Hard drive in NTFS or Fat32 Format.
(a) Accessing USB (Menu > Expansion > USB) or press USB button on Remote.
(b)Multimedia
When a USB device is attached you can select from the Music, Photo, or Movie options in this menu.
(c) USB Recording
This function is available only when a USB storage device is connected to the receiver.
- Instant recording:
If you want to start recording a live show, which is currently being broadcast, go to the desired channel and press the REC button on the remote. Press Stop Button which is a white square (Above the Green Subtitle button) to stop recording.
By pressing the REC button twice, you are able to adjust the recording duration. - Schedule a Recording:
To schedule a recording before broadcast (e.g. record your favorite show while you’re out), follow these steps:
Through EPG:
›Press EPG to open the full listings.
›Select the TV channel.
›Press OK to go to the Program listing area.
›Select the TV show you want to record.
›Press the REC button to save a timer.
›If you want to change any settings, press the Red button on the Remote to Edit the timer.
Through Manual Timer: Menu > Time/Timer Manager
> Event Timer. Or, press the TIMER Button on Remote.
›This will display all scheduled recordings (through EPG or Manual Timer).
› Then press the RED button on the remote to add, or YELLOW to delete, or GREEN to edit the timer.
(d) Timeshift (pause & rewind live TV)
- To activate Time Shift, press the PLAY button on the remote (above the Yellow button).
- This will pause the currently viewed program and allow you to resume watching from this point by pressing the PLAY button again.
- Press the STOP button twice (white square button above green button) to end the time-shift function.
Note: Time Shift will only be available when USB HDD is connected to the system and read/ write speed is high enough to do that.
(e) Playback a recorded file: (USB Button)
- Press the USB button from the remote control.
- Select the file from the list, press OK.
(f) Stop the playback:
- Press the white square button on the remote (above the green button).
(g) Delete a recorded file:
- Select the file from the list and press RED Button (Audio) on the remote.
- From the list, select the Delete option.
- Select the file and press the OK button.
- Then press the EXIT button and select Yes.
- To select Region, Time Zone & Daylight Savings.
Note: Day and Date are automatically collected via the Broadcast stream (by Default).
Trouble Shooting
Before contacting your local service center, please read the tips below carefully. If the problem persists after completing the following procedure, please contact your local product distributor or service center for further instructions.
6.1 No message displayed on the front display. (The product will not switch on.)
- Check the main power cable and make sure it is plugged into a suitable power outlet.
- Check that the mains supply is switched on.
- Connect the power cable to a different power outlet.
- Check that the power switch is on at the rear of the product. (where applicable)
6.2 No picture
- Make sure that the product is powered on and in operation mode. (Press the STANDBY button).
- Make sure that the AV (RCA) or HDMI cable is firmly connected to the TV.
- Make sure that the antenna cable is properly connected to the
- Be sure to activate channel search.
- Check the brightness level of the TV.
- Check if the channel is currently on air. Contact the broadcaster to ensure that the channel is running.
6.3 Poor picture/sound quality
- Make sure there is no mobile phone or microwave oven near the product.
- Adjust the antenna direction to get a better picture.
- Set the antenna power in the menu to On, if you use the active antenna to improve the reception (where applicable).
6.4 No or poor sound
- Check that your AV/HDMI cable is connected correctly.
- Check the volume levels of your TV set and the product.
- Check if the product or TV is on mute.
- Check audio type or soundtrack option. (where applicable)
6.5 Remote control does not operate.
- To control the product, the top end of the remote control should point directly towards the receiving part of the product.
- Remove and reinsert the batteries in the remote control.
- Replace the batteries in the remote control for a new set.
Unit Specifications
| DVB-T2 (MPEG4)TUNER x 1 | |
| Guard Interval Modes | : 1/4,1/8,1/16,1/32,1/128 |
| Code Rate | :1/2,3/5,2/3,3/4,4/5,5/6 |
| Frequency Range | : 177.5-226.5MHz (VHF) BW=7MHz | 474- 8585MHz (UHF) BW =8MHz |
| IF Bandwidth | : 7 MHz |
| Waveform | : COFDM |
| Input Impedance | : 75 Ω |
| Carrier Mode | : 1k,2k,4k,8k,16k,32k mode |
| MPEG TRANSPORT STREAM & AV DECODING | |
| Transport Stream | : MPEG-2/4 ISO/IEC 13818-1 |
| Profile Level | : MPEG-1/2 MP@ML, H.264, DivX & MPEG4 |
| Input Rate | : 80Mps for MPEG Transport Stream and 25 Mps for DV Streams Audio Decoding: MPEG-2 Layer I & II (Music Cam), MPEG4 AAC and MPEG4 AAC-HE (AAC+), Dolby Digital (AC-3) with bit rates up to 640K bits/s, LPCM up to 48KHz, MP3 |
| Audio Mode | : Stereo/Joint-Stereo/Mono |
| Sampling Rate | : 32KHz, 44.1KHz & 48KHz |
| Aspect Ratio | : 4:3, 16:9 |
| Video Resolution | : 576i, 576p, 480i, 480p, 720p60, 1080i, 1080p |
| Video Formats | : JPEG, BMP, PNG, AVI, MKV, MP4, OGG, TS, TP, TRP, MPG, XVID |
| AUDIO/VIDEO IN/OUTPUT | |
| Video | : RCA/Cinch, Video Outputs (CVBS) @576I or 480I : HDMI 1.3(High Definition Multimedia Interface) SUPPORT HDCP |
| Audio L/R | : RCA/Cinch, Volume, and Mute control/ |
| Audio | : Coaxial digital audio output/ SPDIF |
| DATA PORT | |
| USB A-type | : USB 2.0 Host (USB Port x 1 Front Panel), |
| HARD DISK – (*Not Supplied) | |
| Will support up to 1TB External USB Hard Disk Drive: | NTFS or Fat32 File system |
| POWER SUPPLY | |
| Input Voltage | : AC100~240V (Detachable AC/DC Adaptor) |
| DC Output | : 12 Volts |
| Power Consumption | : Standby <1W, on mode Max 6W (w/out DVR) |
| GENERAL DATA | |
| Unit Dimensions | : W150 x D90 x H30mm |
| Unit Weight | : 30grams |
*For optimal picture quality HDMI cable is recommended
Customer’s Note for Warranty
Model: SRT 5437
Serial Number: …………………………………………………………………….
Date of Purchase: ……………………………………………………………….
Place of Purchase:……………………………………………………………….
Attach your purchase receipt here:
![]()
STRONG AUSTRALIA PTY LTD
60 WEDGEWOOD ROAD
HALLAM, VIC. 3803
Ph: +61 3 8795 7990
Fax: +61 3 8795 7991
HELP DESK
1800 820 030
[email protected]
WEBSITE
www.strong.com.au


