VORDON HT-X10 Car Radio
Thank you for purchasing this product, please read this manual carefully before using to ensure that you can use the machine correctly. After reading the instructions, please keep it for future inspection.
Caveat
To prevent damage to the machine and to use the system safely, please
- To prevent short circuits, do not omit metal objects(coins or other metal) inside the machine
- Do not install the unit in a way that hinders the driver’s sight or affects the driver’s operation. When you drive, please do not pay attention. In the system, do not watch the screen for a long time.
- The machine consist of high-precision components, should avoid a strong impact, not to unauthorized removal of the cover or adjust the parts, for maintenance, please go to a nearby professional service center consultation.
Before use
- When you purchase optional accessories or make related system settings, please check with the dealer whether they match the machine.
- You can select your favorite language display in the language setup menu. For more information, see Language Settings (Page 4 of the manual)
Portect the display
- Protect the display from damage, do not use a ballpoint pen or sharp tool to touch the display.
- When the machine panel or display screen is dirty, wipe with a soft cloth and a mild
- You can not use hard cloth or alcohol and other corrosive thinner wipe the display or panel, so as to avoid the display or panel damage, blurred, the screen disappeared and so on.
- Please follow the instruction to use the machine, the damage caused by illegal operation is not covered by the warranty.
The machine display screen you see may be inconsistent with the picture of the manual, which is due to the unannounced software upgrade and update, does not affect the normal use. Some function(DVD, color LED, TV, etc) is optional. The device which you purchase may not includes all the functions that this manual listed.
Basic Operation
Definition of the keys
| Name | Functional description | |
| 1 | When device is working, press and hold about 1 second to power off the system; Short press to mute. | |
| 2 | MAP | Map card slot |
| 3 | MENU | Press to turn to home page |
| 4 | RETURN | Return to the previous interface |
| 5 | NAVI | Display navigation interface |
| 6 | RADIO | Display radio interface |
| 7 | Volume up Volume down | |
| 8 | USB | USB slot |
| 9 | Disc insert/eject | |
| 10 | SD | SD slot |
| 11 | Reset(RST/RES) | When the machine is not working properly, press this button and the machine will return to the factory settings. |
| 12 | Phone | Display the Bluetooth phone screen |
| 13 | DVD | Display the DVD interface |
| 14 | Video | Play videos from an SD card or USB device |
| 15 | Music | Play music from an SD card or USB device |
| 16 | Seek
|
|
| 17 | Mute | Turn off sound , button for muting |
| 18 | Disc insert solt | Insert the disc into the slot |
Note: This table summarizes the definition of most of the panel buttons , but not every model contains all the keys , some of The model contains only a small number of keys , Which does not affect the use, if you have questions, please consult the dealer.
Open the system(manually)
Long press the power button ![]() 3 seconds , activate the system .
3 seconds , activate the system .
Turn off the system(manually)
When the system is on , long press the power button ![]() 3 seconds to turn off the system .
3 seconds to turn off the system .
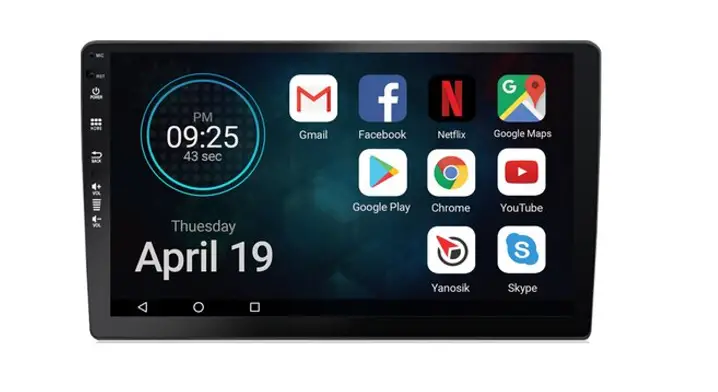
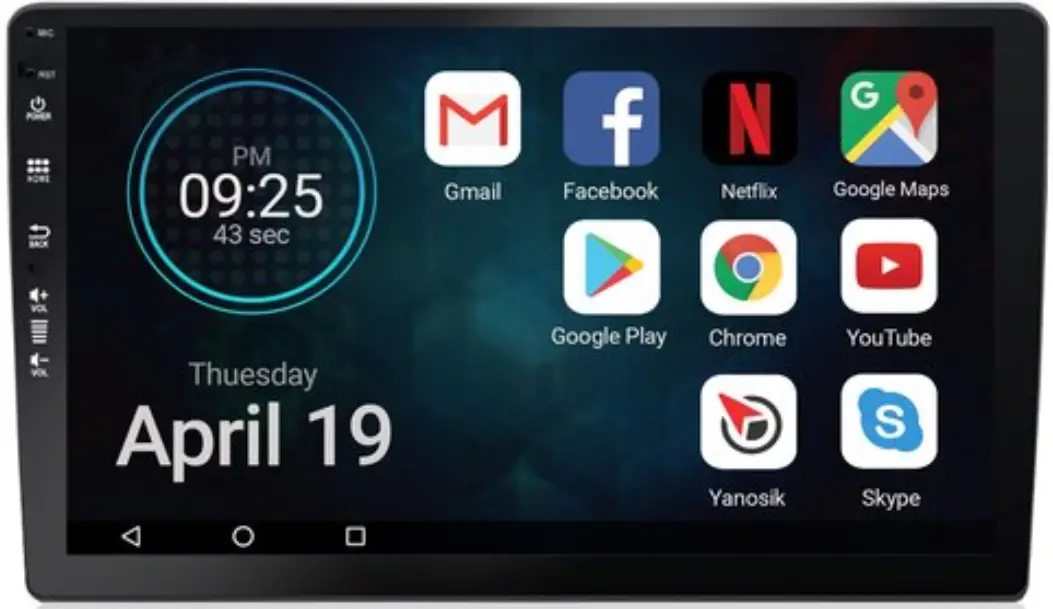
Time and date settings
- Press the button
 , Press the Setup icon
 , select Date & Time As shown in the following two days, choose one.
Adjust the date and time manually
- Touch the < Automatic date & Time> and the <Automatic time zone > to remove the check.
- Touch<Set date>, adjust the date , and touch done.
- Touch<Set time>, adjust the time and touch done.
- Touch<Select time zone>, select a time zone.
- Press the
 button
 button
Start Logo Setup
Touch the , and touch the ES File Explorer
 ![]() , Select your car logo from the USB or SD device. (The image of car logo must be BMP format, click the upper right corner, select Set As Boot logo
, Select your car logo from the USB or SD device. (The image of car logo must be BMP format, click the upper right corner, select Set As Boot logo
Language Setup
Touch the , and touch the , touch “Language & input”, touch Language, select the language, and pull it on top, then press the
 ![]() button.
button.
Steering Wheel Control Setup
Click into key function learning:
- Select the function you need.
- Click your key on the steering wheel.
- Repeat step A and B to set other Keys.
- Press
 to end.
Remark: if you need to reset the keys, click![]() then you can set again.
then you can set again.
Map Installation
- Copy the Navi file to SD card and put the SD card to the GPS slot.
- Touch the , and select the ES File Explorer

- Touch SD, and select the extsd1.
- Select the Navi File, and touch the file with suffix name”.apk” and install.
Navi Shortcut
- GPS Shortcut on the front panel setting
Touch the , and touch the , touch “General”, touch “Navi Application Setting”, choose the Navi software you prefer. - Navi shortcut on the Home Screen
Touch the , and press the Navi software like “Google maps” and drag it to the Navi key on the Home Screen.
Colorful lights set( If the stereo supports)
Press the button , then press the colorful lights, choose your favorite color, the car’s key light color changes.
Network Setup
Wi-Fi Setup
Connect to Wi-Fi access
Touch the Touch the “Settings” touch Wi-fi turn on the Wifi select network type password connect
Connect to Wi-Fi hot sopt
Touch the Touch the “Settings” touch More Tethering & portable hotspot Set up Wi-Fi hotspot enter the Security code Touch Save
3G/4G Dongle Setup
- Connect the 3G/4G dongle to the USB slot on the back
- The system will automatically recognize the 3G/4G dongle and connect
- It connects when the icon displays on the status bar as picture below.
Note: for the 3G/4G dongle, please buy from the dealer to make sure the 3G/4G dongle works with the unit.
Widget and Application Operation
Install and Uninstall APPS
Install APPS
- Online install:
Connect internet open the browser google.com enter Android market download the APK file click NEXT to install - USB/SD install:
Download the APK file to the USB connect USB touch the ES File Explorer touch the local choose USB file select the APK touch to install
Uninstall APPS
- Touch the touch the “Settings” touch the Apps select and touch the APP touch un install touch OK uninstall finished.
- Touch and hold the APP icon till the and the shows and drag the APP to the trash touch OK uninstall finished
Note: The means you can drag the APP to it and uninstall it. If only the displays, it means you can not uninstall the APP, it comes with the system, you can stop use it, nut not uninstall it or delete it.
Radio Operation
Radio Basic Operation
- Select the FM1, FM2, FM3,AM1 or AM2 band
- Frequency display
Switches to previous frequency manually.
Switches to next frequency manually. - Displays the preset channel list, hold the key(P1-P6) to store the current broadcast frequency.
- Multi function menu
Tunes in a station with good reception automatically. Short touch for non stop seek tuning, touch again to cancel Long touch for switching the preset channels, long touch again to cancel. Change between Locate and DX mode. Press to see more functions. Touch to active the RDS function EQ and FAB setting, please see the EQ and FAB setting below. - Mono and DX
Displays LOC or DX. Displays Mono or Stereo, decided by the radio IC.
| TP | Shows the traffic station is on or not |
| AF | Touch AF to light up, RDS can switch to stronger signal frequency when the current frequency is weak ,but keep the contents same, only frequency different. |
| TA | Touch TA to light up, it can source the traffic into every minute, and stops to broadcast the traffic info once news come in. |
| PTY | Touch PTY to search by type |
Stores Channel
- Press the P1 key and hold to the current channel to P1 key.
- Press the P2 key and hold, then store the current channel to P2 key. If P3,then to P3 key etc.
Set up
General settings
Radio area: set general settings radio area
Button sound: set general settings button sound on/off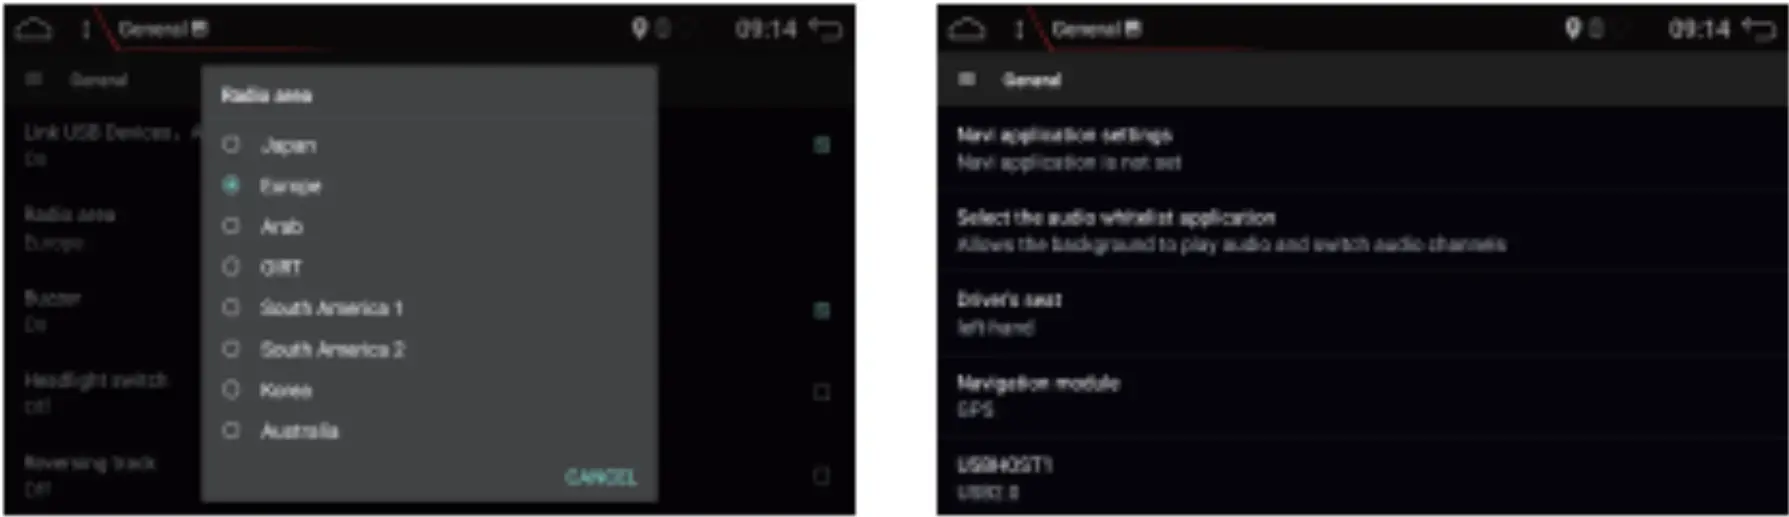
Display
Screen brightness: settings display brightness adjust the brightness confirm Backup and reset Backup the files and reset the system. Set up Backup and reset reset Restore the factory settings
About device
- Setting about device
- Enter the device interface you can view the version, host memory.
Bluetooth Control
Connecting
Rsgisting your bluetooth device
- Active the Bluetooth on your phone
- Touch search to search the Bluetooth waiting for pairing
- Touch the Bluetooth Device name(JJ or other) for connecting
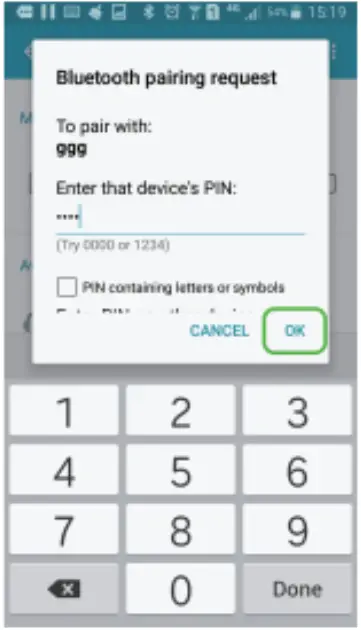
- Type the pin code(default code is 0000 or 1234) on your phone
Connecting a registered bluetooth manually
- Active the Bluetooth on your phone
- Touch the to see the registered Bluetooth device list
- Kick the box of the Bluetooth device name to connect
- Type the pin code(default code is 0000 or 1234) on your phone
Delete a registered device
- Touch the to see the registered Bluetooth device list
- Cross the box of the device name
- Touch the cross, and it tips “Do you want to unpair the Device?”
- Touch Ok the device deleted
Hands-Free Call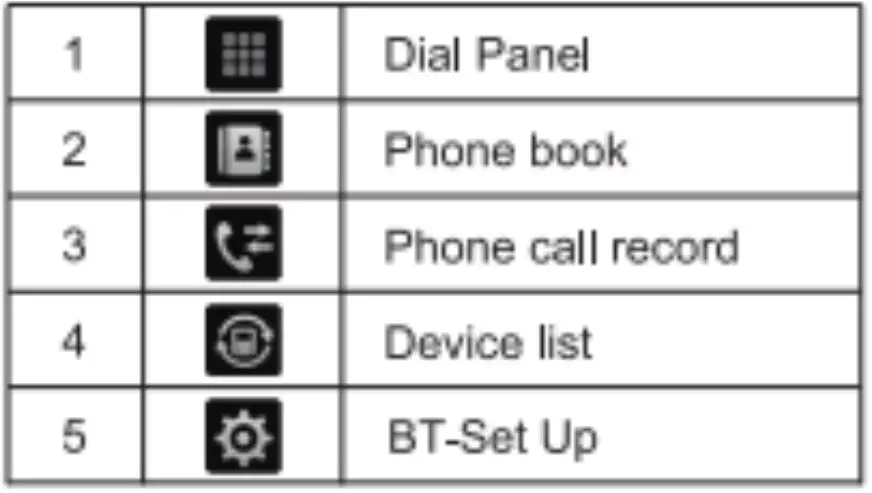
Phone cal
Touch the type the phone number, and click
  phone call success as screen below. cancel the phone call by touch the
  and touch the
 to switch to speaker.
Bluetooth Setup
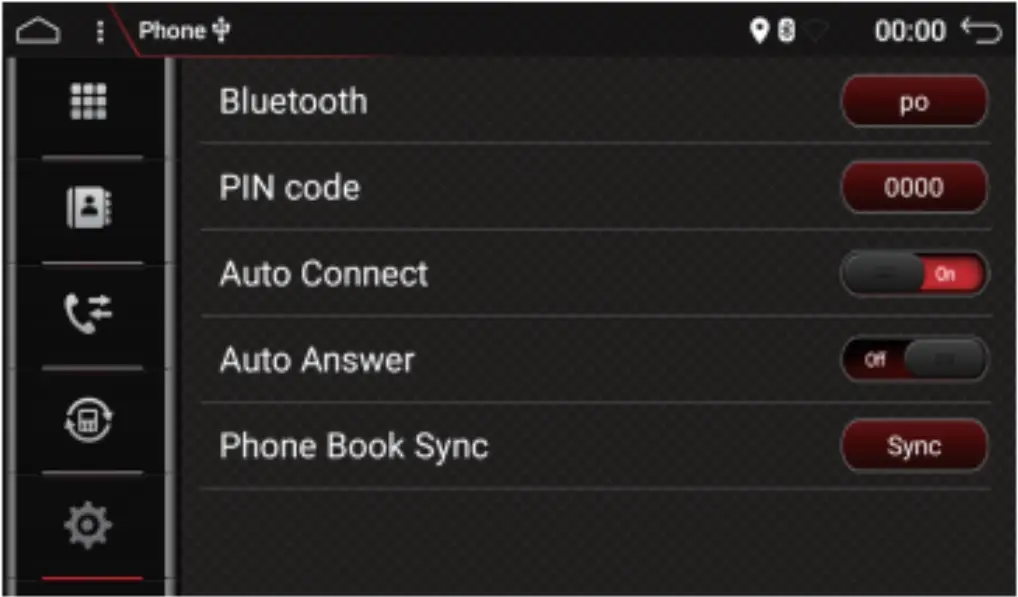
- Touch the Bluetooth to change the Name
- Touch the PIN code to change the PIN code
Playing Bluetooth Audio Device
Click into BT music and play music of the device oonnected by BT
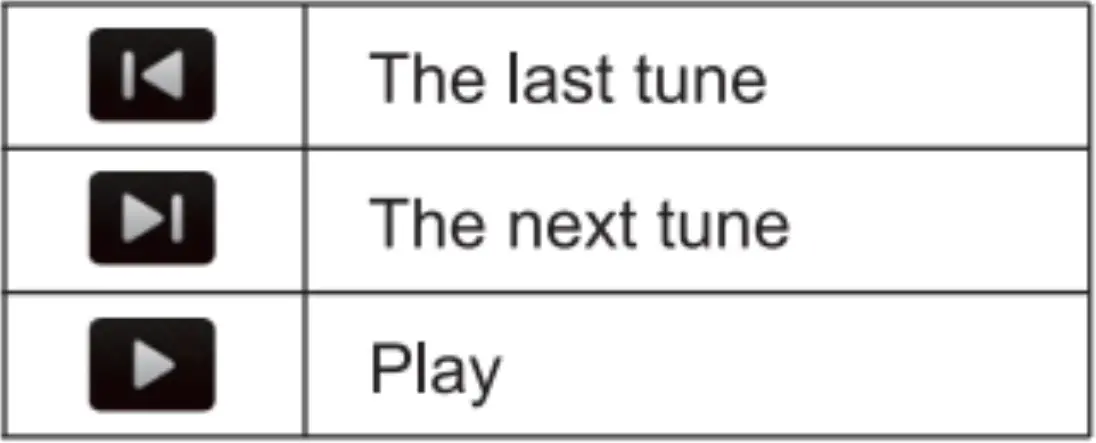
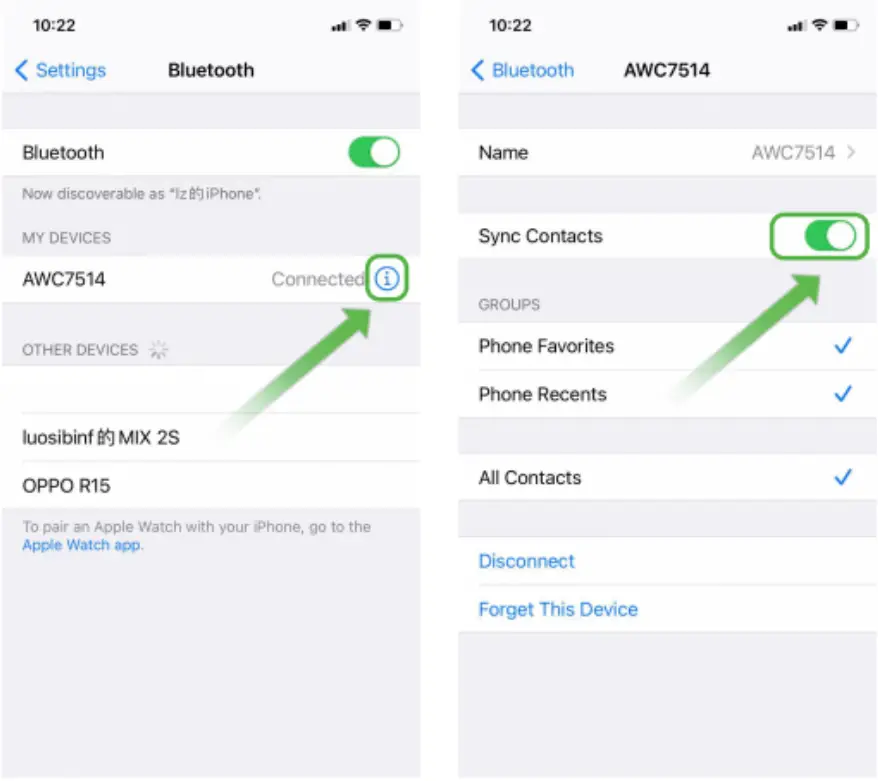
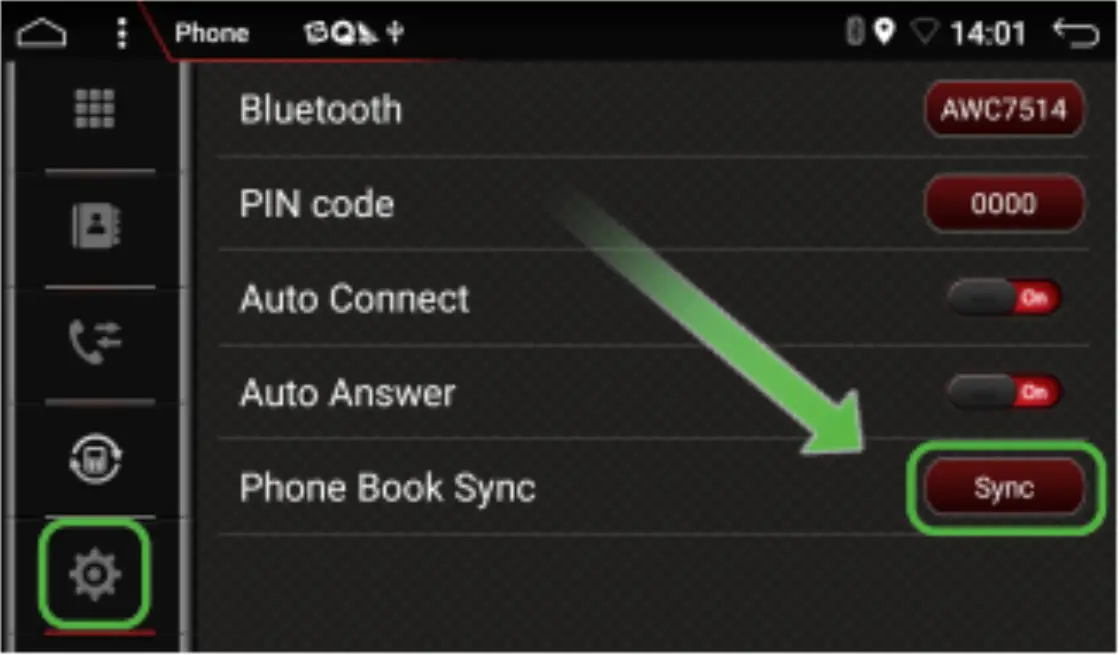
Bluetooth Sync Contacts
- Open Phone Bluetooth and connect the stereo(name beginning with AWC),then Sync Contacts Button
- Turn on Bluetooth Setting on stereo also and click the Sync button


Rear Camera
Note: The reverse cable(pink color) of the power cable must be connected to the car’s parking or reversing wire, then parking or reversing. the parking screen will automatically display.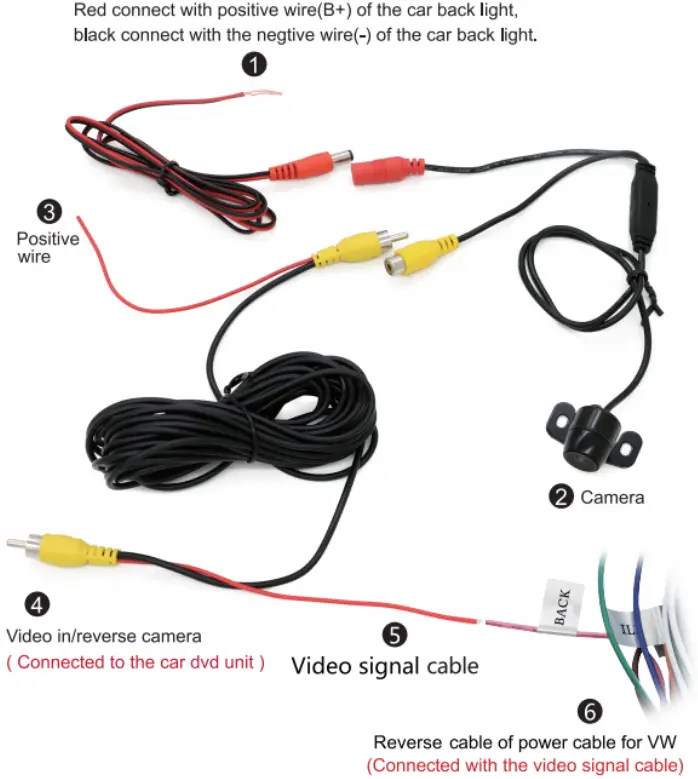 Note: For Car Navigation for Volkswagen(VW) with CANBUS, the video signal cable(5 red color) must be connected to the Reverse cable of the power cable. For other models no need to connect the video signal cable to reverse cable
Mirror Link
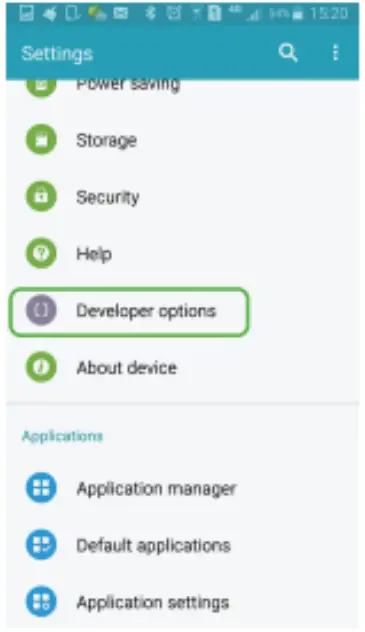
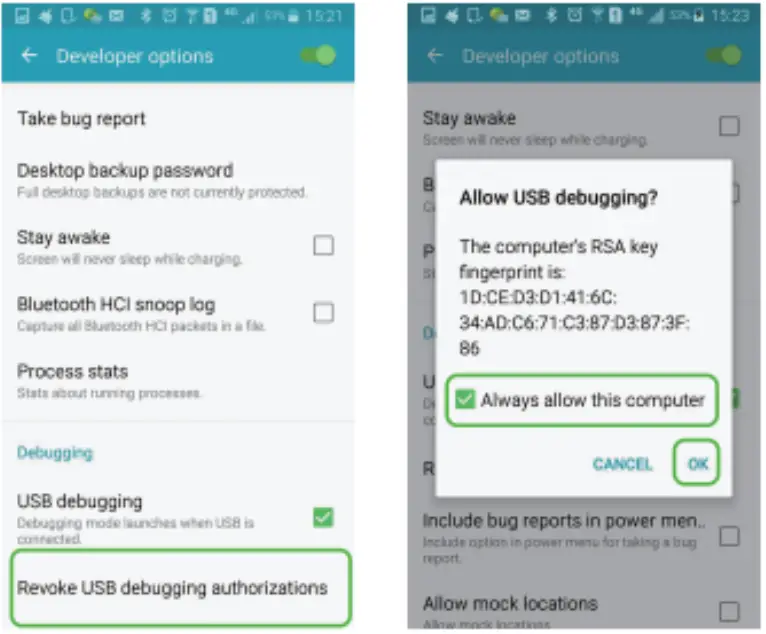
Note: For android mobile, the USB debugging must be turned on for mirror link function.
And the mirror link not support all android phone, and only support the android mobile that with the USB debugging.
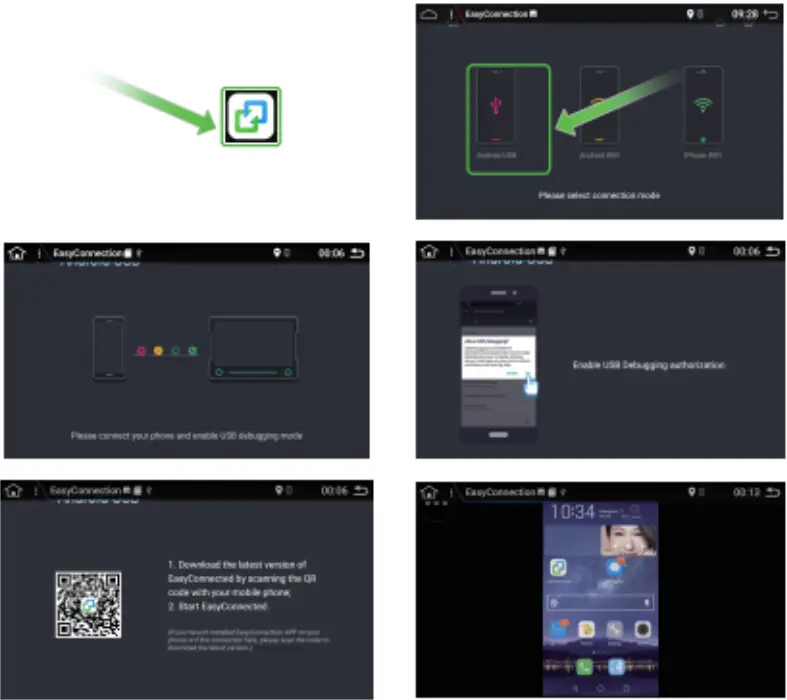
Android USB connect
Find the developer options of the mobile turn on the USB Debugging turn on the BT of the mobile connect to the BT to the Unit BT connected Touch the easy connect Select the connecting method 9Connected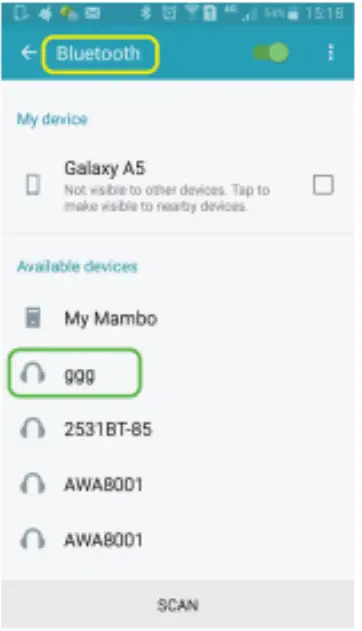
 Android WIFI
Uch the easy connect Select the connecting method connected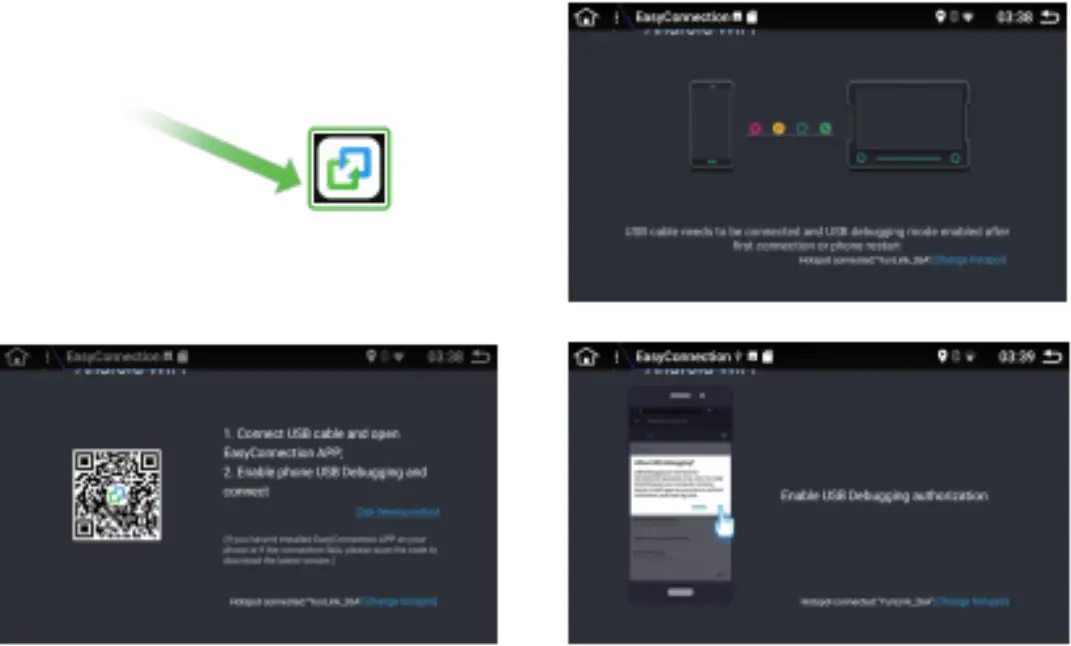
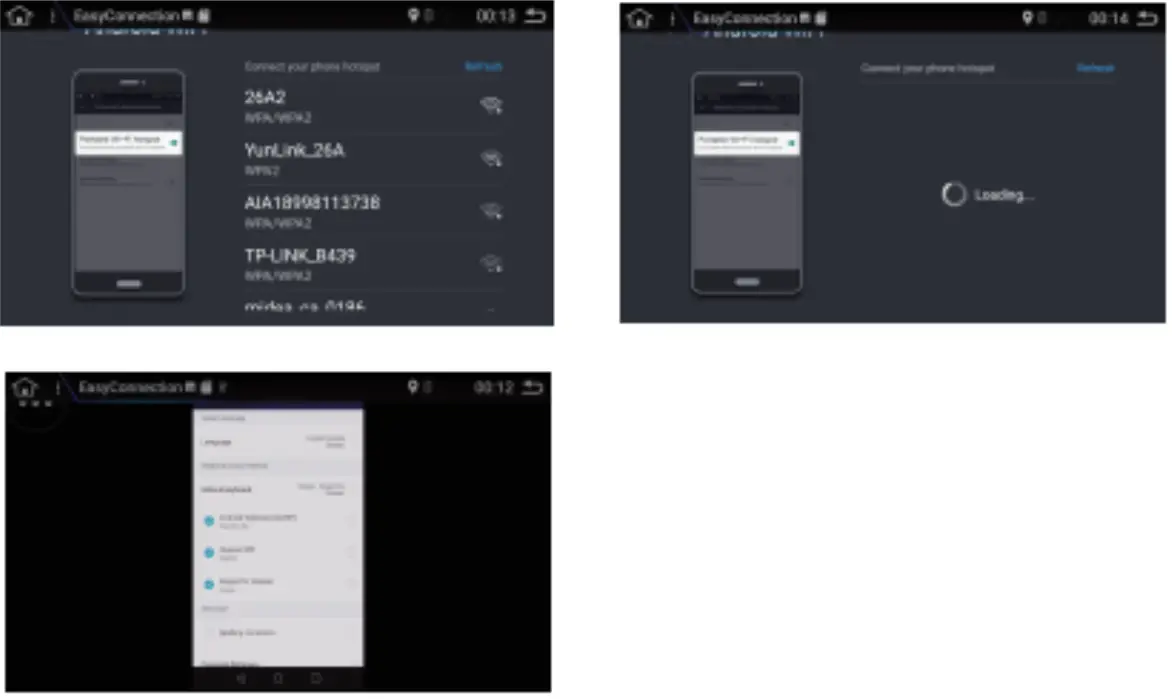
Iphone WIFI connect
Touch the easy connect select the connecting method connected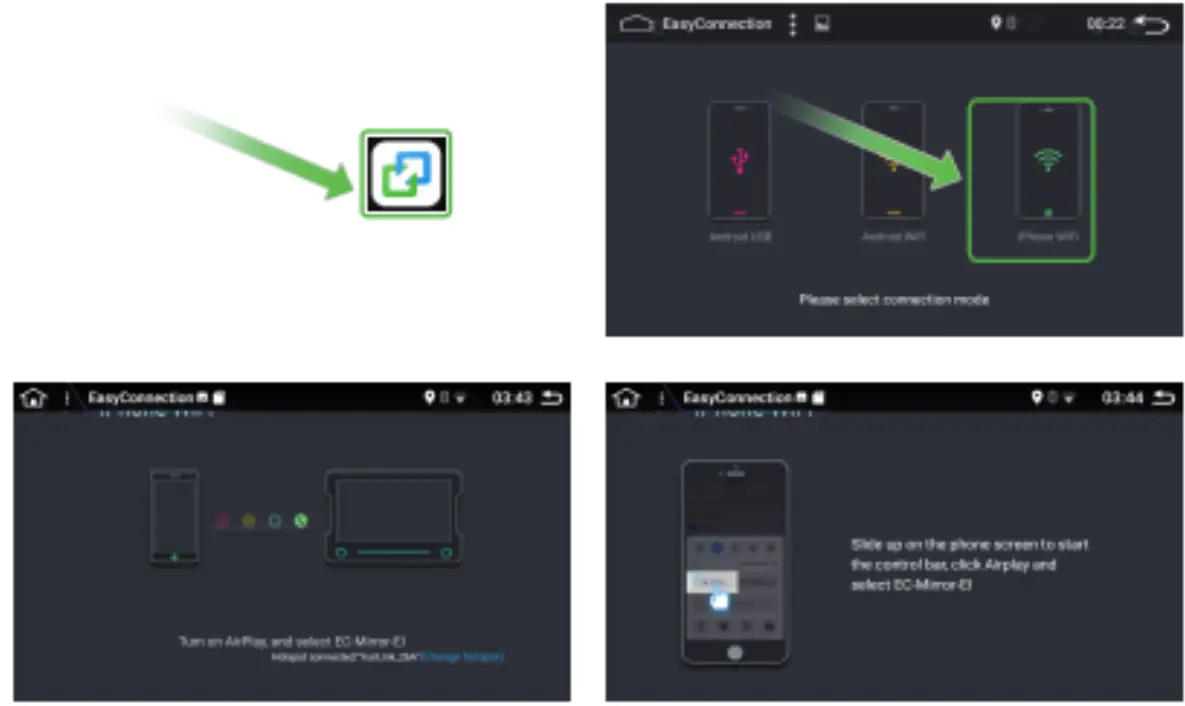
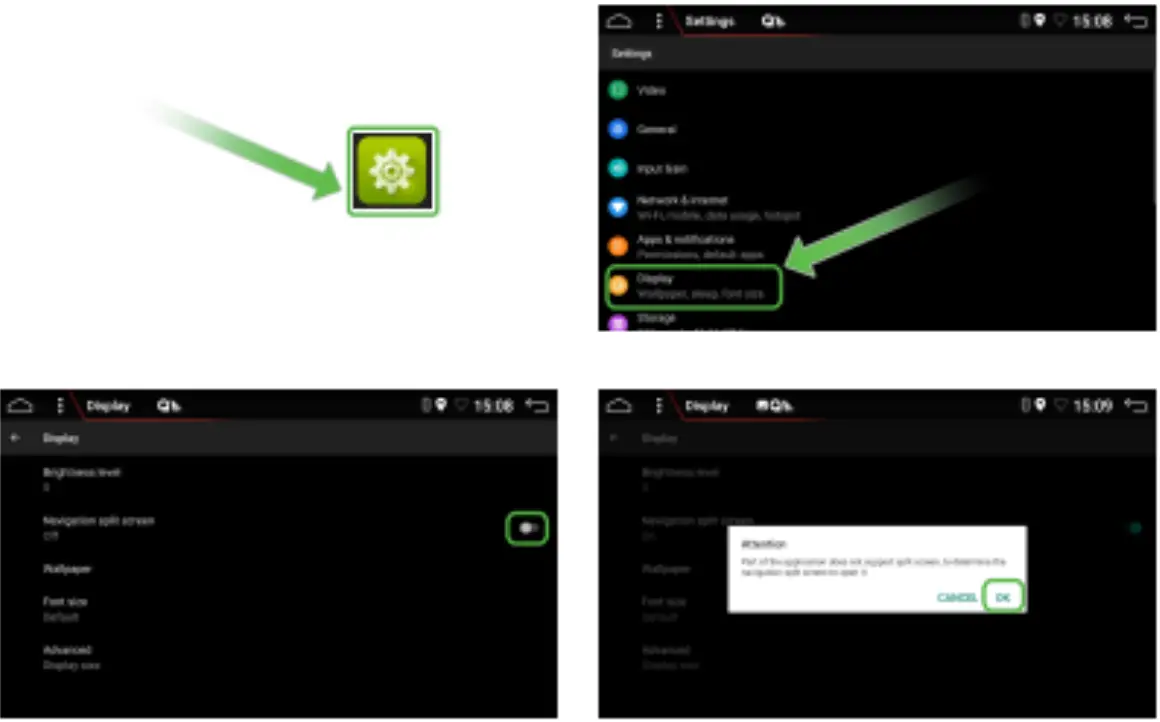
Split screen
- Press the setup icon
 select display select navigation split screen Open the button
  The dialog box select Ok
 - Press the Navigation icon
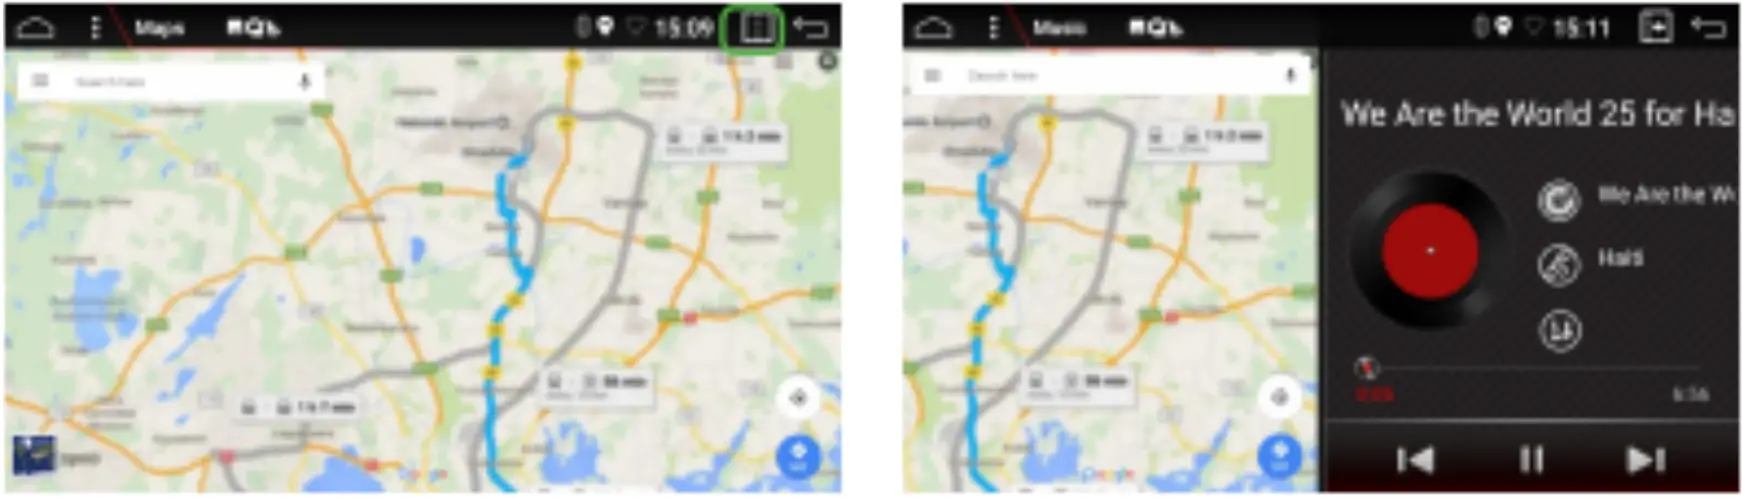
 Press the Split screen icon


 Press the Split screen icon
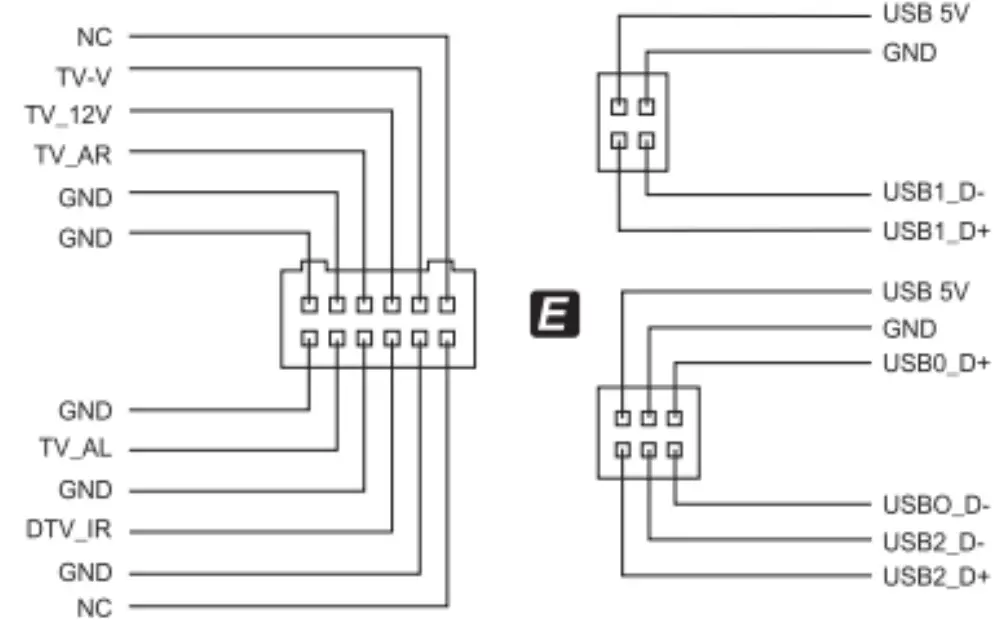
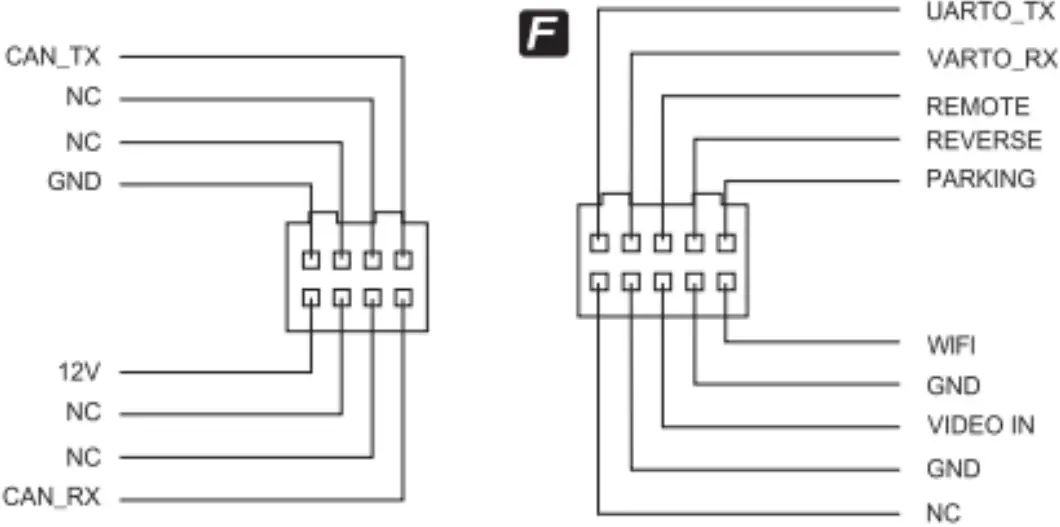
Wiring Diagram
Diagram of power cable and RCA cable
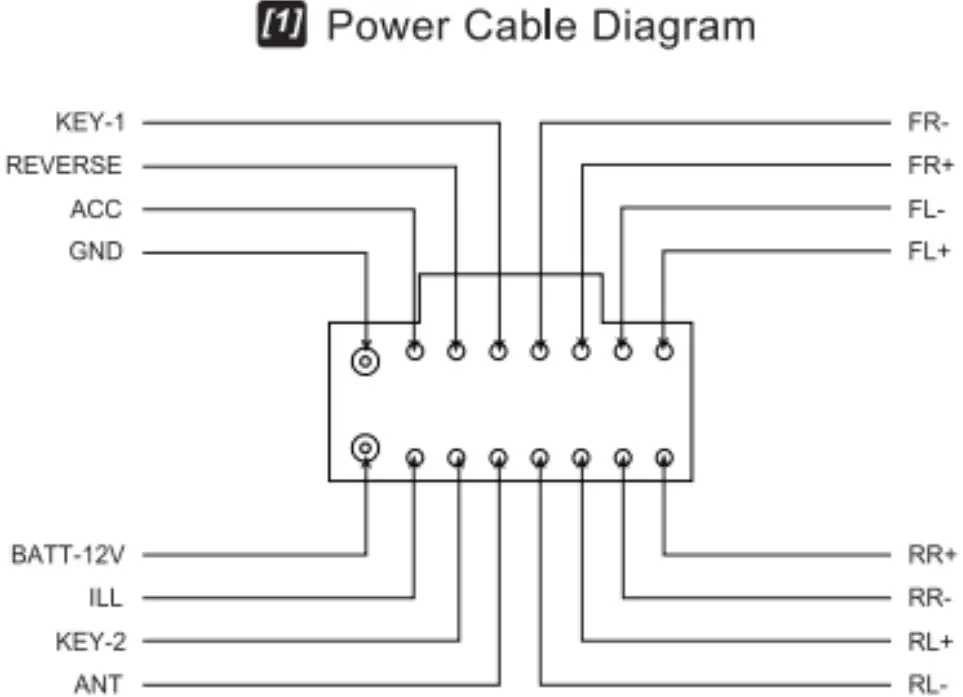
Note: only work within DC 10.5V-16V power FM 87.5-108.OMHz Speaker prohibit grounding!
AM 522KHz-1620KHz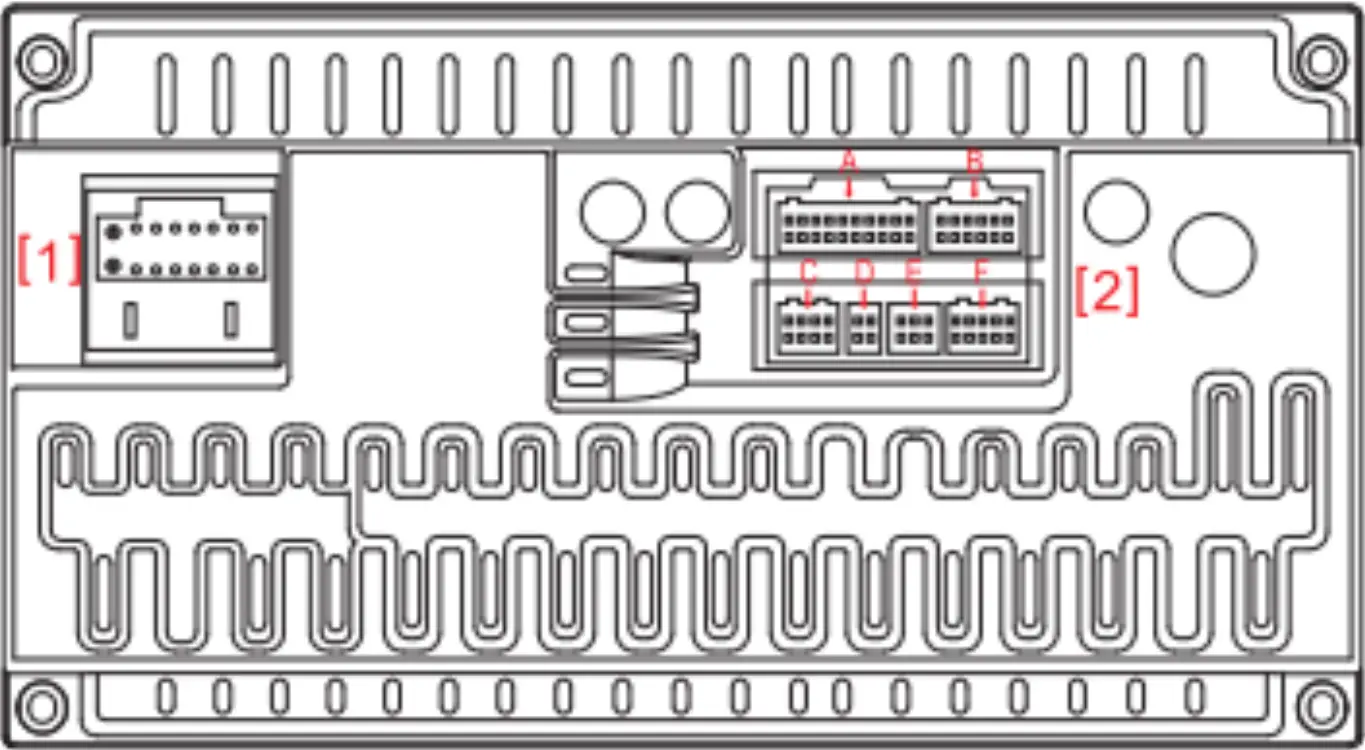
 [2] RCA output socket
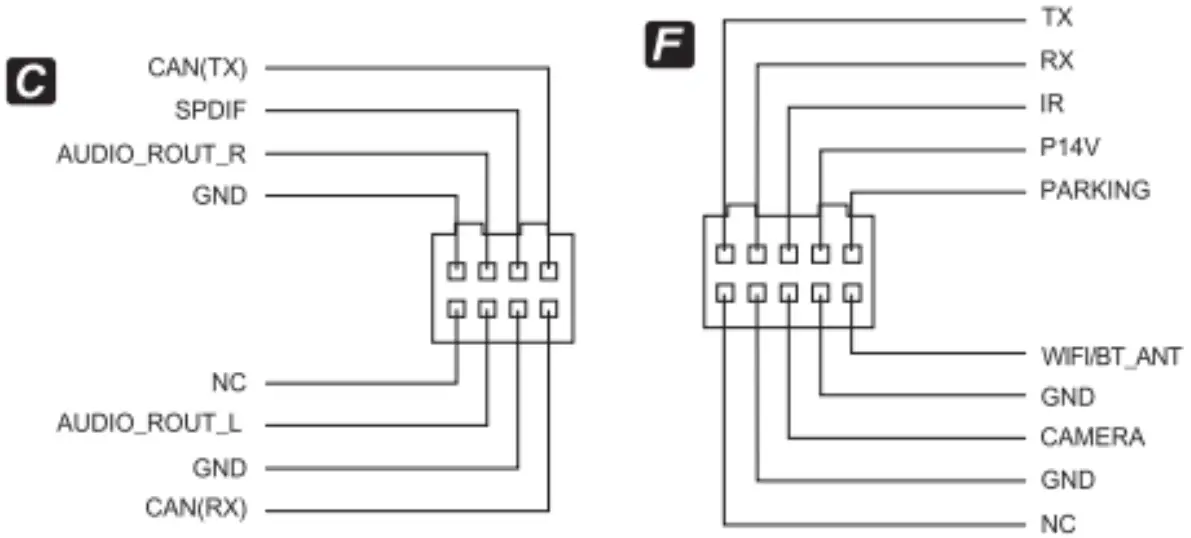 Diagram of power cable and RCA cable
Note: only work within DC 10.5V-16V power FM 87.5~108.0MHz Speaker prohibit grounding!
AM 522KHz~1620KHz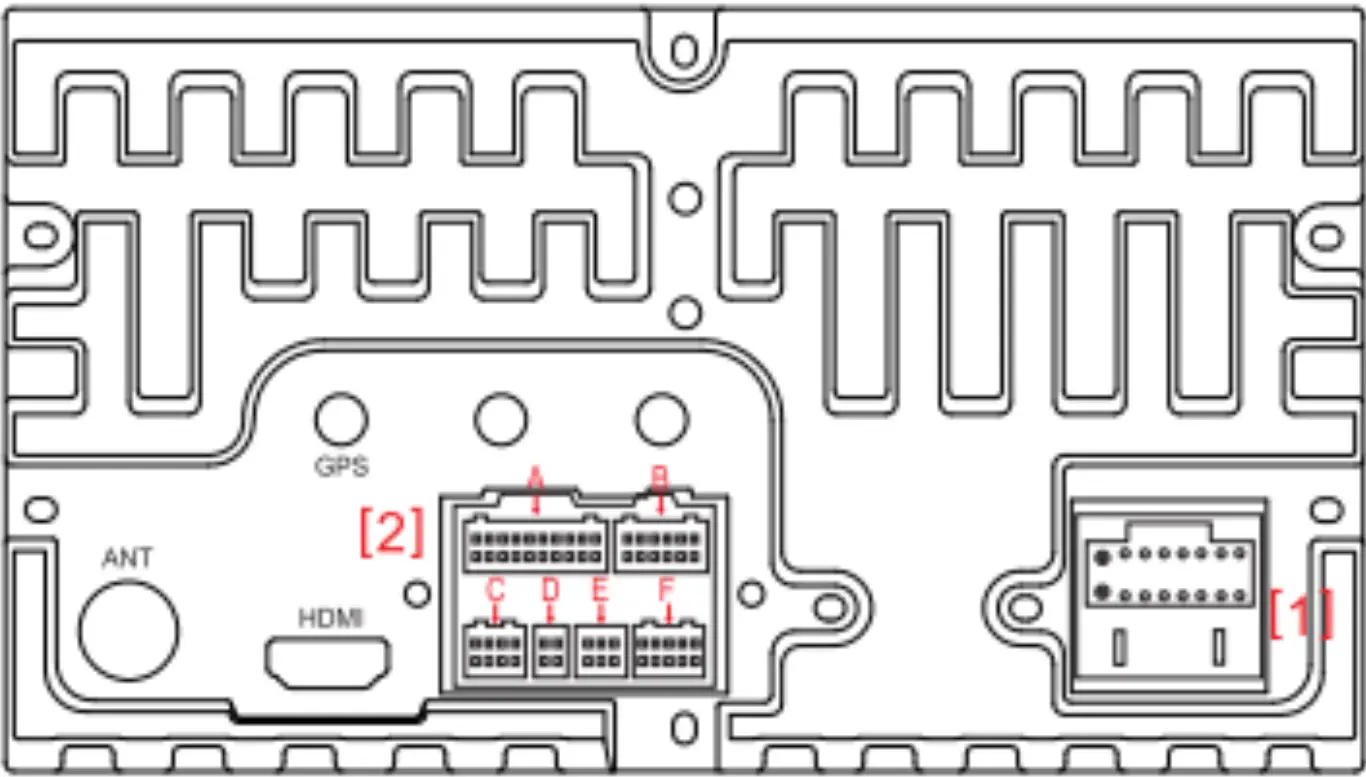
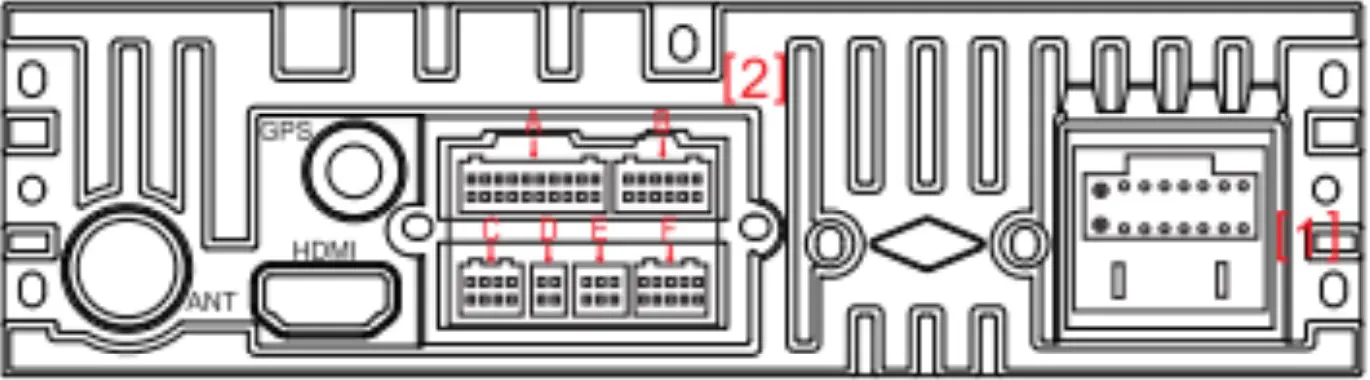 [1] Power cable Diagram
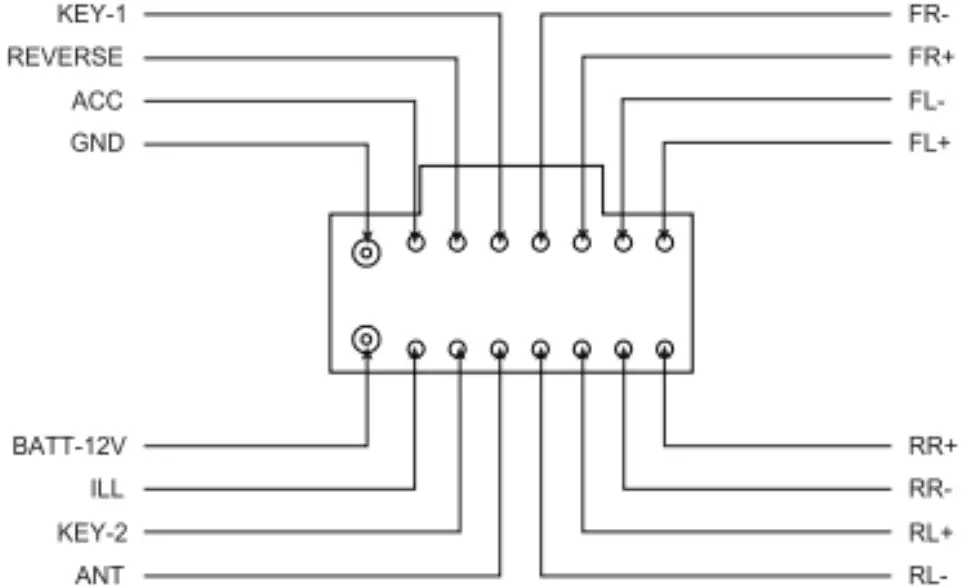 [2] RCA output socket
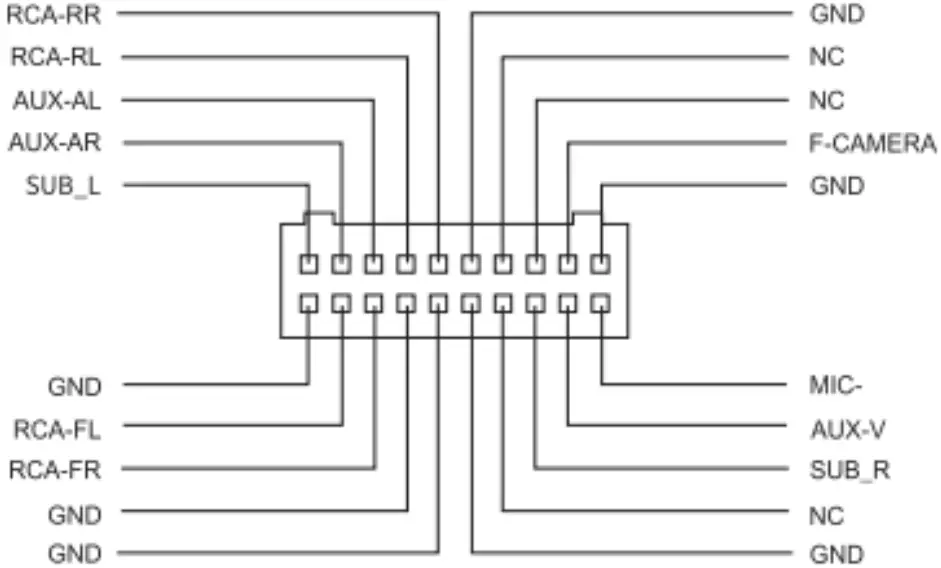
Troubleshooting
| malfunction | Solution |
| Cannot power up | Check the connection of ACC,B +, Ground.
|
| Can not read discs | Remove the screws |
| No image when reversing | Connect the car DVD’s reversing line with the car’s reversing line, to ensure the reverse camera workable. |
| Navigation doesn’t work |
If well connected, make sure the GPS antenna is exposed to the air. If still not working, please replace a new antenna. |
| The key light does not light |
|


