 SAMSUNG BN68 LED TV 6300
Important Instructions
- The slots and openings in the cabinet and in the back or bottom are provided for necessary ventilation. To ensure reliable operation of this apparatus, and to protect it from overheating, these slots and openings must never be blocked or covered.
- Do not place this apparatus in a confined space, such as a bookcase, or built-in cabinet, unless proper ventilation is provided.
- Do not place this apparatus near or over a radiator or heat register, or where it is exposed to direct sunlight.
- Do not place vessels (vases etc.) containing water on this apparatus, as this can result in a fire or electric shock.
- Do not expose this apparatus to rain or place it near water (near a bathtub, washbowl, kitchen sink, or laundry tub, in a wet basement, or near a swimming pool etc.). If this apparatus accidentally gets wet, unplug it and contact an authorized dealer immediately.
- This apparatus uses batteries. In your community, there might be environmental regulations that require you to dispose of these batteries properly. Please contact your local authorities for disposal or recycling information.
- Do not overload wall outlets, extension cords or adaptors beyond their capacity, since this can result in fire or electric shock.
- Power-supply cords should be placed so that they are not likely to be walked on or pinched by items placed upon or against them. Pay particular attention to cords at the plug end, at wall outlets, and the point where they exit from the appliance.
- To protect this apparatus from a lightning storm, or when it is left unattended and unused for long periods of time, unplug it from the wall outlet and disconnect the antenna or cable system. Tllis will prevent damage to the set due to lightning and power line surges.
- Before connecting the AC power cord to the DC adaptor outlet, make sure the voltage designation of the DC adaptor corresponds to the local electrical supply.
- Never insert anything metallic into the open parts of this apparatus. Doing so may create a danger of electric shock.
- To avoid electric shock, never touch the inside of this apparatus. Only a qualified technician should open this apparatus.
- Make sure to plug the power cord in until it is fiITTlly seated. When unplugging the power cord from a wall outlet, always pull on the power cord’s plug. Never unplug by pulling on the power cord. Do not touch the power cord with wet hands.
- If this apparatus does not operate normally – in particular, if there are any unusual sounds or smells coming from it – unplug it immediately and contact an authorized dealer or service center.
- Be sure to pull the power plug out of the outlet if the TV is to remain unused or if you are to leave the house for an extended period of time (especially when children, elderly or disabled people will be left alone in the house).
- Accumulated dust can cause an electric shock, an electric leakage or a fire by causing the power cord to generate sparks and heat or the insulation to deteriorate.
- Be sure to contact an authorized service center for information if you intend to install your TV in a location with heavy dust, high or low temperatures, high humidity, chemical substances, or where it will operate 24 hours a day such in an airport, a train station, etc. Failing to do so may lead to serious damage of your TV.
- Use only a properly grounded plug and wall outlet.
- An improper ground may cause electric shock or equipment damage. (Class I Equipment only .)
- To turn this apparatus off completely, you must disconnect it from the wall outlet. Consequently, the wall outlet and power plug must be readily accessible at all times.
- Do not allow children to hang onto the product.
- Store the accessories (battery, etc.) in a location safely out of the reach of children.
- Do not install the product in an unstable location such as a shaky self, a slanted floor or a location exposed to vibration.
- Do not drop or apply any shock to the product. If the product is damaged, disconnect the power cord and contact a service center.
- To clean this apparatus, unplug the power cord from the wall outlet and wipe the product using a soft, dry cloth. Do not use any chemicals such as wax, benzene, alcohol, thinners, insecticide, air fresheners , lubricants, or detergent. These chemicals can damage the appearance of the TV or erase the printing on the product.
- Do not expose this apparatus to dripping or splashing.
- Do not dispose of batteries in fire.
- Do not short-circuit, disassemble or overheat the batteries.
- There is danger of an explosion if you replace the batteries used in the remote with the wrong type of battery. Replace only with the same or equivalent type.
WARNING – TO PREVENT THE SPREAD OF FIRE, KEEP CANDLES OR OTHER OPEN FLAMES AWAY FROM THIS PRODUCT AT ALL TIMES.
Features of your new TV
SMART HUB:
- This TV features Smart Hub, a multi-purpose entertainment and family center. With Smart Hub, you can surf the web, download applications, and stay in touch with family and friends through social networking services.
- In addition, you can view or play photo, video, and music files stored on external storage devices.
- Press ® to launch Smart Hub. Choose a service using the icons displayed in the top part of the screen.
- Smart Hub services and functionality include:
- Social: Watch the latest YouTube videos and you and your friends’ video posts on Facebook and
- Twitter. You can also make video calls to friends by connecting the TV to a camera (sold separatel y).
- Apps: Samsung Apps offers an extensive collection of free and paid news, sports, weather, and gaming content you can directly download to and enjoy on your TV.
- On TV: Check a listing of programs that are currently airing or are scheduled to air.
- Movies & TV Shows: Purchase and watch movies and series without a separate external device.
- Photos, Videos & Music: Play back photo, video, and music files from an external storage device .
- Anynet+ (HDMI-CEC) : This allows you to control all connected Samsung devices that support Anynet+ with your Samsung TV’s remote.
- e-Manual: Provides a detailed , on-screen user’s manual built into your TV.
- SMART Interaction: Using this function, you can access and control menu options and functions using motions.
- To use the Smart Interaction Feature, connect the SMART TV camera (sold separately) to your TV.
- Device Manager: Use the TV features with a USS keyboard and mouse .
- Screen Mirroring: Displays mobile device screens on your TV using a wireless connection
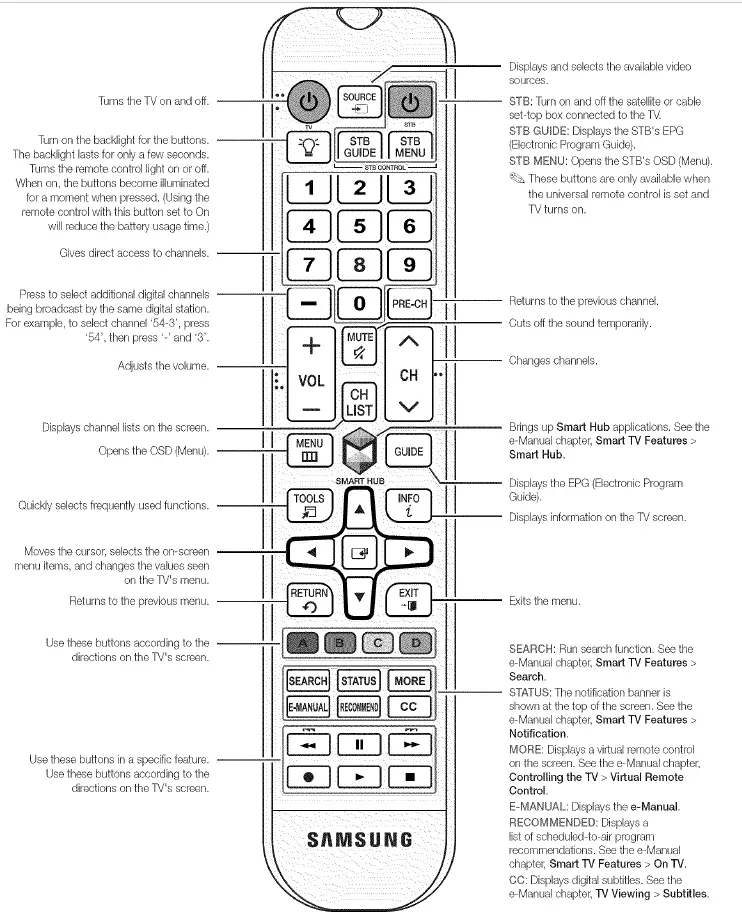
Using the Remote Control
Inserting the Batteries (AAA X 2)
Match the polarity of the batteries to the symbols in the battery compartment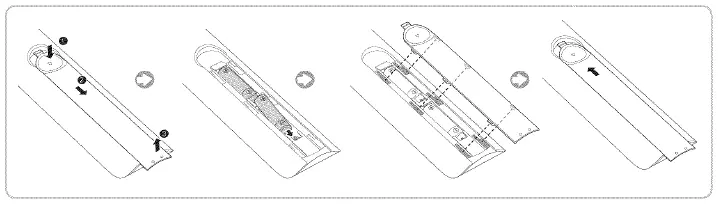
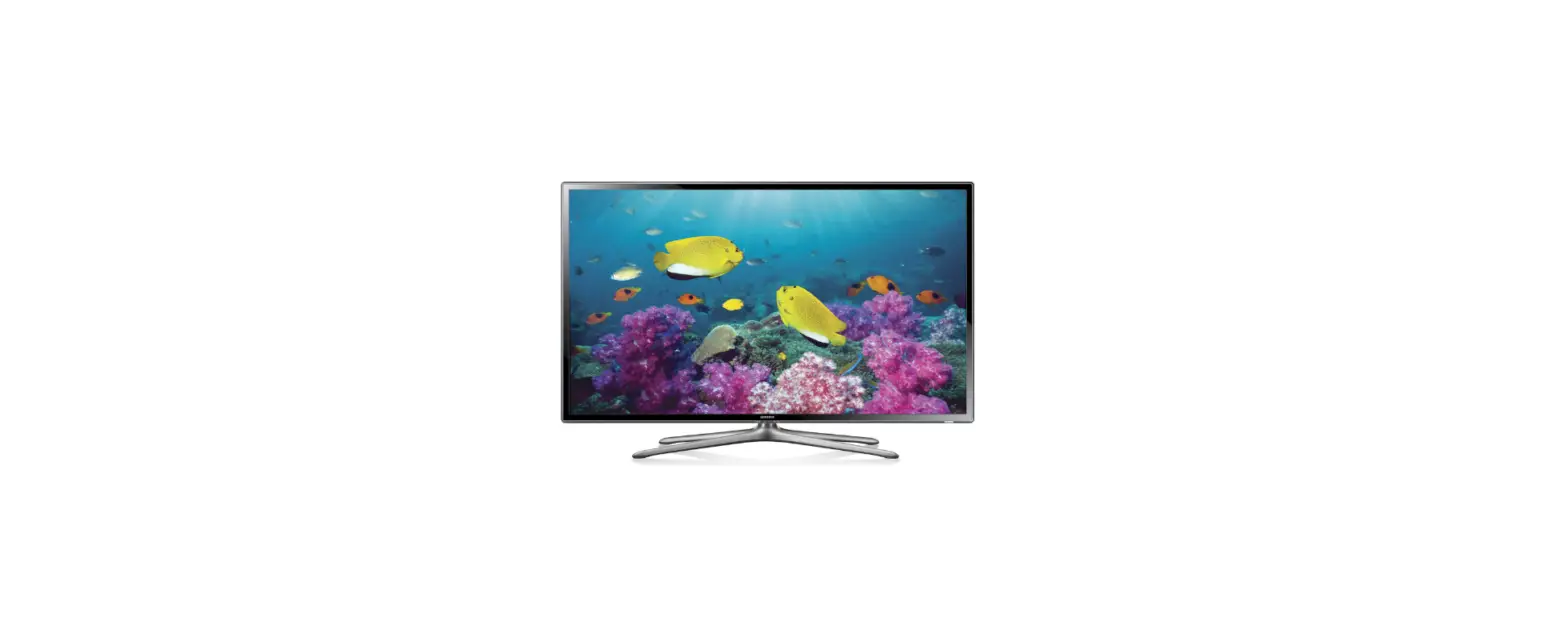
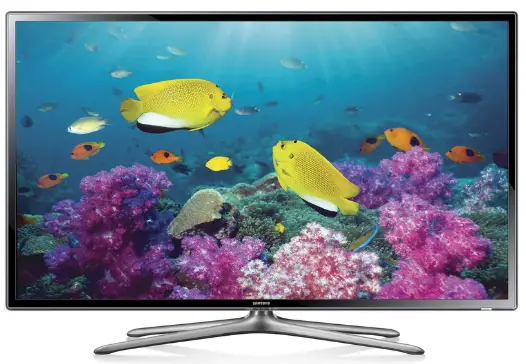
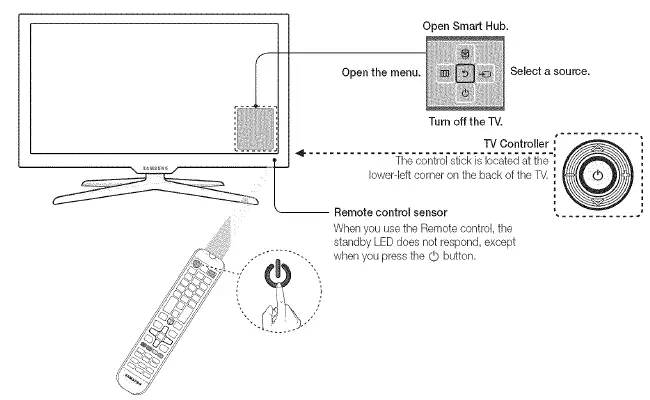
Turning on the TV
- Turn on the TV using the
 ) button on the remote control or TV panel.
 - The product color and shape may vary depending on the model.
- The first time you turn on your TV, it will immediately start the initial setup.
- The TV’s Controll er, a small joy stick like button on the rear right side of the TV, lets you control the TV without the remote control.

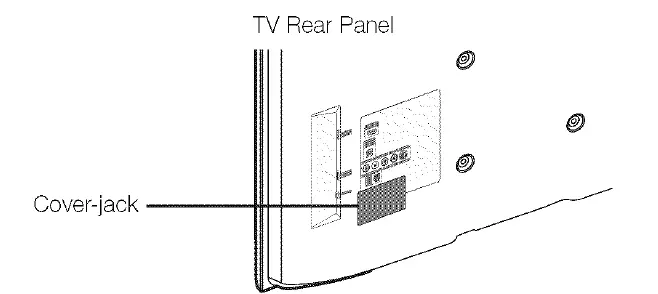
Caution of the cover-jack
- The cover-jack is for use by qualified service personnel only.
- To reduce the risk of electric shock or fire hazard, do not use the cover jack, unless you are qualified to do so.

Switching Between Video Sources
- Press the SOURCE button to switch between devices connected to the TV.
- For example, to switch to a game console connected to the second HDMI connector, press SOURCE button.
- From the Source list, select HDMl2. The connector names may vary depending on the product.
- Select Tools at the upper-right corner of the source screen to access the following functions.
- Edit Name: Lets you associate a device name to an input source.
You can select the following device names in the Edit Name option:
- VCR / DVD / Cable STB / Satellite STB / PVR STB / AV Receiver / Game / Camcorder / PC / DVI
- PC / DVI Devices / TV/ IPTV / Blu-ray / HD DVD / DMA
To associate a device name to an input source follow these steps:
- Select Tools in the upper right corner of the source screen.
- Select Edit Name.
- Find the input source you want in the Source list (HDMli , HDM12 , Component , etc .).
- Select the blank field next to the input.
- In the device name list that appears, select the name of the device attached to the input.
- When you view the Source list, the device name and the input jack will be displayed together.
- If you have connected a PC to the HDMI IN 4 (DVI) port with an HDMI cable, select PC from the device name list.
- If you have connected a PC to the HDMI IN 4 (DVI) port with an HDMI to DVI cable, select DVI PC from the device name list.
- If you connected an AV device to the HDMI IN 4 (DVI) port with an HDMI to DVI cable, select DVI
Devices from the device name list.
- Information: View detailed information about the connected devices.
- Refresh: Select if a connected device does not appear in the list.
- If the list does not show the device after selecting Refresh, check the status of the TV-to-device connection.
- Remove USB: Remove the USB device from the list safely. This function is only available when the
USB device selected.
Universal Remote Setup: Use to configure universal remote control settings. Using the universal remote control, you can control external devices connected to the TV, such as a set-top box, Blu-ray player, and AV receiver.
Universal Remote Control Setup
This TV has a universal remote control feature that lets you control cable boxes, Blu-ray players, home theaters, and other thi rd -party external devices connected to the TV using the TV’s remote control.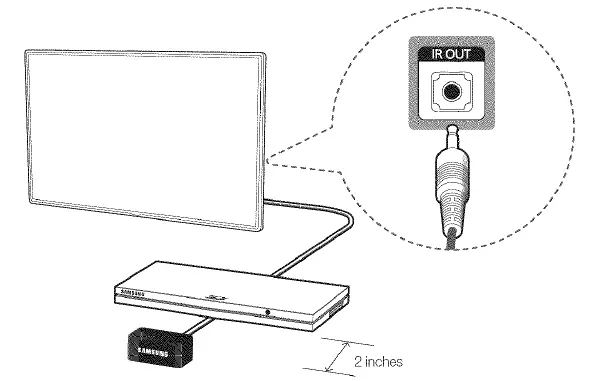
Add the External Device
- Turn on the external device you wish to set up universal remote function for and then press SOURCE to bring up the Source screen.
- Select Universal Remote Setup from the top of the screen. This initiates the universal remote setup process.
- Follow the on-screen instruction and set up the universal remote control. If it does not work, set up the remote control by entering the model number manually.
Viewing the e-Manual
The embedded e-manual contains information about your TV’s key features.
Navigate to the screen menu and select e-Manual (Support > e-Manual).
- Select a category from the left side of the screen.
- Select an item. Thee-Manual will open on the page containing the selected information.
- Words in blue refer to screen menu options and words in light blue refer to remote control buttons.
- Arrows are used to indicate the menu path. (Example: Screen Menu > Support > e-Manual)
- Scrolling a Page
- To scroll a page, use of one of the following methods:
- Place the focus on the
 button at the right edge of the screen.
 - Place the focus on the button on the remote.
- Using the Top Icons
- or button at the right edge of the screen.
- or ~ button at the right edge of the screen, press the up or down arrow
- Use the Back, Forward, and Opened pages icons on the top left of the screen to navigate through pages. These icons are available after you have viewed two or more pages.
Returning to the Home Page
- To return to the home page, press the
 button or select
 the top right of the screen.
Searching the Index
- Press the
 button or select
 the page containing the term
Searching Pages
Press the ![]() button or select
button or select ![]() the top right of the screen, and enter search criteria. Select a page from the list of search results to display it.
the top right of the screen, and enter search criteria. Select a page from the list of search results to display it.
Closing the e-Manual
To close thee-Manual, press hold the RETURN button or select X at the upper-right corner of the screen.
Jumping to a Menu Item
To jump directly to the menu item that is described in the current section, select ![]() E-It is possible to jump from a menu item directly to the related section in thee-Manual. On the screen menu, press the E-MANUAL button that appears on the screen. This feature may not be available, depending on the menu.
E-It is possible to jump from a menu item directly to the related section in thee-Manual. On the screen menu, press the E-MANUAL button that appears on the screen. This feature may not be available, depending on the menu.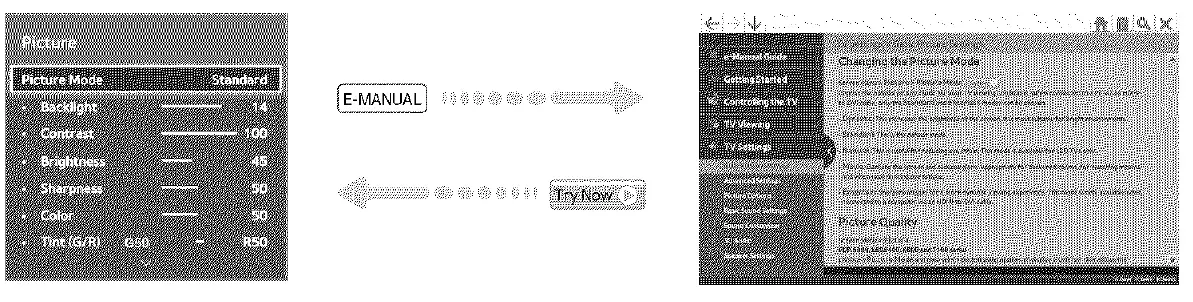
Updating thee-Manual
Press the SMART HUB button on the remote control to display the Smart Hub screen, and then move the
Apps screen.
When the e-Manual needs updating to the latest version, Apps Update window will appear in the Apps screen. Thee-manual can be updated in the same way with an application update. Press the ENTERGJ button on the Apps Update window. Thee-Manual starts updating to the latest version.
Connecting to a Network
Connecting the TV to a network gives you access to online services such as Smart Hub and lets you update the TV’s software online directly from Samsung.com.
Network Connection – Wireless
Connect the TV to the Internet using a standard wireless router or modem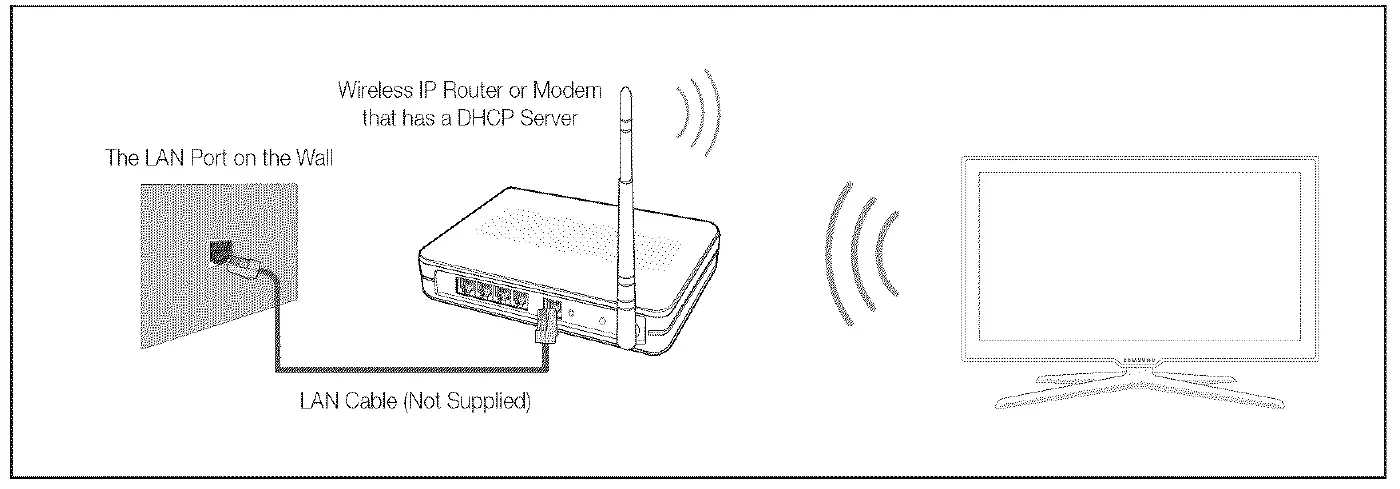
Wireless Network Precautions
- This TV supports the IEEE 802. 11 a/b/g /n communication protocols. Samsung recommends using IEEE 802 .i i n. Otherwise, when you play video over a network connection, the video may not play smoothly.
- To use a wireless network, the TV must be connected to a wireless router or modem. If the wireless router supports DHCP, the TV can use a DHCP or static IP addmss to connect to the wireless network.
- Select a channel that is not currently in use for the wireless router. If the channel set for the wireless router is currently being used by another device, the result is usually interference and/or a communications failure.
- Most wireless networks have an optional security system. To enable a wireless network’s security system, you need to create a security key using characters and numbers, and then enter that key into the router th rough its menu. You then must enter this security key into any other devices you want to connect to the wireless network.
Network Security Protocols
- The TV only supports the following wireless network security protocols:
- Authentication Modes: WEP, WPAPSK, WPA2PSK
- Encryption Types: WEP, TKIP, AES
- In compliance with the newest Wi-Fi certification specifications, Samsung TVs do not support WEP or TKIP security encryption in networks runn ing in the 802.1 in mode.
- If the wireless router supports WPS (Wi-Fi Protected Setup), you can connect the TV to your network using
- PBC (Push Button Configuration) or a PIN (Personal Identification Number). WPS automatically configures the SSID and WPA key settings.
- Your Smart TV cannot connect to uncertified wireless routers.
Network Connection – Wired
There are three main ways to connect your TV to your network using cable, depending on your network setup. They are illustrated below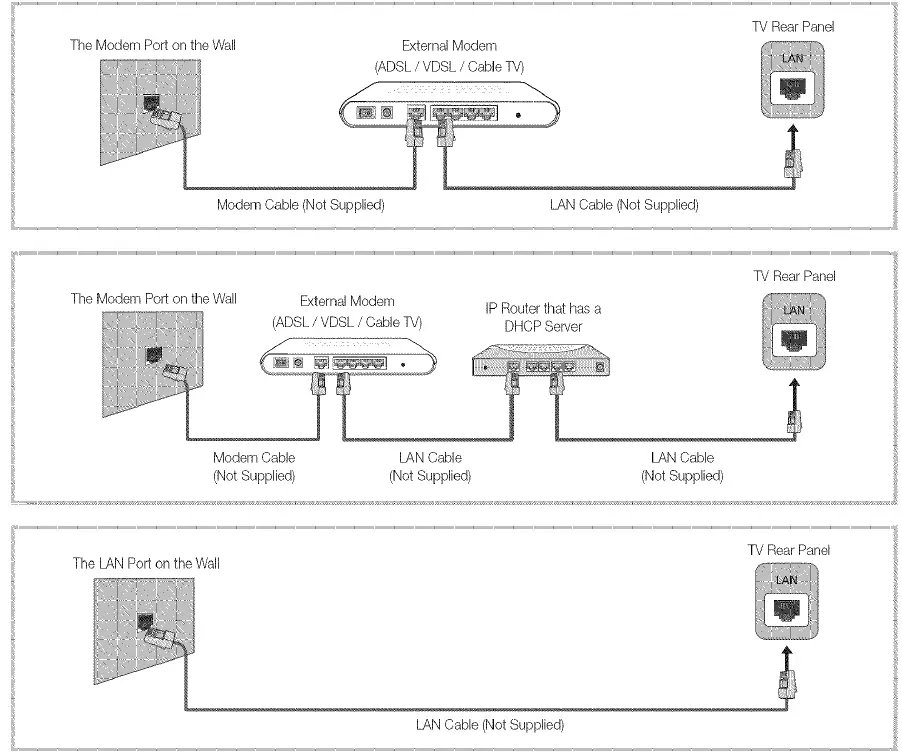
What is Remote Support?
Samsung Remote Support service offers you one-on-one support with a Samsung Technician who can remotely.
- Diagnose your TV
- Adjust the TV settings for you
- Perform a factory reset on your TV
- Install recommended firmware updates
How Does it Work?
Having a Samsung Tech remotely service your TV is easy
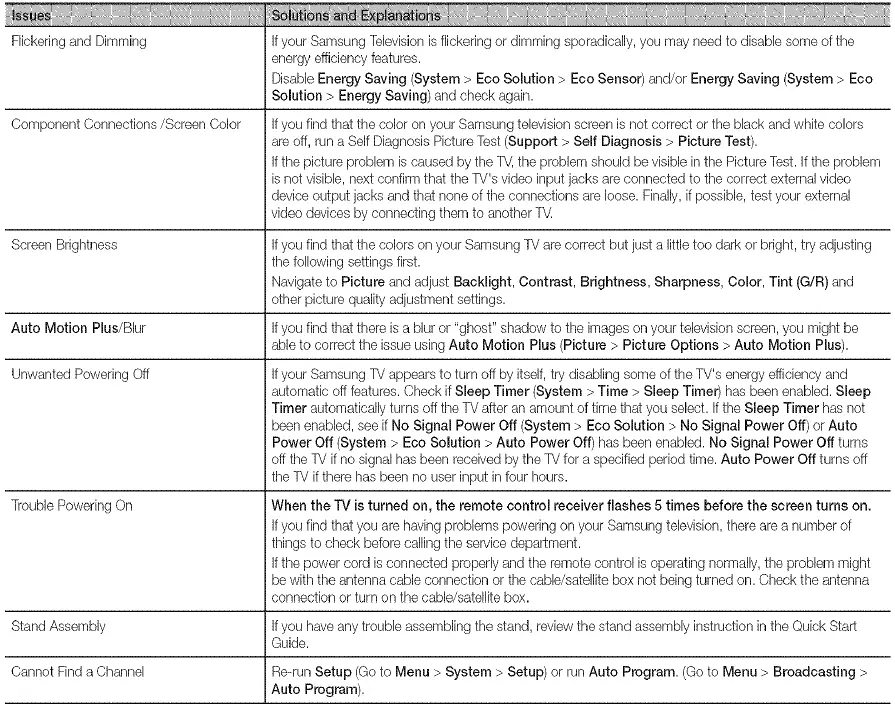
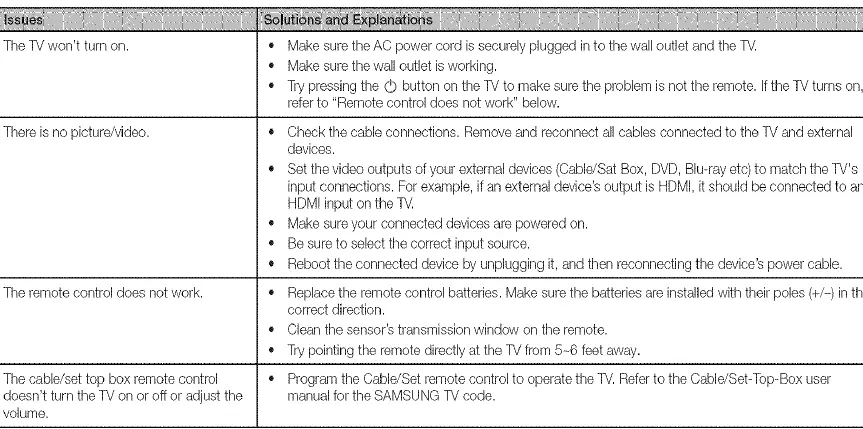
Troubleshooting

Mounting the TV on the Wall Using the Wall Mount Kit (Optional
Installing the Wall Mount Kit
The wall mount kit (sold separately) lets you mount the TV on the wall. For detailed information about installing the wall mount, see the instructions provided with the wall mount. We recommend you contact a technician for assistance when installing the wall mount bracket. We do not advise you to do it yourself. Samsung Electronics is not responsible for any damage to the product or injury to yourself or others if you elect to install the wall mount on your own. To order the wall mount kit, contact Samsung Customer Care at “1-800-SAMSUNG (“1-800- 726-7864).
Installing a Wall Mount using the Wall mount adapter
- For more detailed information , refer to the User Manual of the Wall Mount Kit.
- Wall mount adapters are provided only with 46-inch or bigger TVs.
- 46 – 50 inches models: 2 pieces (BN96-18153B)
- 55 inches and above models: 4 pieces (BN96- 18153A)

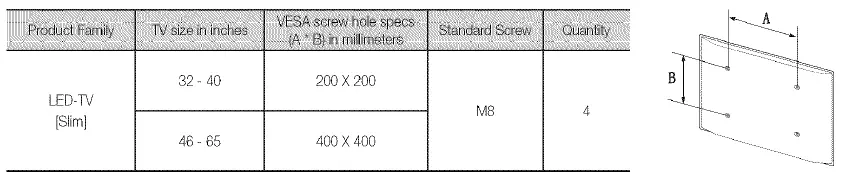
VESA Wall Mount Kit Notes and Specifications
Install your wall mount on a solid wall perpendicu lar to the floor. Before attaching the wall mount to surfaces other than plaster board, please contact your nearest dealer for additional information. If you install the TV on a ceiling or slanted wall, it may fall and result in severe personal injury.
NOTE
- Standard dimensions for wall mount kits are shown in the table below.
- Samsung wall mount kits contain a detailed installation manual, and all parts necessary for assembly are provided .
- Do not use screws that do not comply with VESA standard screw specifications.
- Do not use screws that are longer than the standard length or do not comply with VESA standard screw specifications. Screws that are too long may cause damage to the inside of the TV set.
- For wall mounts that do not comply with the VESA standard screw specifications, the length of the screws may differ depending on the wall mount specifications.
- Do not fasten the screws too fi rmly. This may damage the product or cause the product to fall, leading to personal injury. Samsung is not liable for these kinds of accidents.
- Samsung is not liable for product damage or personal injury when a non-VESA or non-specified wall mount is used or the consumer fails to follow the product installation instructions.
- Do not mount the TV at more than a 15 degree tilt.
- Always have two people mount the TV on to a wall.


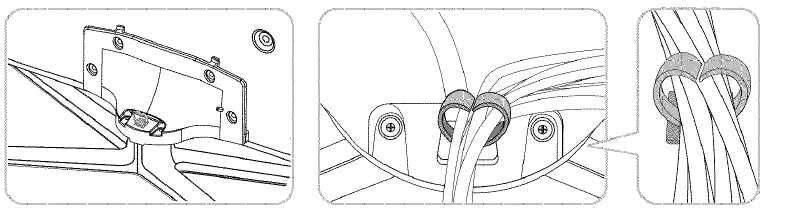
Assembling the Cable manager
Eco Sensor and Screen Brightness
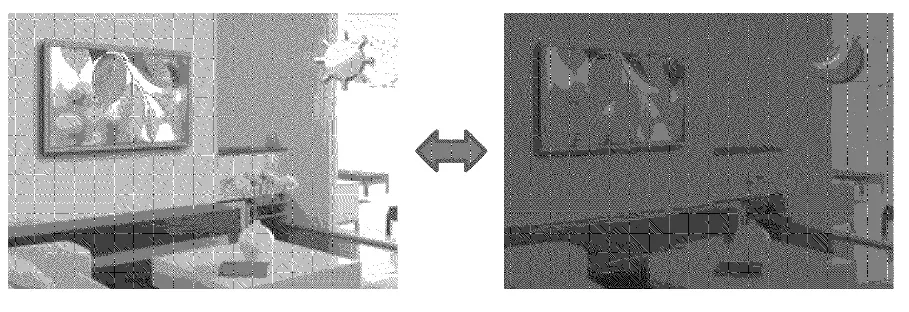
Eco Sensor measures the light in your room and optimizes the brightness of the 1V automatically to reduce power consumption. This causes the 1V to brighten and dim automatically. If you want to turn this function off, go to Menu > System > Eco Solution > Eco Sensor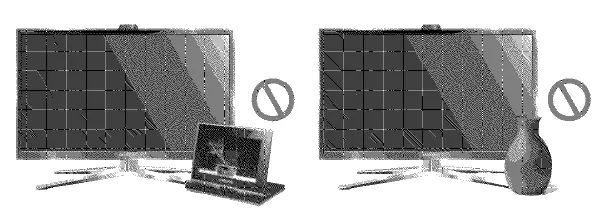
Maintenance
- If a sticker was attached to the TV screen, some debris can remain after you remove the sticker.
- Please clean the debris off before watch ing TV.
- The exterior and screen of the product can get scratched during cleaning. Be sure to wipe the exterior and screen carefully using the cloth provided or a soft cloth to prevent scratches.


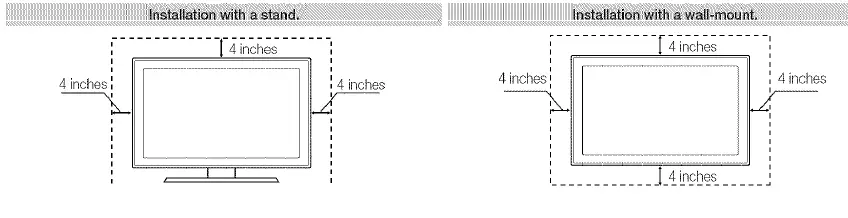
Providing Proper Ventilation for Your TV
- When you install your TV, maintain a distance of at least 4 inches between the TV and other objects (walls, cabinet sides, etc.) to ensure proper ventilation.
- Failing to maintain proper ventilation may result in a fire or a problem with the product caused by an increase in its internal temperature.
- Whether you install your TV using a stand or a wall-mount, we strongly recommend you use parts provided by Samsung Electronics only.
- If you use parts provided by another manufacturer, it may cause difficulties with the product or result in injury caused by the product falling

Securing the TV to the Wall Caution: Pulling, pushing, or climbing on the TV may cause the TV to fall. In particular, ensure your children do not hang on or destabilize the TV. Doing so may cause the TV to tip over, causing serious injuries or death. Follow all safety precautions provided in the Safety Flyer included with your TV. For added stability and safety, you can purchase and install the anti-fall device as described below.
To Avoid the TV from Falling
- Put the screws into the clamps and firmly fasten them onto the wall. Confirm that the screws have been firmly installed onto the wall.
- You may need additional material such as an anchor depending on the type of wall.
- Since the necessary clamps, screws, and string are not supplied, please purchase these additionally.
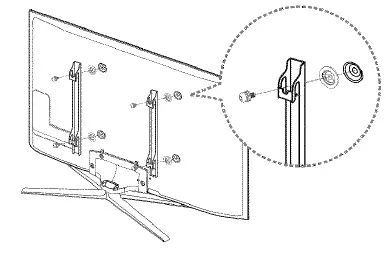
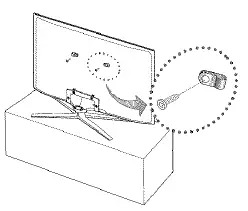
 Remove the screws from the back center of the TV, put the screws into the clamps, and then fasten the screws onto the TV again.
- Screws may not be supplied with the product. In this case, please purchase the screws of the following specifications.

 Remove the screws from the back center of the TV, put the screws into the clamps, and then fasten the screws onto the TV again.
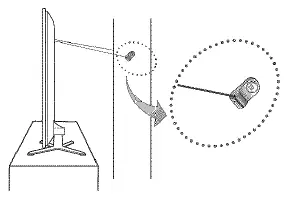
Screw Specifications
- For a 32 – 65 inches: M8
- Connect the clamps fixed onto the TV and the clamps fixed onto the wall with a strong cable and then tie the string tightly.
NOTE
- Install the TV near to the wall so that it does not fall backwards.
- It is safe to connect the string so that the clamps fixed on the wall are equal to or lower than the clamps fixed on the TV.
- Untie the string before moving the TV.
- Verify all connections are properly secured. Periodically check the connections for any sign of fatigue or failure. If you have any doubt about the security of your connections, contact a professional installer.
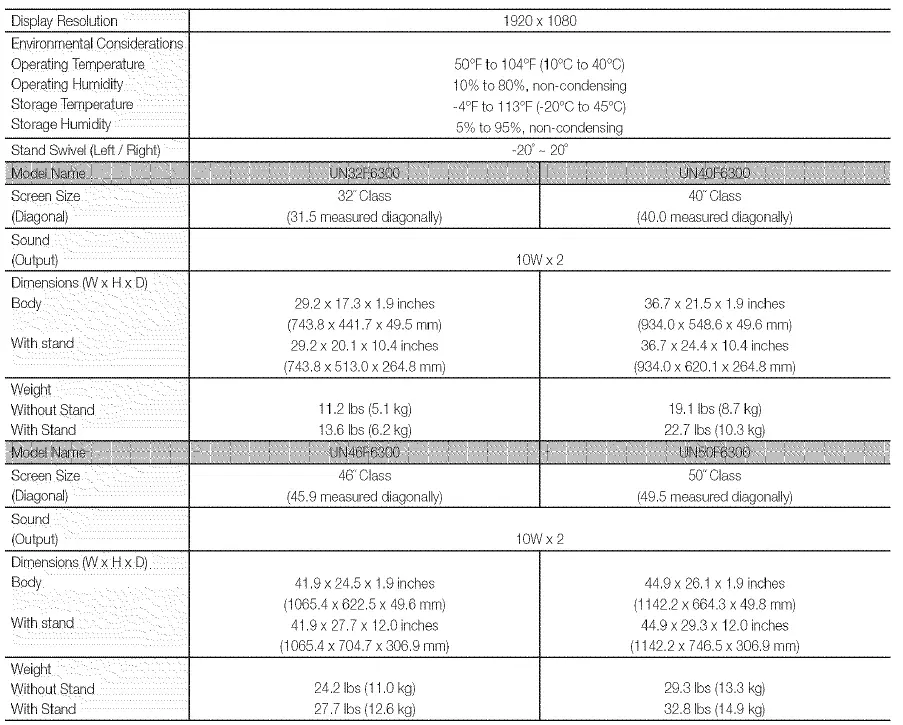
Specifications
Standby mode
To decrease power consumption, unplug the power cord when you don’t intend to use the TV for a long time.
Dimensions
Jack panel detail / Rear view
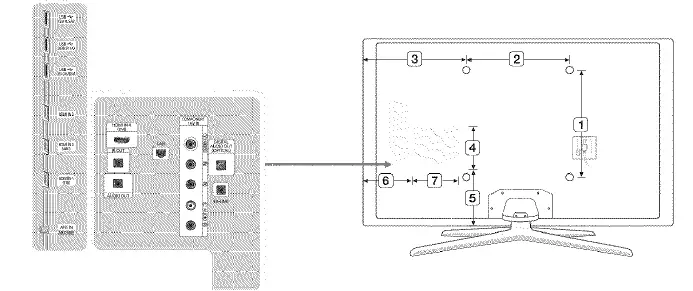
The displayed image may differ depending on the model.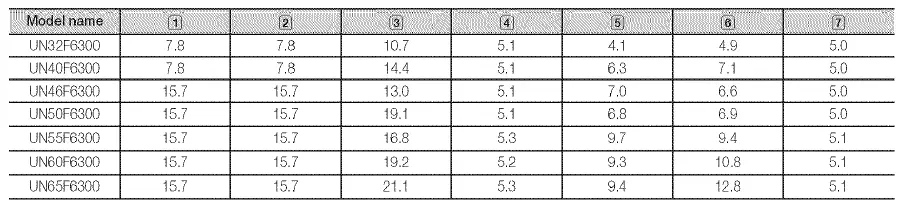
Licenses

FCC
This device complies with Part 15 of the FCC Rules. Operation is subject to the following two conditions:
- This device may not cause harmful interference, and
- this device must accept any interference received, including interference that may cause undesired operation.
For product available in the USNCanada market, only channel 1 – 11 can be operated. Selection of other channels is not possible. This device and its antenna(s) must not be colocated or operation in conjunction with any other antenna or transmitter. This equipment has been tested and found to comply with the limits for a Class B digital device, pursuant to Part 15 of the FCC Rules. These limits are designed to pmvide reasonable protection against harmful interference in a residential installation . This equipment generates, uses and can radiate radio frequency energy and, if not installed and used in accordance with the instructions, may cause harmful interference to radio communications. However, there is no guarantee that interference will not occur in a particular installation. If this equipment does cause harmful interference to radio or television reception, which can be determined by turning the equipment off and on , the user is encouraged to try to correct the interference by one of the following measures:
- Reorient or relocate the receiving antenna.
- Increase the separation between the equipment and receiver.
- Connect the equipment into an outlet on a circuit different from that to which the receiver is connected.
- Consult the dealer or an experienced radio/TV technician for help.
FCC Caution: Any changes or modifications not expressly approved by the party responsible for compliance could void the user’s authority to operate this equipment.
FCC Radiation Exposure Statement: This equipment complies with FCC radiation exposure limits set forth for an uncontro lled environment. This equipment should be installed and operated with a minimum distance 20cm between the radiator & your body. This Class B digital apparatus complies with Canadian ICES-003. This device complies with Industry Canada license-exempt RSS standard(s). Operation is subject to the following two conditions:
- this device may not cause interference, and
- this device must accept any interference, including interference that may cause undesired operation of the device.
For products available in the USNCanada market, only channels 1 – 11 can be operated. Selection of other channels is not possible. This device and its antenna(s) must not be co-located or operation in conjunction with any other antenna or transmitter. Under Industry Canada regulations, this radio transmitter may only operate using an antenna of a type and maximum (or lesser) gain approved for the transmitter by Industry Canada. To reduce potential radio interference to other users, the antenna type and its gain should be so chosen that the equivalent isotropically radiated power (e. i.r.p.) is not more than that necessary for successful communication .
IC Radiation Exposure Statement:
This equipment complies with IC RSS-102 radiation exposure limits set forth for an uncontrolled environment. This equipment should be installed and operated with minimum distance 20cm between the radiator & your body.
IMPORTANT WARRANTY INFORMATION REGARDING TELEVISION FORMAT VIEWING
See the warranty card for more information on warranty terms. Wide screen format LED Displays (with i 6:9 aspect ratios, the ratio of the screen width to height) are primarily designed to view wide screen format full-motion video. The images displayed on them should primarily be in the wide screen, i 6:9 ratio format, or expanded to fill the screen, if your model offers this feature, with the images constantly in motion. Displaying stationary graphics and images on the screen, such as the dark sidebars on nonexpanded standard format television video and programming , should be limited to no more than 5% of the total television viewing time per week. Additionally, viewing other stationary images and text such as stock market crawls, video game displays, station logos, websites or computer graphics and patterns, should be limited as described above for all televisions. Displaying stationary images that exceed the above guidelines can cause uneven aging of LED Displays that leave subtle, but permanent burned-in ghost images in the LED picture. To avoid this, vary the programming and images, and primarily display full screen moving images, not stationary patterns or dark bars . On LED models that offer picture sizing features, use these controls to view different formats as a full screen picture. Be careful about the television formats you select and the length of time you view them. Uneven LED aging as a result of format selection and use, as well as burned in images, are not covered by your Samsung limited warranty.
SAMSUNG ELECTRONICS NORTH AMERICAN LIMITED WARRANTY STATEMENT
Subject to the requirements, conditions, exclusions and limitations of the original Limited Warranty supplied with Samsung Electronics (SAMSUNG) products, and the requirements, conditions, exclusions and limitations contained herein, SAMSUNG will additionally provide Warranty Repair Service in the United States on SAMSUNG products purchased in Canada, and in Canada on SAMSUNG products purchased in the United States, for the warranty period originally specified, and to the Original Purchaser only. The above described warranty repairs must be performed by a SAMSUNG Authorized Service Center. Along with this Statement, the Original Limited Warranty Statement and a dated Bill of Sale as Proof of Purchase must be presented to the Service Center. Transportation to and from the Service Center is the responsibility of the purchaser. Conditions covered are limited only to manufacturing defects in material or workmanship, and only those encountered in normal use of the product. Excluded, but not limited to, are any originally specified provisions for, in-home or on-site services, minimum or maximum repair times, exchanges or replacements, accessories, options, upgrades, or consumables. For the location of a SAMSUNG Authorized Service Center, please call toll-free:
- In the United States: i -BOO-SAMSUNG (i – 800-726-7864)
- In Canada: i -BOO-SAMSUNG
Still image warning
Avoid displaying still images (such as jpeg picture fil es), still image elements (such as TV channel logos, stock or news bars at the screen bottom etc.), or programs in panorama or 4:3 image format on the screen. Constantly displaying still pictures can cause image burn-in on the LED screen, which will affect image quality. To reduce risk of this effect, please follow the recommendations below:
- Avoid displaying the same TV channel for long periods.
- Always try to display any image in full screen .
- Use the TV set’s picture format menu for the best possible match.
- Reduce brightness and contrast to avoid the appearance of after-images.
- Use all TV features designed to reduce image retention and screen burn. Refer to the e-Manual for details.
LIMITED WARRANTY TO ORIGINAL PURCHASER
This SAMSUNG brand product, as supplied and distributed by SAMSUNG and delivered new, in the original carton to the original consumer purchaser, is warranted by SAMSUNG against manufacturing defects in materials and workmanship for a limited warranty period of 90 Days Parts and Labor for Commercial Use This limited warranty begins on the original date of purchase, and is valid only on products purchased and used in the United States. To receive warranty service, the purchaser must contact SAMSUNG for problem determination and service procedures. Warranty service can only be performed by a SAMSUNG authorized service center. The original dated bill of sale must be presented upon request as proof of purchase to SAMSUNG or SAMSUNG’s authorized service center. SAMSUNG will repair or replace this product, at our option and at no charge as stipulated herein, with new or reconditioned parts or products if found to be defective during the limited warranty period specified above. All replaced parts and products become the property of SAMSUNG and must be returned to SAMSUNG. Replacement parts and products assume the remaining original warranty, or ninety (90) days, whichever is longer. Certain products are eligible for In-home service at Samsung’s discretion. To receive in-home service, the product must be unobstructed and accessible to service personnel. If during in-home service, repair cannot not be completed, it may be necessary to remove, repair and return the product. If in-home service is unavailable, SAMSUNG may elect, at our option, to provide for transportation of our choice to and from a SAMSUNG authorized servce center. Otherwise, and for 37″ and smaller LCD/LED 1V, transportation to and from the SAMSUNG authorized service center is the responsibility of the purchaser
Contact SAMSUNG WORLDWIDE
If you have any questions or comments about Your Samsung 1V, please contact the SAMSUNG customer care center
- Samsung Electronics America, inc.
- 85 Challenger Road
- Ridgefield Park, NJ 07660-2112
- 1-800-SAMSUNG (7267864) – www.samsung.com
- 1-800-749-0260: Projectors only


