Lumberjack 12 Ton Hydraualic Log Splitter Instruction Manual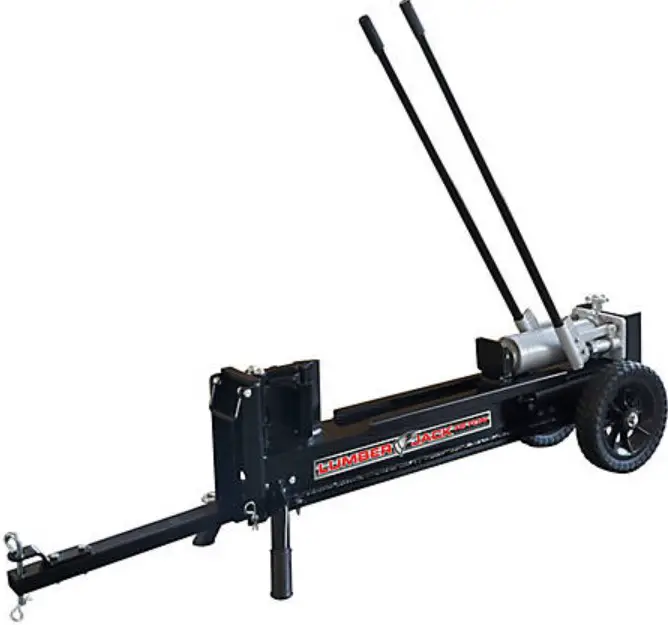
![]() This safety alert symbol identifies important safety messages in this manual. Failure to understand and follow safety, assembly and operating instructions could result in serious injury or death.
This safety alert symbol identifies important safety messages in this manual. Failure to understand and follow safety, assembly and operating instructions could result in serious injury or death.
![]() GENERAL WARNINGS
GENERAL WARNINGS
READ and UNDERSTAND this manual completely before using 12 Ton Log Splitter.
Operator must read and understand all safety and warning information, operating instructions, maintenance and storage instructions before operating this equipment. Failure to properly operate and maintain the log splitter could result in serious injury to the operator or bystanders.
Operation Warnings
- Do not at any time carry passengers, sit or stand on the log splitter.
- Do not allow children to play on, stand upon or climb on the log splitter.
- Always inspect the log splitter before using to assure it is in good working condition.
- Replace or repair damaged or worn parts immediately.
- Always use the splitter on a flat and level surface.
- Always check and tighten hardware and assembled parts before operation.
- Only use the log splitter for its intended purpose, splitting logs.
- Do not exceed log length of 15-1/2 inches or the diameter of 8 inches.
- Always split wood in the grain direction. Do not split wood against the grain.
- Do not exceed equipment maximum load capacity of 12 tons.
- Never leave the log splitter unattended while operating the equipment.
- Keep area around the log splitter clear of debris to prevent injury.
- Always clear away wood pieces from work area before splitting another log.
- The log splitter can be towed with any motorized vehicle, Lawn/Garden Tractors or ATVs.
- Do not exceed the towing speed of 5MPH
Crush and Cut Hazards
- Always keep hands and feet clear from moving and cutting parts while operating the equipment.
- Always clear and keep work area clean and free of debris when operating.
- Always wear safety gear, eye protection, gloves and work boots when operating the log splitter.
![]() WARNING
WARNING
The warnings, cautions, and instructions outlined in this instruction manual cannot cover all possible conditions or situations that may occur. It must be understood by the operator that common sense and caution are factors which cannot be built into this product and must be supplied by the operator
![]() PROP 65 WARNING
PROP 65 WARNING
This product can expose you to chemicals including lead and lead compounds which are known to the State of California to cause cancer and birth defects or other reproductive harm. For more information, go to www.P65Warnings.ca.gov
Assembly Is Required
This product requires assembly before use. See “Assembly” section for instructions. Because of the weight and/or size of the log splitter, it is recommended that another adult be present to assist with the assembly. INSPECT ALL COMPONENTS closely upon receipt to make sure no components are missing or damaged.
Hazard Signal Word Definitions
| This is the safety alert symbol. It is used to alert you to potential personal injury hazards. Obey all safety messages that follow this symbol to avoid possible injury or death. | |
| DANGER indicates an imminently hazardous situation which, if not avoided, will result in death or serious injury. | |
| WARNING indicates a potentially hazardous situation which, if not avoided, could result in death or serious injury. | |
|
| CAUTION indicates a potentially hazardous situation which, if not avoided, may result in minor or moderate injury. |
|
| CAUTION used without the safety alert symbol indicates a potentially hazardous situation which, if not avoided, may result in property damage. |
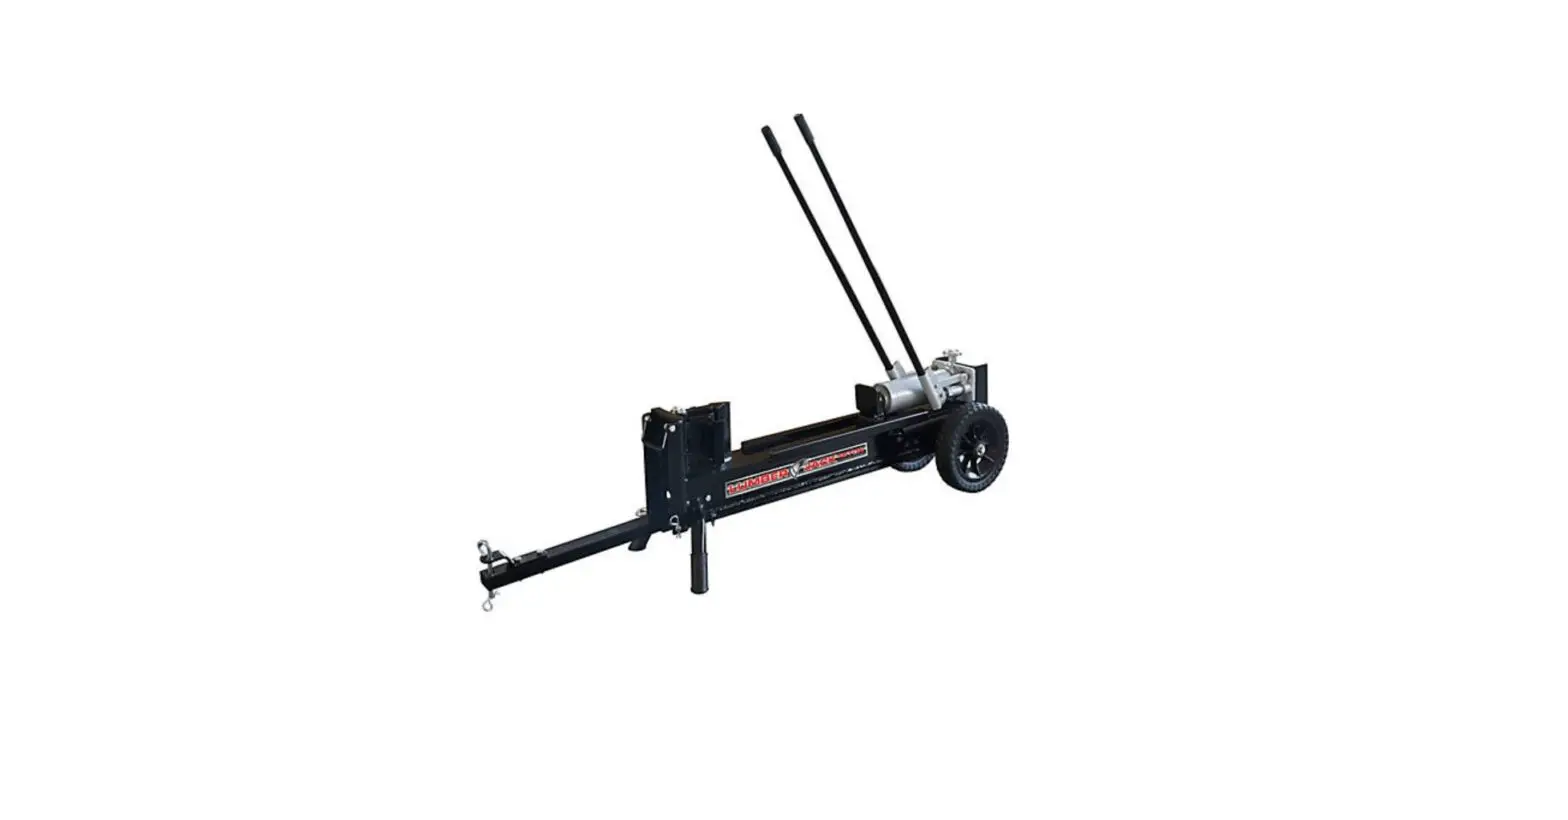
ABOUT YOUR 12 TON MANUAL LOG SPLITTER
This 12 ton hydraulic log splitter is made of heavy duty steel and is designed to split some of the most difficult logs from Oak, Elm, Walnut and Cherry to name a few. With only a few pumps this powerful log splitter makes a difficult job easy. It is portable, lightweight and can be operated both indoors/outdoors.
Never exceed the rated load capacity of 12 tons when operating the log splitter as it may damage the log splitter.
Technical specifications on the log splitter are provided in the “Specifications” section of this manual.
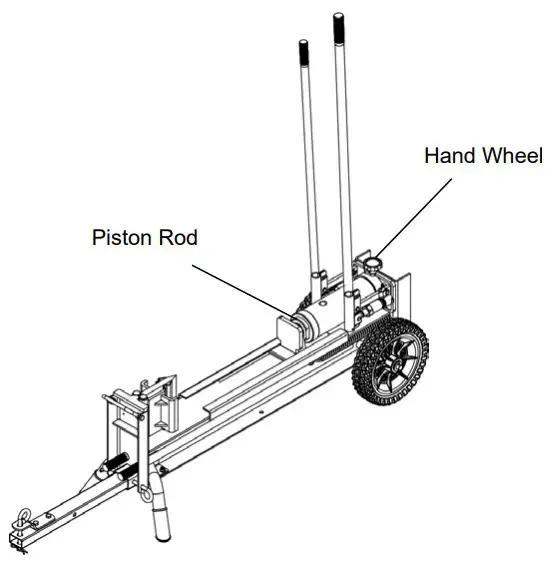
Controls and Features Identification
Read this owner’s manual before operating the equipment. Familiarize yourself with the location and function of the controls and features. Save this manual for future reference.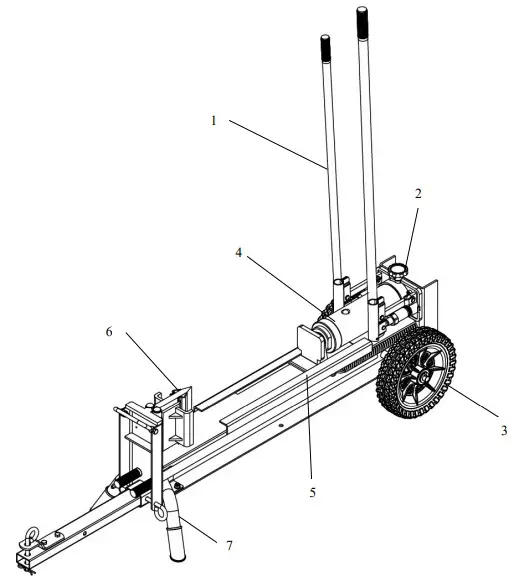
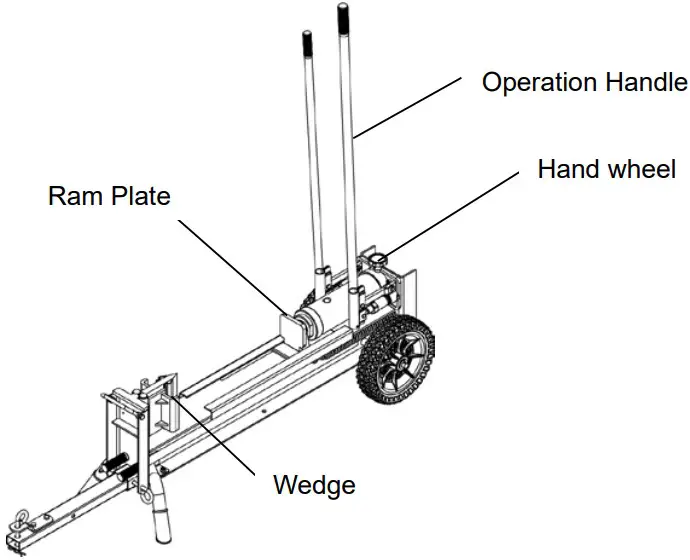
- Operating Handles –Move handles back and forth to move the ram forward.
- Hand Wheel –Turn knob to retract ram.
- Tire –Do not exceed the maximum towing speed of 5MPH
- Hydraulic Pump – Do not exceed rated capacity of 12 Tons.
- Log Cradle –Holds log in place during splitting.
- Splitting Wedge-Splits wooden log.
- Support Leg – Use to maneuver the log splitter.
![]() CAUTION
CAUTION
Read and follow all instructions for assembly and operation. Failure to properly assemble this equipment could result in serious injury to the user or bystanders, or cause equipment damage
12 TON HYDRAULIC LOG SPLITTER ASSEMBLY
Take all parts out of the shipping crate and inspect components to ensure there are no missing pieces before starting to assemble the log splitter.
Assembly Instructions
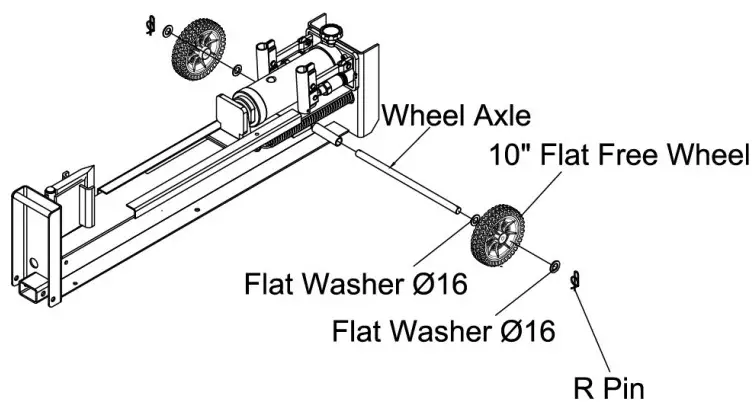
STEP 1: Attach Wheels to the Beam
- Insert the Wheel Axle to the beam, fix the flat free tire to the wheel axle, secure with Flat Washer Ø16 and R Pin. Fix the other side too

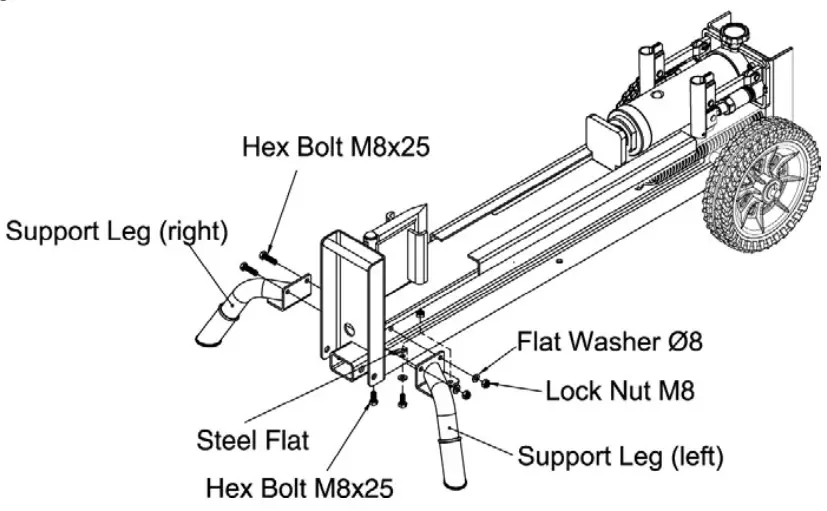
STEP 2: Attach the Support Leg
- Fix the Right and Left Support Leg to the front of beam by using two sets of Hex Bolt M8x25, Steel Flat, Flat Washer Ø8 and Lock Nut M8. Do not tighten the hardware.
- Secure the both Support Leg with two sets of Hex Bolt M8x25, Flat Washer Ø8 and Lock Nut M8. Tighten all hardware

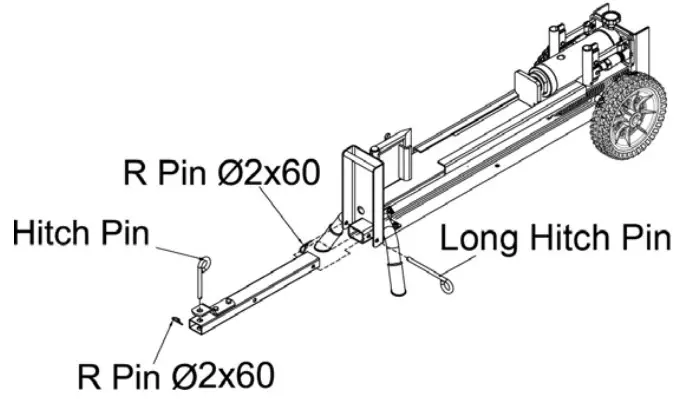
STEP 3: Adjust the Tow Hitch
- Insert Hitch Pin to Tow Hitch and secure with R Pin Ø2×60.
- The Tow Hitch can be adjusted by using Long Hitch Pin and R Pin Ø2×60. You can pull the tow hitch under beam when in working position, and pull out for towing.

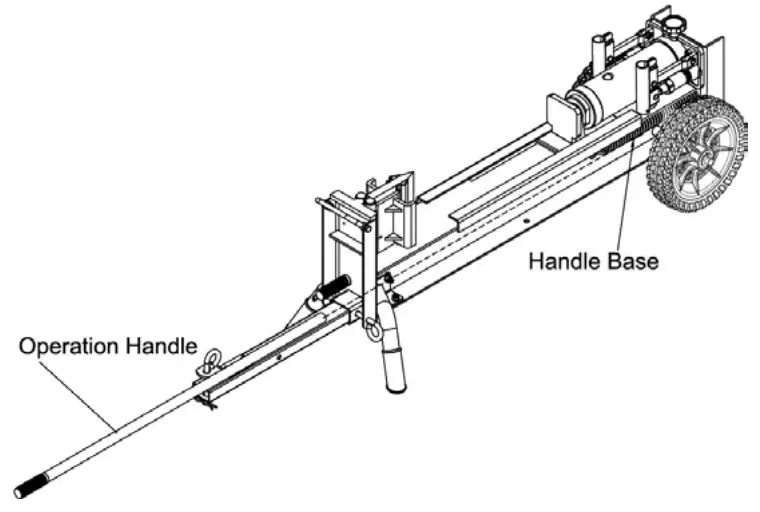
STEP 4: Operation Handle
- Put the Operation Handle to Handle Base on both sides of beam when in towing position

Operation Instructions
![]() WARNING
WARNING
Before using the log splitter, review the instructions below and all safety information. Failure to follow these instructions may result in property damage or injury to the operator or bystanders.
SPLITTING OPERATION / ADDITIONAL SAFETY INSTRUCTIONS
- When loading or positioning a log always use the bark side, never the ends. Never place your hands or body parts between the log and the splitter.
- Never load or unload logs while the ram is moving.
- Do not pile logs to be split in a place where you need to reach across the splitter in order to load them.
- Log ends need to be cut square so they do not slide out while splitting and cause a safety hazard or excessive force to the log splitter components. Use a chainsaw (not included) to cut the logs ends square before attempting to split them.
- Never attempt to split more than one log at a time. A piece of a log can unexpectedly be thrown from the machine, causing personal injury.
- Do not use if there is any indication of damage to the hydraulic cylinder.
- Do not use the splitter to split logs across the grain. Doing so will damage the log splitter and could cause log pieces to be thrown, injuring the operator or bystanders.
![]() WARNING
WARNING
Accidents occur when there is more than one person involved in loading and operating the log splitter. Only one person should operate the splitter, if a second person is assisting in loading the splitter,
NEVER allow an assistant to hold the log in place while the operator is using the working the handles.
USING YOUR 10TON LOG SPLITTER
- Grip one handle in each hand and pump the handles back-and-forth stroke motion. This action will force the log against the wedge.
- Remove the split pieces
- Turn the hand wheel counterclockwise, no more than one full turn to retract the ram.
- Turn the hand wheel clockwise unit it is snug.
- When finished splitting turn the hand wheel counterclockwise one turn to relieve the pressure

![]() WARNING
WARNING
NEVER attempt to remove a stuck log from the splitter. If there is a stuck log never do the following: Using the hydraulic force of the log splitter to split the log, never modify the log splitter or add attachment to the log splitter
HOW TO REMOVE A STUCK LOG
If a log gets stuck on the wedge base or the wedge becomes embedded in the log and will not completely split and separate the log. Follow the directions below to remove the log:
- Fully retract the ram.
- Remove the stuck log from the wedge manually with a pry bar.
- IMPORTANT: Be extremely careful as log pieces may fly off as they separate from the wedge.
- Do not attempt to re-split a stuck log once it has been removed from the wedge.
- Manually split the log with a maul or cut it with a chainsaw.
HOW TO BLEED THE LOG SPLITTER
- Extend the ram to its maximum length.
- Remove the Oil Plug.
- Turn the hand wheel counterclockwise as fast as possible. The piston rod will retract into the hydraulic pump and push the air out of the cylinder via the oil plug hole.
- Add oil and make sure the oil level is full. If needed add more hydraulic oil to the hydraulic pump.

- Check the oil level again and if need add more hydraulic oil.
- Replace the oil plug and repeat steps 1-5 as needed.
- To add oil, remove the oil plug and add oil to just below the fill plug.
- Then replace the oil plug
Maintenance and Storage
![]() WARNING
WARNING
Improper maintenance and storage of the log splitter may void your warranty.
![]() WARNING
WARNING
Periodically apply a light coat of rust resistant oil to the springs to keep them in good working order.
MAINTENANCE
- Periodically check all fasteners for tightness.
- Annually clean and lightly lubricate parts.
- Use a glossy enamel spray paint to touch up scratched or worn painted metal surfaces.
- Never exceed load capacity rating of 12 tons it will damage the log splitter.
IMPORTANT:
If a part needs replacement, only use parts that meet the manufacturer’s specifications. Replacement parts that do not meet specifications may result in a safety hazard or poor operation.
STORAGE
- Before storing make sure the log splitter is clean and dry for years of trouble-free service.
- The hydraulic pump needs to be in the released position before storing.
- Lightly lubricate all metal surfaces before storing.
- Store indoors or protected area during severe weather and winter mo
Specifications
Load Capacity …………………… 12 Ton
Material……………………………………….Steel
Max. Log Length……………………………………. 15-1/2 inches
Max. Log Diameter…………………………………..8 inches
Parts Drawing & Parts List
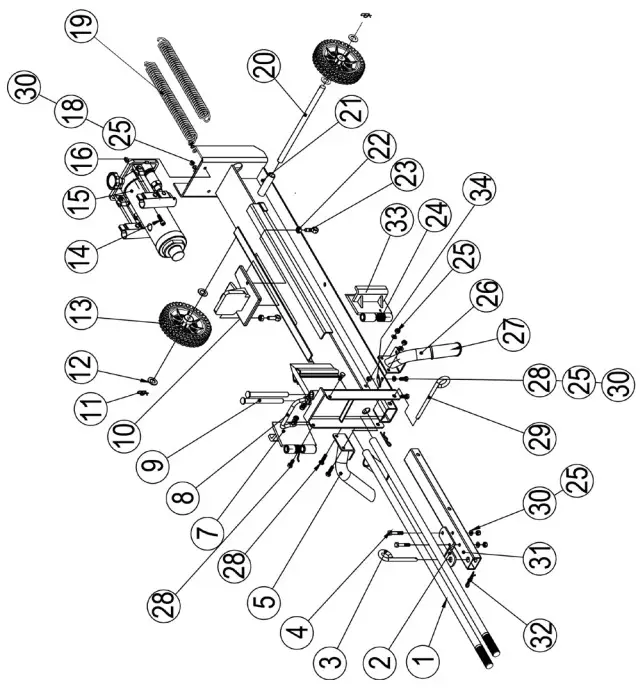
Parts Drawing & Parts List
| Ref# | Drawing No. | Description | Qty |
| 1 | MS10-30022 | Operation Handle | 2 |
| 2 | N390-00002 | Hitch Pin Bracket | 1 |
| 3 | N180-00013-DX | Hitch Pin | 1 |
| 4 | 9201-08045-DX8.8 | Hex Bolt M8x45 | 2 |
| 5 | MS12-06000 | Support Leg (right) | 1 |
| 7 | MS12-03000 | Tension Plate | 1 |
| 8 | MS12-00007 | Handle | 1 |
| 9 | MS12-00001-DX | Hinge Pin | 2 |
| 10 | MS12-05000 | Ram Plate | 1 |
| 11 | N57F-00007-DX | R Pin | 2 |
| 12 | 9301-16000-DX | Flat Washer Ø16 | 4 |
| 13 | MS12A-00001 | 10-2.75 Flat Free Wheel | 2 |
| 14 | 9105-08030-FH | Screw M8x30 | 2 |
| 15 | MS12-01000 | Ram | 1 |
| 16 | MS12-00008-DX | Spacer | 2 |
| 18 | 9306-08000-DX | Lock Washer Ø8 | 2 |
| 19 | MS12-00009-FH | Latch Spring | 2 |
| 20 | MS12A-00002 | Wheel Axle | 1 |
| 21 | MS12-02000 | Beam | 1 |
| 22 | 9206-01000-DX | Nylon Lock Nut M10 | 2 |
| 23 | 9119-10040-FH | Eyelet Bolt M10x40 | 2 |
| 24 | MS12-00002-FH | Torsional spring | 2 |
| 25 | 9206-08000-DX | Nylon Lock Nut M8 | 10 |
| 26 | MS12-04000 | Support Leg (left) | 1 |
| 27 | MS12-00005 | Foot strap | 2 |
| 28 | 9101-08025-DX8.8 | Hex Bolt M8x25 | 6 |
| 29 | MS12-00004-DX | Long Hitch Pin | 1 |
| 30 | 9301-08000-DX | Flat Washer Ø8 | 10 |
| 31 | MS12-00003 | Tow Bar | 1 |
| 32 | N580-00015-DX | R Pin Ø2×60 | 2 |
| 33 | MS12-03100 | Tension Plate 2 | 1 |
| 34 | MS12-00010 | Steel Flat | 2 |
Limited Warranty
Warranty
For 3 years from the date of purchase YTL International will replace or repair defects in material and workmanship for the original purchaser of the log splitter. For 1 year from date of purchase YTL International will repair or replace hydraulic system components. The warranty will not apply to any unit which was not assembled correctly, misused, overloaded or which has been used or operated contrary to our instructions, or which has been repaired or altered by anyone other than a service representative authorized by YTL International Inc.
Warranty Exclusions
This warranty does not cover cosmetic defects such as paint, decals or wear items such as tires. This warranty will not cover failures or problems due to acts of God, or events or forces beyond the control of the manufacturer.
Normal Wear Exclusion
The log splitter needs periodic service to perform well. This warranty does not cover repair when normal use has exhausted the life of a part or the equipment as a whole.
Installation, Use and Maintenance Exclusion=
This warranty will not apply to parts and/or labor if the log splitter has been misused, neglected, involved in an accident, abused, loaded beyond its limits, modified or assembled incorrectly. Normal maintenance is not covered under this warranty. Limits of Implied Warranty and Consequential Damage Exclusion YTL International disclaims any obligation to cover any loss of time, use of this product, freight, or any incidental or consequential claim by anyone from using this log splitter. THIS
WARRANTY IS IN LIEU
OF ALL OTHER WARRANTIES, EXPRESS OR IMPLIED, INCLUDING WARRANTIES OF MERCHANTABILITY OR FITNESS FOR A PARTICULAR.
An exchange unit will be subject to the original warranty. The length of the warranty governing the exchanged unit will have the date as the purchase date of the original unit. This warranty gives you certain legal rights which may change from state to state. Your state may also have other rights you may be entitled to that are not listed within this warranty
Contact Information
YTL International Inc.
17517 Fabrica Way, Suite H
Cerritos, CA 90703
Phone: (888) 723-6534
Phone: (562) 404-8016
Fax: (562) 404-8013
Email: [email protected]
Website: www.ytlinternational.com
Warranty & Customer Support Questions
Phone: (888) 723-6534


