 BOYO VISION VTW73M Replacement Rear-View Mirror
Product Introduction
Specifications
The packing box contains the following accessories. Please confirm:
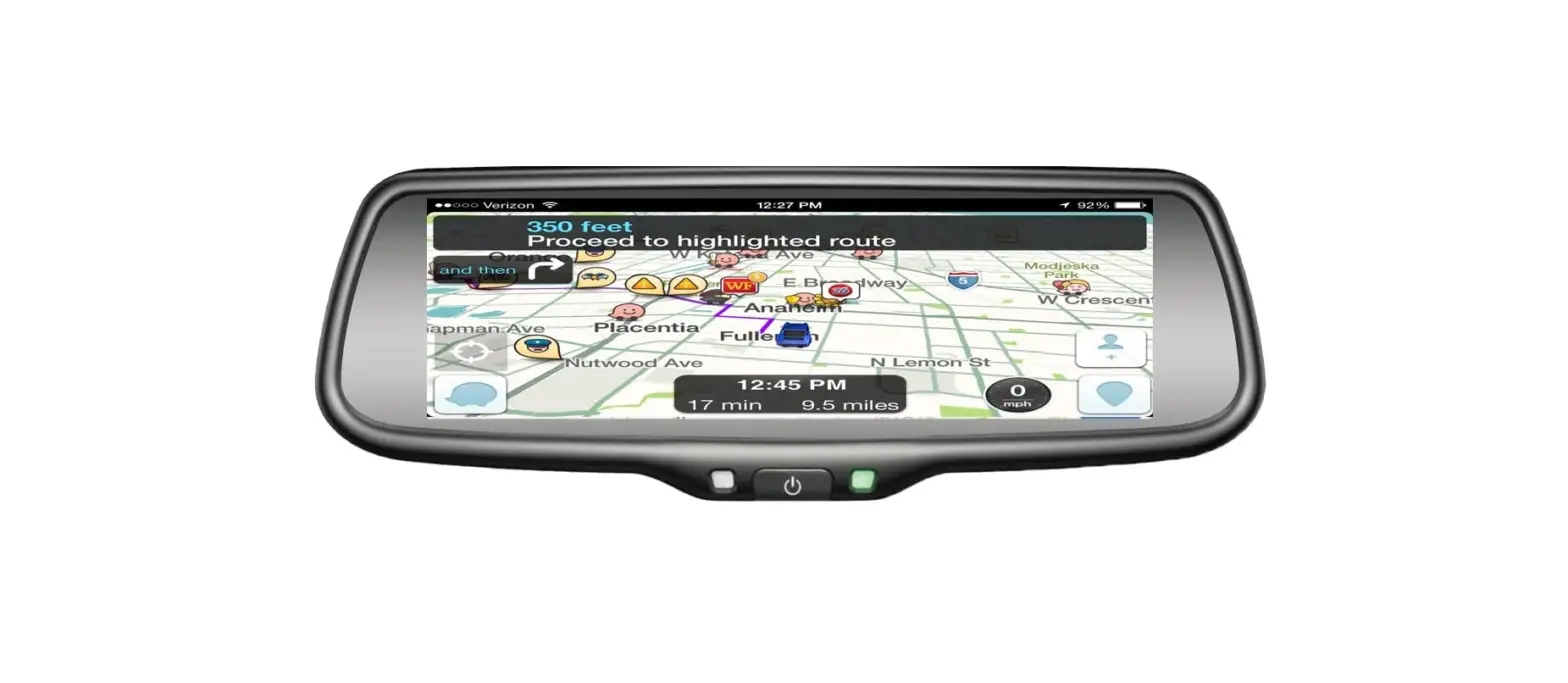
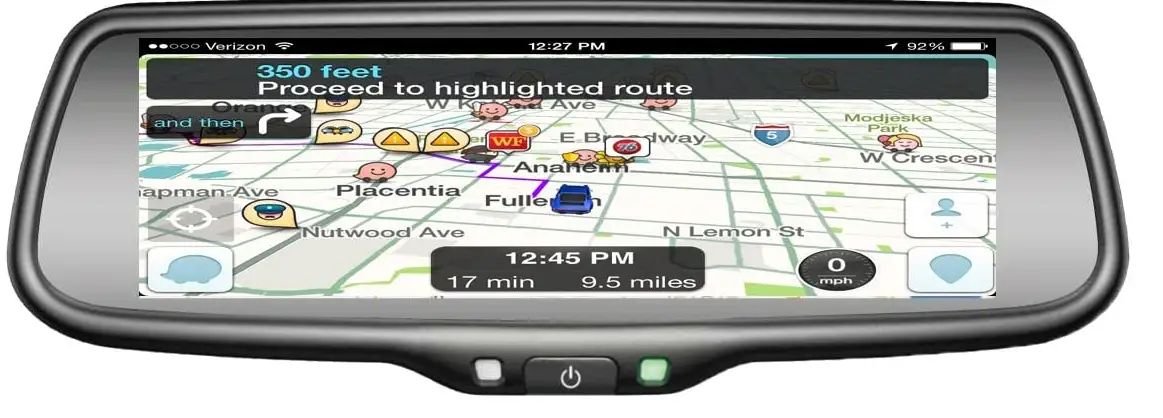
- 7.3 inch car rear view mirror monitor with mirror link
- Wire harness
- User’s manual
- Wire cover
- Remote control
- Please check your package box for the items listed above. Please contact the distributor or the agent as soon as possible if there is any damage.
Package
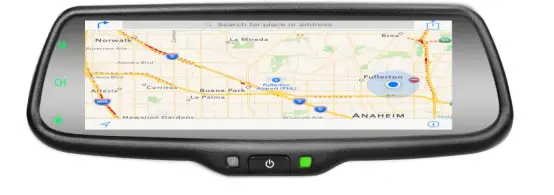
- 7.3 inch wide LCD display screen
- 2-way video inputs
- Back-up camera display
- Automatic brightness adjustment
- 4.0 mm glass and 21 mm car factory OEM bracket
- Adjustable guide line
- Mode switch between wide screen and dual screen LCD display separately
Features
- Screen size: 7.3 inch
- Display screen: TFT-LCD
- Aspect resolution: 1280(H)*390(V)
- Working voltage: 12V
- Working temperature: -20℃~+65℃
- Signal system: PAL/Auto/NSTC
Front buttons operation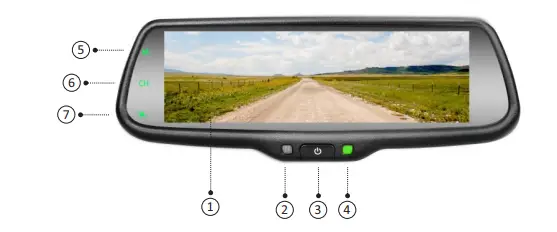
| 1 | 7.3 inch ultra high brightness display screen |
| 2 | Front light sensor |
| 3 | Turn on/off the display screen ( reversing mode: short press to adjust the screen brightness) |
| 4 | Indicator |
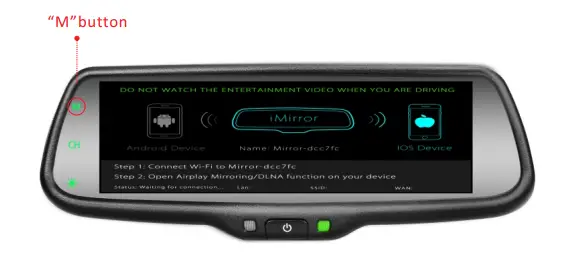
| 5 | built-in miracast mode switch Press”M” button to switch back and forth between Android mode and iOS mode |
| 6 | Switch display mode Press the”CH” button to switch back and forth among 7 display modes: miracast, Video+miracast, miracast+video, camera+miracast, miracast+camera, video full display, camera full display. |
| 7 | Color mode adjustment Pressing this button shortly can adjust the color mode of the image. Four modes are available– -standard, bright, beautiful, and soft. |
| 8 | Speaker |
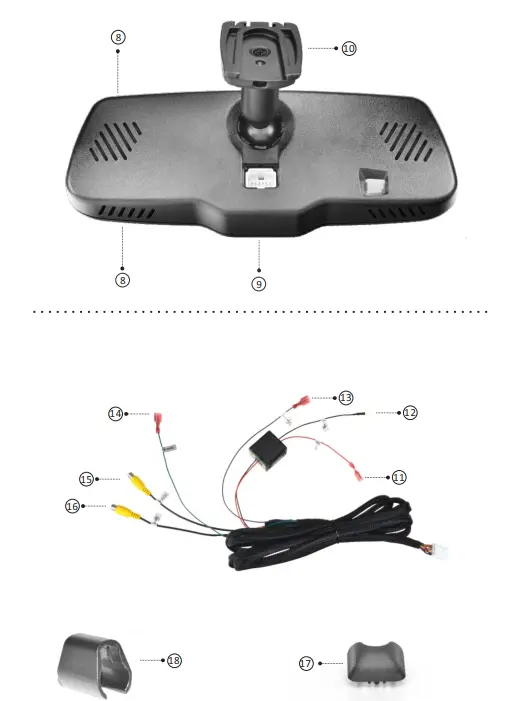
| 9 | Connector |
| 10 | Special bracket |
| 11 | Red to ACC+ |
| 12 | Black to GND |
| 13 | Trigger line 1 |
| 14 | Back car signal |
| 15 | Video input |
| 16 | Camera |
| 17 | Connector cover |
| 18 | Cable cover |
Installation and Wiring
How to install
Remove the original mirror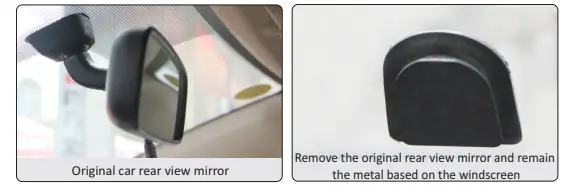
Different cars have different brackets. It depends on your vehicle maker and manufacturer. There are many methods to remove the original rear view mirror. However, please don’t force the mirror off the bracket. The manufacturer will not be responsible for any damage caused to your car by wrong installation of the mirror.
Install mirror monitor on the base.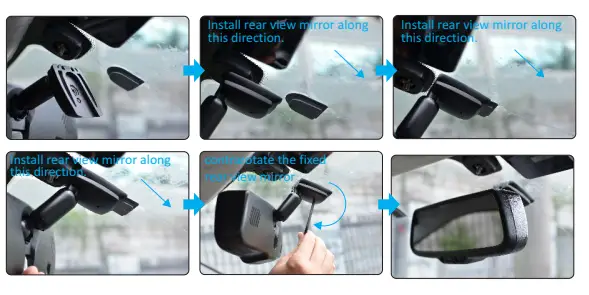 Special bracket
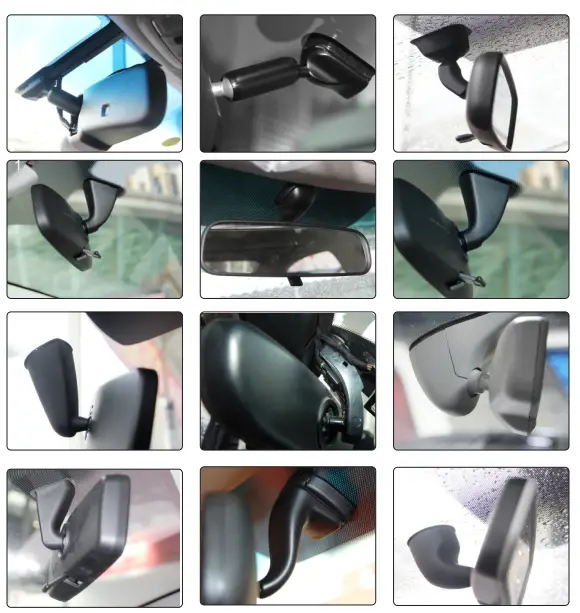
Many kinds of brackets are available. Please find the one that suits your vehicle.
Please contact us if you could not find the bracket of your car here.
How to wire
The reversing signal is input to rear view mirror by connecting the green line. Therefore, reversing video can be displayed automatically on the wide 7.3-inch LCD monitor.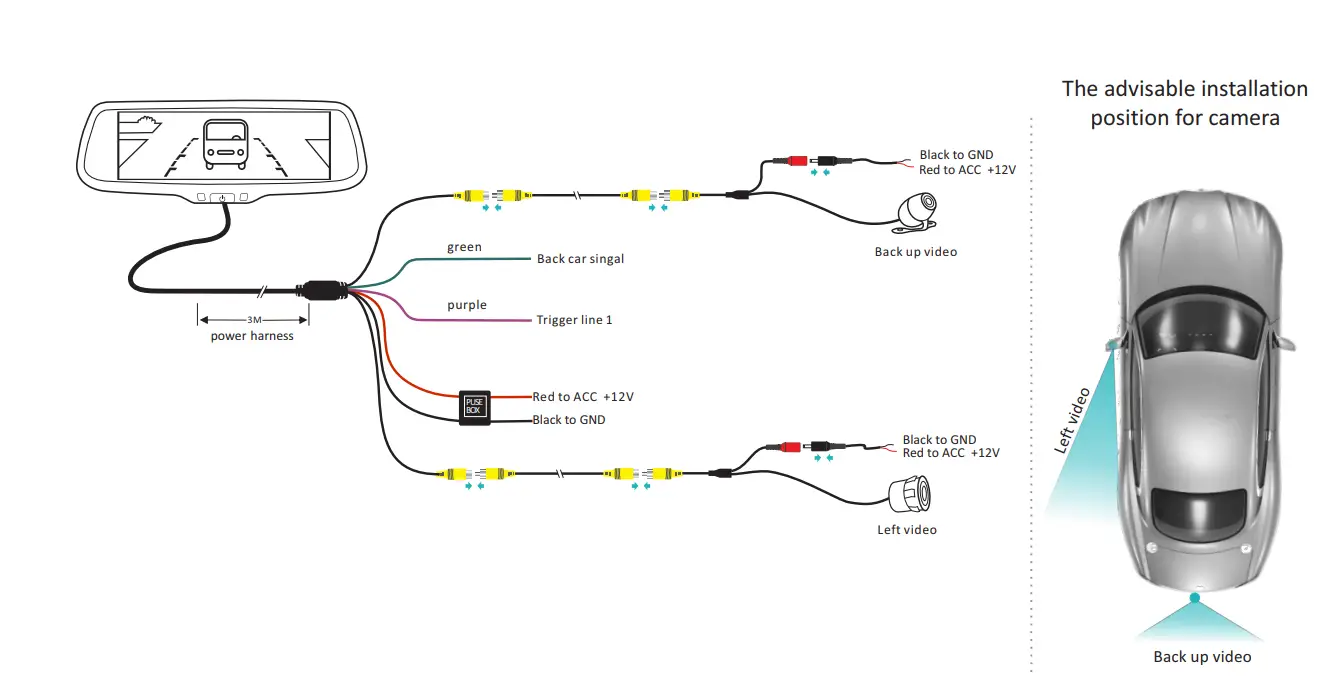
Adjustable Guide Line
About guideline
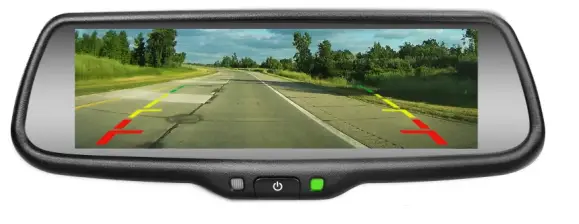
There are three lines—red, yellow, and green, to help drivers estimate the distance from obstacles. Those three lines are displayed on the monitor when the car is reversing. The green line is 10 feet away from the back of the car, and the yellow line is 6.5 feet away. The distant red line is 3.3 feet away from the back of the car, while the closed red line is 1.3 feet away. Please note that there is 0.65 feet distance from the car for reference lines shown below.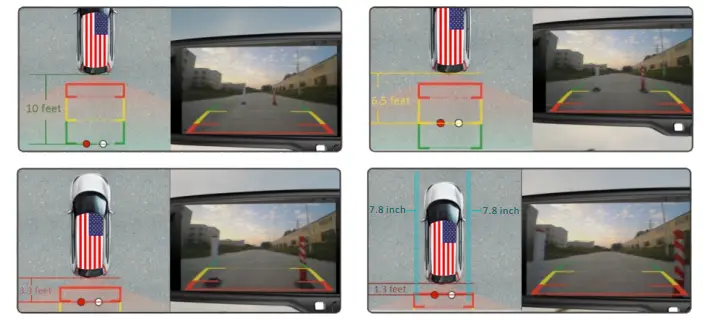
What the regular guideline is
Regular guide lines are fixed although installation sites of camera and car size are different. The fixed guide line is not accurate enough for drivers. There is huge difference between the regular, fixed guide lines, and real guide lines of the car. It may cause accidents when camera is mounted on the left or right side on the back side of the car.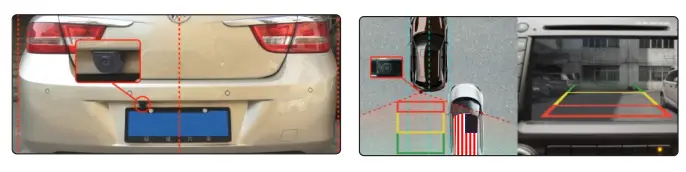
How to adjust the guideline
According to the site of the standard reference line, we can put reference objects such as desks in the back side of the car. Compared with the marked reference objects, we can adjust the sites and angles of two guidelines are displayed on the monitor. You will get the accurate and safety guidelines once it coincide with the reference objects.
Press the setting button to enter “guideline adjustment” mode. The system is defaulted to adjust left guideline first. Press the button again to switch to adjust the right guideline. The up
  down
down left
left  and right
 buttons are to adjust the corresponding location of guidelines. The clockwise rotation
 and contra-rotating buttons are to adjust the angles of guidelines. It is easy to operate and calibrate. After finishing calibration, switch the reverse gear to save the information.
Caution: keep the remote control 0.5m-1.0m away from rear view mirror when you use the remote to adjust the parking lines.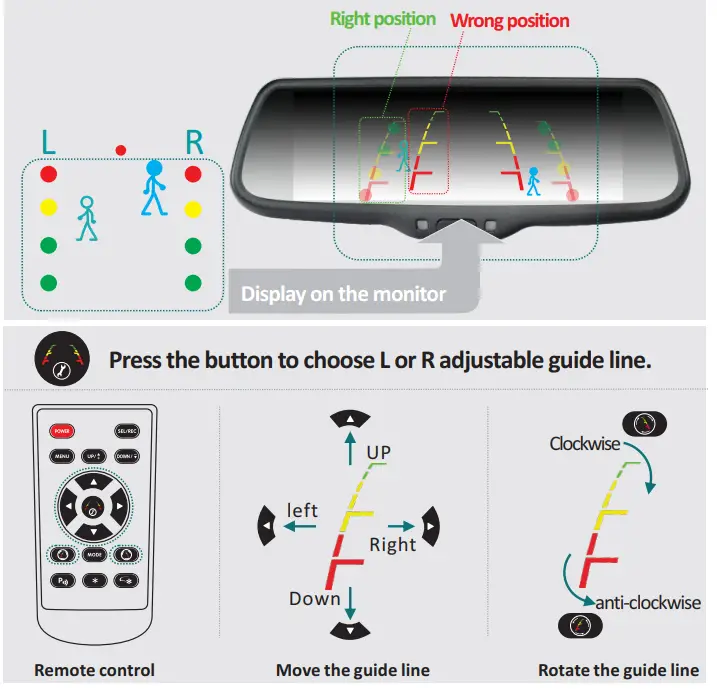
Remote control
The menu only can be set by remote control, and kindly check its definition as below.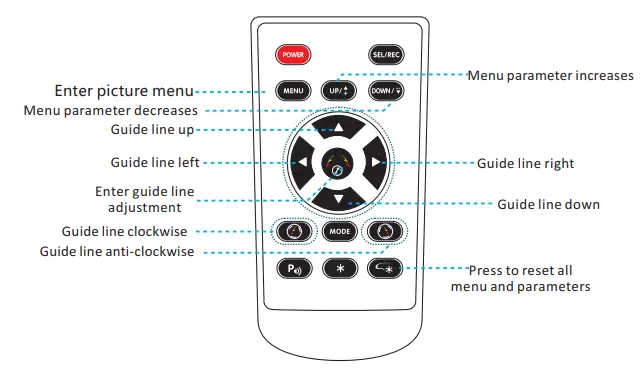
Menu setting guidance
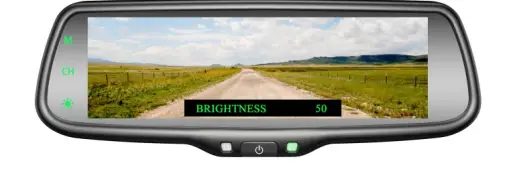
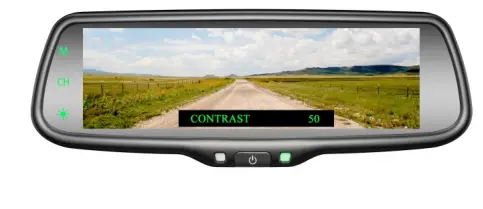
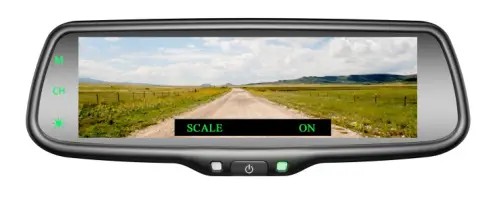
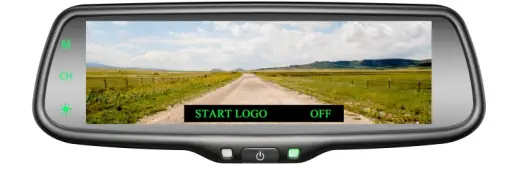
Short press “MENU”to enter “PICTURE”, then you can switch between “BRIGHTNESS”, “COLOR”, “CONTRAST”, “SCALE”, “START LOGO”, “PRESET”, or enter out. When it switches to “PRESET”, re-press shortly the MENU, and you would close the menu. UP and DOWN are to change the figure of each setting.
- BRIGHTNESS ADJUSTMENT
The defaulted setting is 50, ranging from 0 to 100, and only the CVBS signal can work.
- COLOR ADJUSTMENT
The defaulted setting is 50, ranging from 0 to 100, and only the CVBS signal can work.
- CONTRAST ADJUSTMENT
The default setting is 50, ranging from 0 to 100, and only the CVBS signal can work.
- SCALE ADJUSTMENT
Turn on/off the adjustable guidelines.
- START LOGO ADJUSTMENT
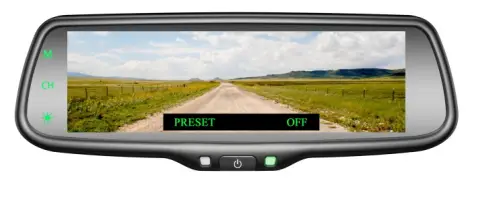
It is defaulted as “ON”, you can set it to “OFF” manually. - PRESET ADJUSTMENT
It is defaulted as OFF, and ON is to pre-set the menu, then it switches to OFF automatically.
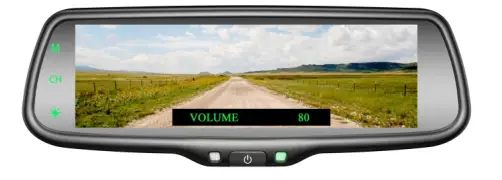
- VOLUME ADJUSTMENT
The defaulted setting is 80, ranging from 0 to 100, and only CVBS signal can work.
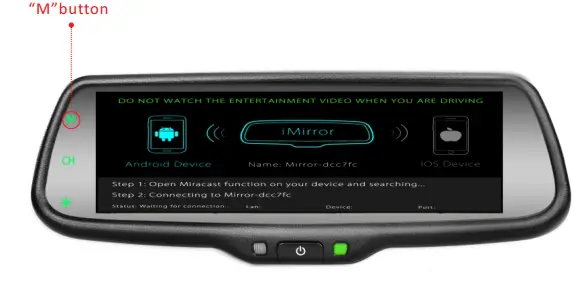
Built-In Miracast
This is a special device to project your mobile phone to rear view mirror monitor through a Wi-Fi connection, and popular standards like DLNA, Miracast and Air Play. The driver can set the navigation path on the phone before entering the car. The navigation audio and video can be displayed simultaneously on the rear view mirror as long as the Wi-Fi is connected to the rear view mirror. While driving you can also set the navigation path by a passenger using a mobile phone, the image is displayed simultaneously on the rear view mirror.
Please note: Make sure to turn of the Bluetooth when you use miracast function and connect your phone!
How to connect
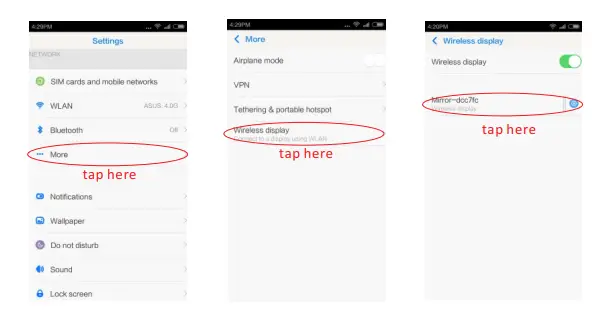
How to connect with Android phone (Android version has more functions on how to use wireless projection. Please see your phone instructions for reference. )
- Make sure android phone has wireless projection function ( part of the phone can not support wireless projection, or part of the phone wireless display needs to root and could use after changing the system file).
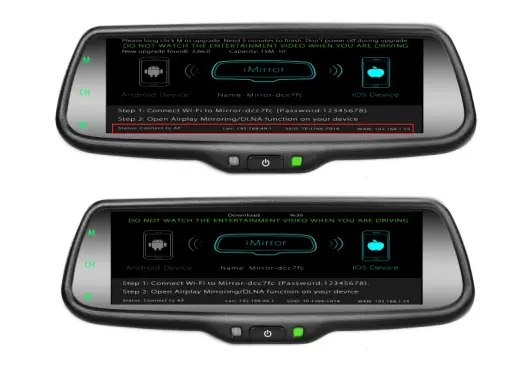
- Click the “M” button on the TP button, switch wireless mode to Android mode; open the Wi-Fi on your phone, then search equipment in the phone’s wireless projection function, connect the device according to the wireless device names that are displayed on the screen. Please see the steps as below,


After finishing the connection, then the phone screen is projected to the rear view mirror, you can press “CH” on TP button to choose “double mobile dual mode” or “single-screen mode”.
How to connect with iPhone
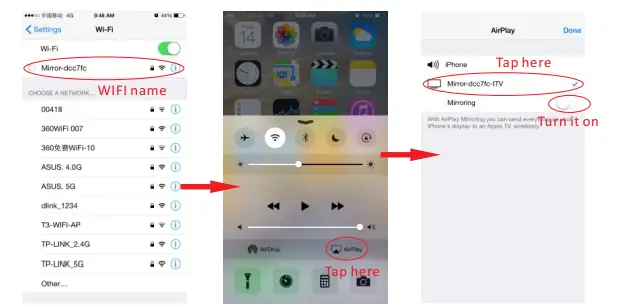
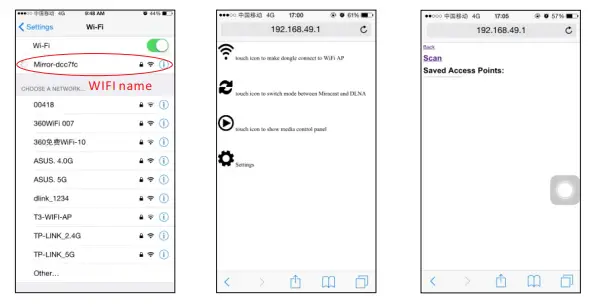
- Click the “M” button on TP button, switch the wireless mode to iOS mode.

- Using iPhone search Wi-Fi (Wi-Fi name is displayed on the screen and shown as below), then enter the default password: 12345678. After finishing WIFI connection, bring up the shortcut menu, click on the AirPlay function, select the device name, and open the mirroring.

After finishing the connection, then the phone screen is projected to the rearview mirror, you can press “CH” on the TP button to choose “double mobile dual-mode”or “single-screen mode”.

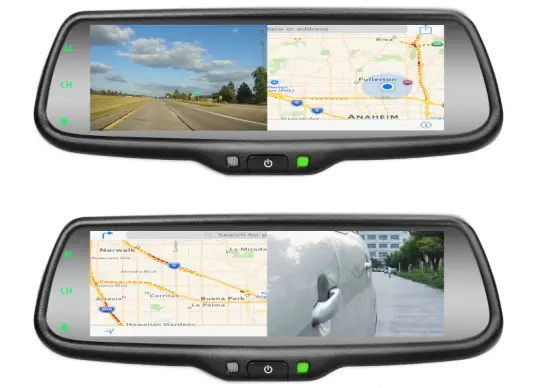
Channel switching
Press the “CH” button on the screen to switch display among CAMERA, VIDEO1, MOBILE, VIDEO1+MOBILE, MOBILE+VIDEO1, CAMERA+MOBILE, and MOBILE+CAMERA.
- Full CAMERA screen display

- Full VIDEO1 screen display

- Full MOBILE screen display

- VIDEO1 and MOBILE display simultaneously

- cAMERA and MOBILE display simultaneously


Please note:
- Both Reversing mode and non-reversing mode have seven states: built-in miracast, video+built-in miracast, built-in miracast+video, camera+built-in miracast, built-in miracast+camera, full video screen, and full camera screen.
- Power on each time, and the screen automatically keep the last status before the shut down. There are total eight states or styles—seven are listed as above, and off-screen state.
- There are three modes of operation can trigger video;
- The first grade is +12V BACKUP LIGHT: You can adjust the seven states when there is signal of triggering
reversing by touching the CH button. The final state will be stored after powering off, and the final state
will be shown automatically when there is a trigger BACKUP LIGHT next time; - The second grade is +12V VIDEO CONTROL– Video channel triggered line, which connects the turning light or brake light in a general way. Mirror will switch automatically to the full-screen mode of VIDEO when the trigger signal appears; while it will switch automatically to previous state when the trigger signal disappears after 3 seconds, in the VIDEO trigger state: the only brightness button of TP buttons can work, while button of M and CH don’t work.
- The first grade is +12V BACKUP LIGHT: You can adjust the seven states when there is signal of triggering
- When the camera and mobile show at the same time, guide line can’t be displayed.
Firmware Update
- click the “M” button on the TP button, switch the wireless mode to iOS mode.
- using mobile/laptop/table search Wi-Fi (Wi-Fi name is displayed on the screen), then enter the default password: 12345678.
- Upon the connection between mobile/laptop/table and dongle is completed, open web browser on the mobile phone/laptop/tablet and visit http:\\192.168.49.1.
- Tap the icon to make the web browser jump to another page.

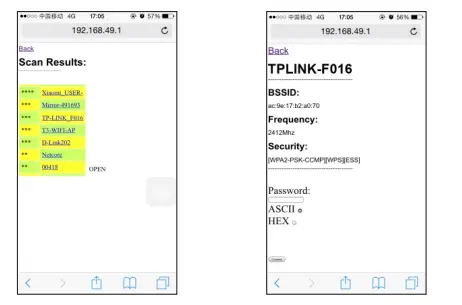
Tap “Scan” and follow the instructions to connect to Wi-Fi AP which allows accessing the Internet through WAN. Please note that when the connection between dongle and AP is established, the connection between dongle and mobile phone/laptop/table may be disconnected. The reason is that the connection channel between dongle and mobile phone is different from the channel between dongle and AP. In this case, mobile phone/laptop/tablet should be connected to dongle by using soft AP again.
- The dongle is able to access the Internet through AP. AP’s SSID and dongle’s IP address that are dispatched from AP (“Device IP1”) will be shown on the screen. The mobile phone/laptop/tablet that is connected to dongle allows to access the Internet because of AP bridge function of the dongle.
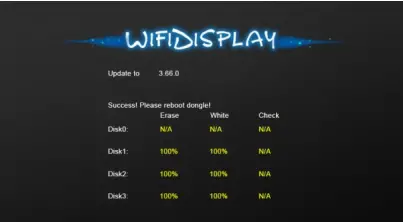
Then long press the “M” button to upgrade within 30 seconds.
- After the upgrade is completed, restart the mirror.
 “If new iOS releases, VTW73M may require new firmware updates for the Miracast function. Availability of New firmware update may take awhile after Apple’s released new iOS.”
 “If new iOS releases, VTW73M may require new firmware updates for the Miracast function. Availability of New firmware update may take awhile after Apple’s released new iOS.”
FAQS
Blue lines outside the white lines indicate that your car is heading in the right direction. A dotted black line is the center line guide that helps you line up your vehicle in front of a trailer or camper. Green lines represent objects farthest from your vehicle. Red lines represent objects nearest your vehicle.
If a driver does not get a rearview camera feed while in reverse, there is likely some issue with the electrical system. Most likely, the camera itself behind your vehicle is not the problem. The very first step to troubleshooting this issue is to check the manual provided by the manufacturer.
Not every backup camera has an adjustable lens or enclosure. This means adjusting the angle of the camera includes adjusting the entire mount. Simply remove the mount from the vehicle and place washers, bolts, or grommets between the mount and the surface of the vehicle and refasten the screws or bolts.
The best place to put a reversing camera is in the middle of the vehicle. Being fitted in a lower position will give it a better field of view – or high up looking downwards. For example, the rear bumper is ideal – but on some vehicles above the rear doors can also be suitable.
In order to wire a backup camera to be on all of the time, you would have to wire it into the running light circuit instead of the reverse light circuit. This way, when you wanted it on, you would just turn the running lights on
Description. The red wire at the end of video cable are extra power wires runs inside the video cable, It’s purpose is-if you power easily in the rear from the reverse lights, you can get your power fro the rear and use this to bring it to the front.
If the reverse camera is misbehaving and showing the message, “No Signal” instead of an image on the dashboard monitor, then the connection between the reverse camera and the monitor has been interrupted. This is likely caused by a connection point fully dislodging or the wiring circuit being completely cut through
Most rear view backup cameras today come with a 120-degree viewable angle, it is the minimum you should have and if the option to upgrade to 170 degrees is available we suggest you take it. This will allow you to see approximately 3 lanes behind you.
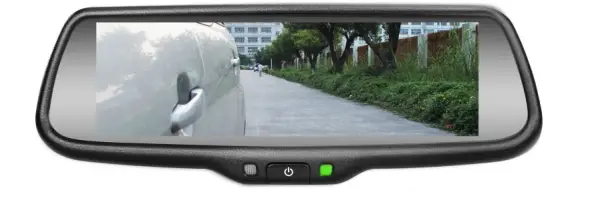
A rear view mirror system (also known as a Reverse camera mirror) is the most popular type of reversing camera system. It replaces the existing rear view mirror in your vehicle, with one that has a LCD screen integrated. When you select the reverse gear, the screen appears. This type of mirror needs power.
Step 1: Long-tap on the Camera app icon and open the app info menu. Step 2: Go to Storage & cache menu. Step 3: Tap on Clear cache and you are all set to use a working Camera app on Android.
No you don’t have to drill a hole in your car. you can feed the wire for the back up cam through the tag, light, or even through the grommet.
Although many high-end reversing cameras in the market are designed to work in a wide variety of lighting conditions, these can provide a clear image in near or total darkness. This is where the infrared night vision illumination or light emission diode (LED) helps.
If the camera is installed and connected to the ignition circuit for main power, the dash camera will never drain your battery.
Backup camera – a camera that turns on when you put your vehicle in reverse. Rear-view camera – a camera that you can turn on at any time to see what’s behind your vehicle.


