![]()
ALTERNATE INSTRUCTIONS
UNIVERSAL WIRELESS WALL CONSOLE
Alternate instructions for Fixed Code/Dip Switch Programming and alternate blink rates are to be used in conjunction with the main instruction set.
Page 1: Changing Blink Rate Patterns
Page 2: Fixed Code/Dip Switch Programming
BLUE LED Blink Rate Mode 1: Factory Default Setting
(Blink Rate ‐ Once every 3 sec)
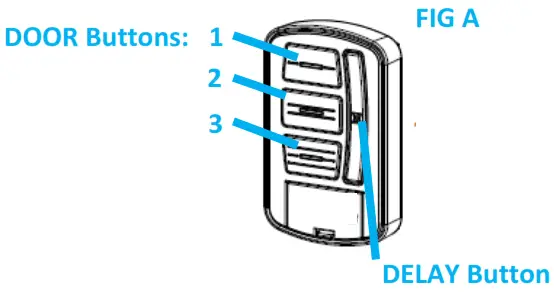
- With only (1) AAA battery installed ‐ hold down the TOP DOOR button while simultaneously installing the second AAA battery. Continue to hold the TOP DOOR button for a total of 10 seconds until the blue LEDs on the OTHER 2 BUTTONS blink 3 times in unison.
BLUE LED Blink Rate Mode 2
(Faster Blink Rate ‐ Once every 2 seconds)
- With only (1) AAA battery installed ‐ hold down the MIDDLE DOOR button while simultaneously installing the second AAA battery. Continue to hold the MIDDLE DOOR button for a total of 10 seconds until the blue LEDs on the OTHER 2 BUTTONS blink 3 times in unison.
BLUE LED Blink Rate Mode 3
(Blue LED OFF ‐ Maximum Battery Life)
- With only (1) AAA battery installed ‐ hold down the BOTTOM DOOR button while simultaneously installing the second AAA battery. Continue to hold the BOTTOM DOOR button for a total of 10 seconds until the blue LEDs on the OTHER 2 BUTTONS blink 3 times in unison.
Changes made to the blue LED blink rate pattern will impact battery life. For best battery life, see Blink Rate Mode 3 to turn LEDs off completely.
If the opener has a group of switches with 3 positions per switch (TRINARY):
- Switch in the UP (+) position = press button 1
- Switch in the MIDDLE (0) position = press button 2
- Switch in the DOWN (‐) position = press button 3
In this example, the code would be: 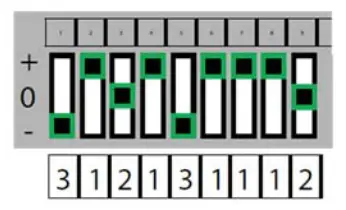
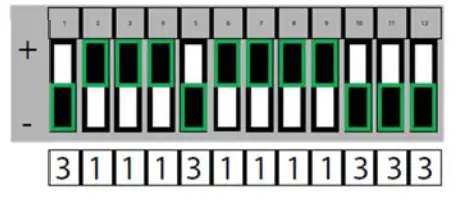
If the opener has a group of switches with 2 positions per switch (BINARY):
- Switch in the UP (+) position = press button 1
- Switch in the DOWN (‐) position = press button 3
In this example, the code would be:
Step 1: Record Switch Positions
- Each shaded box below represents a switch position. In these boxes, write in the number 1, 2, or 3 as it corresponds to the +, 0, or – switch position shown on the emote, opener, or receiver. If you have less than 12 switches, only fill in what you have. You will reference this section in STEP 3.5 below.

Step 2: Determine Specifications
- Find your specification from CHART B below and record the number here: This box should say 1, 2, 3, 4, or 5. You will reference this in STEP 3.3 below.

CHART B
| Brand Name | NUMBER OF SWITCHES/POSSIBLE POSITIONS | NUMBER OF TIMES TO PRESS THE BUTTON OF YOUR CHOICE |
| Genie | 12 switches with 2 possible positions (UP, DOWN) | 1 |
| 9 switches with 2 possible positions (UP, DOWN) | 2 | |
| Overhead Door | 9 switches with 3 possible positions (UP, MIDDLE, DOWN) | 3 |
| Stanley | 310 Mhz, 10 switch/2 position dip switch | 4 |
| Chamberlain’ | 390 MHz, 9 Switch / 3 Position Dip Switch’ | 5 |
Step 3: Programming
- Remove the activation tab from the inside battery compartment.
- Press and hold down the DELAY button for @10 seconds until only a green LED light on the top button ‐ then release. The green LED will continue flashing.
- Press your DOOR button of choice the required number of times that corresponds
with your opener from Chart B above (recorded answer from STEP 2). - Press the DELAY button one time to signal the entry is complete. The green LED will blink rapidly indicating it is ready to receive the recorded switch positions from STEP 1.
- Enter the switch positions that you determined in STEP 1 above (a series of DOOR button presses – 1, 2, or 3).
- After you have entered the final switch position, press and release the DELAY button ONE time to signal the entry is complete.
- Test the button – the next DOOR button press should activate the opener.


