![]() H0053/H0066
H0053/H0066
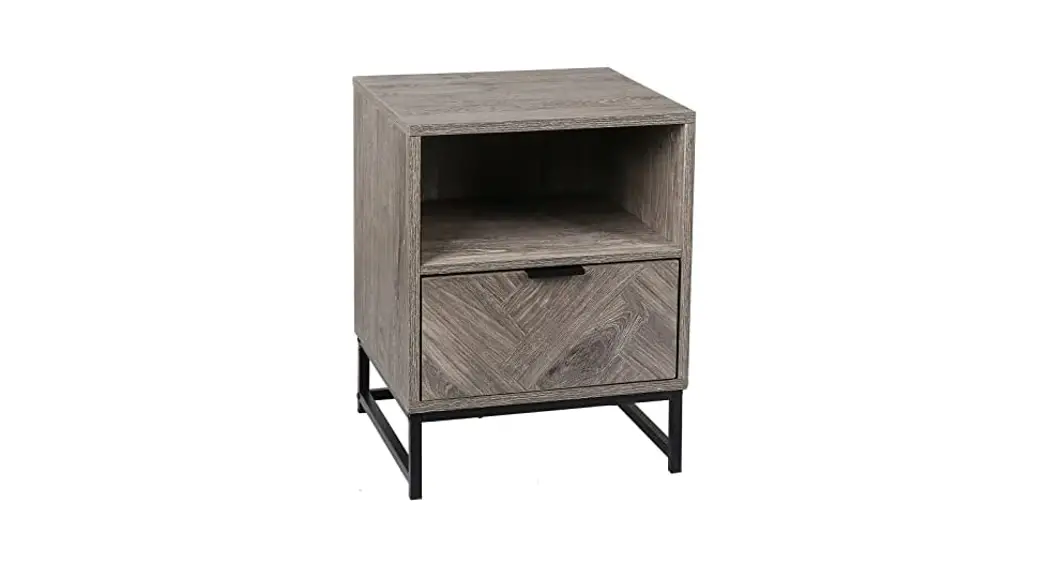
Savannah Two
Drawers Side Table
Instruction Manual
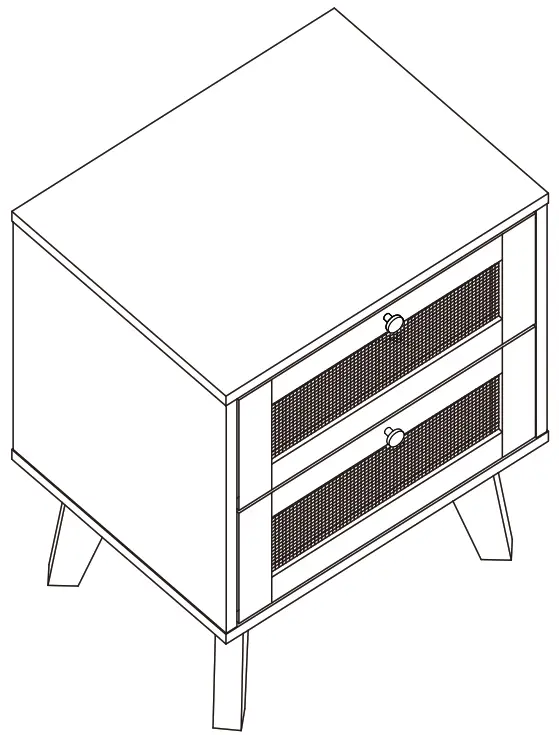
H0053 Savannah Two Drawers Side Table
ASSEMBLY TIME | 1 PEOPLE REQUIRED FOR ASSEMBLY | 1 x 1 m FLOOR SPACE REQUIRED |
SAFETY PRECAUTIONS
PLEASE READ ALL INSTRUCTIONS CAREFULLY BEFORE ASSEMBLING AND USING THE PRODUCT.
- Please check that all parts are present before you start the assembly of your furniture. A Philips head screwdriver (not included) is required for the assembled of thisproduct.
- For ease and speed of assembly, we recommend that before you commence each step of the assembly, that you identify all the parts required for that step.
- For larger items, please ensure that you have sufficient space and people to assemble your product safely.
- We recommend that, where possible, all items are assembled near to the area in which they will be placed in use, to avoid moving the product unnecessarily once assembled.
- For the protection of your furniture, we recommend that the product is placed on a protected surface during assembly to prevent any damage.
- During assembly, Do n ot ti ghten b olts / sc rews completely u ntil al l b olts / sc rews are lined up and inserted into holes, Do not over tighten screws and bolts to avoid stripping, Do not use power tools
- Always place the product on a flat, steady and stable surface.
- Do not stand on the product. Do not use the product as a stepladder.
- This product is intended for indoor, household use only as it is a non industrial product.
CARE AND CLEANING
- Please periodically check all fittings and re-tighten as necessary.
- To clean your item, please use a damp cloth and wipe clean.
- Never allow any kind of liquid to remain on your furniture. If liquid spills onto the product, please wipe clean as soon as possible.
![]() WARNING : ENSURE THE WALL STRAPIS AT TACHED TO AVOID SERIOUS INJURY.
WARNING : ENSURE THE WALL STRAPIS AT TACHED TO AVOID SERIOUS INJURY.
To avoid any serious or fatal injury, this product has been fitted with a wall strap to prevent toppling. We strongly recommend that this product is permanently fixed to the
wall or other suitable surface. Fixing devices are not included since different surface materials require different attachments. Please seek professional advice if you are in doubt of what fixing device to use.
Do not stand on the product. Do not climb on the product. Do not swing on the product.
READ AND SAVE THESE INSTRUCTIONS FOR FUTURE REFERENCE
ASSEMBLY DIAGRAM
AFTER SALES SUPPORT
If you have any general enquiries or require spare parts for this product, please feel free to
contact us via the following email: Email: [email protected]
You can contact us for support at any time. We’ll answer you in 24hrs.
HARDWARE LIST
Hardware List
| A | 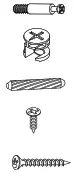 | Ø6x35mm | Cam Bolt | 12 pcs |
| B | Ø15x10mm | Cam Lock | 12 pcs | |
| C | Ø6x30mm | Wooden dowel | 4 pcs | |
| D | Ø3x12mm | Screw | 20 pcs | |
| E | Ø4x35mm | Screw | 13 pcs |
| F | 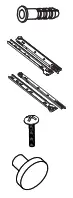 | Wall Anchor | 1 pc | |
| G | Drawer Glide | 2 pcs | ||
| H | Drawer Glide | 2 pcs | ||
| I | Bolt | 2 pcs | ||
| J | Handle | 2 pcs |
| M |  | Foot Pad | 16 pcs | |
| N | Ø3x14mm | Screw | 1 pc | |
| P | Safety Strap | 1 pcs | ||
| Q | Washer | 2 pcs | ||
| R | Ø5x40mm | Screw | 8 pcs | |
| S | Allen key | 1 pc |
 Philips head screwdriver required for assembly (not included)
Some extra hardware may also have been included.
The hardware quantities listed above are required for proper assembly.
TIPS Before ASSEMBLY
IMPORTANT:
- Do not tighten bolts / screws completely until all bolts / screws are lined up and inserted into holes.
- Do not over tighten screws and bolts to avoid stripping.
What you need
- Some of your favourite fruits or your preferred snacks.
- Use the packaging carton as a working surface to prevent possible product damage during assembly.
Safety First, Fun Later
We want your Furniture Unit to last as long as possible, so we recommend that you tighten the screws 2 weeks after assembly,and for added safety, check the tightness of all screws every 2 months.
We do our best to ensure your Furniture arrives without any problems, but occasionally mistakes happen – as humans we are imperfect beings. In the event that a part is damaged or missing, we will be more than happy to provide you with replacement part(s) for free.
For more help, you can send a message to our customer support email [email protected] in any time.
Ready? Ok, let’s get rolling!
This should be very easy, just follow our simple instructions step by step and you will put it together in no time.
ASSEMBLY STEPS
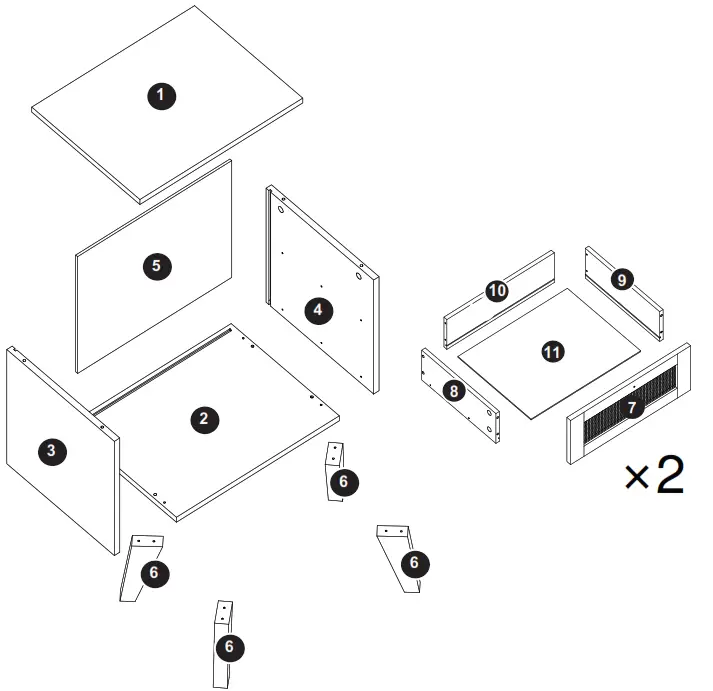
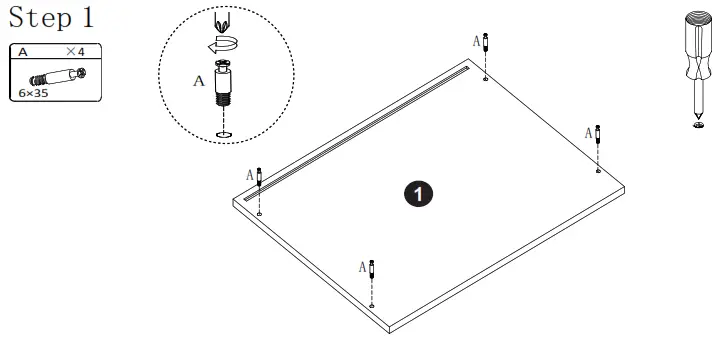 Secure 4 x cam bolts (A) to panel (1) with a screwdriver.
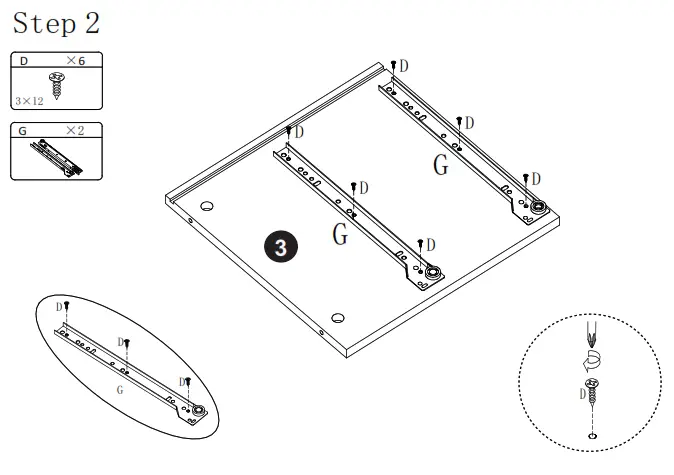 Attach 2 x drawer glides (G) to panel (3) using 6 x screws (D) with a screwdriver. Make sure the protruding edge at the silver button screw end is upward. The end of the
glides are close to the groove.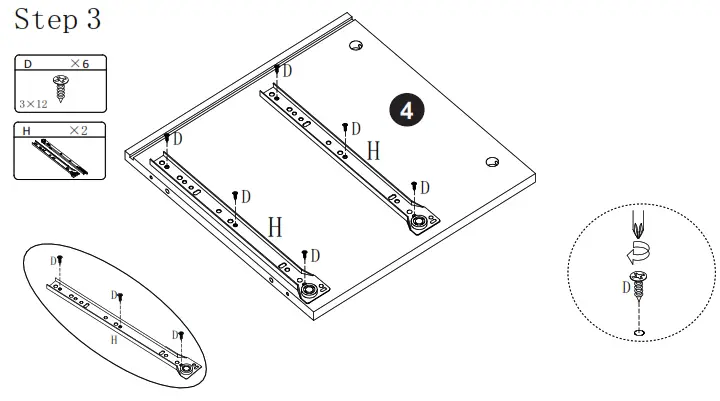 Attach 2 x drawer glides (H) to panel (4) using 6 x screws (D) with a screwdriver.
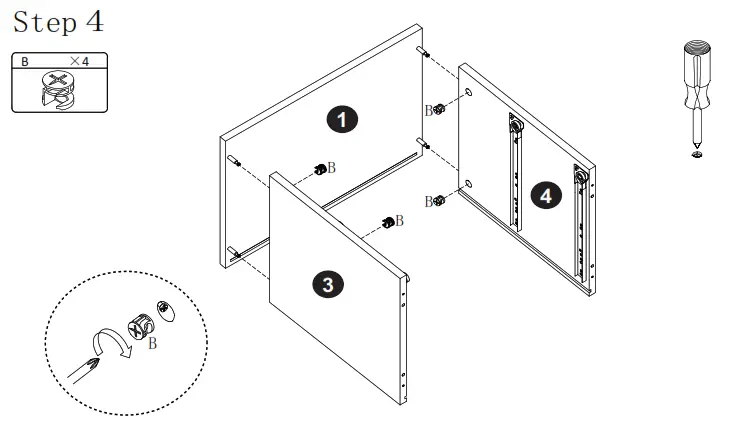
Attach panel (3), (4) to panel (1) using 4 x cam locks (B). Tighten with a screwdriver. Please make sure the grooves inside panels are at the bottom.
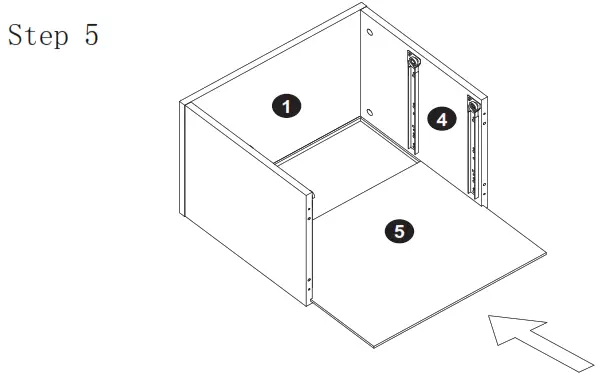 Slide panel (5) into position.
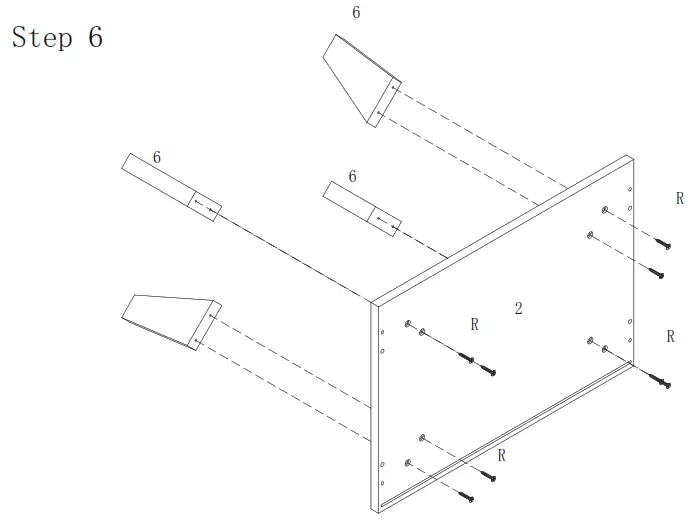
Fix legs (6) to panel (2) by using screws (R)
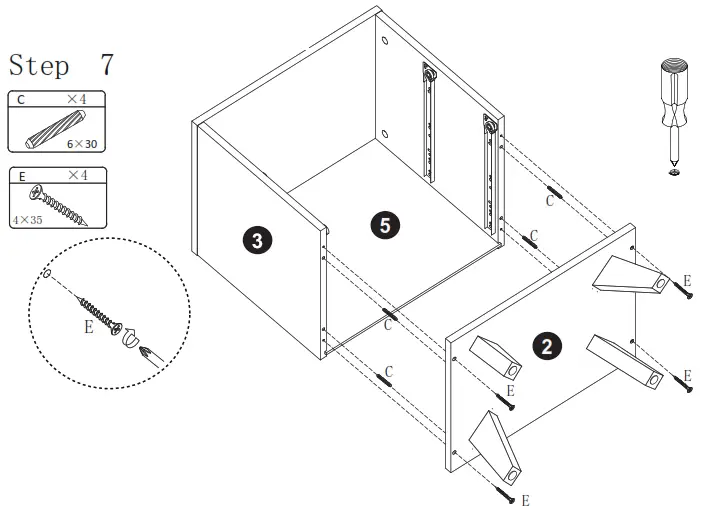
Attach panel (2) to assembled unit using 4 x wooden dowels (C), 4 x screws (E). Tighten with a screwdriver.
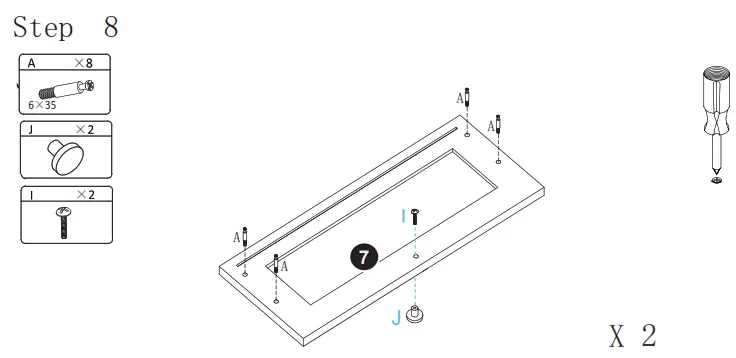
Secure 4 x cam bolt (A) to panel (7) with a screwdriver. Attach the handle (J) to the panel using a bolt (I) and tighten with a screwdriver.
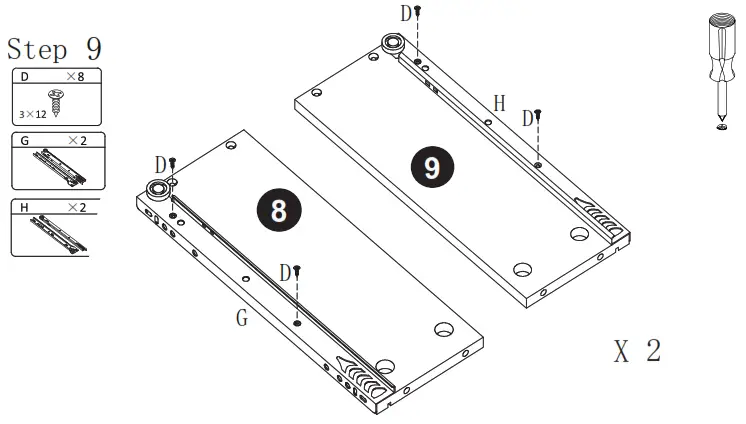
Fix drawer glide (G) to panel (8) using 2 x screws (D) and tighten with a screwdriver.
Fix drawer glide (H) to panel (9) using 2 x screws (D) and tighten with a screwdriver.
Please note that the roller of the glide is close to the smaller hole on panel.
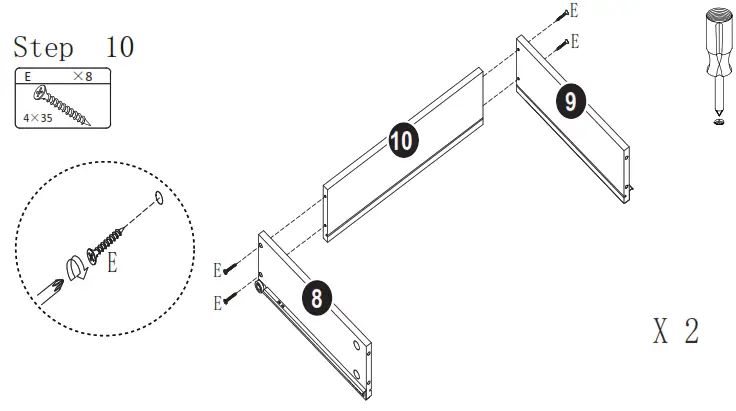
Attach panel (8), (9) to panel (10) using 4 x screws (E) and tighten with a screwdriver.
Please make sure the grooves inside panels are at the bottom.
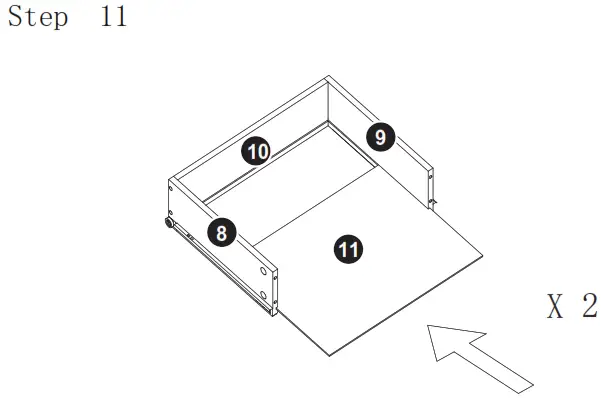
Slide panel (11) into position.
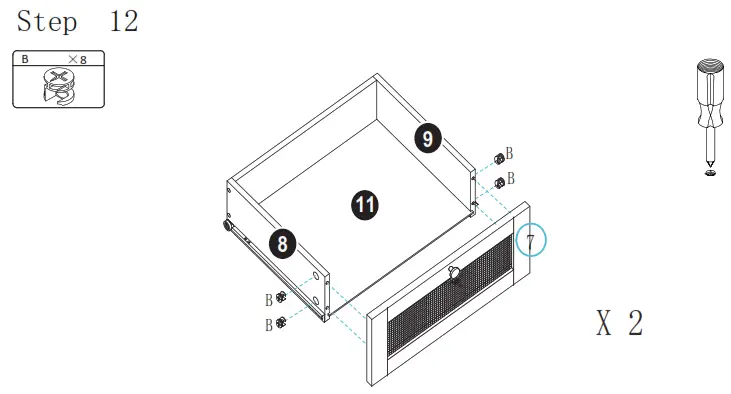
Attach panel (7) to assembled unit using 4 x cam locks (B) and tighten with a screwdriver.
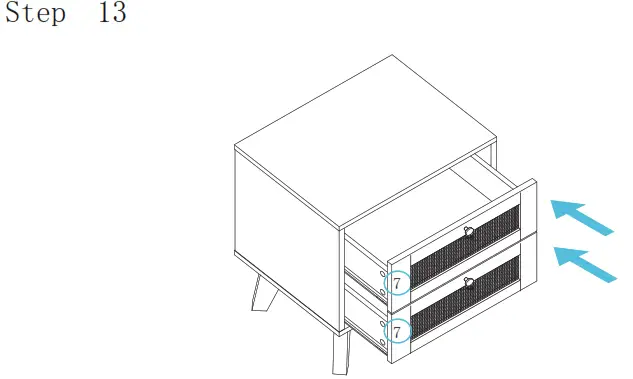
Slide drawers into position.
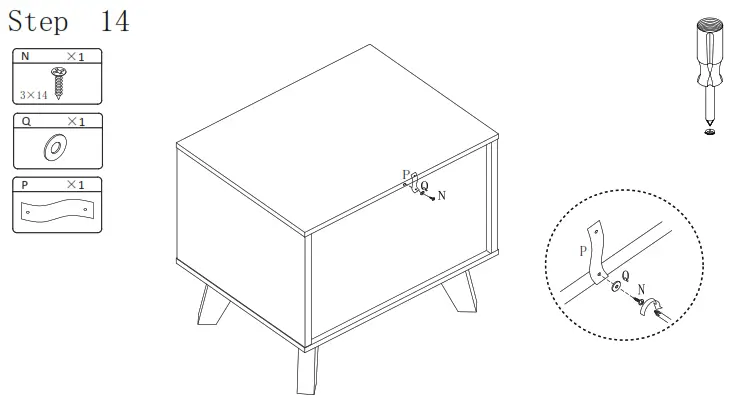
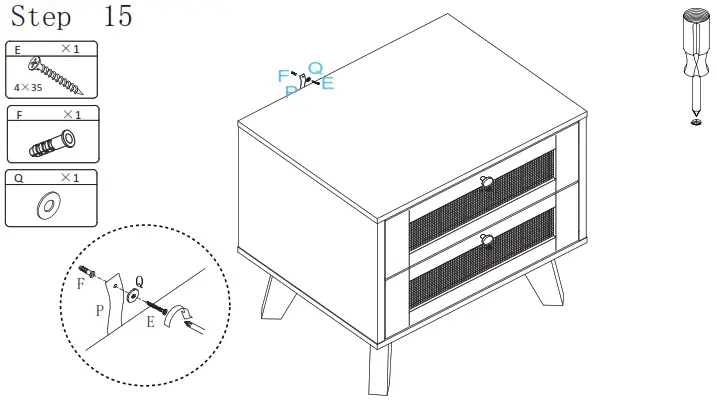
Fix the safety strap (P) to the furniture using a washer (Q), a screw (N) and tighten with a screwdriver.
Fasten the furniture to wall using a wall anchor (F), a washer (Q), a screw (E) and tighten with a screwdriver.
WALL FIXING GUIDE
NOTE: Supplied wall plugs are only suitable for use in masonry walls.
If you have any doubts about using the correct plug for your wall, please seek professional advice. Failure of theproduct due to using incorrect fixings is the responsibility of the installer.![]() IMPORTANT:
IMPORTANT:![]() When drilling into walls, always check for hidden wires or pipes, etc.
When drilling into walls, always check for hidden wires or pipes, etc.
Tips & Tricks
Make sure that the hardware used is suitable for supporting your unit.
P lease consult a qualified trades person if unsure.![]() If you are unsure, please select a larger screw and wall plug.
If you are unsure, please select a larger screw and wall plug.![]() Ensure that you use the recommended drill bit to match the wall plug and hole size.
Ensure that you use the recommended drill bit to match the wall plug and hole size.![]() Take extra care when drilling high walls, ceiling and ceramic tiles. Ensure wall plugs are inserted beyond the thickness of the ceramic tiles to avoid splitting or cracking.
Take extra care when drilling high walls, ceiling and ceramic tiles. Ensure wall plugs are inserted beyond the thickness of the ceramic tiles to avoid splitting or cracking.![]() Ensure that wall plugs are well fitted and are a tight fit in the drilled hole.
Ensure that wall plugs are well fitted and are a tight fit in the drilled hole.
Types of Walls
Use one of the following types of wall plug (not included) if your walls are made of brick, breeze block, concrete, stone or wood. Screws may be able to be fixed directly to solid wood walls as they will provide a secure anchor point.
 | ||
| 1. General Purpose Wall Plug Generally, aerated blocks should not be used to support heavy loads, use a specialist fitting in this case. For light loads, general purpose wall plugs can be used. | 2. Plasterboard Wall Plug For use when attaching light loads onto plasterboard partitions. | 3. Cavity Fixing Wall Plug For use with plasterboard partitions or hollow wooden doors. |
 | ||
| 4. Cavity Fixing Heavy Duty Wall Plug For use when fitting or supporting heavy loads such as shelving and wall cabinets. | 5. Hammer Fixing Wall Plug For use with concrete block or brick walls, or walls stuck with plasterboard. The hammer fixing allows it to be fixed to the wall rather than the plasterboard. Always check the fixing is secure to the retaining wall. | 6. Shield Anchor Wall Plug Heavy Loads For use with concrete or brick walls, or for use with heavier loads such as TV & HiFi speakers and satellite dishes, etc. |
Contact Us: [email protected]


