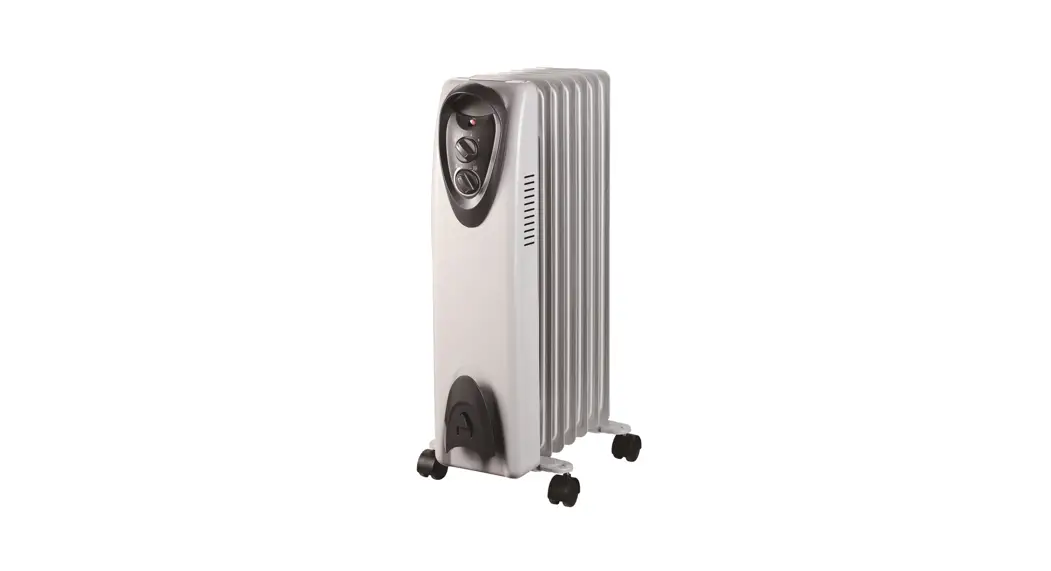
Oil-filled Heater With Thermostat
Owner’s Manual
Model: NDB-1Y

PLEASE READ AND SAVE THESE
IMPORTANT SAFETY INSTRUCTIONS
PET OWNERS WARNING:
The health of some small pets including birds is extremely sensitive to the fumes produced during the first-time use of many appliances. These fumes are not harmful to humans, but we recommend that you do not use your heater around birds and small pets during its initial use until the manufacturing corrosion (anti-corrosion) coatings burn off.
IMPORTANT INSTRUCTIONS
PLEASE READ ALL INSTRUCTIONS BEFORE USING THIS HEATER. WHEN USING ELECTRICAL APPLIANCES, BASIC PRECAUTIONS SHOULD ALWAYS BE FOLLOWED TO REDUCE THE RISK OF FIRE, ELECTRIC SHOCK AND PERSONAL INJURY, INCLUDING THE FOLLOWING:
When switching on the appliance for the first time, allow it to run at full power for about two hours to get rid of the unpleasant smell. Make sure that the room in which the appliance is located is well ventilated during this operation. It is normal for the appliance to emit small cracking sounds when you turn it on if the first time.
- Read all instructions before using this heater.
- This heater is hot when in use. To avoid burns, do not let bare skin touch hot surfaces.
Use the handle when moving the unit. Keep flammable materials such as furniture, pillows, bedding, papers, clothes, and curtains at least 3 feet (0.9 m) from the front and top of the heater and keep them away from the sides and rear of the heater. Keep the rear grille away from walls or drapes so as not to block the air intake. - Extreme caution and supervision are necessary when any heater is used near children or invalids and whenever the heater is left operating and unattended.
- Always unplug the heater when not in use.
- Do not use any heater with a damaged cord or plug or after the heater malfunctions or has been dropped or damaged in any manner. Discard heater or return to an authorized service facility for examination and/or repair.
- Do not use outdoors.
- This heater is not intended for use in bathrooms, laundry areas, or other similar indoor locations. Never locate a heater where it may fall into a bathtub or other water container.
- Do not run cord under carpeting. Do not cover the cord with throw rugs, runners, or similar coverings. Do not route the cord under furniture or appliances. Arrange cord away from traffic areas and place it where it will not be tripped over.
- To disconnect the heater, turn controls off, then remove the plug from the outlet.
- This appliance has a polarized plug (one blade is wider than the other). This plug is intended to fit a polarized outlet only one way. If the plug does not fit fully in the outlet, reverse the plug. If it still does not fit, consult a qualified electrician. Do not connect the heater to extension cords, surge protectors, timers, direct breakers, or an outlet with other appliances connected to the same outlet. Risk of fire, overheat, malfunction, property damage, injury, or even death may result if not adhered to!
- Connect to properly polarized outlets only.
- Do not insert or allow foreign objects to enter ventilation or exhaust openings, as this may cause an electric shock or fire, or damage the heater.
- To prevent a possible fire, do not block air intakes or exhaust in any manner. Do not use it on soft surfaces, like a bed, where openings may become blocked.
- A heater has hot and arcing or sparking parts inside. Do not use it in areas where gasoline, paint, or flammable liquids are used or stored.
- Use this heater only as described in this manual. Any other use not recommended by the manufacturer may cause fire, electric shock, injury to persons or other damage to property.
- This heater must be plugged into a 120V, 15 amps (or more) circuit of its own. Nothing else can be plugged into the same circuit. If unsure if you home meets this specification, consult a certified electrician prior to use. Risk of fire, overheat, malfunction, property damage, injury, or even death may result if not adhered to!
- To prevent overload and blown fuses, be sure that no other appliance is plugged into the same outlet or into another outlet wired into the same circuit.
- It is normal for the heater’s plug and cord to feel warm to the touch. A plug or cord that becomes hot to the touch or becomes distorted in shape may be a result of a worn electrical outlet. Worn outlets or receptacles should be replaced prior to further use of the heater. Plugging the heater into a worn outlet/receptacle may result in overheating of the power cord or fire.
- Ensure the heater is on a stable, secure surface to eliminate the potential of tipping over.
- Always plug heaters directly into a wall outlet/receptacle. Never use an extension cord or relocatable power tap (outlet /power strip).
- Be sure that the plug is fully inserted into an appropriate receptacle. Please remember that receptacles also deteriorate due to aging and continuous use: check periodically for signs of overheating or deformations evidenced by the plug. Do not use the receptacle and CALL your electrician.
- Check that neither the appliance nor the power cable has been damaged in any way during transportation.
- Make sure that no pieces of polystyrene or other packaging material have been left between elements of the appliance. It may be necessary to pass over the appliance with a vacuum cleaner.
- This appliance is not intended for use by persons (including children) with reduced physical, sensory or mental capabilities, or lack of experience and knowledge unless they have been given supervision or instruction concerning the use of the appliance by a person responsible for their safety. Children should be supervised to ensure that they do not play with the appliance.
CAUTION: To prevent electric shock, match wide blade of plug to wide slot, fully insert.
SAVE THESE INSTRUCTIONS
ASSEMBLY INSTRUCTIONS
The heater is packaged with the wheels unattached. You must attach them before operating the heater. WARNING: Only operate the heater in a normal upright position with wheels assemblies attached to the bottom (wheels on the bottom, controls on the top), any other position could create a hazardous situation.
- Be sure the heater is unplugged and off.
- Turn the heater body upside down on a scratch-free and stable surface to make sure it is
stable and will not fall. (see Fig 1)
- Screw off the wing nut from the U-shaped bolts provided. Fit the wheel assemblies onto
the heater by placing the U-shaped bolts over the base pipe, between the outermost fins on each side of the heater. (see Fig.2,3,4).


- Securely fasten the wheel assemblies onto the heater by screwing the wing nuts onto the bolts (see Fig. 5).

OPERATIONS INSTRUCTIONS
NOTE: It is normal when the heater is turned on for the first time or after having not been used for a long period, the heater may emit some smell and fumes or have some noise inside, these will disappear when the heater has been on a short while.
- Before using the heater, make sure that it is on a flat a stable surface. Damage may
occur if it is placed on an incline or decline. - Turning the thermostat knob counter-clockwise to the – position and setting the power
control dial to “0” for off. Insert the plug into a 120V AC, 60Hz outlet. Check that the plug and the socket fit well, then you can operate the appliance. - Rotate the thermostat knob clockwise to + position and turn the power switch from “0” to either “1” for low heating, “2” for medium heating, or “3” for high heating.
- When the room temperature reaches a comfortable level, slowly turn the thermostat counter-clockwise until the thermostat shuts off (you will hear a faint “click” sound). The thermostat can now be left at this setting. As soon as the room temperature has dropped below the set temperature, the unit will switch itself on automatically until the set temperature has been reached again. In this way, the room temperature remains constant with the most economical use of electricity.
- If you want to change the room temperature setting, rotate the thermostat control dial clockwise to raise the temperature, or counter-clockwise to lower it.
- To completely shut the heater off, turn all the controls to OFF, and remove the plug from the socket-outlet.
CAUTION: DO NOT OPEN OR REFILL/CHANGE OIL FINS. OIL FINS ARE PERMANENTLY SEALED AND DO NOT REQUIRE REFILLING OR OIL CHANGING. ATTEMPTING TO OPEN FINS WILL DAMAGE THE UNIT.
PROTECTION SYSTEMS
OVERHEAT PROTECTION
This heater includes an overheat protection system that shuts the unit off when parts of the heater overheat. If this occurs, turn the heater off, unplug it, and inspect and remove any objects on or adjacent to the heater that may cause high temperatures. Wait 10 to 20 minutes for the unit to cool down then plug it back in and resume the normal operation.
TIP-OVER SWITCH
Your heater is equipped with a tip-over switch, which is designed to automatically shut off the unit when tipped forward or backward. When returned to a normal upright position, the heater will automatically come on again. This is a safety to avoid possibility of fire should the unit be accidentally tipped over.
POWER INDICATOR LIGHT
This heater is equipped with a power indicator light. The power light will illuminate when the heater is plugged in and has electric power.
CLEANING AND MAINTENANCE
- Before any cleaning, make sure that:
a. The heater is turned OFF
b. Disconnect power supply at source by removing the plug from the power outlet. - Regular cleaning:
a. Interior dust can often be removed by using a vacuum cleaner with a crevice tool attachment.
b. Do not use cleaning spray-on liquids or other chemicals on the unit
c. To clean the enclosure, use a clean, soft, and slightly damp cloth to gently wipe off the dirt from the surface of the unit. Be sure not to wet the heating element and the switches. Allow the unit to dry completely before using it.
CAUTION: DO NOT ALLOW WATER TO RUN INTO THE INTERIOR OF THE HEATER AS THIS COULD CREATE A FIRE OR ELECTRIC SHOCK HAZARD.
STORAGE
- Perform the cleaning procedures described in the “CLEANING AND MAINTENANCE” section.
- Wipe all parts to dry.
- Pack the heater in a plastic bag and store it in a cool, dry place.
TROUBLESHOOTING
If your heater fails to operate, please follow these procedures prior to contacting Customer Service.
| Problem | Probable Cause | Solution |
| The heater will not power on | The heater is not plugged into a 120V polarized outlet/receptacle. | Ensure unit is in OFF position. Plugin the unit and attempt to turn it on again. |
| Breaker/Fuse has been tripped. | Please check your electrical box to confirm the breaker has not been blown. This may occur if the unit is sharing a receptacle with another high-power consuming appliance. Ensure unit is in OFF position. Plugin the unit and attempt to turn it on again. Attempt to plug the unit into another independent output in the house. | |
| Unit is not heating | Room temperature has been warmed up to thermostat setting | To resume heating, adjust the thermostat temperature to a higher setting. |
| The heater is creating a burning smell. | A drop of oil fell on the heating coil during the manufacturing process. It will quickly evaporate and should not occur again. | Ensure the room in which the heater is situated is well ventilated. |
| Check & ensure there are no combustible materials within 3′ (0.9 m) of the heater. | Remove the combustible materials preventing air intake into the heater. |
PLEASE DO NOT ATTEMPT TO OPEN OR REPAIR THE HEATER YOURSELF, DOING SO COULD VOID THE WARRANTY AND CAUSE DAMAGE OR PERSONAL INJURY.
Technical support: 1-888-538-0082
Service email: [email protected]
Documents / Resources
 | PROFUSION HEAT NDB-1Y Oil-Filled Heater with Thermostat [pdf] Owner's Manual NDB-1Y, Oil-Filled Heater with Thermostat |
