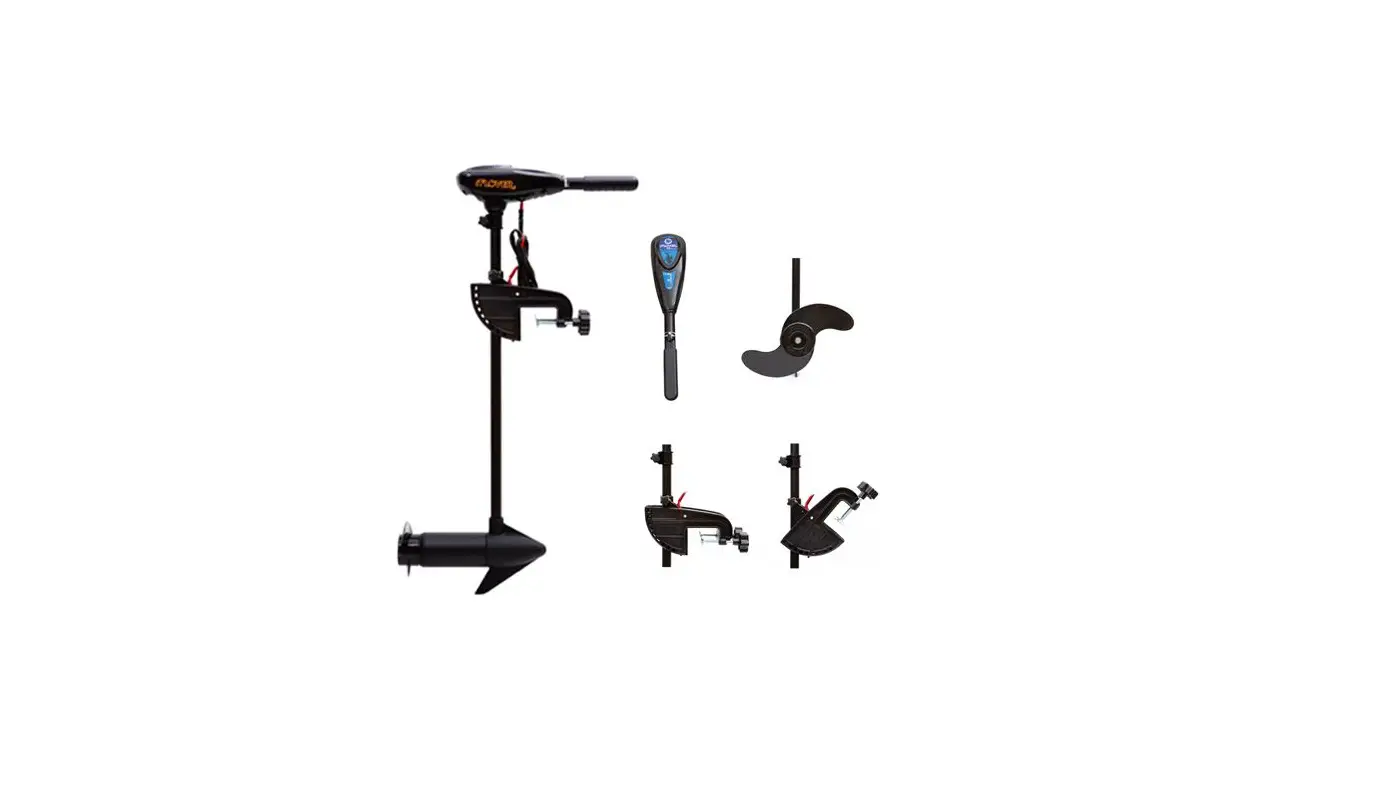
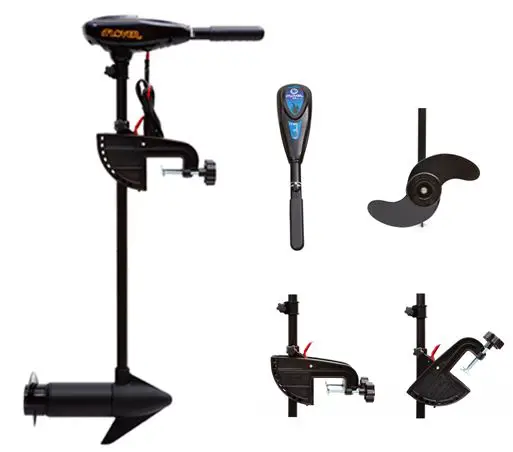
FLOVER Saltwater Electric Outboard Motor
INSTALLING THE MOTOR MOUNT
Install the trolling motor on a boat transom and then turn the clamp screw to the right to tighten the motor column in the bracket.
Over-tightening the clamp screw could lead to its malfunction.
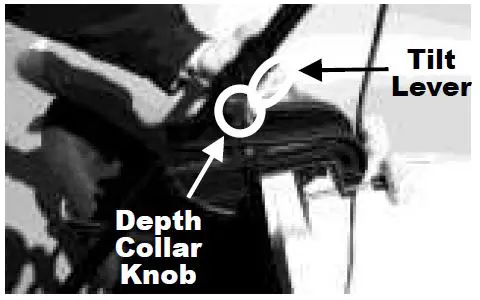
DEPTH ADJUSTMENT
- Grasp the aluminum shaft by hand.
- Turn to the left the Depth collar knob and Steering control knob to loosen. Turn the Depth collar knob to the right to tighten after soaking the motor housing and the prop in water properly.
If the prop is not soaking in water properly, say at least 30cm in water for a normal inflatable boat, the power will not be sufficiently efficient.
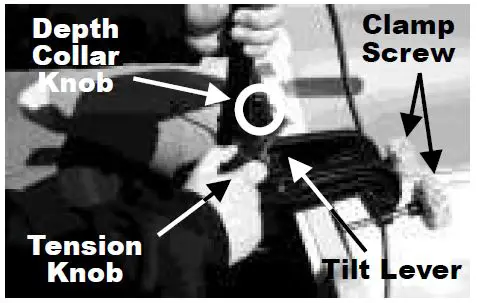
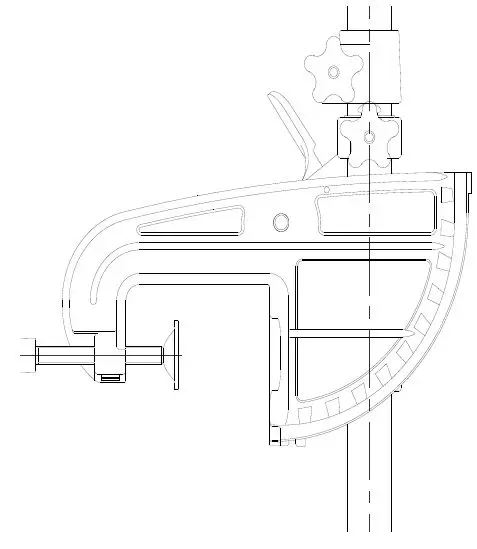
BRACKET ADJUSTMENT
You can lock your motor in a various angle for shallow water or tilt it completely out of the water.
- Grasp the aluminum shaft.
- Depress and hold the tilt lever on the bracket.
- Tilt to any of the position on the mounting bracket.
- Release the tilt lever.
STEERING ADJUSTMENT
- Loosen the steering tension knob to provide enough tension to allow the motor to turn freely.
- For other methods, tighten the knob and lock the motor in a preset position to leave your hands free for fishing.
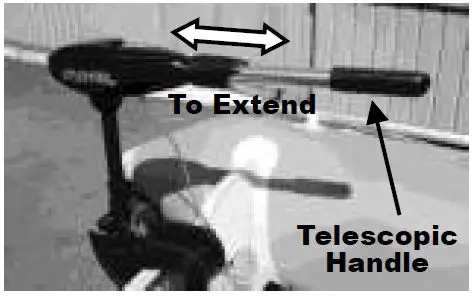
TWIST TILLER [T, TG, TGS]
- The motor offers a choice of five forward and three reverse speeds. The speed control may be operated in either direction, forward or reverse.
- Turn the twist tiller handle counterclockwise from N(OFF) to increase reverse speed and clockwise from N(OFF) to increase forward speed.
- You can choose to have the motor with telescopic handle. The handle lever of the control unit enables the hand to be extended. You need a smooth operation to function the handle lever to avoid its mal-functioning.
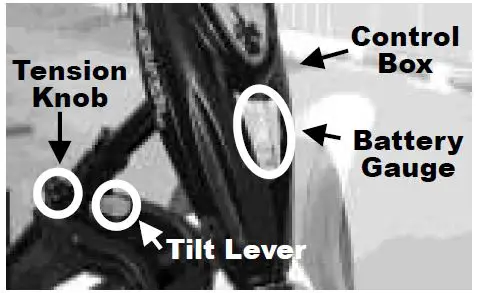
BATTERY GAUGE [TG, TGS]
The L.E.D.s on the control box display the remaining of the power for the connected battery.
- Replace the battery with a fully-charged one or recharge the battery when the red L.E.D.s turns on and off.
- Excessive use of the battery could lead to a shortening of battery working life.
BATTERY CONNECTION [12V]
- The red line (+) on the motor connects to (+) terminal of the battery.
- The black line (-) on the motor connects to the (-) terminal of the battery.
- Check the handle on N(OFF) position before battery is connected.
- Check lines connect to battery terminal firmly.
- Battery should be kept in shady and ventilated place.
- Use a 100A/h 12V Deep Cycle battery for marine.
PROP REPLACEMENT [T, TG]
- Grasp the prop and loosen the nut using a plier or a wrench.
- Take off the nut and star-washer.
- Turn the old prop to the horizontal and pull it straight off. If the drive pin falls out, push it back in.
- Align the new prop with the drive pin.
- Install the star-washer and nut.
- It is critically important to disconnect the motor from the battery, when you replace the prop.
- Tighten up the prop nut. If you unnecessarily over-tighten the nut, there could be damage to the prop.

ANODE REPLACEMENT [TGS]
- Grasp the prop and manually loosen the anode where the nut is incorporated.
- Replace the anode and install the new anode.
When you do the replacement, check out the battery is disconnected.
MAINTENANCE
- After each use, wipe off the motor with a dry cloth or towel.
- The prop must be cleaned of weeds and fishing line. Line can get behind the prop, wear away the seals and allow water to enter the motor. Check this after every 20 hours of normal use.
- During trailering, storage or not in use, disconnect the motor from the battery.
- For maximum performance, restore battery to full charge before each use.
- Maintain the battery terminal clean with smooth sandpaper.
TROUBLESHOOTING
- Motor fails to run or lacks power:
- Check battery connections for proper polarity.
- Check the battery terminal for clean and corrosion.
- Check the prop for line or weeds.
- Motor loses power after a short running time:
- Check battery charge, if low, restore to full charge.
- Motor is hard to steer.
- Loosen the steering tension knob on the bracket.
- Lubricate the aluminum shaft.
For all other malfunctions, contact to authorized service center listing for nearest service center.
LIMITED WARRANTY
The manufacturer warrants Flover trolling motors to be free from defects in materials and workmanship under normal use for a period of twenty-four (24) months from the date of purchase.
To have full warranty, it is important to keep ‘Limited Warranty’ and the receipt, and make the best use of it for your own interest.
The warranty does not cover damages due to unauthorized modification of motor structure, misuses against stated instructions on the manual and originally-aimed purpose. In particular, not one except ‘authorized service dealers’ should open the motor housing.
- There exist no other warranty clauses issued by the manufacturer except the limited warranty on the users’ manual.
- No dealers and/or sellers are entitled to give promise and/or make assertion regarding the warranty.
LINE UP
| FLOVER | F33 | F35 | F40 | F45 | F50 | F55 |
| Thrust in lb | 33 | 35 | 40 | 45 | 50 | 55 |
| Thrust in kg | 15.0 | 15.9 | 18.1 | 20.4 | 22.7 | 24.9 |
| Voltage | 12 Volt | |||||
| Speeds Steps | 5 forward steps / 3 reverse steps | |||||
| Shaft Length [cm] | 75 | 85 (100 for TGS) | ||||
| Prop dia. × pitch [in] | 9×4 | 11×4 | ||||
| Net wt. [kg] | 6.8 | 6.8 | 7.8 | 8.6 | 8.8 | 9.0 |
| Gross wt. [kg] | 10.3 | 10.3 | 11.8 | 12.5 | 12.6 | 12.9 |
| Packing size [cm] | 107*57*18 | 118*57*18 (134*57*18 for TGS) | ||||
| Selection | F, T, TG | T, TG | T, TG | T, TG, TGS | T, TG | T, TG, TGS |
F: Fixed hand tiller / T: Telescopic tiller / G: battery gauge / S: Saltwater / TG: T+G / TGS: T+G+S
TECH MATRIX
| FRW SPEED | 1 | 2 | 3 | 4 | 5 | |
| F33 | AD | 8 | 10 | 14 | 20 | 30 |
| HR | 9.4 | 7.5 | 5.4 | 3.8 | 2.5 | |
| BS | 2.0 | 2.7 | 3.4 | 4.2 | 5.0 | |
| F35 | AD | 11 | 16 | 20 | 25 | 34 |
| HR | 6.8 | 4.7 | 3.8 | 3.0 | 2.2 | |
| BS | 2.1 | 2.7 | 3.5 | 4.2 | 5.1 | |
| F40 | AD | 10 | 14 | 20 | 27 | 40 |
| HR | 7.5 | 5.4 | 3.8 | 2.8 | 1.9 | |
| BS | 2.0 | 2.6 | 3.3 | 4.1 | 4.9 | |
| F45 | AD | 12 | 16 | 22 | 28 | 42 |
| HR | 6.3 | 4.7 | 3.4 | 2.7 | 1.8 | |
| BS | 2.2 | 2.8 | 3.6 | 4.4 | 5.3 | |
| F50 | AD | 14 | 18 | 22 | 28 | 42 |
| HR | 5.4 | 4.2 | 3.4 | 2.7 | 1.8 | |
| BS | 2.1 | 2.8 | 3.5 | 4.3 | 5.2 | |
| F55 | AD | 14 | 18 | 24 | 30 | 50 |
| HR | 5.4 | 4.2 | 3.1 | 2.5 | 1.5 | |
| BS | 2.1 | 2.8 | 3.5 | 4.3 | 5.2 | |
- AD: Ampere Draw, HR: Running time in hours, BS: Boat Speed in Miles
- using 12V marine deep cycle battery with 100 Ah
- assuming 85% battery consumption and 85% efficiency of propulsion
PART LIST
| Code | Description | Inclusion | Application |
| F311 | Seal Set | 2 x seal, 1 x paper tube, 1 x retainer | F33F, F33T – F55T, F33TG – F55TG, F40TGS – F55TGS |
| F312 | Ball bearing | 1 x ball bearing | F33F, F33T – F55T, F33TG – F55TG, F40TGS – F55TGS |
| F313 | Bushing | 1 x bushing | F33F, F33T – F55T, F33TG – F55TG, F40TGS – F55TGS |
| F314 | E-ring | 3 x e-ring | F33F, F33T – F55T, F33TG – F55TG, F40TGS – F55TGS |
| F315 | O-ring | 3 x 71mm, 3 x 81mm, 3 x 3mm | F33F, F33T – F55T, F33TG – F55TG, F40TGS – F55TGS |
| F321 | Brush Plate | 1 x brush plate | F33F, F33T, F35T, F33TG, F35TG |
| F322 | Brush Plate | 1 x brush plate | F40T – F55T, F40TG – F55TG, F40TGS – F55TGS |
| F323 | Brush | 2 x brush | F33F, F33T, F35T, F33TG, F35TG |
| F324 | Brush | 2 x brush | F40T – F55T, F40TG – F55TG, F40TGS – F55TGS |
| F325 | Brush Set | 1 x brush plate, 2 x brush, 2 x spring | F33F, F33T, F35T, F33TG, F35TG |
| F326 | Brush Set | 1 x brush plate, 2 x brush, 2 x spring | F40T – F55T, F40TG – F55TG, F40TGS – F55TGS |
| F331 | Switch | 1 x switch | F33F, F33T – F55T, F33TG – F55TG, F40TGS – F55TGS |
| F332 | Battery Cable | 1 x battery cable | F33F, F33T – F35T |
| F333 | Battery Cable | 1 x battery cable | F33TG – F35TG |
| F334 | Battery Cable | 1 x battery cable | F40T – F55T |
| F335 | Battery Cable | 1 x battery cable | F40TG-F55TG, F40TGS-F55TGS |
| F341 | Bracket | 1 x hinge set, 1 x bracket | F33F, F33T – F55T, F33TG – F55TG |
| F342 | Bracket | 1 x hinge set, 1 x bracket | F40TGS – F55TGS |
| F343 | Hinge Set | 1 x hinge, 1 x hinge pin, etc. | F33F, F33T – F55T, F33TG – F55TG |
| F344 | Hinge Set | 1 x hinge, 1 x hinge pin, etc. | F40TGS – F55TGS |
| F345 | Depth Collar | 1 x depth collar | F33F, F33T – F55T, F33TG – F55TG |
| F346 | Depth Collar | 1 x depth collar | F40TGS – F55TGS |
| F347 | Up Cover | 1 x up cover | F33F, F33T – F55T, F33TG – F55TG |
| F348 | Up Cover | 1 x up cover | F40TGS – F55TGS |
| F349 | Down Cover | 1 x down cover | F33F, F33T – F55T, F33TG – F55TG |
| F350 | Down Cover | 1 x down cover | F40TGS – F55TGS |
| F361 | Prop Low | 1 x prop | F33F, F33T – F40T, F33TG – F40TG, F40TGS |
| F362 | Prop High | 1 x prop | F45T – F55T, F45TG – F55TG, F45TGS – F55TGS |
| F363 | Prop Nut Kit | 2 x washer, 2 x pin, 2 x nut | F33F, F33T – F55T, F33TG – F55TG |
| F364 | Prop Zink Anode | 1 x nut, 1 x Zink anode | F40TGS – F55TGS |
| F371 | Sticker Small Plain | 2 x sticker small plain | F33F, F33T – F55T |
| F372 | Sticker Small Gauge | 2 x sticker small gauge | F33TG – F55TG, F40TGS – F55TGS |
| F373 | Sticker Large 33 | 2 x pc plate 33 | F33F, F33T, F33TG |
| F374 | Sticker Large 35 | 2 x pc plate 35 | F35T, F35TG |
| F375 | Sticker Large 40 | 2 x pc plate 40 | F40T, F40TG, F40TGS |
| F376 | Sticker Large 45 | 2 x pc plate 45 | F45T, F45TG, F45TGS |
| F377 | Sticker Large 50 | 2 x pc plate 50 | F50T, F50TG, F50TGS |
| F378 | Sticker Large 55 | 2 x pc plate 55 | F55T, F55TG, F55TGS |
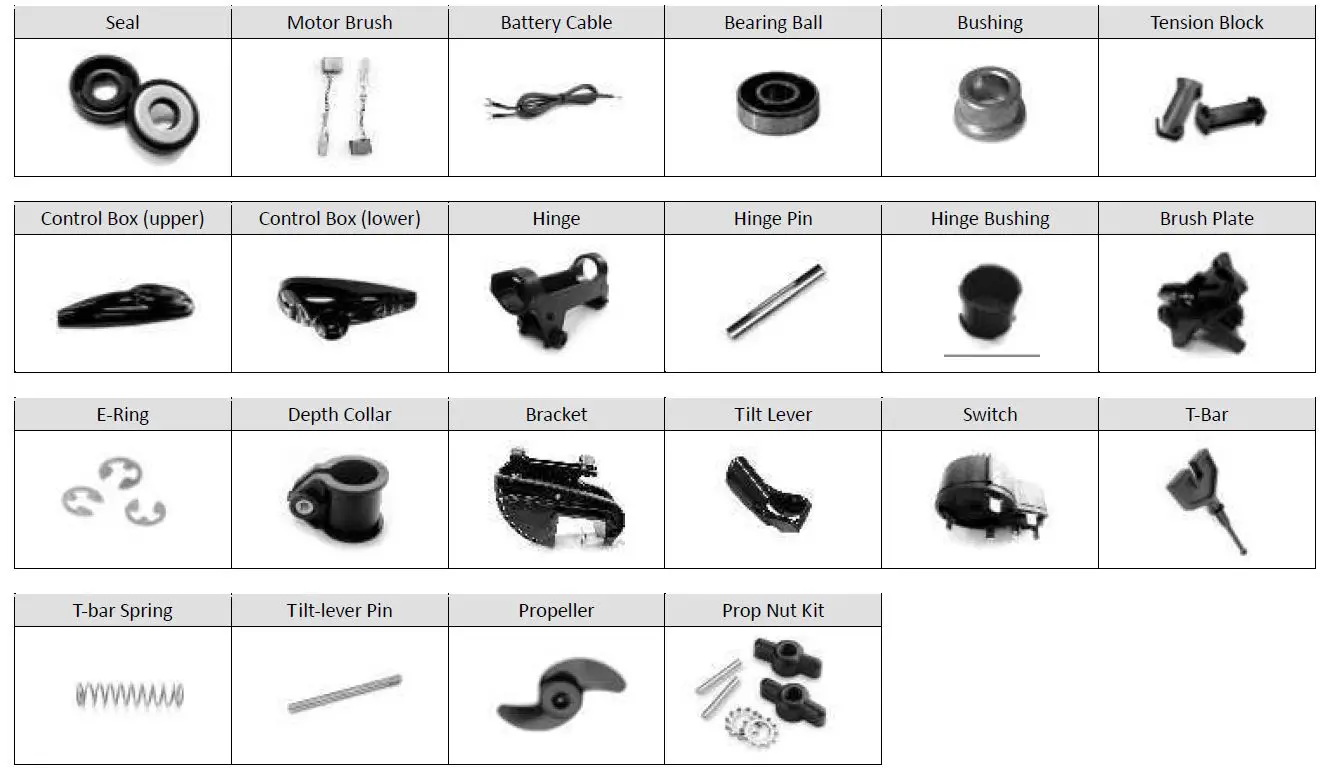
PART IMAGE
LIMITED WARRANTY
|
Client | Name | |
| Address | ||
| Tel No. | ||
| Product No. | ||
| Purchasing Date | ||
| Guarantee Period | ||
|
Dealer | Seller’s Name | |
| Company Name | ||
| Location | ||
| Tel No. |
Make sure you save the receipt or invoice given at the time of purchase. It is the proof that entitles you to fully honor the warranty desired.
FLOWER Div. / CSM TECH CO., LTD
FLOVER DIV.
CSM TECH CO., LTD
T : 82-51-728-1266
F : 82-51-727-1569
[email protected]
www.FLOVERMOTOR.com
Eco-friendly electric outboard motor


