
GRACE DESIGN REX Microphone Preamplifier Pedal
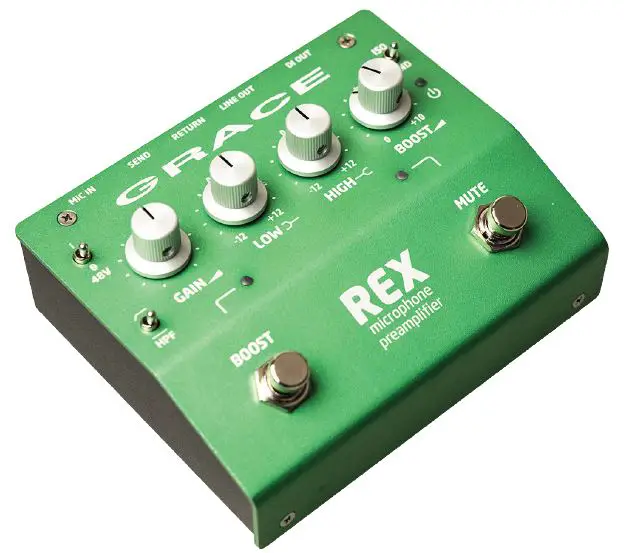
The REX Microphone Preamplifier Pedal is a compact and rugged device designed to provide performing and recording musicians with high-quality mic preamplification. It features a range of controls including GAIN, HPF, LOW EQ, HIGH EQ, BOOST level control, and MUTE footswitch. The device also has a 48V phantom power switch and an LED signal level indicator.
Features
- Compact and rugged design
- GAIN control
- HPF switch
- LOW EQ control
- HIGH EQ control
- BOOST level control and footswitch
- MUTE footswitch
- 48V phantom power switch
- LED signal level indicator
- OUTPUT ground / ISO switch
- XLR Microphone Input and XLR DI Output
Top Panel Controls
The top panel of the REX Microphone Preamplifier Pedal features the following controls:
- 48V phantom power switch
- GAIN control
- LED signal level indicator
- LOW EQ control
- HIGH EQ control
- BOOST level control
- LED power indicator
- OUTPUT ground / ISO switch
- HPF switch
- BOOST footswitch
- BOOST active LED
- MUTE active LED
- MUTE footswitch
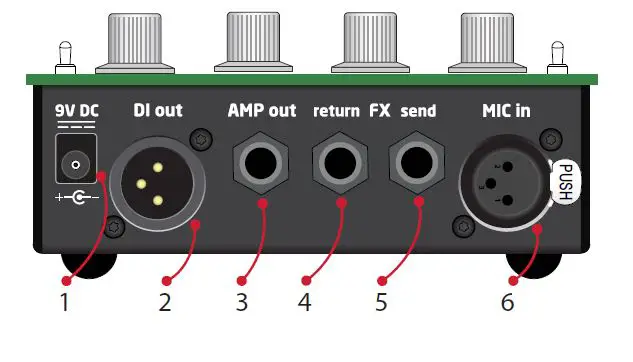
Rear Panel Connectors
The REX Microphone Preamplifier Pedal has the following rear panel connectors:
- MIC IN
- SEND
- RETURN
- LINE OUT
- DI OUT
- 9VDC Power Input
Unpacking and Installing
The REX Microphone Preamplifier Pedal can be carried in a guitar case or shoulder bag, or mounted to a pedalboard. The device comes with four threaded rubber feet that can be removed to allow mounting with Velcro. When mounting the device to a pedalboard, ensure that access to the microphone input and XLR DI output is preserved for plugging and re-plugging on a nightly basis.
Operation
Setting The Gain
To set the gain on the REX Microphone Preamplifier Pedal, use the GAIN control. Adjust the control until the LED signal level indicator shows the desired signal level.
HPF
The HPF switch on the REX Microphone Preamplifier Pedal can be used to activate or deactivate the high-pass filter. When activated, frequencies below 75Hz are attenuated.
Low EQ
The LOW EQ control on the REX Microphone Preamplifier Pedal can be used to boost or cut frequencies below 200Hz.
High EQ
The HIGH EQ control on the REX Microphone Preamplifier Pedal can be used to boost or cut frequencies above 2kHz.
Boost
The BOOST level control on the REX Microphone Preamplifier Pedal can be used to adjust the level of the boost effect. The BOOST footswitch can be used to activate or deactivate the boost effect. When activated, the BOOST active LED will light up.
Boost Switch
The BOOST switch on the REX Microphone Preamplifier Pedal can be used to activate or deactivate the boost effect. When activated, the BOOST active LED will light up.
Mute Switch
The MUTE switch on the REX Microphone Preamplifier Pedal can be used to mute or unmute the signal. When activated, the MUTE active LED will light up.
Welcome
Thanks for purchasing the REX! Like its bigger sibling ROXi, it is designed to provide performing and recording musicians with the highest quality mic preamplification available. REX is compact, rugged and great sounding, so no matter where and how you play – whether you toss it in your case, or mount it to your pedalboard, you can rely on it to sound great and work flawlessly for many years.
While setup and operation is pretty simple, please take a little time to read through this manual and familiarize yourself with its features and functions. It will make a big difference that you know exactly what to do to adapt quickly to whatever conditions may come your way on stage. Most of all, have fun and go play!
Safety and SymbolsCaution
Read Accompanying Documents
This symbol, located on the equipment and in this manual, refers to important instructions. Read this manual thoroughly before operating this equipment.
Service Information
The Grace Design REX contains no user serviceable components. Contact Grace Design for repair and upgrade information. In the event that your Grace Design REX needs to be returned to the factory, contact us for a return authorization number.
Features
- Studio-quality mic preamplifier
- 48V phantom power
- Separate FX send and return
- 1/4” unbalanced line output
- Balanced XLR DI transformer iso output
- 10dB variable boost control
- Mute and Boost footswitches
- High and Low shelving EQ
- 9VDC operation
- Over 30V internal operating voltage
- Pedalboard friendly design
- 5 year transferable warranty
- Made in the USA
Top Panel Controls

- 48V phantom power switch
- GAIN control
- LED signal level indicator
- LOW EQ control
- HIGH EQ control
- BOOST level control
- LED power indicator
- OUTPUT ground / ISO switch
- HPF switch
- BOOST footswitch
- BOOST active LED
- MUTE active LED
- MUTE footswitch
Rear Panel Connectors
- 9VDC power input – 2.1mm center negative
- DI out, balanced XLR transformer isolated
- Unbalanced AMP line output 1/4” TS
- Insert return 1/4” TS
- Insert send 1/4” TS
- MICROPHONE input XLR
Unpacking and Installing
This REX has arrived to you in a box that features Korvu® internal packaging, which was carefully designed to protect its contents from the uncertain world of freight handling. We recommend you hang on to this box in the event that you want to ship it somewhere, it will beat having to rummage around for a box and bubble wrap or worse, Styrofoam peanuts. This box contains:
- Your new preamp, REX
- 9VDC power supply
- A USB stick with this Owner’s manual
In the event that your are missing any of these items, please contact your retailer or us directly at 303-823-8100 and we will get you squared away.
INSTALLING
REX is designed to operate like any normal footpedal – at your feet. You can carry it in your guitar case, shoulder bag, upon a magic floating pillow, or strapped to your pedalboard. If you choose the latter, you can remove the 4 threaded rubber feet to allow mounting with Velcro. Hang on to those rubber feet though, you may want them down the road. Also, remember that when mounting it to your pedalboard, do so in a way that preserves access to the microphone input and the XLR DI output, as they may need to be plugged and re-plugged on a nightly basis.
REX is powered by a 9VDC input. This jack is a standard 2.1mm BOSS™ style, with center negative. The current requirement is 340mA, so you’ll need to make sure you have this available from your pedalboard power supply. Or, simply use use the included 9VDC wall wart. We tested many supplies, and this is the lowest noise, lowest profile one we could find.
Plugging in
By holding the REX in your hand, you probably already have a pretty good idea what to do from here. Plug a mic in, turn it up and go. But keep reading, because there’s some details that will help you get the most out of your new preamp.
XLR MICROPHONE INPUT
This is where you connect your microphone to the REX. The connector is wired pin 2 positive, pin 3 negative and pin 1 ground. Phantom power is supplied on pins 2 and 3.
Before plugging in, first make sure the gain knob is turned all the way down and the 48V phantom power switch is set to off. Then connect your microphone and if 48V is needed, simply activate it with the 48V switch. Always remember to turn 48V power on after connecting your microphone and off before disconnecting your microphone.
INSERT SEND AND RETURN (FX LOOP)
This is a buffered, unbalanced insert point (pre boost) for connecting outboard effects or a tuner to REX. This allows mono outboard signal processing to be placed in series with the signal, while still utilizing all of REX’s output capabilities. They are 1/4” TS jacks each wired tip signal, sleeve ground. If you wish to connect just a tuner to the REX, you may connect the SEND to your tuner’s input and leave the RETURN disconnected. Doing so will allow your tuner to always be active even when the REX is MUTED.
AMP OUT
This output is for sending a non-transformer isolated output to your tuner, a stage amp or anywhere else you may need an additional unbalanced signal sent. It is a 1/4” TS jack, wired tip signal, sleeve ground.
DI OUTPUT
This XLR output is balanced and transformer isolated, for sending signal to a front of house, monitor console, or any mixer or interface where a balanced, isolated signal needs to be sent. XLR pinout is: pin 2 positive, pin 3 negative and pin 1 ground.
Flipping the top panel GND/ISO toggle switch to ISO will disconnect the REX ground from the XLR output. Do this if the PA system is picking up hum or buzz from the REX.
9VDC POWER INPUT
This is where you provide life giving power to REX. The jack is a standard 2.1mm BOSS™ style, with the center negative. Either use the included Grace Design power supply unit, or make sure that the supply you are using conforms with the power input requirements – 500mA output is recommended
SETTING THE GAIN
With your microphone connected to the XLR input and sound going into the microphone, turn the GAIN knob clockwise until the signal / peak LED indicator is on and lit solid green. This will represent a good operating level. The indicator will start to flash red when your signal is 10dB before clipping, so an occasional red flash is ok, but mostly red means you should turn the gain control down / counterclockwise.
HPF
The High Pass Filter (HPF) allows signal information only above 75Hz to pass to the output. You can also think of this as a low-cut. This filter employs 12dB per octave roll off and is designed to be very musical sounding. Simply flip this switch to the UP (on) position to tame unwanted low end rumble or stage noise that may find its way into your microphone.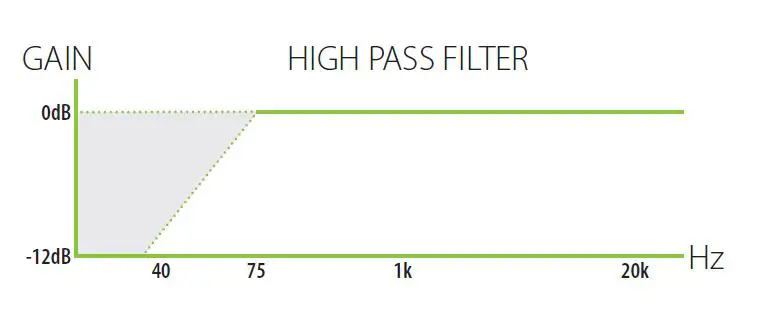
LOW EQ
The Low control of the REX is fixed at 250Hz corner frequency with a gain range of -10 to +10dB. This is a fixed shelving type control, which means frequencies below the selected corner frequency are boosted or cut. Use this control for cutting or boosting bass frequencies. It’s all about the bass.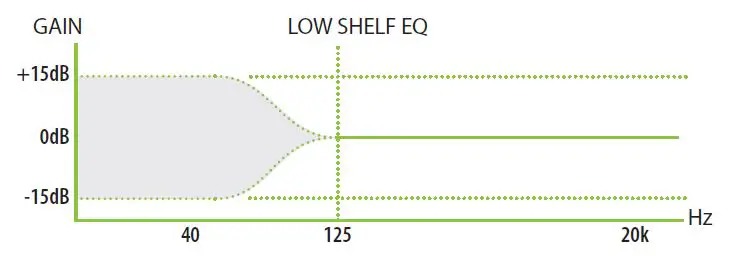
HIGH EQ
The High control of the REX is fixed with a 2kHz corner frequency, with a gain range of -10 to +10dB. Again, this is a fixed shelving type control, which means everything above the corner frequency is boosted or cut. Otherwise known as the treble knob. If you think your banjo may be too bright (which it probably is), turn this knob counterclockwise. If you think your electric 2 string gourd needs a little more bite, turn this knob clockwise. If you’re not sure, start turning it one way or the other until it sounds better.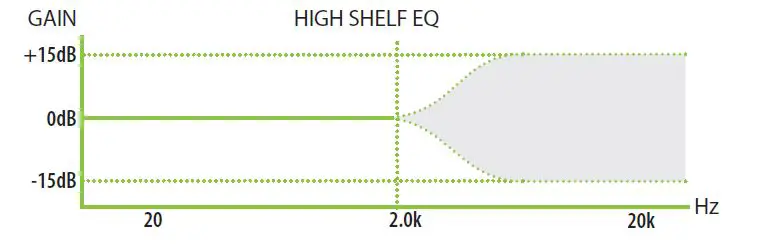
EQ BASICS
With such a simple EQ section, it’s easy to make quick, broad adjustments to your microphone’s signal. You won’t really be able to chase down and make surgical adjustments to a particular trouble spot, but you’ll find with a little practice you can easily adjust your tone in a useful way. If your sound really requires a more surgical approach (i.e. a parametric EQ control), you can easily insert one into the FX loop.
As with all EQ settings, the more you know about what your instrument needs the better off you will be making adjustments on the fly. We recommend you get to know these controls and experiment a lot with them to find what works best.
BOOST
Need to rock a wee bit harder? This knob will let that happen. It sets the amount your signal is boosted when you activate the ‘BOOST’ footswitch. Fully counter-clockwise is zero boost added, fully clockwise adds +10dB of boost. The boost is after the FX loop and affects both the DI and line outputs.
As you know, adding boost can easily send a microphone in to feedback territory, so start small. If you need to boost your output, start with a gentle boost amount and work your way upwards. If you start to hear stage feedback or are overloading the input at the console, then you’ll need to back it off.
BOOST SWITCH
Yep. This switch activates the Boost circuit, at whatever level you set with the boost knob. This circuit is global, so the boosted signal will be coming out of every output. For those about to rock, you’ll need to activate this switch first before we will salute you. The LED will light up AMBER for awesome.
MUTE SWITCH
This switch mutes the DI and AMP outputs. This enables you to quickly and easily cut your signal to the FOH or stage amp and tune or sneeze without having to have the soundperson mute your channel. When MUTE is active, the adjacent LED illuminates RED
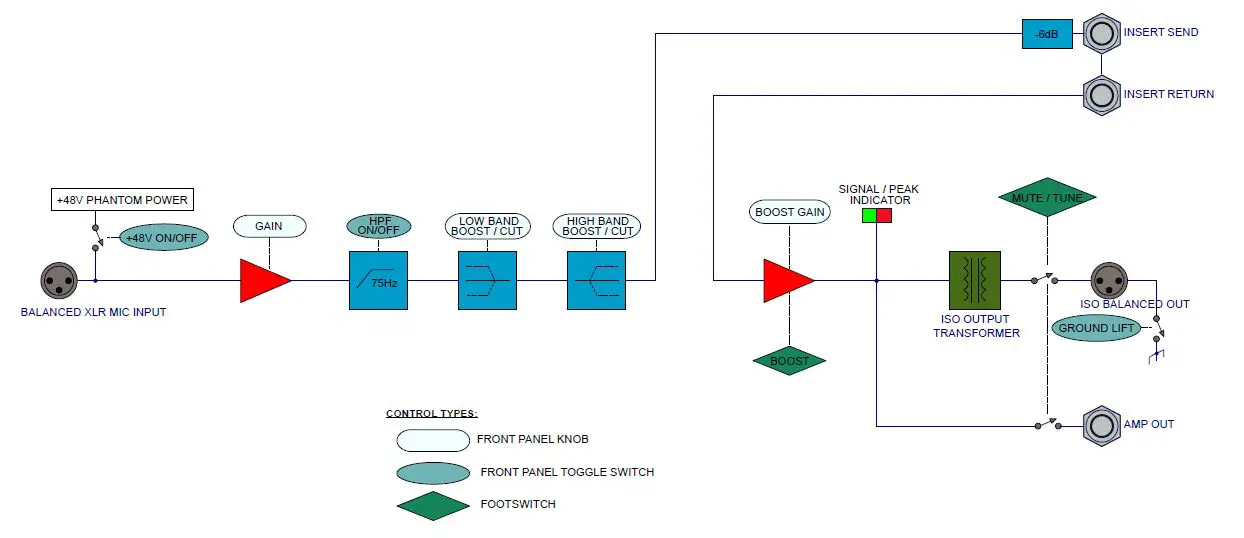
Block diagram
Specifications
| GAIN RANGE | |
| Mic In, Line Out, Boost 0dB | +7dB to +57dB |
| Mic In, Line Out, Boost 12.47dB | +20.0dB to +69dB |
| Mic IN, DI Out, Boost 0dB | -21dB to +28dB |
| Mic IN, DI Out, Boost 12.47dB | -9dB to +41dB |
| Boost | 0-10dB |
| THD+N 1kHz, 22Hz-22kHz BW (MIC Input to Line Output) | |
| @ 20dB Gain Line out +10dBu | < -95dB |
| DI out -18.8dB | < -80dB |
| @ 40dB Gain Line out +10dBu | < -90dB |
| DI out -18.8dB | < -80dB |
| @ 57dB Gain Line out +10dBu | < -81dB |
| DI out -18.8dB | < -77dB |
| @ 69dB Gain Line out +10dBu out (boost at max) | < -69dB |
| DI out -18.8dB | < -69dB |
| INTERMODULATION DISTORTION – SMPTE/DIN 4:1 7kHz/50Hz | |
| @ 40dB Gain Line out +10dBu | < 0.009% |
| DI out -18.8dB | < 0.030% |
| FREQUENCY RESPONSE (Input to DI Output) | |
| Mic input @ 0.5dB Gain -3dB | 11Hz – 63kHz |
| FREQUENCY RESPONSE (Input to Line Output) | |
| Mic input @ 0.5dB Gain -3dB | 9Hz – 180kHz |
| I/O IMPEDANCE | |
| Mic Input | 8.1kΩ |
| Insert Input | 200kΩ |
| Insert Output | 375Ω |
| DI Outputs | 150Ω |
| Line Output | 500Ω |
| SIGNAL / PEAK LED METER | |
| Green threshold | -13dBu |
| Red threshold | +12dBu |
| MAXIMUM INPUT LEVEL | |
| Instrument Input | +10dBu |
| Insert Return (0dB Boost) | +22dBu |
| MAXIMUM OUTPUT LEVEL – 100k Ohm load, 0.1% THD | |
| DI Outputs | -7.9dBu |
| Line Out | +20.9dBu |
| Insert Send | +15.6dBu |
| EQ | |
| Gain | +/- 10dB |
| Low Frequency | 250Hz Shelving |
| High Frequency | 2kHz Shelving |
| DYNAMIC RANGE 22Hz-22kHz BW | |
| Minimum Gain, Line Out | 129dB |
| Minimum Gain, DI Out | 129dB |
| OUTPUT NOISE 22Hz-22kHz BW | |
| DI Out | -117.5dBu (-102dBu A weighting) |
| Line Out | -98dBu (-100dBu A weighting) |
| OUTPUT MUTE ATTENUATION | |
| DI Output | -98.2dB |
| Line Out | -95.5dB |
| POWER | |
| Connector | 2.1mm Center Negative |
| Nominal Input Voltage | 9VDC |
| Nominal Input Current | 3.06W (340mA) |
| WEIGHT and DIMENSIONS | |
| 0.8lbs (0.4kg) | H2.5” x W5.1” x D4.5” (H6.35cm x W13.0cm x D11.4cm) |
Cleaning and Care
Your REX chassis is constructed out of high quality aluminum and steel. Under normal circumstances, very little maintenance is required to keep it looking good. However, if you find it getting more dirty or dusty than you like, here are some cleaning tips: We recommend using a little shot of Windex™ applied to a clean, dry, lint free cloth. Gently wipe all surfaces, taking care not to allow the cleaning product to build up around or under the knobs.
Warranty Info
- Grace Design warrants this product to be free of defective parts and workmanship for a period of five years. This warranty period begins at the original date of purchase and is transferable to any person who may subsequently purchase the product during this time.
- This warranty excludes the following conditions: normal wear and tear, misuse, customer negligence, accidental damage, unauthorized repair or modification, cosmetic damage and damage incurred during shipment.
- During the time of this warranty, Grace Design will repair or replace, at its option, any defective parts or repair defective workmanship without charge, provided the customer has appropriate proof of purchase and that the product has its original factory serial number.
- In order for Grace Design to provide efficient and timely warranty service, it is important that you mail the completed warranty registration card enclosed with all of our products within 10 days of the original date of purchase. You may also register your product directly with Grace Design by telephone (303-823-8100 Monday-Friday 9:00 am to 5:00 pm MST), or you can register your product online at www.gracedesign.com.
- This warranty is in lieu of all other warranties whether written, expressed, or implied, INCLUDING ANY WARRANTIES OF MERCHANTABILITY OR FITNESS FOR A PARTICULAR PURPOSE.
- In no event will Grace Design be liable for lost profits or any other incidental, consequential or Exemplary damages, even if Grace Design is aware of the possibility of such damages? In no event will Grace Design’s liability exceed the purchase price of the product.
- This warranty gives the customer specific legal rights. The customer may also have other rights, which vary from state to state. Some states do not allow limitations on implied warranties or consequential damages, so some of the limitations of the above may not apply to a particular customer.
Manual Revisions
| Revision | Page | Change | Date | Initials |
| A | all | Initial release | 01/12/2023 | edg |


