
OSOTEK G6 Robotic Vacuum Cleaner User Manual
Safety Instructions
Household use only.
IMPORTANT SAFETY INSTRUCTIONS
When using an electrical appliance, basic precautions should always be followed, including the following:
READ ALL INSTRUCTIONS BEFORE USING (THIS APPLIANCE).
Failure to follow the warnings and instructions may result in electric shock, fire, and/or serious injury.
WARNING: To reduce the risk of explosion, fire, electric shock, injury:
- Do not use outdoors or on wet surfaces.
- Do not allow to be used as a toy. Close attention is necessary when used by or near children, pets or plants.
- Use only as described in this manual. Use only manufacturer’s recommended attachments.
- To provide continued protection against risk of electric shock, connect to properly grounded outlets only.
- Do not use with damaged cord or plug. If appliance is not working as it should, has been dropped, damaged, left outdoors, or dropped into water, return it to a service center.
- Any servicing should be done with the appliance disconnected from the supply circuit.
- Do not pull or carry by cord, use cord as a handle, close a door on cord, or pull cord around sharp edges or corners. Do not run appliance over cord. Keep cord away from heated surfaces.
- Do not unplug by pulling on cord. To unplug, grasp the plug, not the cord.
- Do not handle charger, including charger plug, and charger terminals with wet hands.
- Risk Of Injury. Brush May Start Unexpectedly. Keep the power off Before Cleaning or Servicing
- Do not put any object into openings. Do not use with any opening blocked; keep free of dust, lint, hair, and anything that may reduce air flow.
- Keep hair, loose clothing, fingers, and all parts of body away from openings and moving parts.
- Use extra care when cleaning on stairs.
- Do not use to pick up flammable or combustible liquids, such as gasoline, or use in areas where they may be present.
- Do not pick up anything that is burning or smoking, such as cigarettes, matches, or hot ashes.
- Do not use without filter in place.
- Turn off all controls before unplugging.
- Prevent unintentional starting. Ensure the switch is in the off-position before connecting to battery pack, picking up or carrying the appliance. Carrying the appliance with your finger on the switch or energising appliance that have the switch on invites accidents.
- Disconnect the battery pack from the appliance before making any adjustments, changing accessories, or storing appliance. Such preventive safety measures reduce the risk of starting the appliance accidentally.
- Have servicing performed by a qualifed repair person using only identical replacement parts. This will ensure that the safety of the product is maintained.
- Do not modify or attempt to repair the appliance or the battery pack (as applicable) except as indicated in the instructions for use and care.
- Before operating this appliance, please clear the area of fragile items and sundries (e.g. vases or plastic bags, etc.). Doing so will help to avoid blocking the robot and reduce the chances of damaging fragile items due to slight collisions.
- Do not use this appliance to clean up toner used in laser printers and copiers, astoner may cause fire or explosion.
- Do not use this appliance to pick up sharp or hard objects, such as glass, nails, screws, or coins, which may damage this appliance.
- Do not place this appliance on unstable surfaces such as chairs or tables to prevent damage or personal injury caused by its falling off. If this appliance malfunctions because of being knocked over or damaged, please contact the authorized service department. Never attempt to disassemble this appliance on your own.
- Do not rinse the charging stock with water.
- Do not use the appliance at ambient temperature abovel 04°F(40°C) or below 32°F (0°C).
- Please follow the instructions in themanual to operate this product properly. The user irresponsible for any loss caused by improper operation.
Battery Pack and Charging
- Recharge only with the charger specified by the manufacturer. A charger that is suitable for one type of battery pack may create a risk of fire when used with another battery pack.
- Use appliances only with specifcally designated battery packs. Use of any other battery packs may create a risk of injury and fire.
- When battery pack is not in use, keep it away from other metal objects, like paper clips, coins, keys, nails, screws or other small metal objects, that can make a connection from one terminal to another. Shorting the battery terminals together may cause burns or a fire.
- Under abusive conditions, liquid may be ejected from the battery; avoid contact. If contact accidentally occurs, flush with water. If liquid contacts eyes, additionally seek medical help. Liquid ejected from the battery may cause irritation or burns.
- Do not use a battery pack or appliance that is damaged or modified. Damaged or modified batteries may exhibit unpredictable behavior resulting in fire, explosion or risk of injury.
- Do not expose a battery pack or appliance to fire or excessive temperature. Exposure to fire or temperature above l 30°C may cause explosion.
- Follow all charging instructions and do not charge the battery pack or appliance outside of the temperature range specified in the instructions. Charging improperly or at
temperatures outside of the specified range may damage the battery and increase the risk of fire. - Battery charging can only be performed at the ambient temperature between 32°F (0°C) and l 04°F (40°C). Excessively high or low temperature may extend the battery charging time, and even damage the battery. The normal charging of this product takes about 5-7 hours, and it is best to perform 1-3 complete charging and discharging processes for the first use, so as to fully activate the battery.
- To safely dispose of the battery pack, remove it from the appliance first.
- To avoid fire hazards, do not dispose of the appliance or the battery pack in a fre, water, or other liquids.
- The Li-ion battery in the appliance needs to be serviced or recycled by an authorized service provider and must be recycled or disposed of separately from household waste.
- Dispose of the battery pack according to your local environmental laws and regulations.
- For use only with CRDAI 1X.1 Charging Doc
Transportation
It is recommended to transport the vacuum cleaner in its original packaging
SAVE THESE INSTRUCTIONS
FCC STATEMENT
- This device complies with Part 15 of the FCC Rules. Operation is subject to the following two conditions:
- This device may not cause harmful interference, and (2) This device must accept any interference received, including interference that may cause undesired operation.
2. any Changes or modifications not expressly approved by the party responsible for compliance could void the user’s authority to operate the equipment.
NOTE: This equipment has been tested and found to comply with the limits for a Class B digital device, pursuant to Part 15 of the FCC Rules.
These limits are designed to provide reasonable protection against harmful interference in a residential installation. This equipment generates uses and can radiate radio frequency energy and, if not installed and used in accordance with the instructions, may cause harmful interference to radio communications. However, there is no guarantee that interference will not occur in a particular installation. If this equipment does cause harmful interference to radio or television reception, which can be determined by turning the equipment off and on, the user is encouraged to try to correct the interference by one or more of the following measures:
- Reorient or relocate the receiving antenna.
- Increase the separation between the equipment and receiver.
- Connect the equipment into an outlet on a circuit different from that to which the receiver is connected.
- Consult the dealer or an experienced radio/TV technician for help.
FCC Radiation Exposure Statement
This equipment complies with FCC radiation exposure limits set forth for an uncontrolled environment. This equipment should be installed and operated with minimum distance 20cm between the radiator & your body.
C Warning
This device contains licence-exempt transmitter(s)/receiver(s) that comply with Innovation, Science and Economic Development Canada’s licence-exempt RSS(s). Operation is subject to the following two conditions:
- This device may not cause interference.
- This device must accept any interference, including interference that may cause undesired operation of the device.
RF warning statement:
This equipment complies with IC radiation exposure limits set forth for an uncontrolled environment. This equipment should be installed and operated with minimum distance 20cm between the radiator & your body.
![]() Direct current
Direct current![]() Alternating current
Alternating current![]() Power on/Off
Power on/Off
Specification
| Robot Vacuum Cleaner | |
| Model | RDAl1.Al |
| Rated Voltage | I 4.4 V |
| Rated Power | 30 W |
| Charging Input | l9V – 0.6A |
| Unit Dimension | 13.4 in x 13.4 in x 3.1 in (340 mm x 340 mm x 78.5 mm) |
| Unit Net Weight | Approximately 8.05Ibs(3.65kg ) |
| Charging Dock | |
| Model | CRDA1 1X.1 |
| Rated Input | 19 V 0.6 A |
| Rated Output | 19 V 0.6 A |
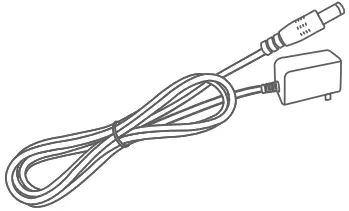
| Power Adapter | |
| Model | SAI 82V—l 90060U |
| Input | 100-240V 50/60Hz 0.4A |
| Output | 19V -0.6A |
What’s In The Box
- Robot Vacuum Cleaner

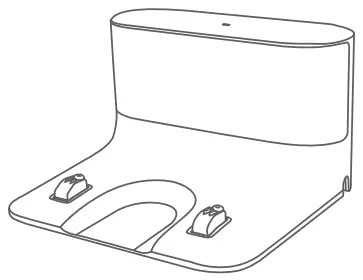
- Charging Dock

- Power Adapter

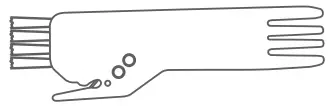
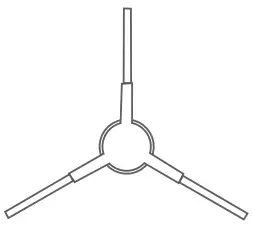
- Cleaning Tool

- Mopping Pad Holder

- Washable Mopping Pad

- Spare Side Brush

- User Manual

- Tip: The robot vacuum cleaner comes equipped with a pre-assembled higheffciency filter
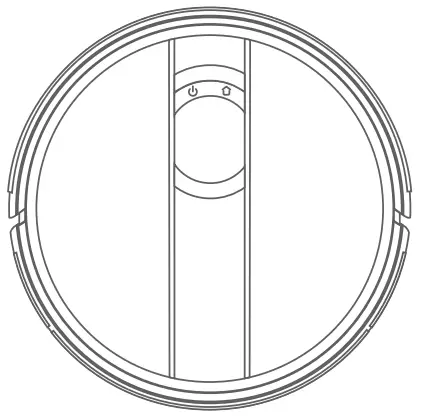
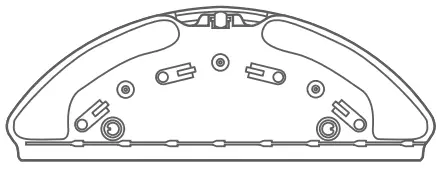
Know Your Robot Vacuum Cleaner
Robot Vacuum Cleaner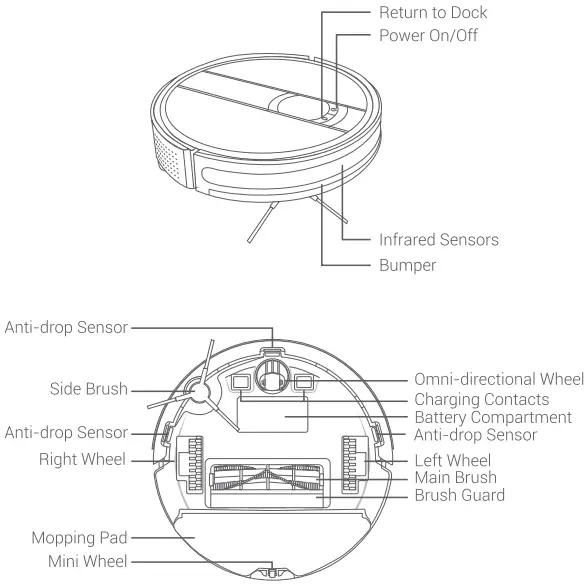
2-in-1 Dust Bin and Water Tank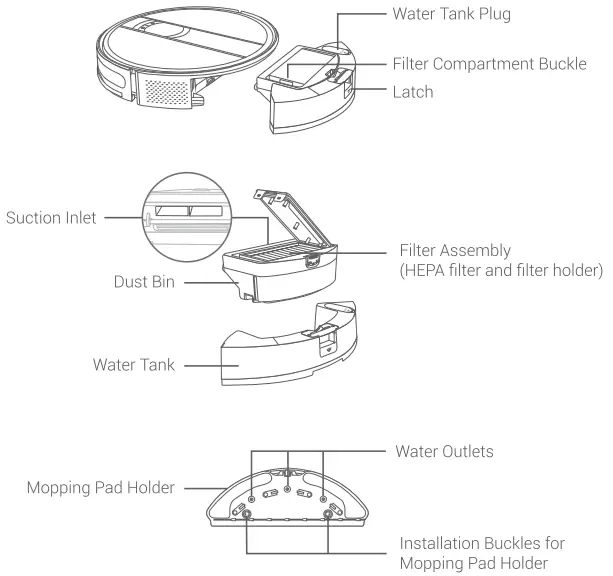
Get Started
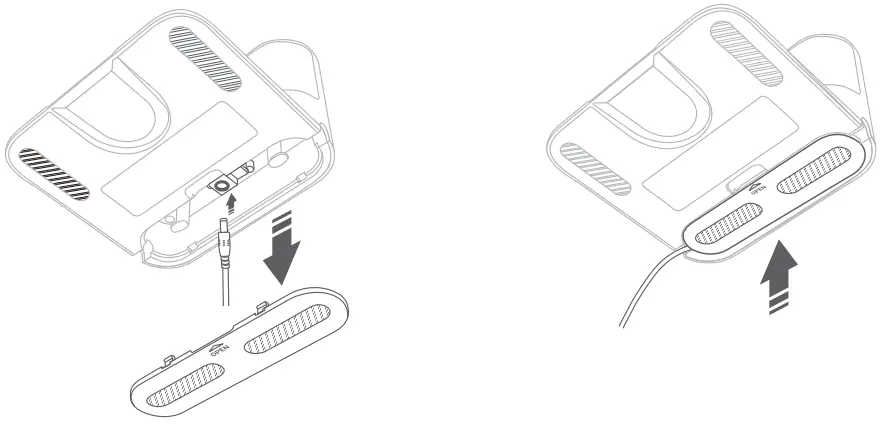
- Open the cover at the bottom of the charging dock, insert one end of the power adapter into the DC-in port, and place the cover back on

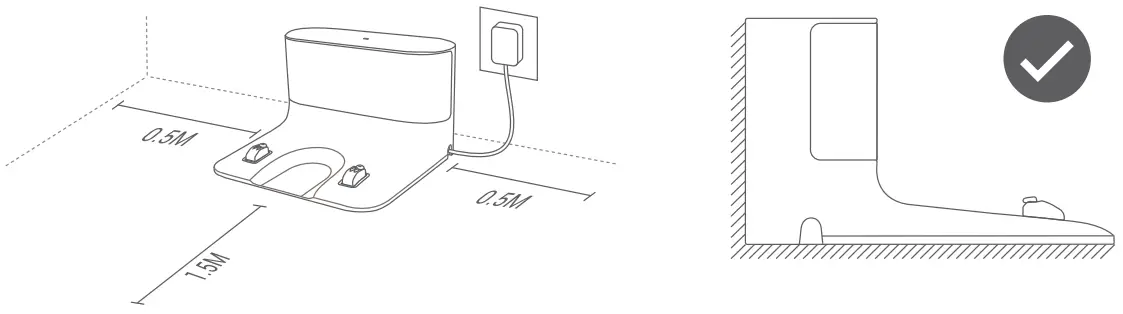
- Place the charging dock on a flat and hard floor, against a wall, and then plug the power adapter into a working power outlet. Make sure that there are no objects within a 1.5M distance in front of the dock, and a 0.5M distance on the left/right sides of the doc

Notes:- Place the charging dock in a place that the robot vacuum cleaner can easily access. Do not place the robot on a carpet or fabric floor surface.
- Ensure that the charging dock is always plugged into a power outlet; otherwise, the robot vacuum cleaner will not automatically return to the dock
- To make sure that the robot vacuum cleaner can be charged normally, do not move the charging dock frequently
- Remove all the protective materials on the robot vacuum cleaner.

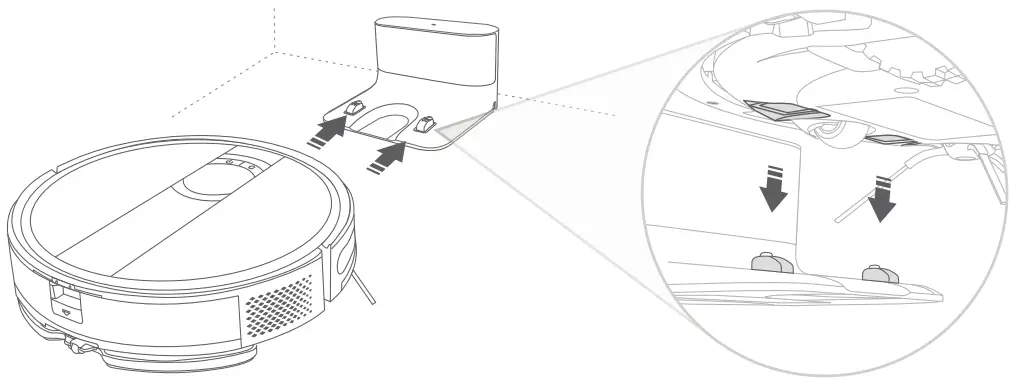
- Fully charge the robot vacuum cleaner before using it. To charge the robot vacuum cleaner, manually place it onto the charging dock. Make sure that the charging contacts on the robot are aligned with those on the dock.

LED indicators explanations:
| Indicators on the Robot | |
| Solid White | Battery power >20% |
| Solid Pink | Battery power <20% |
| Solid Red | Malfunction or robot has an issue |
| Indicator on the Charging Dock | |
| Solid on | Connect to power |
| Off | Disconnect power or charge the robot normally |
App Downloading And Wi-Fi Connection
Step 1:
Search for the Smart Life App on Google Play/ App Store or scan the QR code. Download and install the App onto your smart phone
Step 2:
Launch the App, follow the in-app instructions to create an account, and log into your account.
Step 3:
Simultaneously press and hold ![]() and
and ![]() on the robot vacuum cleaner until you hear a beep from the robot. The robot is now ready for Wi-Fi connection.
on the robot vacuum cleaner until you hear a beep from the robot. The robot is now ready for Wi-Fi connection.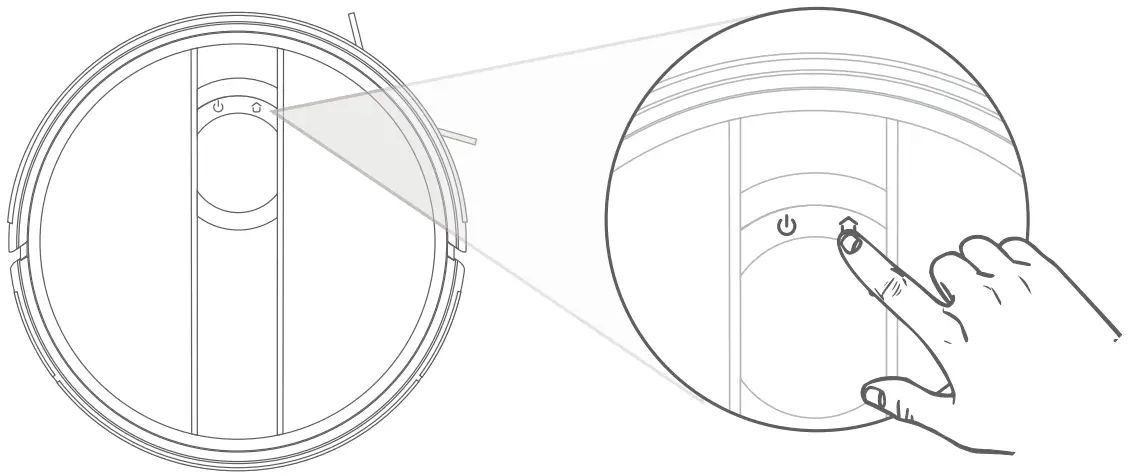
| LED Indicators on the Robot | |
| Flashes White Slowly | AP Mode |
| Flashes White Quickly | EZ Mode |
| Solid White | Wi-Fi Connected |
Step 4:
Tap the ”+” icon on the upper right corner of the homepage to start.
Step 5:
Select Small Home Appliance and Window Cleaner(BLE+Wi-Fi). Then, follow the in-app instructions to connect the robot vacuum cleaner to Wi-F
Important:
Before the Wi-Fi connection can be made, please make sure the robot vacuum cleaner and your Wi-Fi network are both operational and ready to connect.
For the robot vacuum cleaner
- Make sure the robot vacuum cleaner has enough power and has been turned on. Make sure the indicators on the robot vacuum cleaner are flashing white slowly
For the Wi-Fi network:
- The password for the Wi-Fi network must be input correctly.
- Do not use VPN (Virtual Private Network) or a proxy server. Your router must support 802.11 b/g/n and IPv4 protocols.
The frequency band of your router should be 2.4 GHz. If you have a dual-band router, please select the 2.4 GHz network because the robot doesn’t support a 5 GHz network. - lf the robot is connecting to a hidden network, please make sure that you enter the right Wi-Fi name (case-sensitive).
If you are using a wireless extender or repeater, make sure the network name and password are the same asthe main network. - Please set the firewall and port of your router to allow the robot to connect with the App’s server.
- The network should be a WPA or WPA 2 network with TKIP, PSK, and AES/CCMP encryption.
Operation Guide
Power On/Off
Press and hold the button for 3 seconds to power on the robot vacuum cleaner.
Press and hold the same button again for 3 seconds to power it off.
Auto Cleaning Mode
After powering on, press the button W to start auto cleaning. The robot vacuum cleaner will automatically clean the accessible space in a ”bow” shape until it finishes the cleaning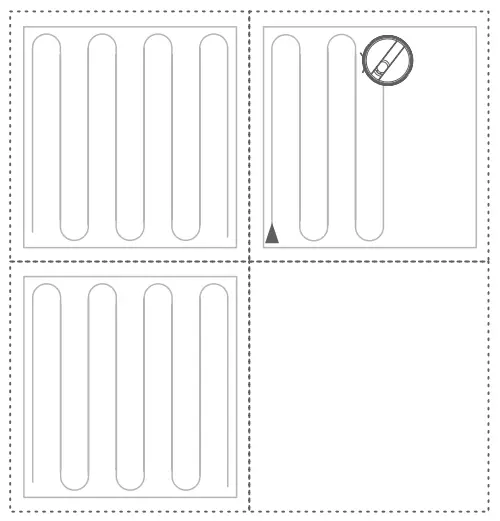
Tips:
- If the battery power of the robot is too low, the robot can not start auto cleaning. Please charge it first.
- Tidy up all the power cords in the area or wires before the robot starts cleaning.
- In Auto Cleaning Mode, if the cleaning area is smaller than 10 rri, the robot will clean the area two times by default.
- Do not move or unplug the charging dock when the robot is working; otherwise, the robot won’t be able to return to the dock.
Spot Cleaning Mode
Move the robot cleaner to the area that needs intensive cleaning. Press the button ![]() twice to start the spot cleaning. The robot will clean a circular area with a diameter of 1.5 meters.
twice to start the spot cleaning. The robot will clean a circular area with a diameter of 1.5 meters.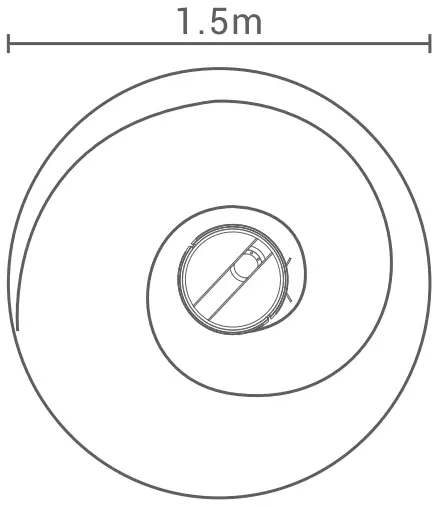
Tip:
The robot vacuum cleaner won’t start spot cleaning when it’s charging on the base.
Pause Cleaning
When the robot vacuum cleaner is working, you can press any button to pause cleaning.
Suction Power Adjustment (Only supported in the App)
There are 4 suction power levels for you to adjust in the App, including Quiet, Standard, Power, and Max.
Remote Controlling of the Robot (Only supported in the App)
You can also remotely guide the robot through the App to go to a specified area and clean. Explore more in the App.
Sleep Mode
If the robot is idle for 10 minutes, it will enter sleep mode. If the robot remains in sleep mode for 1 2 hours, it will automatically power off. When the robot is fully charged, it will enter sleep mode after 10 minutes.
Charge
Option 1
The robot vacuum cleaner will automatically return to the dock after the cleaning task is finished.
Option 2
When the robot is pausing, you can press the button to let it return to the dock. If the robot is getting stuck or can’t find its way to the dock, please manually move it to the dock.
Reset
When the robot is in Standby Mode, you can press and hold Lai for 15 seconds to reset it. After resetting, the robot will erase all the programmed maps and the default settings, including the virtual line.
2-in-1 Vacuuming and Mopping Mode
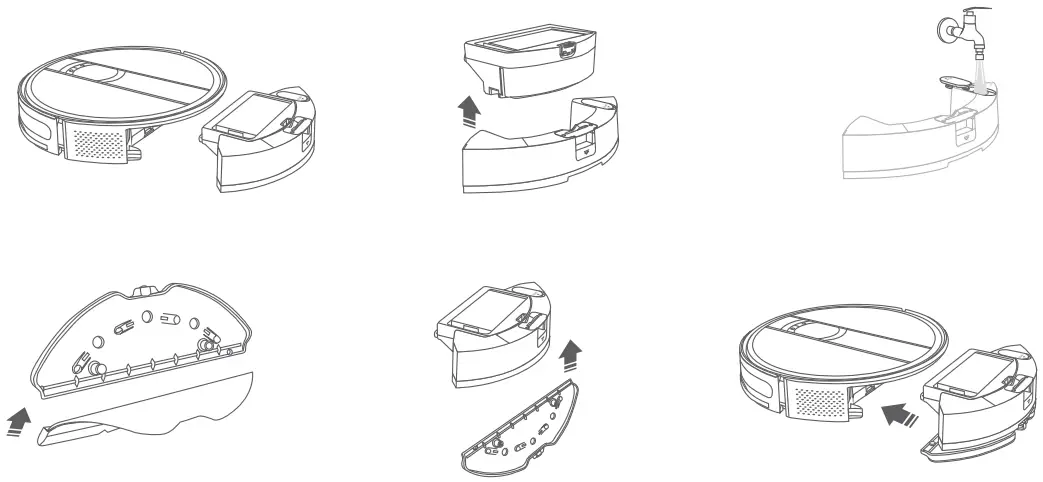
Step 1 :
Install the 2-in-1 vacuuming and mopping assembly.
- Take out the 2-in-1 dust bin and water tank from the robot.
- Remove the dust bin, then open the water tank plug, and add water into the tank.
- Attach the mopping pad to the mopping pad holder, then install the holder to the bottom of water tank.
- Wipe the residual water, and then put the dust bin and water tank back into the robot.

Step 2:
Select a cleaning mode to start vacuuming and mopping the floor. You can adjust the water output volume in the App as needed.
Notes:
- Do not add sanitizer into the water tank.
- Do not allow the robot to clean on the carpet or fabric floor surfaces. You can use a magnetic strip to set a virtual wall around your carpets and rugs.
- When the robot is idle or getting charged, please remove the mopping pad holder.
- To avoid damaging your wooden floors, please remove the mopping pad assembly immediately after the robot has finished cleaning.
- Please remove the mopping pad swiftly after the robot pauses for an extended period of time or finishes the mopping task.
Cleaning And Maintenance
2-in-J Dust Bin and Water Tank
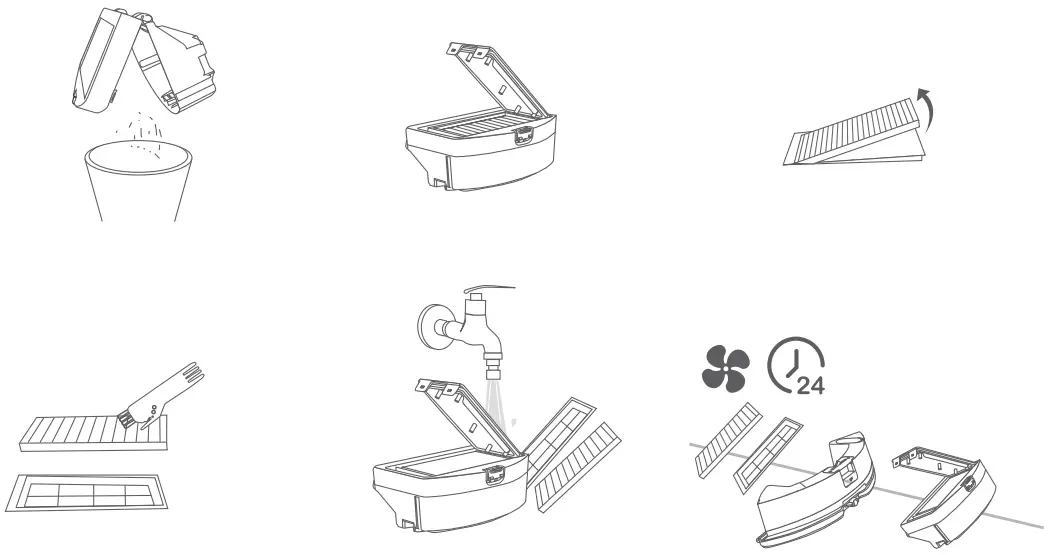
- Remove the 2-in-1 dust bin and water tank from the robot. Then, open the dust bin and empty it into your home trash bin.
Open the fIter compartment in the dust bin and take out the filter assembly. - Use the cleaning tool we provided to clean the HEPA fIter and filter holder. If needed, you can rinse the water tank, dust bin, and filter assembly with water.
- After cleaning, please completely air-dry all the parts and reinstall them into the robot vacuum cleaner.

Mopping Pad Holder and Mopping Pad
We recommend removing the mopping pad holder from the robot and cleaning the parts on it after each use. Empty the water tank, wash the mopping pad, and air-dry it thoroughly to avoid mold or odor.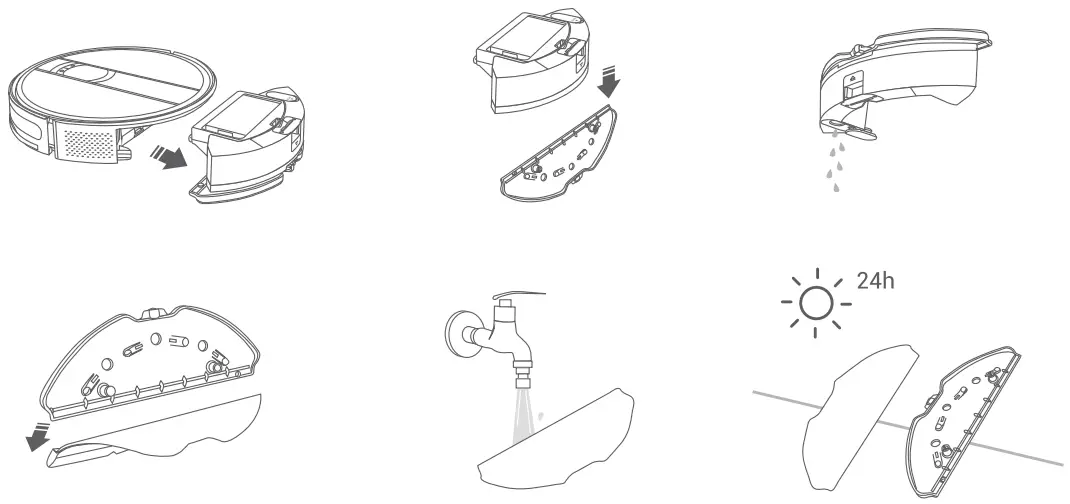
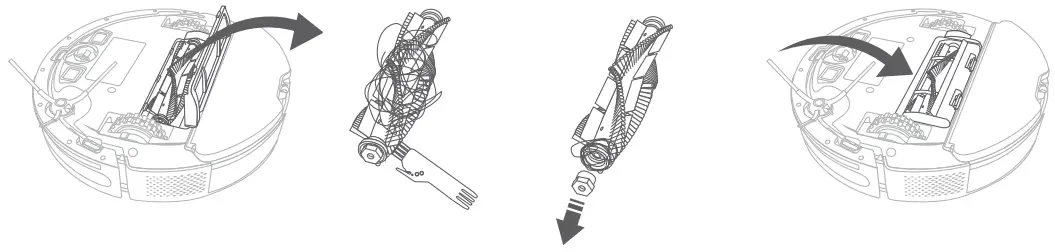
Main Brush
- Remove the main brush guard and take out the main brush.
- Use the cleaning tool to clean the main brush and cut off the hair wrapped around it with the blade on the brush
- Take out one end of the main brush and remove the hair wrapped on it.
- Install them back into the robot vacuum cleaner correctly.

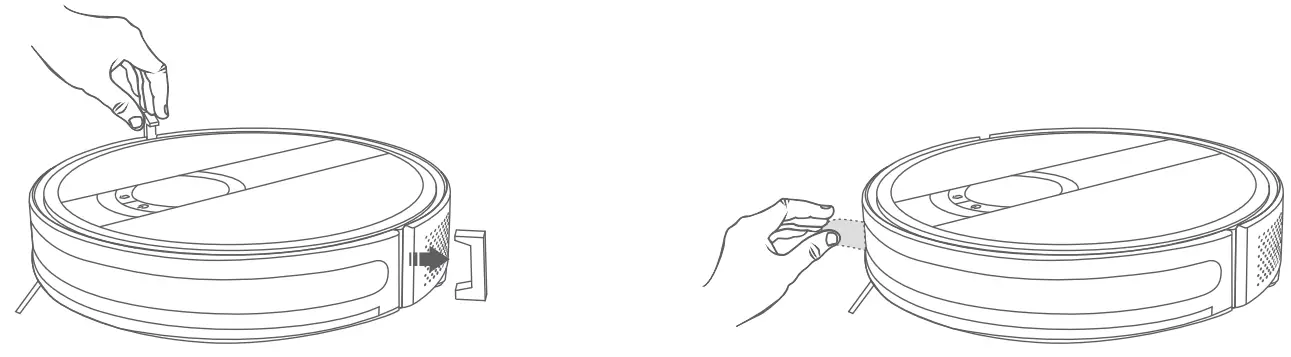
Slide Brush
Take out the side brush from the robot vacuum cleaner and clean the hair or foreign objects lodged in it. You can use a damp cloth to wipe the brush as needed. After cleaning, Please install it tightly back onto the mount.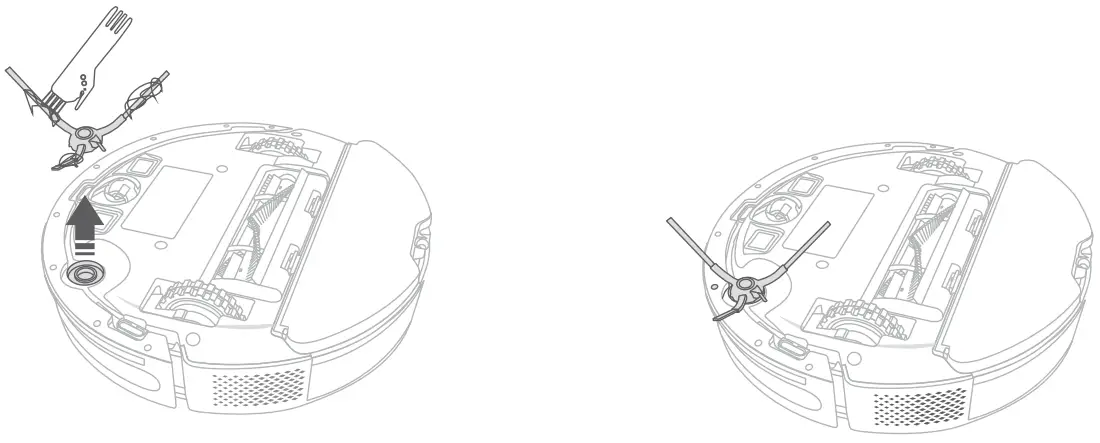
Omni-directional Wheel
Since hair or dUstdFticles cdn easily become entangled and embedded in the wheel, clean it regularly or as needed. Pull out the Omni-directional wheel and clean the hair wrapped around it. After cleaning, push the wheel back into place until you hear it click.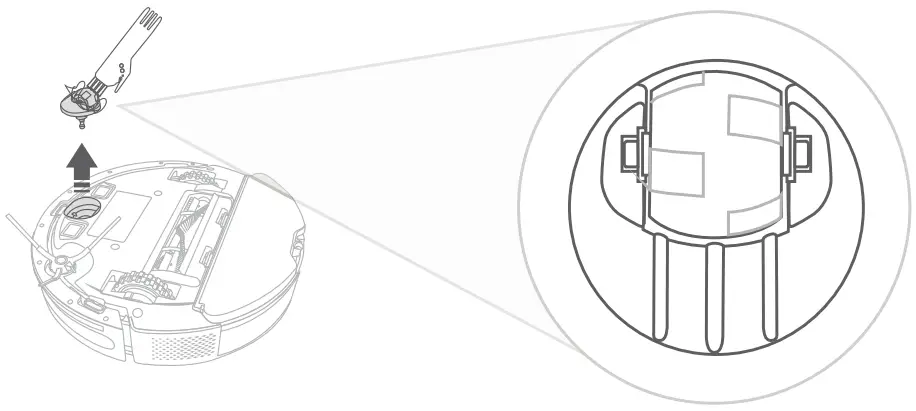
Charging Contacts
Please regularly use a soft dry cloth or the cleaning brush to wipe the charging contacts on the charging dock and at the bottom of the robot.
Tip:
We recommend replacing the side brush with a new one every 3 to 6 months.
Infrared Sensors and Anti-drop Sensors
Please clean the sensors on the robot vacuum cleaner and wipe the dust off with a soft dry cloth or the cleaning brush.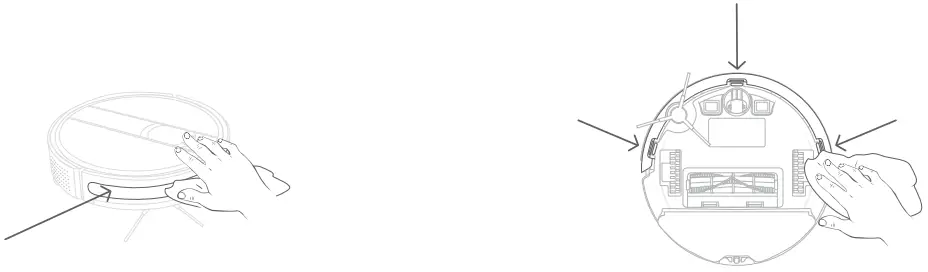
Troubleshooting Guide
Please follow the troubleshooting instructions. If the issue is still not resolved after troubleshooting, please directly contact the manufacturer.
| Issue | Solution |
| The robot vacuum cleaner can’t start working. |
|
| The robot vacuum cleaner stops working suddenly. |
|
| The robot can’t perform the scheduled cleaning. |
|
| The suction power of the robot is too weak. |
|
| The robot can’t be charged. |
|
| The robot can’t return to the charging dock. |
|
| The main brush doesn’t rotate. |
|
| There is no water coming out from the water tank when the robot is mopping the floor. |
|
| The robot can’t connect to the Wi-Fi network. |
|
| The battery is abnormal. Please check for the solution in the user manual or the App. |
|
| The left or right wheel is abnormal. Please check for the solution in the user manual or the App. |
|
| The side brush is abnormal. Please check for the solution in the user manual or the App. |
|
| The fan in the robot is abnormal. Please check for the solution in the user manual or the App. |
|
| The main brush is abnormal. Please check for the solution in the user manual or the App. |
|
| The water pump is abnormal. Please check for the solution in the user manual or the App. |
|
| The robot can’t be charged. Please clean the charging contacts. |
|
Warrant Information
THIS LEGAL WARRANTY NOTICE INFORMS YOU ABOUT YOUR RIGHTS UNDER THE LEGAL WARRANTY. FOR A FULL UNDERSTANDING OF YOUR RIGHTS, YOU ARE INVITED TO CONSULT THE LAWS OF YOUR COUNTRY, PROVINCE, OR STATE.
LIMITED PRODUCT WARRANTY
The Products shall be free from defects in materials and workmanship under normal use and use in accordance with the respective Product user manual, during the Warranty Period
The warranty only covers defects in material or workmanship under normal use and use in accordance with the respective product user manual, during the Warranty Period.
The repairs under warranty may only be carried out by an authorized service center.
Damages arising from non-compliance with the instructions related to the use of the Product are excluded.
When making a claim under the warranty, Purchase Order No. /Invoice/SN must be submitted.
The warranty will not apply in cases of:
I. Failures caused by:
- Use of an OSOTEK product that is not in accordance with the “Usage Restrictions” in the User Manual.
- Use of an OSOTEK product for cleaning white ashes, sand, and other non-household garbage.
- Use of an OSOTEK product for decoration, ornament, or cleaning in a commercial environment.
- Use of an OSOTEK product for cleaning in an environment with special adsorption chemicals, metal, or other micro particles.
- Use of an OSOTEK product in an environment with corrosive objects.
ii. The product you purchased is a prototype, the model or SN of which does not follow the SN coding rule for a brand-new complete machine.
Please consult us if you are unclear about these terms.
Customers support
E-mail:
North America: support [email protected]
EU: support [email protected]
Asia: support [email protected]
Other Area: support [email protected]


