The static
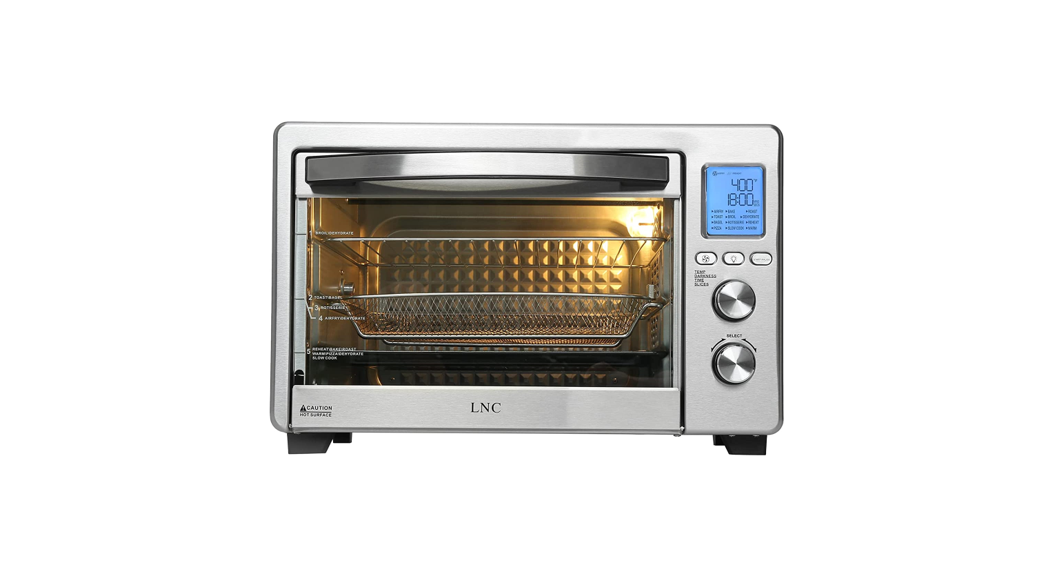
A05000B Silver Stainless Steel Air Fry Oven
User Manual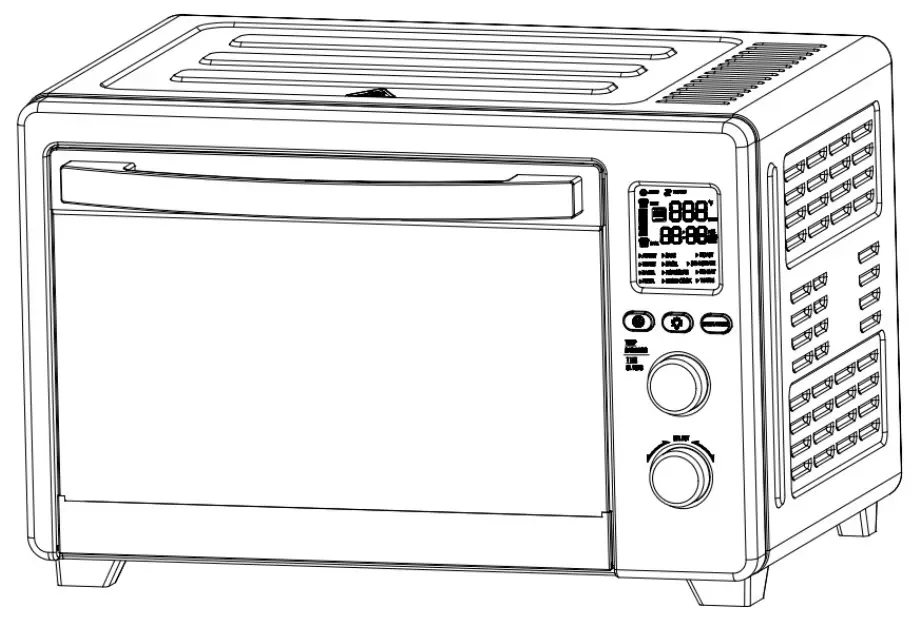 Please refer to the actual product
IMPORTANT SAFETY NOTES
![]() Warnings
Warnings
PLEASE READ THIS MANUAL CAREFULLY BEFORE USE.
This product is specially designed for household heating and cooking food.
DO NOT use your oven for anything other than its intended purpose.
DO NOT use outdoors or for commercial purposes.
1. Precaution
Electric Shock
- To avoid electric shock, NEVER let water or any liquid enter this appliance.
- NEVER immerse the cord, plug, or outer housing, which contains electrical components or heating elements, in water or any other liquid, nor rinse it under tap water.
- DO NOT plug in this appliance or operate the control panel with wet hands.
Fire Hazard
- To avoid fire, KEEP the digital oven AWAY from flammable objects, especially curtains, wallpapers, or similar items.
- DO NOT place this product against a wall or other objects.
- Leave at least 15 mm (about 0.6 inches) free space on the back, and at least 100 mm (about 4 inches) free space on the sides and above this appliance.
- Put the digital oven on a dry, flat, and heat-resistant surface for use.
- DO NOT operate the oven in an enclosed space or under hanging cabinets.
- DO NOT place any object on top of this appliance.
Personal Injuries
- This product is NOT SUITABLE for children under 8 years old, and people with unsound limbs, sensory or mental disabilities, or lack of relevant experience and knowledge, unless they are instructed and supervised on how to use this product safely.
- Take care of children and ensure that they DO NOT play with this product.
- NEVER leave the product unattended during operation.
- Children should STAY AWAY from the appliance during operation, as the accessible parts of this appliance may become hot.
To Use Parts or Accessories Safely
» Oven Door
- Open and close the door carefully.
- If the door or door seal is damaged, please STOP using it before it is repaired by qualified maintenance staff.
» Accessories inside the Oven
- MUST use the recommended temperature probe for the oven.
- Use accessories recommended by the manufacturer inside the digital oven but DO NOT store any other items inside the oven.
- As the appliance will heat up during use, KEEP hands or any other objects AWAY from the heating elements inside the oven.
» Power Cord
- Please DO NOT use this appliance, if the plug, power cord, or the appliance itself is damaged.
- To avoid danger, if the power cord is damaged, it MUST be replaced by the manufacturer or the professional maintenance staff.
2. Notes for Using Product
Check the Voltage
- Before the power-on of this appliance, please check whether the voltage marked on the appliance matches the local power supply voltage.
- The product may fail to work properly under too low or unstable voltage. Please unplug the power plug, then use it after the voltage stabilizes.
Before First Use
- When using the oven for the first time, preheat for 10~15 minutes to remove the oily fume remaining inside. To preheat, select any modes with preheat feature and keep the empty oven working for at least 10 minutes.
- It is normal and harmless to see smoke for the first time operation. The heating elements have been specially treated to prevent easy oxidation. Smoke appears because the protective substance is burning.
To Move the Appliance
- Before moving the appliance, you need to remove the plug from the outlet.
- ALWAYS unplug by gripping the electrical plug.
NEVER pull on the cord. - DO NOT drag by a power cord, but lift and move the appliance with both hands.
3. Cautions for Using Product
Before Using
- Please make sure the cooking utensil is suitable for the appliance before use.
- It is recommended to use high-temperature resistant glass or ceramic containers for food.
- Please use suitable utensils, and the amount of liquid food should NOT exceed two-thirds of the container.
- DO NOT deep-fry food in this oven to prevent fire.
Preparing the Food
» For apple/chestnut/potato/chicken wings, etc.
- The food with skin and shell should be perforated with a knife or fork before cooking, to prevent it from bursting.
To Avoid Burn
- Please put the oven on a heat-resistant and horizontal table and then use it.
- During working, please DO NOT touch the hot surface of the oven.
- Please power off the oven and wait for it to cool down before you touch or move the oven.
- High-temperature steam or air will be released through the door during or after cooking.
- To avoid scalding yourself, keep a safe distance and then open the oven door.
- When the cooking is completed, DO NOT put food on the flat surface of the opened glass door, as it may spill and cause serious burns.
Circuit Safety
- The digital oven should operate on a separate electrical circuit, to avoid the overloaded circuit and working abnormally.
- The appliance is UNABLE to operate with an external timer or separate remote-control system.
- Please DO NOT plug your oven and other high-wattage electrical appliances into the same outlet, as the overloaded circuit may cause fire.
- If the appliance is NOT used for a long time, unplug the power cord from the outlet, as the aged insulated rubber wire may cause leakage/ fire.
3. Cautions for Using Product
Before Using
- Please make sure the cooking utensil is suitable for the appliance before use.
- It is recommended to use high-temperature resistant glass or ceramic containers for food.
- Please use suitable utensils, and the amount of liquid food should NOT exceed two-thirds of the container.
- DO NOT deep-fry food in this oven to prevent fire.
Preparing the Food
» For apple/chestnut/potato/chicken wings, etc.
- The food with skin and shell should be perforated with a knife or fork before cooking, to prevent it from bursting.
To Avoid Burn
- Please put the oven on a heat-resistant and horizontal table and then use it.
- During working, please DO NOT touch the hot surface of the oven.
- Please power off the oven and wait for it to cool down before you touch or move the oven.
- High-temperature steam or air will be released through the door during or after cooking.
- To avoid scalding yourself, keep a safe distance and then open the oven door.
- When the cooking is completed, DO NOT put food on the flat surface of the opened glass door, as it may spill and cause serious burns.
Circuit Safety
- The digital oven should operate on a separate electrical circuit, to avoid the overloaded circuit and working abnormally.
- The appliance is UNABLE to operate with an external timer or separate remote-control system.
- Please DO NOT plug your oven and other high-wattage electrical appliances into the same outlet, as the overloaded circuit may cause fire.
- If the appliance is NOT used for a long time, unplug the power cord from the outlet, as the aged insulated rubber wire may cause leakage/fire.
» For sealed glass bottle/box of milk, etc.
- The food in the sealed container should be removed from the package to other containers before heating.
After Machine Operating
- DO NOT operate the oven when there is no food inside to prevent damage.
- If dark smoke comes out of the oven, immediately switch off the appliance or unplug the power cord, and keep the oven door closed as smoke or flame may spread.
LEARN ABOUT YOUR OVEN
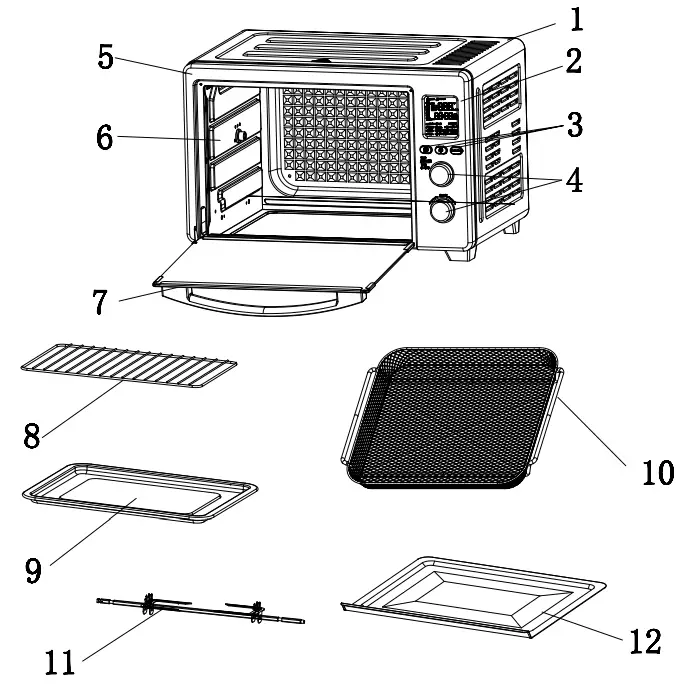
4. Product Parts Diagram
| [1] Outer Housing(1) | (1) |
| [2] Display Screen | (1) |
| [3] Feature Button | (3) |
| [4] Control Knob | (2) |
| [5] Front Panel | (1) |
| [6] Inner Wall | (2) |
| [7] Door Handle | (1) |
| [8] Baking Rack | (1) |
| [9] Baking Tray | (1) |
| [10] Air Fry Basket | (1) |
| [11] Rotisserie Fork Set | (1) |
| [12] Crumb Tray | (1) |
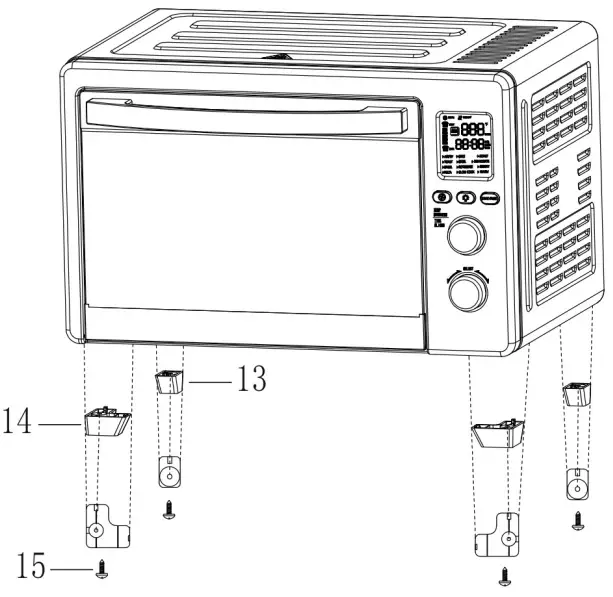
| [13] Back Stand | (2) |
| [14] Front Stand | (2) |
| [15] Screw Screw (spare parts) | (4) (2) |
 NOTE:
NOTE:
Carefully check all parts and accessories are included as shown in the above illustration.
Besides the above parts, you will also receive 4 stands for your oven.
To install oven stands:
- Using a screwdriver, remove the screws.
- The place stands in the correct position according to the illustration on the right.
- Check that all the screws are tightened.
5. Control Panel and Operation Guide
 | Buttons | Icons | Description |
| Fan Button |  | When the fan is enabled and off: Press once, fan ON. Press again, fan OFF. | |
| Oven Light Button |  | When oven light is off: Press once, oven lights ON. Press again, oven light OFF. | |
| Start/Pause Button |  | When the oven is not working: • Press once, and the selected mode starts. • Press again, all the activated features pause, temperature/slices, and time/darkness are adjustable at this time. • Press once more, and the mode restarts. |
| Knobs | Icons | Description |
| Temp/Darkness/Time /Slices Knob |  | When the selected mode icon is flashing: • Rotate this knob, to adjust the temperature/the number of slices. • Press this knob once, and rotate this knob, to adjust the cooking time/the darkness of toast. |
| Mode Selection Knob |  | When in the main menu, select different modes: • Rotate this knob. To cancel the selected modes or go back to the main menu: • Press this knob once. To enter sleep mode or turn off the display screen: • Press this knob for a while. • You will see OFF flashing on the screen, the oven buzzer rings once and all the activated features stop. |
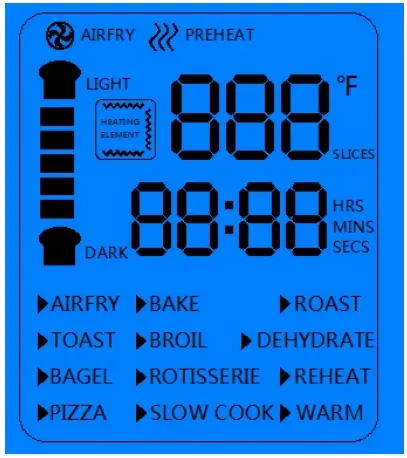
6. Display Screen Instructions
| Features | Icons | Description |
| Fan |  AIR FRY AIR FRY | When the fan feature is activated, you will see: Fan icon spinning. Text is always on. |
| Preheat |  PREHEAT PREHEAT | When preheat feature is activated, you will see: This icon flashes. |
| Heating Element |  | When the heating element feature is activated, this icon shows which heating element is working, including: • upper + lower heating elements • upper heating element • lower heating element • upper + lower + coil heating elements  |
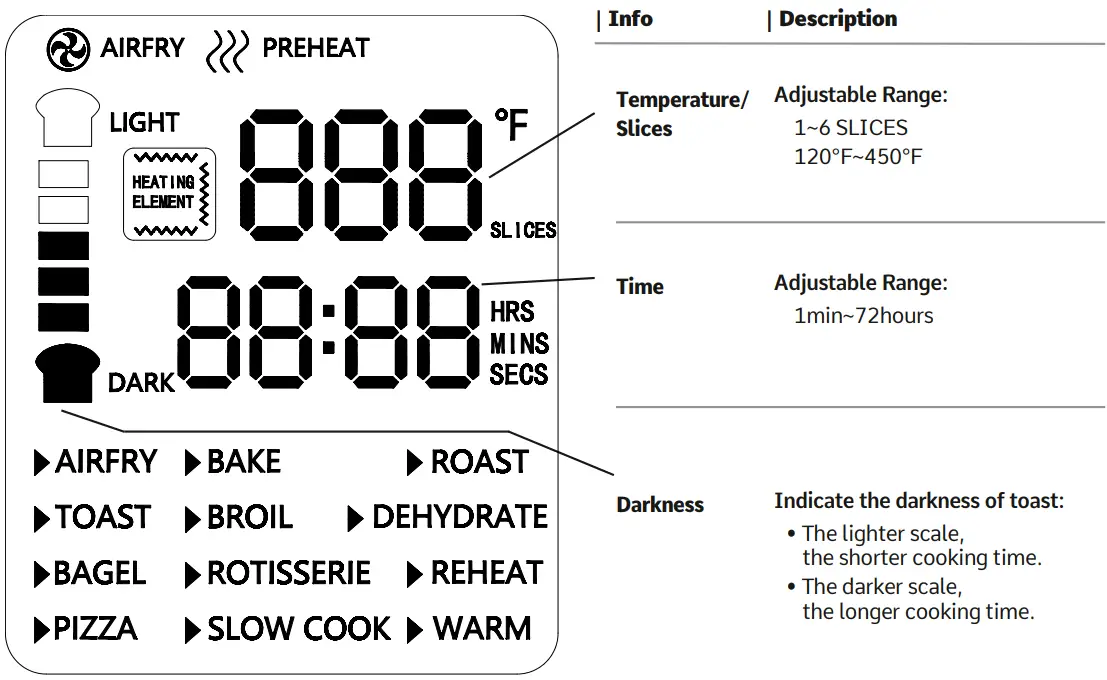
| Mode | Features and Heating | Default Info | Adjustable Range |
| Air Fry | Step 1: Step 2: 3 Heating Elements +Fan 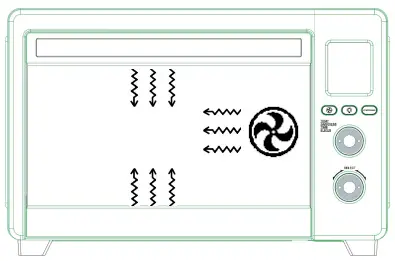 | Temperature ……….400°F Time …………………..18 mins Fan ………………….on Wattage ………………….Max. 1780W, Min. 30W | 120°F~450°F (unit: 5°F) 1~45 mins (unit: 1 min) disabled (NOT able to switch) |
| • recommended to use air fry basket / in position 4 | |||
| Toast | Step 1: Upper and Lower Heating Elements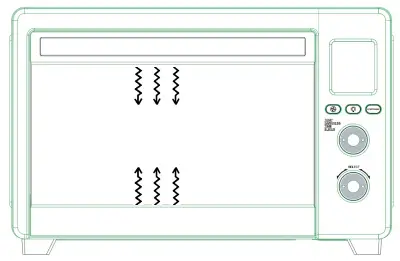 | Slices………………….. 4 Time…………………. 5 min 55 secs Fan…………………… off Wattage……………. 1450W | 1~6 default and not adjustable disabled |
| • recommended to use baking rack / in position 2 | |||
| Bagel | Step 1: Upper and Lower Heating Elements | Slices ………………….4 Time ………………….6 mins Fan ………………….off Wattage ………………….1450W | 1~6 default and not adjustable disabled |
| • recommended to use baking rack / in position 2 | |||
| Pizza | Step 1: Step 2: Upper and Lower Heating Elements | Temperature ………………….375°F Time ………………….15 mins (Suitable for one 12- inch Pizza) Fan ………………….off Wattage ………………….1450W | 120°F~450°F (unit: 5°F) 1 min~1 hour (unit: 1 min) enabled (able to switch) |
| • recommended to use baking rack / in position 5 | |||
| Bake | Step 1: Step 2: Upper and Lower Heating Elements + Fan | Temperature ………………….325°F Time ………………….30 mins Fan ………………….on Wattage ………………….1480W | 120°F~450°F (unit: 5°F) 1 min~4 hour • 1~59 mins (unit: 1 min), • 1~4 hours (unit: 5 min) enabled |
| • recommended to use a baking rack or tray / in position 5 | |||
| Broil | Step 1: Step 2: Upper Heating Element 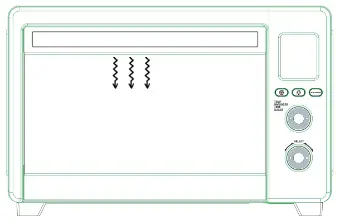 | Temperature ………………….400°F Time …………………. 10 mins Fan …………………. off Wattage ………………….700W | 300°F~400°F (unit: 100°F) 1~20 mins (unit: 1 min) disabled |
| • recommended to use a baking rack or tray / in positions 1, 2 | |||
| Rotisserie | Step 1: Step 2: Upper and Lower Heating Elements + Fan + Rotisserie Step 3: Upper and Coil Heating Elements + Fan + Rotisserie 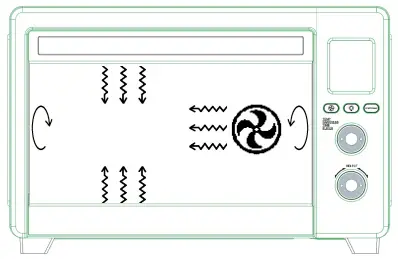 | Temperature …………………. 375°F Time …………………. 30 mins Fan …………………. on Rotisserie …………………. on Wattage …………………. 1010W | 120°F~450°F (unit: 5°F ) 1 min~2 hour: • 1~59 mins (unit: 1 min ), • 1~2 hours (unit: 5 mins) enabled disabled |
| • recommended to use rotisserie fork set / in position 3 | |||
| Slow Cook | Step 1: Step 2: Upper and Lower Heating Elements | Temperature …………………. 225°F Time …………………. 4 hours Fan …………………. off Wattage …………………. 1450W | 225°F~275°F (unit: 25°F) 2~10 hours (unit: 30 mins) enabled |
| • recommended to use a baking rack to support other cooking vessels / in position 5 | |||
| Roast | Step 1: Step 2: Upper and Lower Heating Elements | Temperature …………………. 350°F Time …………………. 1 hour Fan …………………. off Wattage …………………. 1450W | 120°F~450°F (unit: 5°F) 1 min~4 hour: • 1~59mins (unit: 1 min ), • 1~4 hours (unit: 5 mins) enabled |
| • recommended to use a baking rack and tray / in position 5 | |||
| Dehydrate | Step 1: Step 2: 2 Heating Elements alternately work + Fan 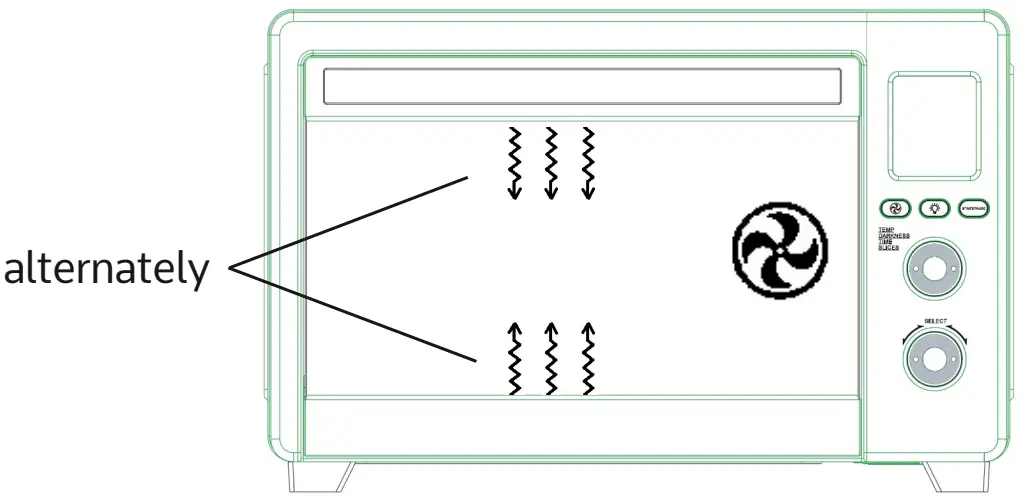 | Temperature …………………. 120°F Time …………………. 6 hours Fan …………………. on Wattage …………………. 730W | 85°F~175°F (unit: 1°F) 30 mins~72 hours (unit: 30 mins) disabled |
| • recommended to use air fry basket / in positions 1, 4, 5 | |||
| Reheat | Step 1: Upper and Lower Heating Elements | Temperature ………………….320°F Time ………………….15 mins Fan ………………….off Wattage ………………….1450W | |
| • recommended to use baking rack / in position 5 | |||
| Warm | Step 1: Upper and Lower Heating Elements | Temperature ………………….160°F Time ………………….1 hour Fan ………………….off Wattage ………………….1450W | |
| • recommended to use a baking rack, baking tray, or air fry basket / in position 5 | |||
START TO TRY YOUR OVEN
7. Operation Instructions
Step A Put the prepared food inside your oven properly
» Choose the desired position for cooking accessories:
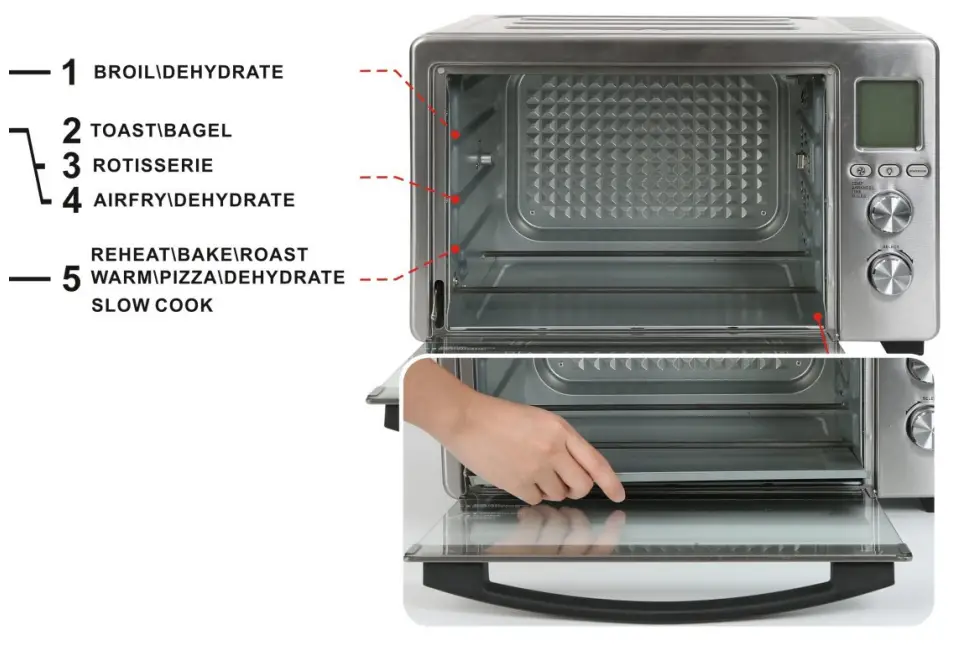
NOTE:
Before starting the oven, ALWAYS keep the crumb tray below the lower heating elements to collect the grease and liquid released from the food during cooking.
» To Use Basket, Rack, and Pan:
› First, check that the crumb tray is below the heating elements.
› Then, refer to the mode description and use the recommended oven accessories in the proper positions.
| Fry Basket | Baking Pan | Baking Rack |
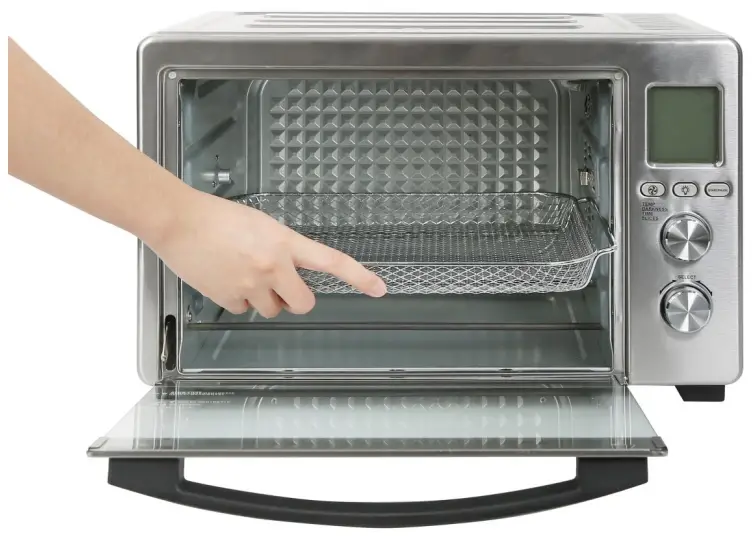 | 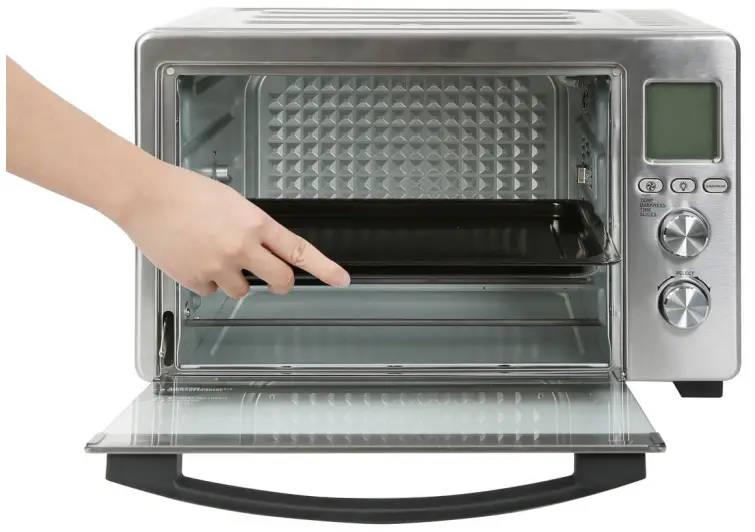 | 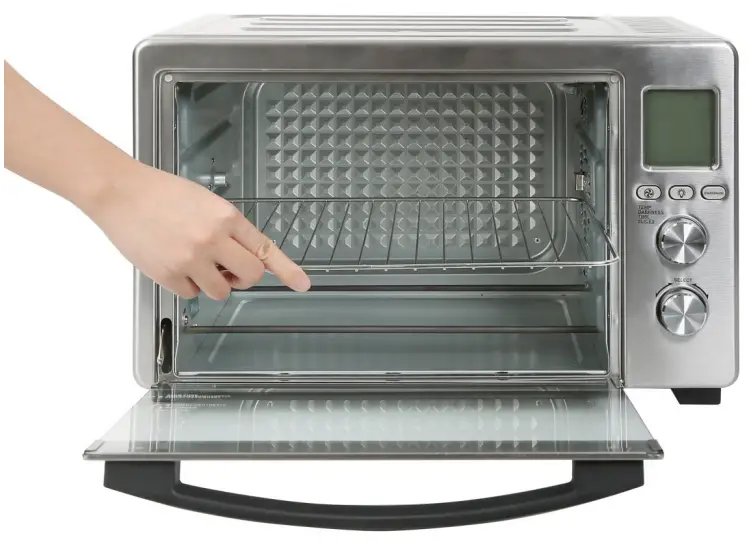 |
» To Use Rotisserie Fork Set:
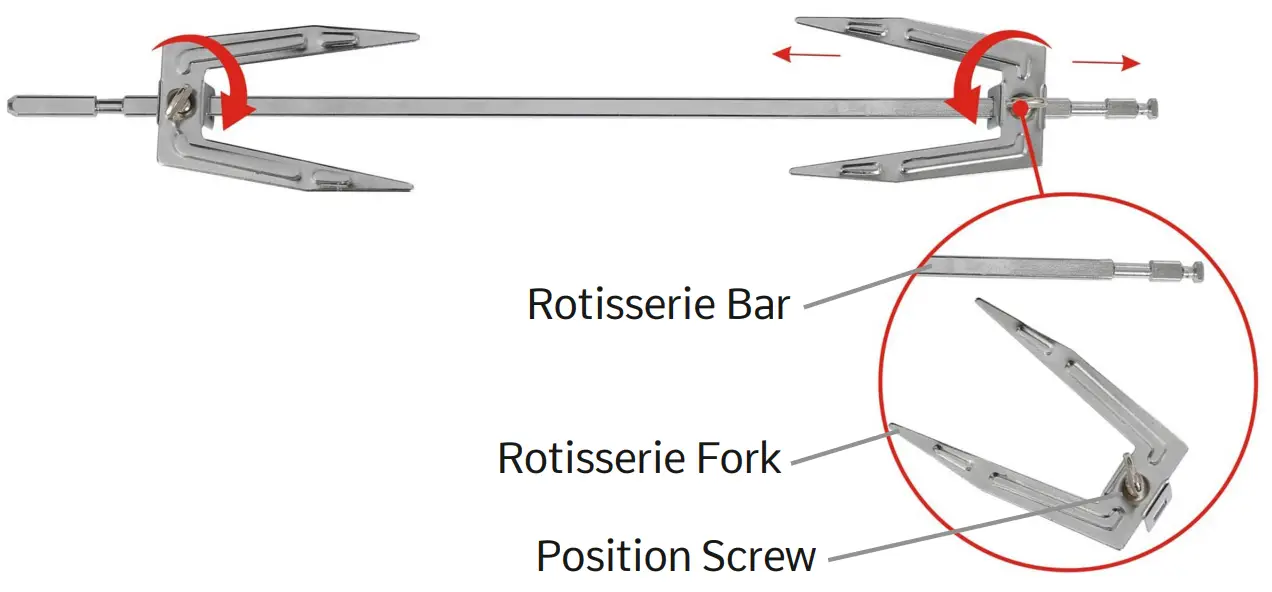
STEP 1
› Unscrew Position Screws in Rotisserie Forks and remove Rotisserie Forks from Rotisserie Fork Set.
STEP 2
› Insert Rotisserie Bar into the food.
› Insert Rotisserie Forks into the food and tighten the Position Screws.
» To Install Rotisserie Fork Set:
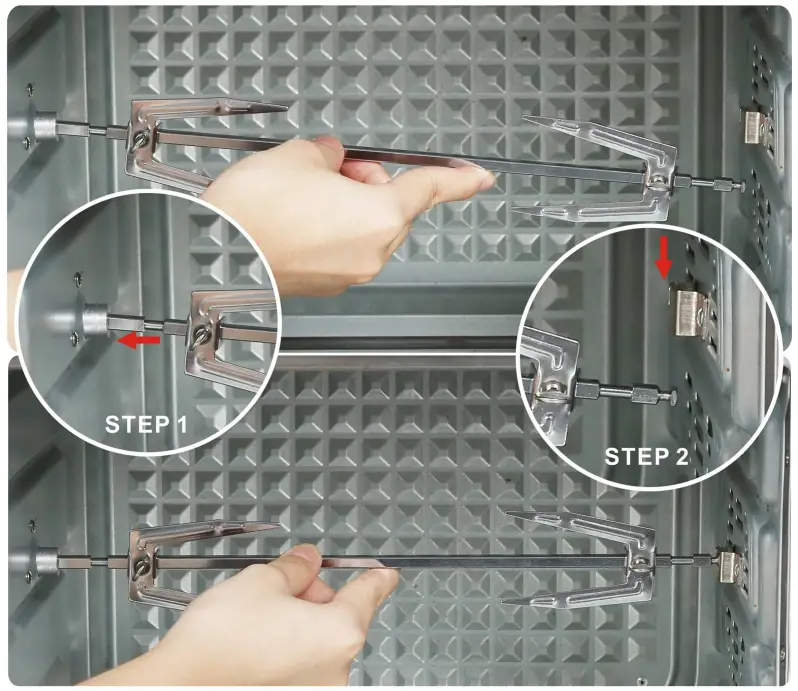
STEP 1
› Insert the longer end of Rotisserie Fork Set into the left Rotisserie Slot.
STEP 2
› Slide the shorter end of Rotisserie Fork Set into the right Rotisserie Slot.
Step B Plug the power cord into the outlet
 The first time powered on, the oven enters the standby mode, and you will find:
› The oven buzzer rings once.
› The digital screen displays fully for 4 seconds and enters the standby mode interface.
› The screen turns blue.
› And the touchpad indicator light is always on.
Step C To select modes

To select modes on the main menu:
Rotate the function selection knob clockwise or counterclockwise.
Available modes on the main menu:
AIR FRY, TOAST, BAGEL, PIZZA, BAKE, BROIL, ROTISSERIE, SLOW COOK, ROAST, DEHYDRATE, REHEAT, WARM.
| TIPS: Refer to the model descriptions, and then rotate the model selection knob clockwise or counterclockwise to choose the modes you need. |
Step D To adjust the selected mode
Example 1
1. First, enter Air Fry mode, and you will find:

› The Air Fry icon flashes.
› The screen displays default info: 400°F, 18 mins.
NOTE:
Except for Toast and Bagel mode, other modes can also refer to example 1.
» Adjust the cooking temperature
2. Next, to increase or decrease temperature:› Rotate Temp/Time/Slices/Darkness knob.› And you will see the temperature keeps flashing. » Adjust the cooking time
3. After temperature is selected, increase or decrease time:› Press the Temp/Time/Slices/Darkness knob once.
Rotate Temp/Time/Slices/Darkness knob.
› And you will see time keeps flashing.
Example 2
1. First, enter Toast mode, and you will find:

› The Toast icon flashes.
› The screen displays default info: 4 slices, 5 min 55 secs.
NOTE: Bagel mode can also refer to example 2.
» Adjust the slices of your toast
2. Next, to increase or decrease slices:› Rotate the Temp/Time/Slices/Darkness knob.
› And you will see the number of slices and time keep flashing at the same time.
» Adjust the darkness of your toast
After the number of slices is selected, to increase or decrease darkness:
› Press the Temp/Time/Slices/Darkness knob once.
Rotate Temp/Time/Slices/Darkness knob.
› And you will see darkness scale and time keep flashing at the same time.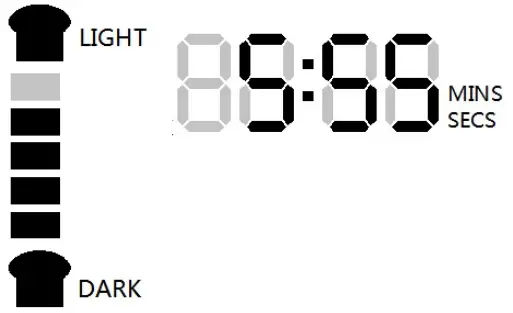 Step E To start the selected mode
| After the time of darkness is selected, press the Start/Pause button, then you will see: › The oven buzzer rings once. › And the screen turns an orange color. › Then the oven starts working. |
TIPS:
Before working:
To return to the main menu
• Rotate the mode selection knob clockwise or counterclockwise.
During working:
To cancel the selected mode:
• Press the mode selection knob once.
Turn off the display screen:
• Press the mode selection knob and hold for 3 seconds.
To adjust the temperature/darkness and time again:
• Press the start/pause button again.• Then rotate and press the Temp/ Time/Slices/Darkness knob to adjust.
8. Cooking Reference Guide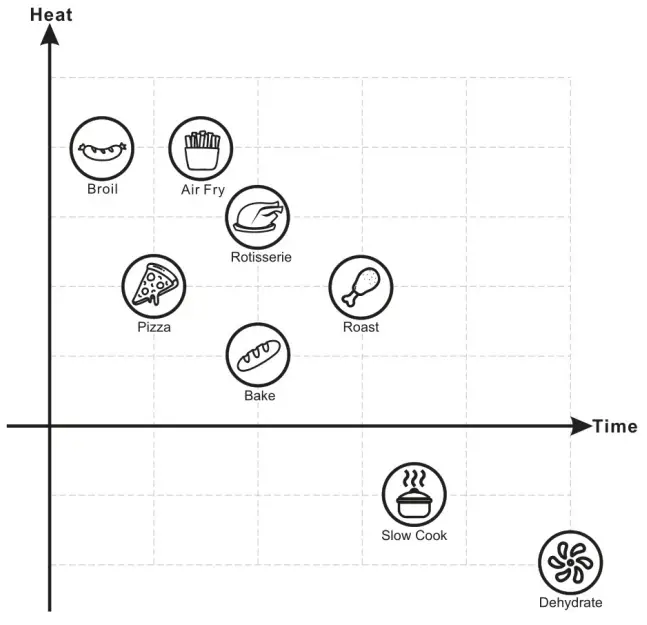
Tips:
- The chart on the left shows 8 modes together with different heat ranges and average cooking time range.
- As provided below, you can refer to the approximate cooking time for 7 modes in the chart and readjust the time and temperature according to your needs.
According to your desired flavor, moisture, and the type of food, compare and choose the needed modes, for example:
- If you need higher heat for your food, refer to the left chart, and choose the modes on the upper side.
- If you need a shorter time for your food to keep more moisture, refer to the left chart, and choose the modes on the left side.
Mode Suitable Items Examples Cook Time (After preheating) Broil Thin slices/Fully
cooked foodCheese, Ham, Bacon, etc. 8-16 mins or until hot or cheese melts Breaded meat/Frozen snacks/ Pastries/ Vegetables/ Small cut
of meatBreaded chicken, Frozen fries, Steak, Salmon, Shrimp, biscuits, Ground meat, Burgers, Fresh mushroom, etc. 10-30 mins or until golden brown or the breading is crispy RotisserAir Frye Large pieces of meat
or Poultry/Stuffed
pastriesWhole chicken, Chicken legs
or wings, Lamb/beef ribs, etc.25-50 mins or until golden brown Roast 40 mins-1.5 hours or until golden brown Pizza Bread Dough, Cake, Pie, Pizza
Dough, etc.15-30 mins or until golden brown Bake 30-50 mins or until golden brown Slow Cook A large and tough cut of meat/ Creamy dishes/Stew in a pot Chicken bones stock, Lasagna,
Vegetable/meat stew, etc.3 hours-6 hours or until the food is tender or creamy inside
9. Other Modes:
Sleep Mode
› Before starting the oven, press the mode selection knob and hold for 3 seconds, and the digital screen will enter sleep mode.
› To unlock sleep mode, rotate the mode selection knob in any direction or press once.
MAINTAIN YOUR OVEN PROPERLY
10. Cleaning and Maintenance
Cleaning
» Before Cleaning
- Before cleaning or replacing the bulb, to avoid possible electric shock, please turn off the power and unplug the power cord, then wait for the oven to cool down to room temperature.
» Cleaning the Inner Wall
- Do ALWAYS keep the inner cavity clean. After cooking, clean the grease around the inner cavity.
- DO NOT use rough and abrasive lotions. If the inner wall of the oven is dirty, use soft lotion.
- DO NOT use hard materials for cleaning. When food or grease stains splash on the inner wall, wipe them off with a damp cloth.
- DO NOT leave water in the device and keep the inner wall dry.
» Cleaning the Glass Door
- To clean the glass door of the oven, please use a soft damp cloth.
- Often clean the sealing surface of the door, and wipe it with a soft dry cloth.
- DO NOT use rough detergent or sharp cleaning appliances to clean the glass door.
» Cleaning the Baking Tray
- DO NOT use metal or abrasive cleaning materials for cleaning, as this will damage the enamel coating on the surface of the baking tray.
Maintenance
- If not used for a long time, unplug the power cord, clean the inner cavity and place the oven in a ventilated and dry environment without corrosive gases.
- Keep all the air outlet openings of the oven unblocked, and the outer housing MUST NOT cover other items.
- DO NOT insert metal or any other external objects (such as iron wires/fingers) into the air outlet and inlet openings of the digital oven, otherwise, it may cause electric shock and injury.
- If metal or any other external object is inserted into the product accidentally, please unplug and contact our after-sales service center.
Repair
- When this appliance malfunctions, repair MUST be inspected by professional maintenance staff.
- DO NOT disassemble the oven for repair and modification by yourself.
11. Accessories & Technical Specification
| Accessories | |||||||
| Crumb Tray | Baking Tray | Baking Rack | Tray Handle | Rotisserie Fork | Fry Basket | ||
| • | • | • | X | • | • | ||
| Model Number | Rated Voltage and Rated Current | Rated Capacity | |||||
| A05000 | 120V-60Hz | 32L | |||||
| Hot Air Convection | Maximum Power | Power for coil heating | Power for upper and lower heating | ||||
| 1750W | 1750W | 300W | 1450W | ||||
| Executive Standard: UL 1026:2012 | |||||||
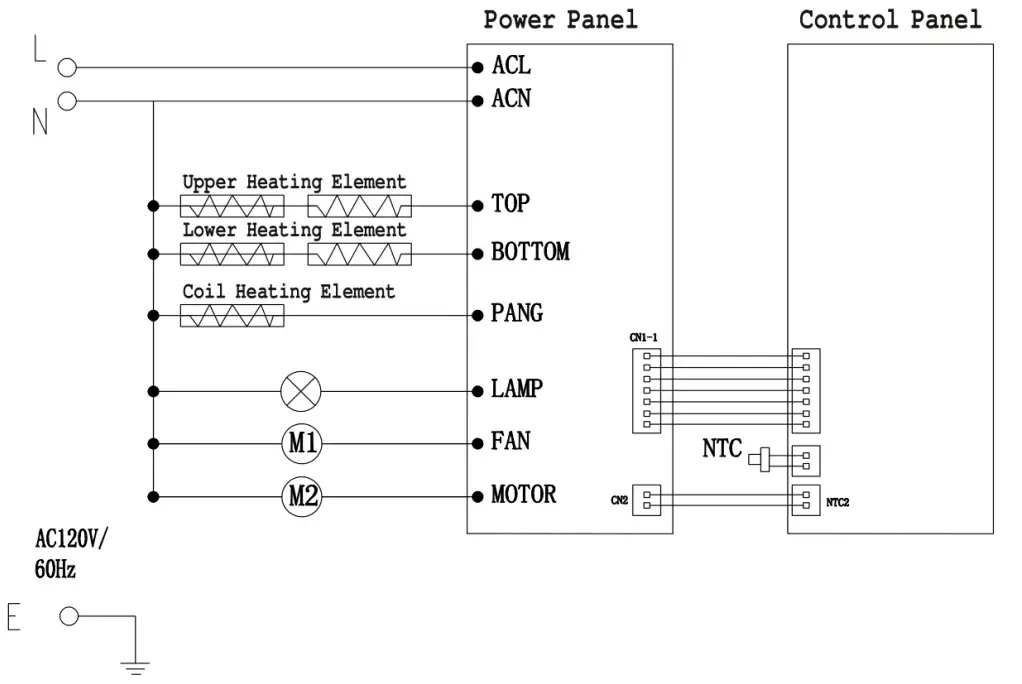
12. Circuit Schematics
13. Troubleshooting Guide
| Problems | Possible Causes | Solutions |
| The digital screen displays E:01 | Sensor Circuit Problem | Contact the after-sales department for maintenance |
| The oven does not work | 1. The oven is not plugged in or powered on. 2. Bad contact of outlet. | 1. Plug the power cord into the outlet. 2. Try another outlet. |
| Food is undercooked | 1. Cooking time is too short. 2. Cooking food of different sizes. 3. Cooking temperature is too low. | 1. Increase the cooking time properly. 2. Try to cut food into even sizes. 3. Increase the cooking temperature properly. |
| Smoke or steam comes out of the oven | 1. Without preheating the empty oven for the first time use. 2. The oven is not cleaned and is left with stains. 3. Baking the food with grease and moisture. | 1. For the first-time use, select any modes with preheat feature and keep the empty oven working for at least 10 minutes. 2. After using, ALWAYS remove the stains inside the oven. 3. The grease and moisture will be released from food during cooking. When the grease touches the heating elements, it burns and smoke comes out. This is normal. |


