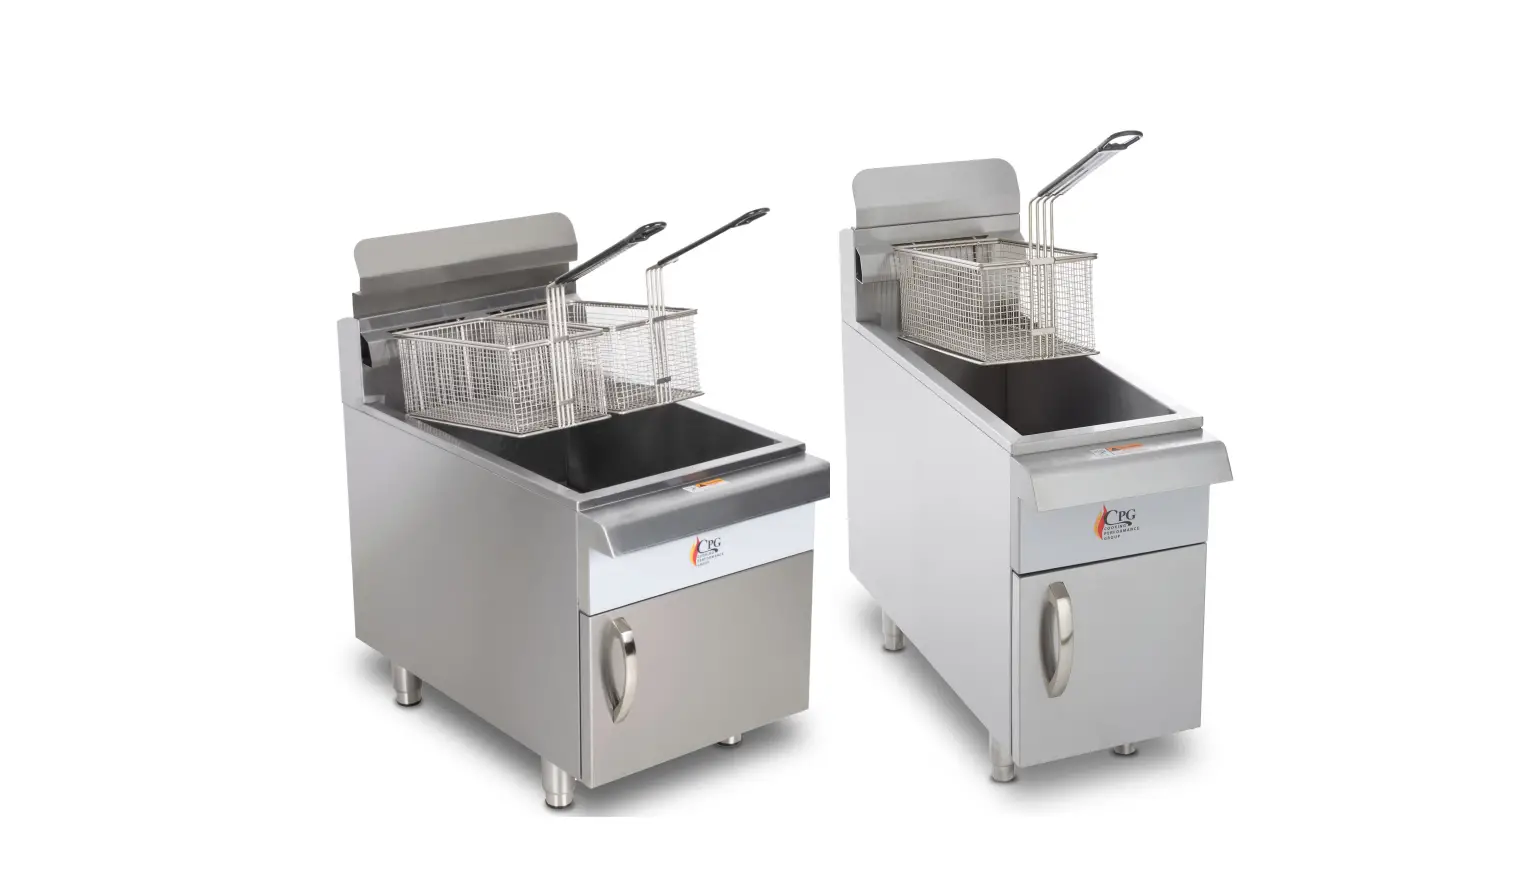
351FCPG15L Liquid Propane 15 lb. Countertop Fryer

Features & Specifications
- Stainless steel construction
- Heavy-duty durable access door
- Stainless steel burners
- Piezo ignition and pilot light
- Heavy-duty adjustable feet
- The flame failure device system
- Stainless steel tube style tank
- Heavy-duty chrome plated fryer basket with cool-grip handle
| ITEM # | # OF BURNERS | POWER | WORK PRESSURE (LN.W.C) |
| 351FCPG15N | 2 | 26,500 BTU | 4 |
| 351FCPG15L | 2 | 26,500 BTU | 10 |
| 351FCPG30N | 4 | 53,000 BTU | 4 |
| 351FCPG30L | 4 | 53,5000 BTU | 10 |
NOTE: Depth DOES NOT include regulator (3¼”) size.
Installation and service should be performed by a qualified installer who thoroughly reads, understands, and follows these instructions.
If you have questions concerning the installation, operation, maintenance, or service of this product, visit Cooking Performance Group’s website at www.CookingPerformanceGroup.com.
Safety Precautions
CAUTION: Potential hazard or unsafe practice could result in minor or moderate injury or product or
property damage.
NOTICE: Local codes regarding installation vary greatly from one area to another. The National Fire
Protection Association, Inc., states in its NFPA96 latest edition that local codes are “Authority Having Jurisdiction” when it comes to requirements for installation of equipment. Therefore, installation should comply with all local codes.
WARNING:
- Do not store or use gasoline or other flammable vapors and liquids in the vicinity of this or any other appliance.
- Improper installation, adjustment, alteration, service, or maintenance could lead to property damage, injury, or death. Read the installation, operating, and maintenance instructions thoroughly before installing or servicing CPG equipment. This manual must be retained for future reference.
Instructions must be posted in a prominent location. All safety precautions must be taken in the event the user smells gas. Safety information can be obtained from your local gas supplier. - A factory-authorized agent should handle all maintenance and repair. Prior to conducting any maintenance or repair work contact an authorized service agency.
GAS PRESSURE: The appliance and its individual shutoff valve (to be supplied by the user) must be
disconnected from the gas supply piping system during any pressure testing of that system at test pressures in excess of 1/2 PSI (3.45 kPa). The appliance must be isolated from the gas supply piping system by closing its individual manual shut-off valve during any pressure testing of the gas supply piping system at test pressures equal to or less than
1/2 PSI (3.45 kPa).
Serial Plate
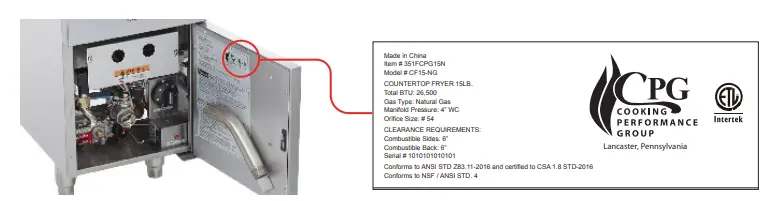
NOTE: The serial plate is located on the inside of the unit.
Installation Instructions
THESE UNITS ARE SUITABLE FOR INSTALLATION ON NON-COMBUSTIBLE SURFACES ONLY. DO NOT INSTALL NEAR ANY COMBUSTIBLE SURFACES.
IMMEDIATELY INSPECT FOR SHIPPING DAMAGE:
All containers should be examined for damage before and during unloading. The freight carrier has assumed responsibility for its safe transit and delivery. If equipment is received damaged, either apparent or concealed, a claim must be made with the delivering carrier.
Apparent damage or loss must be noted on the freight bill at the time of delivery. It must then be signed by the carrier representative (ie: the driver). If this is not done, the carrier may refuse the claim. The carrier can supply the necessary forms.
Concealed damage or loss if not apparent until after the equipment is uncrated, a request for inspection must be made to the carrier within 15 days. The carrier should arrange an inspection. Be certain to hold all contents and packaging material.
Installation and service should be performed by an authorized service agency. If you have questions concerning the installation, operation, maintenance, or service of your equipment, visit CPG’s website at www.CookingPerformanceGroup.com.
Make sure that the floor where you plan to locate the fryer is capable of supporting its weight along with any accessories. Adequate clearance should be provided for proper operation and servicing. Level the fryer once you’ve uncrated it in your facility using the adjustable feet.
Proper ventilation is crucial to safe and optimum performance. Ensure that the oven is installed underneath a ventilation hood according to all applicable local and national codes. Keep adequate clearance for air openings into the combustion chamber.
Lighting Instructions
CPG Fryers are furnished with a Gas Control Safety Valve system. It is recommended that the following steps be followed to ensure the safe and optimal operation of your new CPG Fryer.
BEFORE LIGHTING PILOT AND BURNERS:
Fill the fat tank approximately ¾” below the full line with a proper frying compound prior to lighting the pilot. By filling the tank ¾” below the full line, the tank is provided sufficient space to allow for the frying compound to expand during the preheating phase. Provided the frying compound would expand above the full line, the frying compound may overflow out of the tank during the cooking process.
By adding the frying compound to the fry tank prior to lighting the pilot or burner(s), it ensures that the unit will not be damaged. Provided the above step is not followed, your CPG Fryer could be permanently damaged.
Operating Instructions
CPG Fryers are furnished with a Gas Control Safety Valve system. It is recommended that the following steps be followed to ensure the safe and optimal operation of your new CPG Fryer.
- Ensure the gas control valve dial is turned to the “OFF” position. (Fig. 1)
- Ensure the thermostat dial is in the “OFF” position. (Fig. 2)
- Turn the gas control valve dial to the “Pilot” position and hold. Engage the pilot ignition button. In order to drain any air within the gas pipe system, for initial use, hold the Valve dial in the “Pilot” position for approximately 5-7 minutes until the pilot is lit. Should the Gas Fryer pilot light not ignite, safely hold an ignition source (i.e. match) toward the pilot. When the flame has been established, safely remove the Ignition source. (Fig. 3A-3B)
- Turn the gas control valve dial to the “ON” position. Using the thermostat dial, set the desired temperature. Monitoring flame status can be done with ease via the panel featuring circular holes. (Fig. 4)


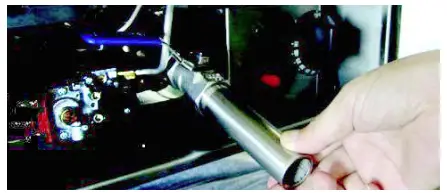
DRAINING OIL
- A drain extension pipe is affixed to the inside of the main door for ease of the draining process.
STEP:
- Thread drain extension pipe into main drain valve.
- Firmly secure the drain extension pipe to the drain valve – do not over-tighten.
- Using the blue handle/lever, slowly rotate the valve to the “ON” position.
- Slowly release oil from the drain valve.

Each burner is lit by a constantly burning pilot. By rotating the thermostat to the desired temperature, your CPG Fryer becomes an active, in-service unit.
Cleaning & Maintenance
INITIAL CLEANING:
Thoroughly clean your new CPG Fryer before its first usage. It is strongly recommended that you clean and remove the protective oil from the bright parts and interior of the tank with a solution of washing soda or other grease dissolving product.
DAILY CLEANING:
The frequency of cleaning should depend on load conditions. Set a definite cleaning schedule corresponding to how hard your CPG Fryer is used. It is recommended that cleaning.
STEPS:
- Always TURN the UNIT OFF and allow it to cool completely before cleaning.
- Never clean the unit by immersing in water.
- Drain the frying of the compound into a clean container.
- Verify that no compound remains in the tank.
NOTE: If the tank is left empty for more than 2 minutes, ensure that the pilot light is shut off. Provided this step is not executed, the fryer tank could be permanently damaged. - Add water up to the MAX line.
- Add approved food grade cleaner and follow cleaner instructions.
- Adjust the thermostat to 250°F.
- Allow the heating unit to bring the solution to a boil.
NOTE: Boil long enough to loosen or dissolve all varnish or carbon deposits. This process should take approximately 30 minutes to complete. - Turn the unit to the OFF position, and be sure that the pilot light is turned on.
- If necessary, clean thermostat probes using a long-handled fiber or plastic brush and mild soap solution.
- Rinse with clean water to remove all cleaning mixture.
- Rinse the inside of the tank using 2 cups of vinegar.
- Rinse with clean water until vinegar odor is eliminated.
NOTE: Fry tank must be thoroughly rinsed, as even a trace of cleaner left inside the tank will likely contaminate the frying compound. - Clean and dry thoroughly.
- Insert frying compound, or fully cover the tank if the frying compound will not be added at this time.
- Clean all exterior surfaces of a unit on a regular basis with a clean, damp cloth.
NOTE: Thin films of oil subjected to frying temperatures could quickly form into a gummy, tough-to-remove formation. In order to avoid such gummy formations, clean the surfaces on a regular basis. - To remove discolorations or oil film, a non-abrasive cleaner may be used cautiously.
CAUTION: Clean fryer regulator monthly. Be sure that the vent opening is fully-opened and unobstructed. Failure to do so will cause negative variations in pressure. Additionally, the unit will not perform optimally, and it could shorten the longevity of the unit.
OVERNIGHT SHUTDOWN
Turn the temperature control knob to the OFF position. Or turn the Off/Pilot/On valve control to
Pilot if you prefer not to change the temperature setting. The pilot flame independently will keep the frying compound temperature to 130-145°F when not under any load. This will shorten the preheat time when the unit is turned back to the ON position.
EXTENDED SHUTDOWN (4 DAYS OR LONGER)
STEPS:
- Turn the temperature control knob to the OFF position.
- Turn Off/Pilot/On valve control knob to OFF position.
- Turn the manual control valve under the unit to the OFF position.
- Turn supply valve to OFF position (not supplied by CPG).
NOTE: The entire flue duct opening, located on the top rear of the unit, must be left uncovered indefinitely.
RECOMMENDED CLEANING AGENT
Attack tough grease, oil, and carbon with this ready-to-use carbonized and degreaser. Its unique formula is designed to clean ovens, grills, hoods, and a wide variety of other surfaces.
FILLING FRY TANK
CAUTION: Never light pilot or turn burners on with an empty tank.
STEPS:
- Fill fry tank approximately 3/4” below a full line.
NOTE: drying compound will expand as it is heated. Heat fry compound to 375° F for 20 minutes, then check frying compound level. Add or decrease the amount of frying compound so as to ensure that it lines up with the full line. - When using solid frying compound, insert enough compound into the fry tank so at least half or more of the tank has frying compound. Then set the temperature to 200° F on the dial and allow the frying compound to liquefy. Add if necessary to adjust the compound level.
- Filter frying compound frequently, daily.
- Skim-out food particles frequently with a strainer/skimmer.
- Add at least 15% (of fry tank capacity) of fresh frying compound daily without overloading the tank. If 15% of the frying compound is not used daily, remove the necessary frying compound to permit adding 15% of fresh compound daily.
- Do not overload fry baskets. This could result in longer recovery time, longer cook time, and compound absorption into the food products.
- Prepare the food properly.
- Keep salt out of the frying compound. Do not salt foods with the basket above the fryer.
- Ensure quality thermostat operation by checking the frying compound temperature with a reliable frying thermometer. The temperature of the compound should be comparable to the thermostat setting.
- Ensure that the fry tank and thermo-probes remain clean at all times.
THERMOSTAT CALIBRATION
The fryer control on your CPG Fryer is factory calibrated to ensure optimal cooking performance. Provided cooking results indicate the unit is not maintaining correct temperatures, consult an authorized service agency.
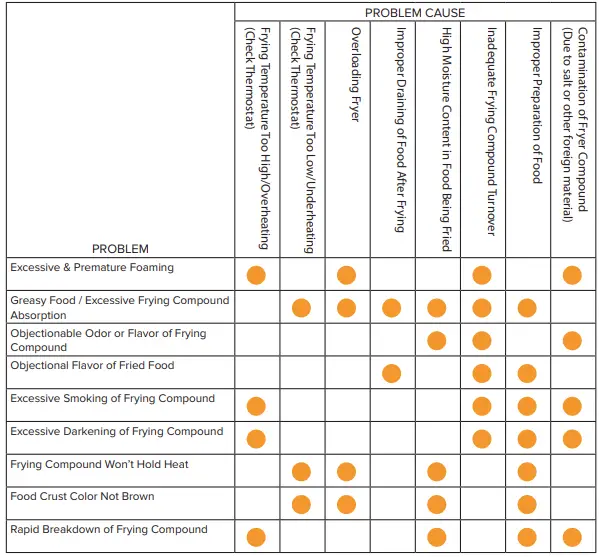
Troubleshooting Guide
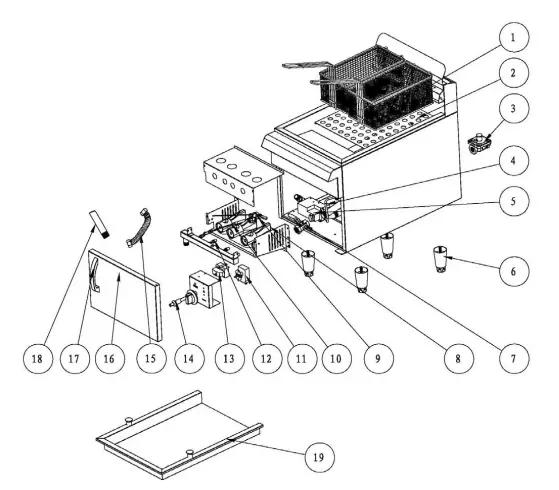
Parts list
| # | DESCRIPTION | MODEL | CODE | QTY |
| 1 | Basket | CF15-NG / CF15-LPG | 01.02.1005190 | 1 |
| CF30-NG / CF30-LPG | 2 | |||
| 2 | Filter Panel | CF15-NG / CF15-LPG | 01.05.1026472 | 1 |
| CF30-NG / CF30-LPG | 01.05.1026210 | |||
| 3 | Regulator 6″ NAT or 10″ LP, ¾” PT | CF15-NG / CF15-LPG | 01.22.1069501 | 1 |
| CF30-NG / CF30-LPG | ||||
| 4 | Pilot Pipe (with Pipe) | CF15-NG / CF15-LPG | 01.02.1005201 | 01.18.1067454 | 1 |
| CF30-NG / CF30-LPG | 01.02.1005197 | 01.18.1067454 | |||
| 5 | Gas Safety Control Valve | CF15-NG / CF15-LPG | 06.05.1470654 | 1 |
| CF30-NG / CF30-LPG | 06.05.1470674 | |||
| 6 | Adjustable Foot | CF15-NG / CF15-LPG | 01.02.1005373 | 4 |
| CF30-NG / CF30-LPG | ||||
| 7 | Valve, Oil Drain | CF15-NG / CF15-LPG | 01.20.1068677 | 1 |
| CF30-NG / CF30-LPG | ||||
| 8 | Burner | CF15-NG / CF15-LPG | 06.05.1470489 | 2 |
| CF30-NG / CF30-LPG | 4 | |||
| 9 | Flame Device System | CF15-NG / CF15-LPG | 01.21.1069001 | 1 |
| CF30-NG / CF30-LPG | 01.21.1069003 | |||
| 10 | Thermopile | CF15-NG / CF15-LPG | 03.11.1250027 | 1 |
| CF30-NG / CF30-LPG | ||||
| 11 | Gas Thermostat | CF15-NG / CF15-LPG | 03.05.1220047 | 1 |
| CF30-NG / CF30-LPG | ||||
| 12 | Orifice #51 NG Orifice #58 LPG | CF15-NG / CF15-LPG | 01.20.1068651 | 2 |
| 4 | ||||
| CF30-NG / CF30-LPG | 01.20.1068658 | 2 | ||
| 4 | ||||
| 13 | LC Series Limit Control | CF15-NG / CF15-LPG | 03.99.1290101 | 1 |
| CF30-NG / CF30-LPG | ||||
| 14 | Piezo Igniter | CF15-NG / CF15-LPG | 03.99.1290152 | 1 |
| CF30-NG / CF30-LPG | ||||
| 15 | Bellows | CF15-NG / CF15-LPG | 01.02.1005117 | 1 |
| CF30-NG / CF30-LPG | ||||
| 16 | Door | CF15-NG / CF15-LPG | 06.05.1470658 | 1 |
| CF30-NG / CF30-LPG | 06.05.1470653 | |||
| 17 | Door Handle | CF15-NG / CF15-LPG | 01.02.1005070 | 1 |
| CF30-NG / CF30-LPG | ||||
| 18 | Oil Drain Pipe | CF15-NG / CF15-LPG | 01.02.1005195 | 1 |
| CF30-NG / CF30-LPG | 06.05.1470653 | |||
| 19 | Cover (Optional Accessories) | CF15-NG / CF15-LPG | 06.05.1470668 | 1 |
| CF30-NG / CF30-LPG | 06.05.1470669 |
Parts Diagram