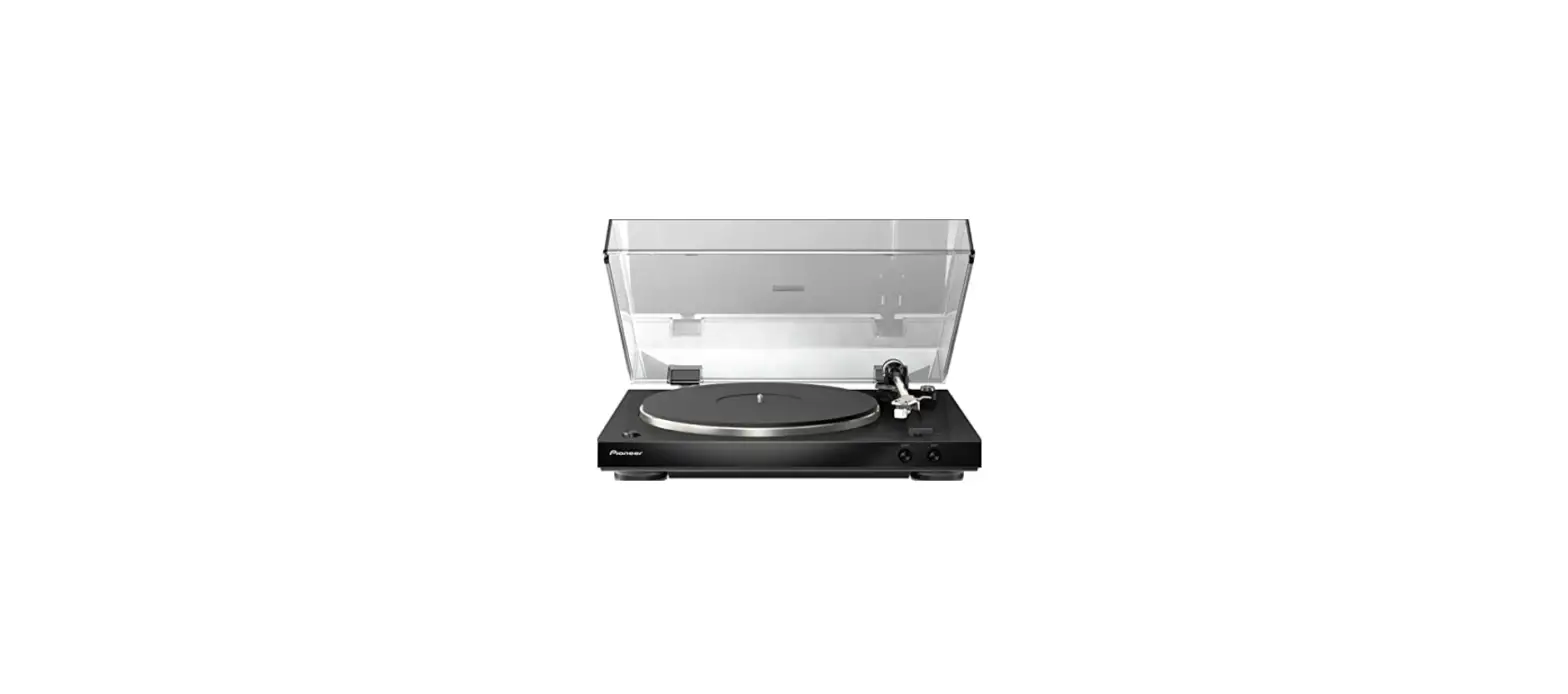
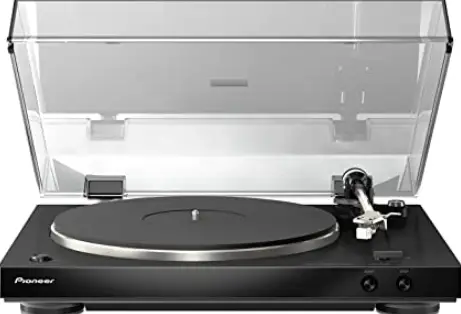
Pioneer PL-30-K Audiophile Stereo Turntable with Dual-Layered
IMPORTANT INSTRUCTION
- Read these instructions. Keep these instructions. Heed all warnings. Follow all instructions.
- Do not use this apparatus near water.
- Clean only with dry cloth. Do not block any ventilation openings.
- Install in accordance with the manufacturer’s instructions.
- Do not install near any heat sources such as radiators, heat registers, stoves, or other apparatus (including amplifiers) that produce heat.
- Do not defeat the safety purpose of the polarized or grounding-type plug.
- A polarized plug has two blades with one wider than the other.
- A grounding type plug has two blades and a third grounding prong.
- The wide blade or the third prong are provided for your safety.
- If the provided plug does not fit into your outlet, consult an electrician for the replacement of the obsolete outlet.
- Protect the power cord from being walked on or pinched particularly at plugs, convenience receptacles, and the point where they exit from the apparatus.
- Only use attachments/accessories specified by the manufacturer.
- Use only with the cart, stand, tripod, bracket, or table specified by the manufacturer, or sold with the apparatus.
- When a cart is used, use caution when moving the cart/apparatus combination to avoid injury from tip-over.
- Unplug this apparatus during lightning storms or when unused for long periods of time.
- Refer all servicing to qualified service personnel.
- Servicing is required when the apparatus has been damaged in any way, such as power-supply cord or plug is damaged, liquid has been spilled or objects have fallen into the apparatus, the apparatus has been exposed to rain or moisture, does not operate normally, or has been dropped
Operating Environment
Operating environment temperature and humidity: +5 °C to +35 °C (+41 °F to +95 °F); less than 85 %RH (cooling vents not blocked) Do not install this unit in a poorly ventilated area, or in locations exposed to high humidity or direct sunlight (or strong artificial light).
VENTILATION CAUTION When installing this unit, make sure to leave space around the unit for ventilation to improve heat radiation (at least 15 cm at top, 5 cm at rear, and 5 cm at each side).
The Safety of Your Ears is in Your Hands
Get the most out of your equipment by playing it at a safe level – a level that lets the sound come through clearly without annoying blaring or distortion and, most importantly, without affecting your sensitive hearing. Sound can be deceiving. Over time, your hearing “comfort level” adapts to higher volumes of sound, so what sounds “normal” can actually be loud and harmful to your hearing. Guard against this by setting your equipment at a safe level BEFORE your hearing adapts.
ESTABLISH A SAFE LEVEL
- Set your volume control at a low setting.
- Slowly increase the sound until you can hear it comfortably and clearly, without distortion.
- Once you have established a comfortable sound level, set the dial and leave it there.
BE SURE TO OBSERVE THE FOLLOWING GUIDELINES:
- Do not turn up the volume so high that you can’t hear what’s around you.
- Use caution or temporarily discontinue use in potentially hazardous situations.
- Do not use headphones while operating a motorized vehicle; the use of headphones may create a traffic hazard and is illegal in many areas.
POWER-CORD CAUTION
Handle the power cord by the plug. Do not pull out the plug by tugging the cord and never touch the power cord when your hands are wet as this could cause a short circuit or electric shock. Do not place the unit, a piece of furniture, etc., on the power cord, or pinch the cord. Never make a knot in the cord or tie it with other cords. The power cords should be routed such that they are not likely to be stepped on. A damaged power cord can cause a fire or give you an electrical shock. Check the power cord once in a while. When you find it damaged, ask your nearest PIONEER-authorized service center or your dealer for a replacement
Features
Simple to use, fully automatic record player
Once you select the record size, all you have to do is press the [START] button to start playing a record. When the record is done, the player’s fully automatic function returns the tone arm to its position.
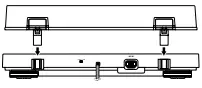
Stable record playing due to low center of gravity chassis
The bottom of the player has a metal plate to give the entire chassis a low center of gravity. That makes it stable while playing records even when there are external vibrations.
Equipped with a phono equalizer that can be switched ON/OFF
Being equipped with its own phono equalizer means the player can be connected directly to amps that don’t have a PHONO terminal. If an amp does have a phono equalizer, this function can be turned off.
Comes with a high-performance MM cartridge
Because it comes with a cartridge, you can use it right away.
Comes with a moderately thick rubber mat
The 5 mm thick rubber mat suppresses external vibration while improving the grip between the record and the turntable–for stable record playing.
Unobtrusive design
Its appearance and finish engender a composed ambience so it harmonizes with your components as well as your interior.
Detachable power cord
Cables are not obstacles when the player is moved, thus preventing disconnection problems
what’s in the box
- Turntable
- Turntable sheet
- Dust cover with removable hinges
- Adapter for EP record
- Balance weight
- Headshell with cartridge
- Spare lead wires
- Power cord
- Operating instructions (this document)
Assembly
- Do not remove the twist tie for clamping the tone arm until assembly is completed.
- Connect the power cord after player assembly and all the connections between other devices have been completed.
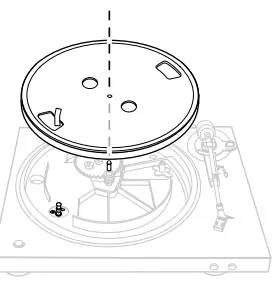
Set the turntable.
- Set the turntable on the center spindle.
- Be careful not to hit the turntable on the main unit or drop it.

- Pinch the ribbon tape and catch the belt on the outer center of the roller.

- Remove the ribbon tape.
- Turn turntable slowly for five or six turns.
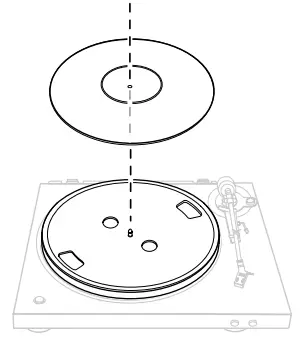
- Set the turntable sheet.

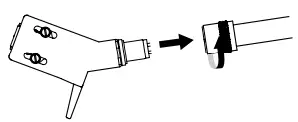
- Attach the headshell.

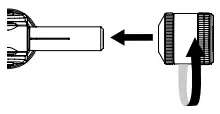
- Attach the balance weight

- Mount the dust cover.


Part names and functions
Top panel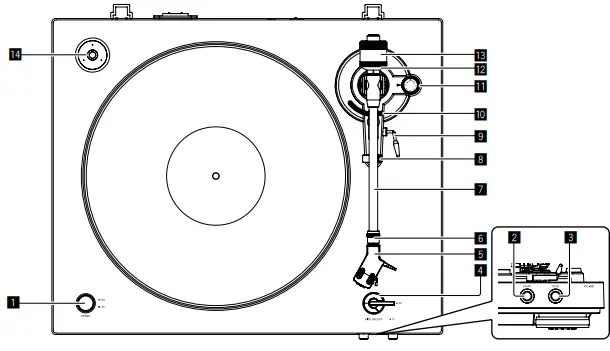
- SPEED button
- Changes the speed according to the record to be played.
- START button
- Pressing the button starts rotation of the turntable.
- STOP button
- Pressing the button stops rotation of the turntable.
- SIZE SELECT lever
- Changes the size according to the record to be played.
- Headshell
- Used with a cartridge attached.
- Lock nut
- Holds the cartridge attached.
- Tone arm
- Arm rest
- Serves as the support base for the tone arm.
- Lifter lever
- The tone arm goes up when the lever is pulled up. The tone arm goes down when the lever is pushed down.
- Arm lifter
- This device is used to move the tone arm up and down. It is operated by the lifter lever.
- ANTI-SKATING dial
- When a record is played, there is power to pull the stylus tip toward the inner perimeter. By matching this dial to the stylus pressure value, that power is eliminated.
- Stylus pressure adjustment ring
- Used to match to the appropriate stylus pressure of the cartridge.
- Balance weight
- Used to balance the tone arm and adjust the stylus pressure.
- Adapter for EP record
- Used to play standard EP records.
Adjustment
Adjusting the tone arm balance
Prepare as follows;
- For cartridges with removable stylus covers, remove the stylus cover.
- Push down the lifter lever.
- Set the [ANTI-SKATING] dial to “0”.
- Keep the tone arm from the arm rest and adjust the balance so it is horizontal.
- Turn the balance weight until the tone arm becomes almost horizontal.
- When moving the tone arm, make sure that the stylus tip does not directly touch the turntable and the like..


Adjusting the stylus pressure
- Return the tone arm to the arm rest.
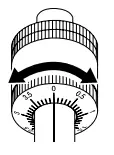
- Match the “0” on the stylus pressure adjustment ring to the center line of the arm rear shaft.
- While using your finger to hold the balance weight to keep it from moving, turn only the stylus pressure adjustment ring so that the number “0” comes to the black center line of the tone arm rear shaft.

Adjust the stylus pressure.
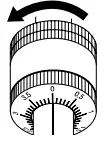
- Turn the balance weight to adjust to the appropriate stylus pressure value for your cartridge.
- When turning the balance weight, the stylus pressure adjustment ring turns together. While observing the adjustment ring, adjust the stylus pressure to the appropriate value.
- The appropriate stylus pressure for the included cartridge is 3.5 g. Set to “3.5”.

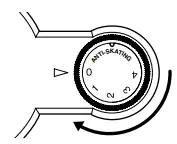
Adjusting anti-skating
- This adjustment is made to prevent stylus jumping.
- Match to the same scale position as the stylus pressure value.
- Turn the [ANTI-SKATING] dial to match the reference mark to the same value as the cartridge stylus pressure value.

Connecting your equipment
- Be sure to turn off the power and unplug the power cord from the power outlet whenever making or changing connections.
- Refer to the operating instructions for the component to be connected.
- Connect the power cord after all the connections between devices have been completed.
Descriptions of terminals
- Equalizer switch
- Move this switch to appropriate position according to the audio input terminal of the pre-main amplifier or other component.
- RCA output terminals
- Connects to the audio input terminal of the pre-main amplifier or other component.
- AC IN terminal
- Connects to a power outlet using the included power cord. Wait until all connections between the equipment are completed before connecting the power cord.
- Be sure to use the included power cord
Additional information
Replacing the stylus
- The included stylus has a service life of about 400 hours. To avoid damaging valuable records, replace the stylus without delay. Purchase a replacement stylus at the store where you purchased the record player or your nearest repair and inquiry outlet. Specify that you want the replacement stylus exclusively for PL-30-K.
- Turn off the amplifier’s power before replacing the stylus, and unplug the player’s power cord.
- The stylus tip is an extremely delicate part, so handle it very carefully. Use a soft brush to gently remove any dust from the stylus tip.
- Removing the headshell makes it easy to replace the stylus.
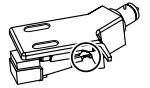
Removing the replaceable stylus
- Holding the cartridge steady with one hand, grasp the replaceable stylus with the other hand, and then push down it.
- Pull the stylus off gently in the direction of arrow.


Attaching the replaceable stylus
- Holding the cartridge steady with one hand, grasp the replaceable stylus with the other hand, point the catch on the replaceable stylus, insert it all the way into the long hole in the cartridge.
- Push up in the direction of arrow until a click is heard.


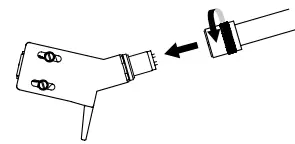
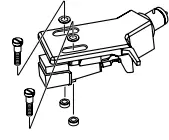
Removing the cartridge
- Turn the headshell lock nut and remove the headshell

- Loosen the cartridge mount screws and remove them.

- Disconnect the lead wires on the cartridge side.

Attaching the cartridge
Connect the lead wires

Attach the cartridge.
To achieve the required overhang, mount in such a way that the stylus tip is positioned about 45 mm from the edge of the headshell’s mount surface (the rubber washer), as shown on the diagram below. ! The overhang for this player should be 19 mm.
Troubleshooting

Cautions on use
About condensation
Water droplets (condensation) may form inside the unit (on operating parts and lenses) in the winter, for example, if the unit is moved from a cold place into a warm room or if the temperature in the room in which the unit is installed rises suddenly (through heating, etc.). The unit will not operate properly and will not be playable with condensation inside. Let the unit stand for 1 to 2 hours at room temperature (though this time depends on the conditions of the condensation) without turning on the power. The water droplets will evaporate and the unit will become playable. Condensation can occur in the summer as well if the unit is exposed to the direct wind from an air-conditioner, etc. If this happens, move the unit to a different location.
When transporting the unit to another location
- Use the original packing materials to pack the unit.
- If the original packing materials are not available, be sure to perform the following.
- Detach the turntable sheet and turntable and pack carefully.
- Detach the headshell and balance weight from the arm and pack carefully.
- Use the arm clamper to secure the tone arm and use tape to secure it so that it does not move.
- Wrap the main unit in a blanket or soft paper so that it will not be damaged.
Maintenance of each part
- When attaching and detaching the headshell, turn off the power of the amplifier.
- If you attempt to do so while the volume is loud, the speaker could be damaged.
- Remove the shell with cartridge and use a soft tip brush or writing brush to carefully remove dust, etc. from the stylus tip.
- Use a good quality record cleaner to clean records.
- Use a soft cloth or something similar to clean the headshell terminal and then reattach it to the tone arm.
Cleaning the dust cover, etc.
- Use a soft cloth to clean the dust cover and cabinet.
- Do not clean the dust cover while playing. Static electricity could cause the tone arm to be pulled by the dust cover.
About trademarks and registered trademarks
- Pioneer is a registered trademark of PIONEER CORPORATION.
- The names of companies and products mentioned herein are the trademarks of their respective owners
Specifications
- Power requirements………………………………………………………………………………………………………………….AC 120 V, 60 Hz
- Power consumption…………………………………………………………………………………………………………………………………….2 W
- Main unit weight…………………………………………………………………………………………………………………………5.6 kg (12.3 lb)
- Max. dimensions….. 435 mm (W) × 110 mm (H) × 372.6 mm (D) (17 3/16 in. (W) × 4 6/16 in. (H) × 14 11/16 in. (D))
- Tolerable operating temperature……………………………………………………………………+5 °C to +35 °C (+41 °F to +95 °F)
- Tolerable operating humidity………………………………………………………………………………. 5 % to 85 % (no condensation)
Turntable part
- Drive method…………………………………………………………………………………………………………………………. Belt drive system
- Motor……………………………………………………………………………………………………………………………………….DC servo motor
- Rotation speed……………………………………………………………………………………………………………………..33 1/3 rpm, 45 rpm
- Wow and flutter…………………………………………………………………………………………………..0.1 % or less WRMS (JIS WTD)
- S/N ratio………………………………………………………………………………………………………………………………………60 dB (DIN-B)
- Turntable………………………………………………………………………………………………………………………..Aluminum die-casting
Tone arm part
- Arm type………………………………………………………………………………………………….. Static balance straight type tone arm
- Effective length………………………………………………………………………………………………………………………………… 221.5 mm
- Overhang……………………………………………………………………………………………………………………………………………… 19 mm
- Stylus pressure variable range……………………………………………………………………………………..0 g to 4.0 g (1 scale 0.1 g)
- Proper cartridge weight………………………………………………………………………………………. 4.5 g to 9.5 g (single cartridge)
- Cartridge type…………………………………………………………………………………………………………………………………….. MM type
- Headshell weight…………………………………………………………………………………………. 10.0 g (including screws and nuts)
Output voltage
- PHONO………………………………………………………………………………………………………………………………………………….2.5 mV
- LINE……………………………………………………………………………………………………………………………………………………..150 mV
FAQS
What model stylus and cartridge comes with the PL-990?
The stylus is a 0.6 mil diamond type. Cartridge is MM type. Style replacement is PZP1004.
Does it not come with a needle or cartridge ?
It does come with a needle cartridge.
I’m having an issue when i raise the volume high,i get a rumble sound that goes away when i lower the volume.Any advise?
You are probably like me and you don’t want to give up any of your bass. To keep the true reproduction of your albums
Does it not come with a needle in it ?
Yes. comes with a cartridge with needle. Ive returned the Pioneer and purchase the
Audio Technica AT-LP60USB. im happier with it and its on sale for 99$
Is it belt or direct driven? Does it have a USB port?
It’s belt driven. Direct drive tends to be available on the DJ models, like the DJ version of this one which runs $799. There isn’t a USB port; I’m not sure that Pioneer has a USB port out on any of their current models.
do i need to get speakers and a audio amp? it is a gift and i want to make sure i get everything i need to set it up.?
If the person you are giving the turntable already has speakers and an amp, you do not. However, if the recipient does not, they are needed, whether you or the recipient purchase them.
does it have built in speakers?
No it does not It is a turntable not a record player. It is built to work with a stereo receiver and speakers.
what are the power requirments for pl-990?
This is 110V normal US voltage
Is the head shell removable on this TT?
If you are asking about the PL-30, then yes, you can easily change the cartridge, either by removing the existing cartridge or by getting another headshell/cartridge assembly. The manual has instructions for either operation.
If I use an RCA to AUX adapter, could I use this turntable with only computer speakers?
You should be able to, yes. This turntable has a built in preamp, so you should get enough gain to your powered computer speakers.
can the arm be moved to start in mid album?
Yes, you can manually move the arm to any position on the album that you desire.
Does this connect with non computer units? older systems?
It does connect to older stereo systems. I can’t recommend it, however. Mine came without a record mat
can this turntable play 78 RPM records.
Sorry, No! It is however a very good turntable for 33s and 45s.
Do you know how long the rca cables are that come with the pl30k? Are they attached to the turntable?
It has 2 RCA connections (red for Right and White for left) I am not sure if it came with the RCA cables.


