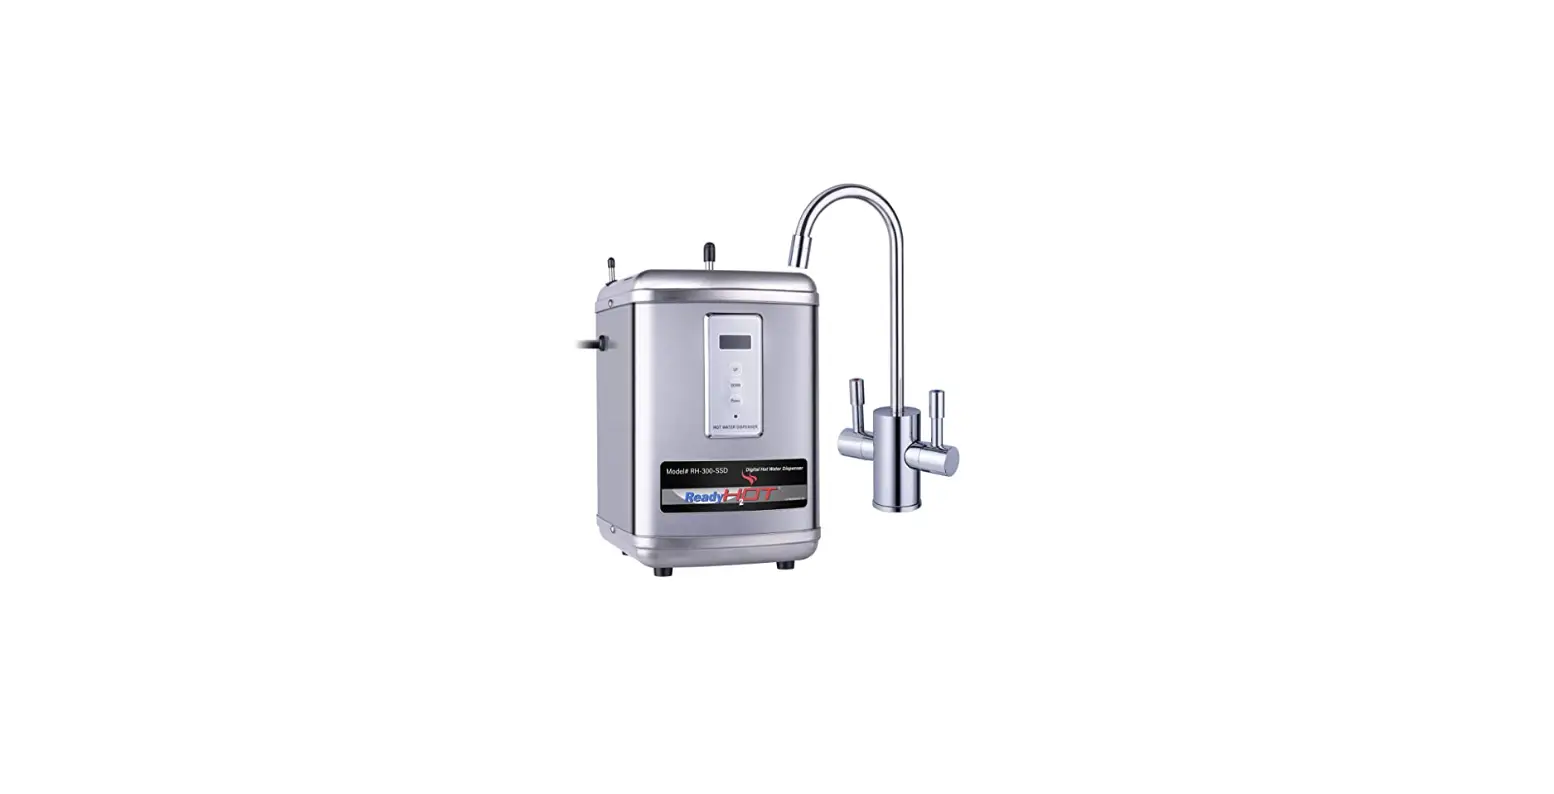
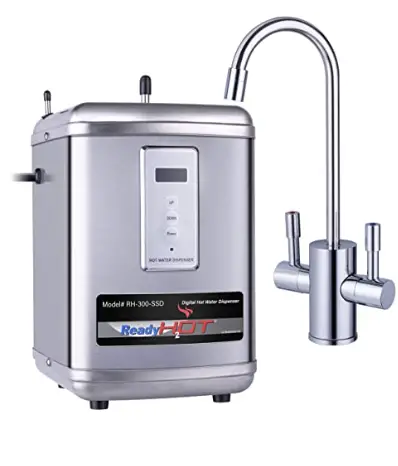
 Ready Hot 41-RH-300-F560-CH Instant Hot Water Dispenser System
 COMPONENTS
 COMPONENTS
When you purchase the Ready Hot Water tank, the contents include:
- Quick-connect fitting for the water inlet tube

- Tank
- 1/4” or 3/8” Hose Clamp

- Connector/Reducer adapter for 1/4” or 3/8” center outlet tubing


TYPE OF FAUCET REQUIRED
Only use an “open vent” faucet with the hot water dispenser. Using a standard or reverse type faucet will
damage the tank and void the warranty.
PRESSURE-FREE HOT WATER DISPENSER CONCEPT
Unlike other household water dispensers, this dispenser tank is not pressurized for safety reasons. For a conventional household water heater, the faucet valve is placed after the heater tank resulting in a pressurized tank. For a hot water dispenser, the faucet valve is placed before the tank, creating an “open vent” style faucet and consequently no pressure is built up inside the tank.
MATERIAL REQUIRED (NOT PROVIDED)
- Shut-off valve and T-union fi tting
- Two mounting bracket screws and plastic support (if attaching to dry wall)
- 1/4” (6.35mm) O.D. inlet tubing (for areas with freezing climate)
- Ruler or measuring tape
- Pliers
- Hand or electric drill
- Small drill bit for starter holes
- 35mm drill bit – if no sink hole exists
- gloves
- Safety glasses
- Open end wrench
- Drip pan or bucket
- Quick Connect fi tting for a cold water supply line
IMPORTANT INFORMATION
This hot water dispenser produces instant hot water of approximately 190°F (88°C) ±5° as dispensed from the faucet. This product is not intended to produce a continuous fl ow of hot water. This model will produce up to 60 cups of water per hour at approximately 190°F (88°C) ±5°. Due to high water temperature, for safety reasons, the tank is not under pressure. Consequently, there is a slight delay of water flow after the faucet has been turned on. This is normal and indicates that the priming chamber is functioning properly.
SAFETY INSTRUCTIONS
Please Read All Instructions Carefully
WARNING
Electric Shock Hazard: Using an ungrounded or improperly connected appliance can result in serious injury or death from electrical shock.
This appliance must be grounded. This instant hot water dispenser is equipped with a cord that has a grounding conductor and a grounding pin. The plug must be connected to an appropriate outlet that is properly installed and grounded in accordance with all local codes and ordinances. Do not modify the plug provided with the appliance – if it will not fit the outlet, have a proper outlet installed by a qualified electrician. Check with a qualified electrician or serviceman if you are in doubt as to whether the instant hot water dispenser is properly grounded.
caution
Personal Injury
This tank is a non-pressurized tank. DO NOT modify this system. DO NOT close the vent tube or connect other types of dispensers or valves to the tank. Use only the Ready Hot dispenser faucet supplied. Use only the parts provided. Contact a certified repair person for repairs or replacement components. Fire Hazard: To minimize the possibility of fire, DO NOT store flammable items such as rags, paper or aerosol cans near the tank. DO NOT store or use gasoline or other flammable vapors and liquids in the vicinity of this or any other appliance.
Property Damage
To avoid water damage, replace any loose or split tubing. Periodically inspect the unit for any signs of leakage and immediately remove from service any unit suspected of leaking When using all electrical appliances, basic safety precautions should always be followed including the following:
- Do not attempt to service this product. Repairs should be done by authorized service personnel.
- Do not operate any appliance with a damaged cord, plug, or after the appliance malfunctions.
- Do not use outdoors or in damp area.
- Do not let cord hang over edge of table or counter, or touch hot surfaces.
- Do not use appliance for other than intended household use.
- When using the appliance, provide 4 to 6 inches of air space around the entire unit for air circulation.
- To protect against electrical shock, do not place cords, plugs or appliances in water or other liquid.
- Do not let children operate. The water can cause severe burns.
- The appliance must not be immersed.
SAVE THESE INSTRUCTIONS.
THIS PRODUCT FOR HOUSEHOLD USE ONLY.
The alert symbols are displayed at the right point to important safety information to make you aware of potential hazards that can cause serious injury or death. Please pay special attention to the information following these alerts and warnings. Failure to comply with these instructions can result in property damage, serious injury or death.
ELECTRICAL REQUIREMENTS
Recommended Ground Method
For your personal safety, the hot water dispenser is equipped with a power supply cord having a 3-prong ground plug. To minimize possible shock hazards, the cord must be plugged into a mating 3-prong, ground-type outlet, grounded in accordance with all local codes and ordinances.
If a mating outlet is not available, it is the personal responsibility and obligation of the customer to have a proper ground, a 3-prong outlet installed by a qualified electrician.
If codes permit and a separate ground wire is used, it is recommended that a qualified electrician determine that the ground path is adequate.
A 110 volt, 60Hz, AC only 15 or 20 amperes fused, grounded electrical supply is required. It is recommended that a separate circuit serving only your hot water dispenser be provided.
Note: Use an outlet that cannot be turned on/off by a switch. If the supply cord is damaged, it must be replaced by the manufacturer, its service agent or similarly qualified persons in order to avoid a hazard.
INSTALLATION
Before You Begin
IMPORTANT: Make sure that the faucet incompatible to this hot water dispenser. Faucet must be “open vent” style. Using a standard faucet will damage the tank and void the warranty.
- Determine where you will install your hot water dispenser. The faucet can be mounted in an existing hole in the sink, or drill a 1⅜ ”/35mm hole in your sink. Stainless Steel: You need a 1⅜ ”/35mm knockout punch available at most hardware stores or drill a hole with an expandable drill. Porcelain: Proper tools are required to drill through a porcelain or cast iron sink. If you are not familiar with this process you should consider having this done by a professional plumber.
Do not attempt to drill without these special tools as you may severely damage your sink. - Make sure you have all necessary parts, tools as suggested on page 2.
- Determine a convenient location to mount your faucet. This can be existing sink hole in the sink top, or you may drill another hole into the sink. As you determine the location of your faucet, consider the container you will use with appliance, such as a large cooking pan. Location of the hole should also provide easy access for tank connections.
- The thickness of the sink must be less than 2.7”/70mm.
- Before connecting to the power source, the dispenser must be fi lled with water and the thermostat turned to the OFF position.
- Do not use an extension cord with this appliance. Appliance must be within 36”/914mm of the power source.
- Plumbing connections must comply with all local codes and ordinances.
- Do not use any pipe sealing compounds as they may get inside the dispenser causing an objectionable taste and odor.
- The suitable water pressure range for this tank is from 35-100psi.
IMPORTANT: Observe all governing codes and ordinances.
Faucet may be installed in spray hose opening in sink or drilled hole. If drilling another hole is needed, the 13⁄8″/35mm maximum diameter hole is required.
- STEP 1 – Mounting Tank
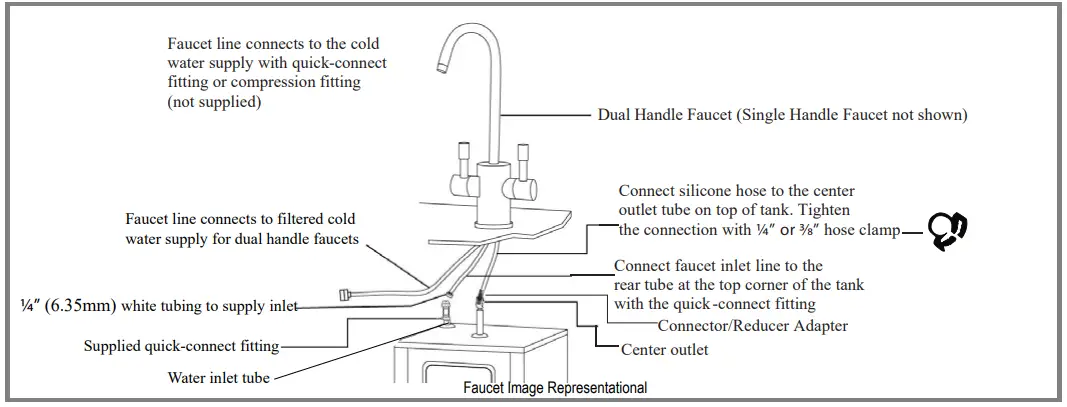
Position the tank vertically beneath the faucet so the flexible tube from the faucet reaches the center faucet supply tube on the tank. Keep the tank .4” (10mm) away from the wall.
NOTE: The tank must be positioned so the hose to the faucet does not twist or kink. - STEP 2 – Faucet Installation
Install a faucet as the manual of the faucet instructs. - STEP 3 – Connect Faucet to Tank ( Refer to the diagram on page #6).
Connect 1/4”/6.35mm faucet inlet line to the rear tube at the top corner of the tank with the quick-connect fitting supplied with the appliance. Push line straight into quick-connect fitting as far as possible for both connections. Connect the silicone tube to the center outlet tube on top of the tank. Use cable ties to fix the connection tightly. It will create a secure connection when properly installed.
Be sure the hose is not twisted or kinked. The hose may be shortened if necessary.
NOTE: DO NOT lengthen the hose – dispenser performance will be impaired and the warranty will be void.
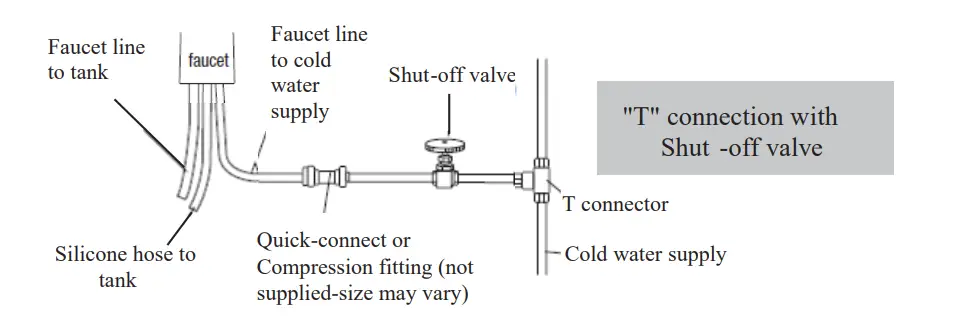
- STEP 4 – Connect Cold Water Supply
Refer to installation instructions included with faucet if necessary. Cold water is supplied to the tank through the faucet. Connect the cold water line to the faucet as shown below.- Make sure the cold water connecting to the faucet is filtered.
- It is suggested that a shut-off valve be installed between this connection and the cold water supply line.
- Another common installation method is with the use of a saddle valve. If a saddle valve is used, follow the manufacturer’s installation guides.
- Connection to a hot water supply is not recommended. If a water filter is used, water pressure to the tank should not drop below 35psi (2.4 bar).

- STEP 5 – Check for Leaks
Open valve in the water line. Turn the faucet on to fill the tank (about 1 minute). When the tank is full, water will flow from faucet. Turn faucet off. Check for leaks. - STEP 6 – Prepare for Power
Double check the thermostat control dial is in the OFF position. The thermostat control dial controls the water temperature, not the water flow or delivery.
IMPORTANT INFORMATION –
This dispenser is equipped with a Self re-setting thermal fuse.
Turn the thermostat to the OFF position and fill tank with water before plugging the power cord from the tank into an electrical outlet.If tank is empty and the thermostat set in the ON position when the power cord is connected, the self re-setting fuse in the heater control will disconnect the current to the heater after approximately one minute, thus protecting the heater from a “dry start” failure. The fuse in the heater control will self-reset after approximately 1/2 hour. Turn on the water supply to the tank and continue the installation. Continued misuse will cause damage to the appliance and is detectable thus, voiding the warranty. - STEP 7 – Test Installation
Plug the electrical cord into a grounded 3-prong outlet. Do not use an outlet controlled by an off/on wall switch. Turn the thermostat control dial clockwise to the highest position. The maximum temperature will be reached in about 15 minutes and the dispenser will be ready for use. Lower the temperature setting by turning the thermostat control dial counterclockwise if you notice vapor or a boiling noise. To raise or lower the water temperature, rotate the ther- mostat dial. At the LOW setting of the thermostat dial water temperature will be approximately 140°F (60˚C) ±5 and the HIGH setting of the thermostat dial water temperature will be approximately 190°F (88°C) ±5°.
CLEANING AND MAINTENANCE
Seasonal Shutdown
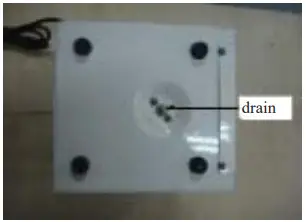
To prevent damage when dispenser is exposed to freezing temperatures, water must be drained.
- Unplug the dispenser tank to the power supply.
- Turn the thermostat control dial to OFF position (fully counterclockwise).
- Turn the faucet on and run water until water is cold.
- Place a 3 quart container under the drain plug at bottom of the tank. Use a screwdriver to remove the screw and O-ring in the drain tube opening. When tank is fully drained replace O-ring and screw. Tighten to reseal the drain.
- Only use mild cleaners to clean the faucet and plastic components. Cleaners with acids, abrasives, and alkaline or organic solvents will result in deterioration of the plastic components and void the warranty.
 NOTE: Do not plug the appliance into the power supply if tank is empty.
 NOTE: Do not plug the appliance into the power supply if tank is empty.
CARE AND USE
WARNING
Electric Shock Hazard: To prevent electrical shock, disconnect power before servicing the unit. Use only a properly grounded and polarized electric outlet.
ADJUSTING THE THERMOSTAT
Factory temperature pre-set is -190°F (88°C) ±5°. To reset the thermostat to that setting, turn the indicator two notches to the right of the vertical.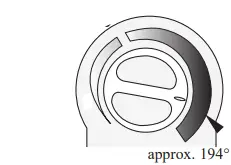
- Adjust the thermostat slowly, turning the dial clockwise to increase temperature or counterclockwise to decrease the temperature, then activate faucet handle for 20 seconds to bring in fresh water to be heated at the new setting. Allow 5-7 minutes for the water to reach a new temperature.
WARNING
Scalding Hazard: Do not allow water to boil. May result in severe burns.
For fresher tasting water, add filtration to your instant hot water dispenser system. For more information, call 1-888-856-6322.
PROPERTY DAMAGE
- Regularly inspect the unit for any signs of leakage. If there are signs of water damage, immediately remove the unit from service.
- To avoid water damage from leakage, replace all cut, loose or split tubing.
- A drain pan, plumbed to an appropriate drain or outfitted with a leak detector, should be used in those applications where any leakage could cause property damage.
CLEANING THE FAUCET AND TANK
- Only use mild cleaners to clean the faucet and plastic components.
- Cleaners with acids, abrasives, and alkaline or organic solvents will result in the deterioration of the plastic components and void the warranty.
RED AND GREEN LIGHTS
- The Green light indicates Hot Water is available.
- The Red Light indicates water is heating to maximum adjustment.
TROUBLESHOOTING
|
PROBLEM POSSIBLE CAUSE WHAT TO DO | |||
| Water and steam spits forcefully from spout without turning on the dispenser faucet. | • Unit is boiling.
May be normal during initial setup. | • Activate the faucet lever to release some water from the tank.
• Adjust water temperature using dial on tank front. Remember that at higher altitudes, water boils at lower temperatures. | |
|
Water is not hot. |
• The unit is unplugged. • The electric outlet is inoperative. |
• Make sure the unit is connected to a properly grounded electric outlet. • Make sure the circuit breaker or fuses are functioning properly. • Check that the outlet is not switched off. • Turn thermostat control dial fully clockwise. This may produce boiling water in approximately 15 minutes and possibly be accompanied by a gurgling sound in the tank and/or water “sputtering” from the faucet. If the water boils, turn thermostat control dial slightly counterclockwise until the gurgling and/or “sputtering” stops. This should take place within 20 seconds. Turn control dial an additional 1/8” (3 mm) counterclockwise at the tip of the dial. Wait 15 minutes and check the temperature of the water. | |
|
Water is too hot or not hot enough. |
• Thermostat is not adjusted to your needs. |
• Adjust the thermostat slowly, then activate faucet lever for 20 seconds to bring in fresh water to be heated at the new setting. Allow 5-7 minutes for water to reach new temperature. | |
|
Water comes out the vent instead of spout. |
• Outlet tube is blocked. |
• Check that outlet tube is not kinked, twisted or pinched. • Unscrew spout end piece and clean out any debris. | |
|
Water is dripping from the spout/vent intermittently. |
• The expansion chamber isn’t draining properly due to low water pressure. • The spout is blocked. |
• Unplug the unit. If the dripping doesn’t stop after a few minutes, check the supply valve to ensure that is fully open and there are no obstructions in the water line reducing the pressure below 30 psi (i.e., a poorly mounted saddle valve, a clogged water filter, or a partially opened shut-off valve). • Unscrew spout end piece and clean out any debris. | |
|
Water does not flow right away or at all: | • Due to high temperature and for safety reasons, the tank is not under pressure causing a slight delay in water flow. | • Make sure all valves on water supply are open.
• Check hose from faucet for twisting or tight bending. • Check if quick-connect filter screen or faucet filter scre clogged (see faucet manual). |
| Water boils or vapor appears: | • The thermostat may be set too high. | • Lower temperature setting by turning thermostat contro counterclockwise. |
| Hot water drips or sputters from faucet: |
• The thermostat may be set too high. |
• Turn the thermostat control dial counterclockwise. • Check that the hose connecting the faucet to the dispens tank is not clogged, twisted or kinked. • If quick-connect fitting is connecting cold water supply check for a clogged filter screen in quick-connect fitting CLEANING AND MAINTENANCE of faucet manual • Check for proper installation of tubing from faucet to dispenser tank and faucet to water line. If connected backward or cross-connected, the valve may be damaged. |
Joneca Corporation
4332 E. La Palma Avenue Anaheim, California 92807 Telephone: 714.993.5997 Fax: 714.993.2126
Website: www.Joneca.com E-Mail: [email protected]
Call Our Toll-Free Help Line
888.8JONECA
FAQS
you can get them at hardware store
I have a reverse osmosis system feeding mine. So, the system ought to last many years. Nothing but near pure water feeds it. A thought…
One has to have some sort of running/flowing water. Stream fed for cabin use, a Well provided it was pumped electrically so water was already flowing into the Ready Hot tank, a portable tank as used in a motor home setting (connected to Electricity), or if you’re really creative, hook it up to a 5+ gallon bottle or drum, hang or set it higher than the Ready Hot tank to have water flow into the Ready Hot tank. You don’t want the tank to run outta water and burn the unit up. This is not a Hot-Pot used in many desk top offices.
Your faucet has a relief vent tube, a function not on the new tank. You can disable this tube but might experience occasional sputtering or a delay in getting the hot water until the supply line from the tank to the faucet clears.
After you have power come back on, the unit is in the off position. I just reached in hit the power button and then reset the temperature to what I like. It will revert back to 192° the default if you don’t change the temperature. So my digital unit simply has three buttons up down and power.
And my two cars are made in Germany. So your point is….?
I had a problem also. The handyman had changed how it was hooked up. It was on same circuit as my dishwasher. Now in same circuit as garbage disposal. Doesn’t pull as much power I guess. Working fine now
Drain the tank, take it out, clean the opening to the faucet and the line leading to the faucet. You may have scale in the opening and the line resticking water flow or the line leading to the tank may be plugged, check that out also.
Not sure about moen specifically, but this matches all of our stainless appliances of different brands.
Yes
If your referring to change the digital readout or the manual dial in either event no, you can not change from Fahrenheit to Celsius.
After you have power come back on, the unit is in the off position. I just reached in hit the power button and then reset the temperature to what I like. It will revert back to 192° the default if you don’t change the temperature. So my digital unit simply has three buttons up down and power.


