![]()
72142 Driving Lights
Instruction Manual
EX2 – L.E.D DRIVING LIGHTS
Instructions & Specifications
P/No. 72142, 72160, 72162, 72170, 72172, 72180, 72182
IMPORTANT SAFETY INFORMATION
- Remove negative battery cable before installation
- Ensure lamps are fitted using the appropriate wiring harness or an equivalent auxiliary wiring systems
- Ensure the lamps are mounted securely to a solid surface on the vehicle or bulbar
- Cables connected to the lamp must not be subjected to wear or other damage
MOUNTING
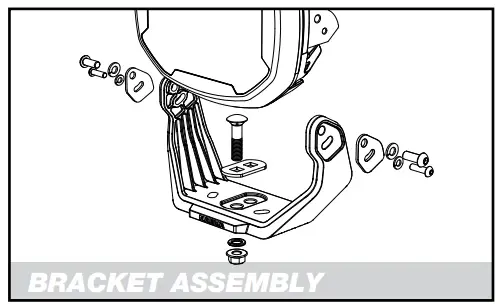
- Each lamp is pre-assembled with stainless steel fasteners
- Choose a solid surface on the vehicle or bulbar to mount the driving lights and secure the lamps by using the flat washer, spring washer with M10 nut
ASSEMBLIES
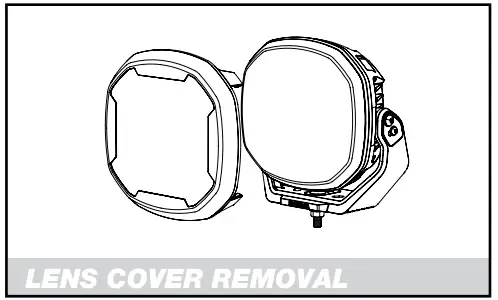
- Remove Lens Protector by un-clipping the side wings
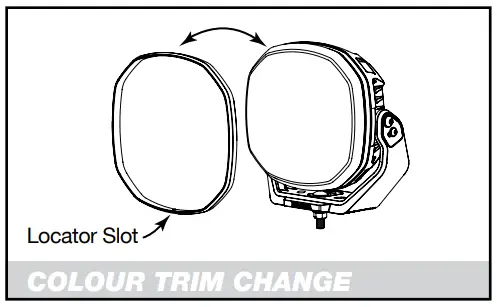
- Remove the Color trim by unclipping from the edge of the lamp
- Change the Color Trim and
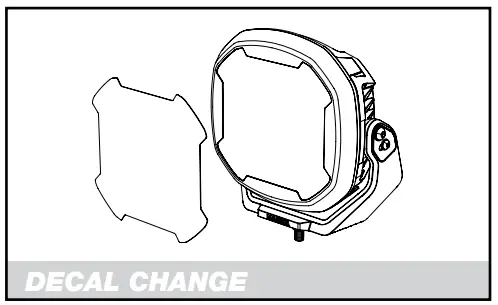 Peel off the adhesive backing of the decal and align the decal to the edge of the lens cover decal outline. Press the decal down firmly and push out any bubbles, Wipe lens cover to avoid decal peeling off when washing
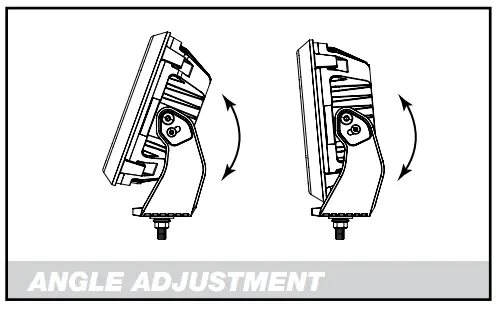
Loosen the nut and adjust lamp to the desired angle. Re-tighten nut
WIRING INSTRUCTIONS
EX2 WIRING WITHOUT SWITCH
- Join both positive red leads from the driving lights to one cable size listed in the below table by crimping the ends together.
- Terminate the cable to one end of the fuse holder and other end to the positive terminal of the battery.
- Join both negative black leads from the driving lights to one cable size listed in the below table by crimping the ends together.
- Terminate to negative terminal of the battery or vehicle ground chassis.
- Join the yellow highbie trigger wire to 3mm wire and connect it to the highbie feed wire of the vehicle.
EX2 WIRING WITH SWITCH
- Join both positive red leads from the driving lights to one cable size listed in the below table by crimping the ends together.
- Terminate the cable to one end of the fuse holder and other end to the positive terminal of the battery.
- Join both negative black leads from the driving lights to one cable size listed in the below table by crimping the ends together.
- Terminate to negative terminal of the battery or vehicle ground chassis.
- Join the yellow highbie trigger wire to 3mm wire and connect it to the switch in cabin. Connect a 3mm wire from the switch to high beam feed wire of the vehicle.
EX2 Driving lights come with 500mm flying lead
| 4″ single | 4″ single | 5A fuse |
| 4″ pair | 4″ pair | 7.5A fuse |
| 6″ single | 6″ single | 7.5A fuse |
| 6″ pair | 6″ pair | 15A fuse |
| 7″ single | 7″ single | 7.5A fuse |
| 7″ pair | 7″ pair | 15A fuse |
| 9″ single | 9″ single | 15A fuse |
| 9″ pair | 9″ pair | 25A fuse |
Driving lights must dip with High Beam to meet ADR requirements. Please refer to your local State Government for wiring requirements, as they can differ from state to state.
Please consult a qualified Auto Electrician to adapt to your vehicle wiring.
LAMP WIRING (WITHOUT SWITCH)
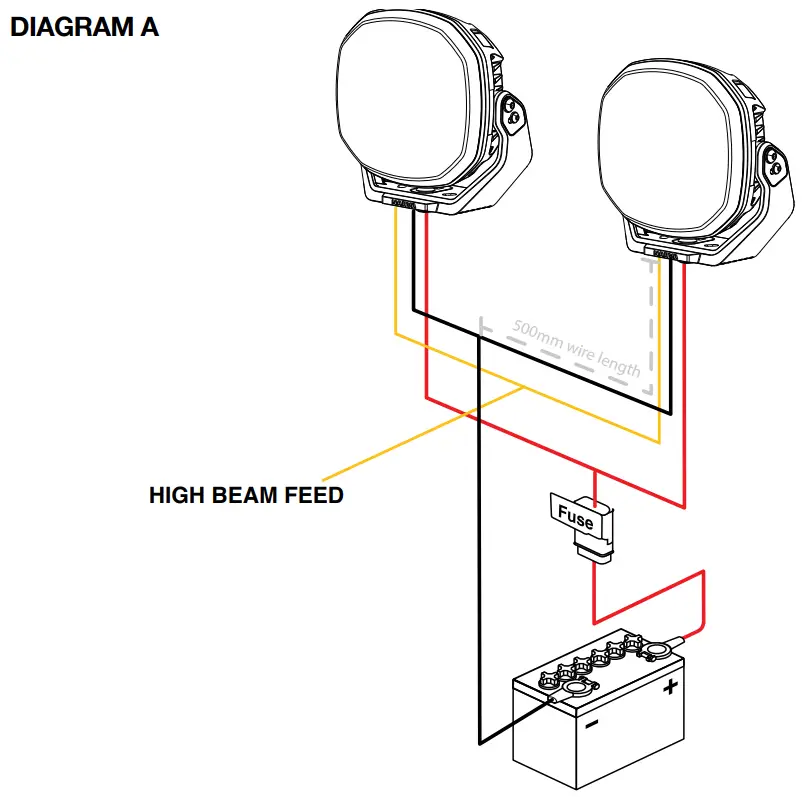
RED – POSITIVE
BLACK – NEGATIVE
YELLOW – HIGH BEAM FEED
*Fuse not included (refer to table)
*Length of wires for diagram purposes only
No relay required due to internal switching technology (patent pending)
Each EX2 driving light comes with 500mm flying lead wire
Note: Driving lights must dip with High Beam to meet ADR requirements.
Please refer to your local State Government for wiring requirements, as they can differ from state to state.
Please consult a qualified Auto Electrician to adapt to your vehicle wiring.
LAMP WIRING (WITH SWITCH)
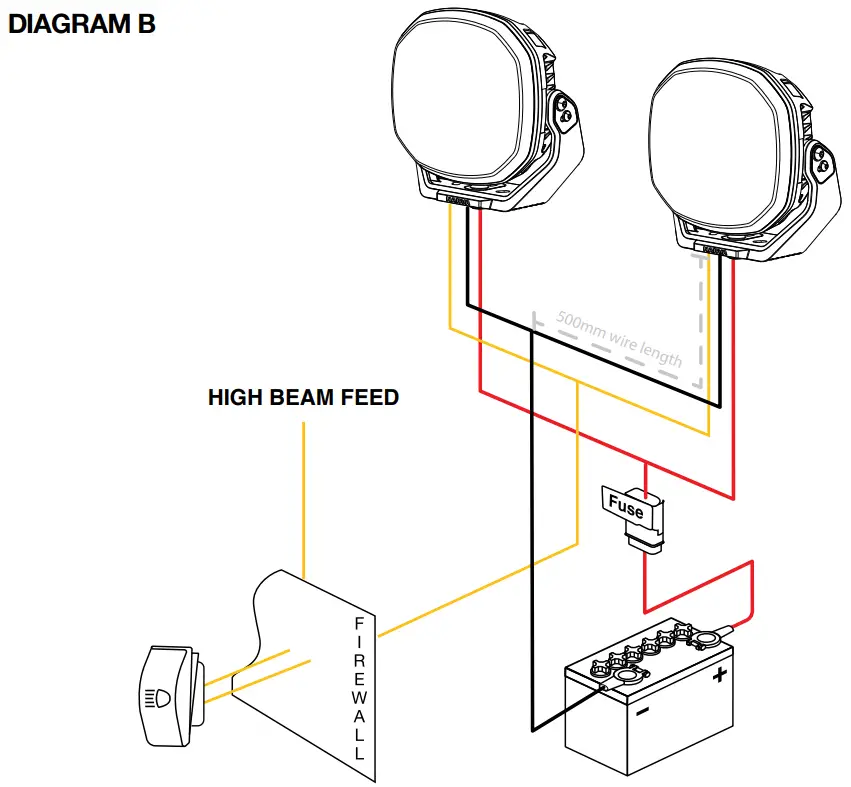
RED – POSITIVE
BLACK – NEGATIVE
YELLOW – HIGH BEAM FEED
*Fuse not included
*Length of wires for diagram purposes only
No relay required due to internal switching technology (patent pending) Each EX2 driving light comes with 500mm flying lead wire
Note: Driving lights must dip with High Beam to meet ADR requirements.
Please refer to your local State Government for wiring requirements, as they can differ from state to state.
Please consult a qualified Auto Electrician to adapt to your vehicle wiring.
TECHNICAL SPECIFICATIONS
| Series Name: | 4” EX2 Driving Lamp (Single) | 6” EX2 Driving Lamp (Single) |
| Voltage: | 12/24 dual voltage with reverse polarity protection | 12/24 dual voltage with reverse polarity protection |
| LEDs: | 12 x 5W Cree LEDs | 24 x 5W Cree LEDs |
| Housing & Bracket | Aluminum pressure die-cast & extra tough glass reinforced polymer | Aluminum pressure die-cast & extra tough glass reinforced polymer |
| Beam Type | Hybrid beam | Hybrid beam |
| Lenses | Hardcoated polycarbonate | Hardcoated polycarbonate |
| Color Temperature | 5700°K | 5700°K |
| Current Draw (@13.5V/@28V) | 2.52/1.22 | 4.74/2.29 |
PARTS AVAILABLE
| 4” EX2 Driving Lamp | 6” EX2 Driving Lamp | 7” EX2 Driving Lamp | 9” EX2 Driving Lamp | |
| Volcano (Red) | C 72142-RD | C 72160-RD | C 72170-RD | C 72180-RD |
| Juiced (Orange) | C 72142-OE | C 72160-OE | C 72170-OE | C 72180-OE |
| Sunburst (Yellow) | C 72142-YW | C 72160-YW | C 72170-YW | C 72180-YW |
| Hyper (Green) | C 72142-GN | C 72160-GN | C 72170-GN | C 72180-GN |
| Electric (Blue) | C 72142-BE | C 72160-BE | C 72170-BE | C 72180-BE |
| Bubblegum (Pink) | C 72142-PK | C 72160-PK | C 72170-PK | C 72180-PK |
| Slate (Grey) | C 72142-GY | C 72160-GY | C 72170-GY | C 72180-GY |
| Stealth (Black) | C 72142-BK | C 72160-BK | C 72170-BK | C 72180-BK |
WARRANTY
Applicable only to product sold in Australia
Brown & Watson International Pty Ltd of 1500 Ferntree Gully Road, Knox field, Vic., telephone (03) 9730 6000, fax (03) 9730 6050, warrants that all products described in its current catalogue (save and except for all bulbs and lenses whether made of glass or some other substance) will under normal use and service be free of failures in material and workmanship for a period of one (1) year (unless this period has been extended as indicated elsewhere) from the date of the original purchase by the consumer as marked on the invoice. This warranty does not cover ordinary wear and tear, abuse, alteration of products or damage caused by the consumer.
To make a warranty claim the consumer must deliver the product at their cost to the original place of purchase or to any other place which may be nominated by either BWI or the retailer from where the product was bought in order that a warranty assessment may be performed. The consumer must also deliver the original invoice evidencing the date and place of purchase together with an explanation in writing as to the nature of the claim. In the event that the claim is determined to be for a minor failure of the product then BWI reserves the right to repair or replace it at its discretion. In the event that a major failure is determined the consumer will be entitled to a replacement or a refund as well as compensation for any other reasonably foreseeable loss or damage. This warranty is in addition to any other rights or remedies that the consumer may have under State or Federal legislation.
IMPORTANT NOTE
Our goods come with guarantees that cannot be excluded under the Australian Consumer Law. You are entitled to a replacement or refund for a major failure and compensation for any other reasonably foreseeable loss or damage. You are also entitled to have the goods repaired or replaced if the goods fail to be of acceptable quality and the failure does not amount to a major failure.
Distributed by:
Brown & Watson Int. Pty. Ltd.
Knox field, Victoria 3180
PH: 1800 422 422
www.narva.com.au
IS520
Issue 1: 27.02.23


