QOMO-QPC80H2-Portable-Visualizer-19
Warnings
- Please prevent children from operating the device without supervision.
- Please unfold the device and adjust the camera head with one hand placing on the base and the other hand holding the case of camera head.
- Please do not look directly to the LED lamp to prevent your eyes from being damaged.
- When allocating the device, please hold the base with both hands. Do not carry the device by the gooseneck flexible tube or camera head with one hand.
- Please prevent the camera head to hit the desk top or any other hard objects, or it can be damaged easily.
- Please do not twist the gooseneck flexible tube.
- Please be careful not to spill liquid on the control panel keys.
- When the device is not in use for a while, please turn off the power.
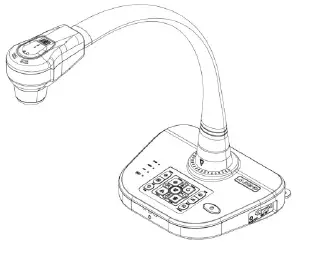
Parts Identification
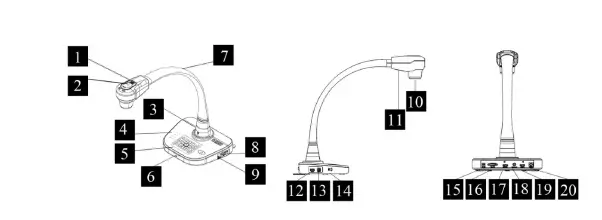
- Ventilation Hole
- Microphone
- Remote Sen sor
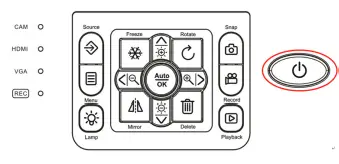
- Signal Indic ator
- Control Pan el
- Power Indi cator
- Goose Neck
- VGA IN
- Audio-OUT
- Camera Head
- LED Lamp Light
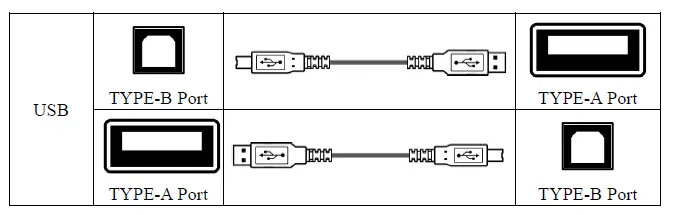
- USB-Thumb Drive & USB mouse USB-B for PC
- Connection
- Anti-theft S lot
- DC 12V Pow er Socket
- VGA-OUT
- HDMI-OUT
- VIDEO-OUT
- HDMI-IN
- RS232
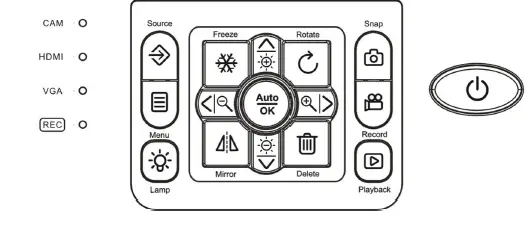
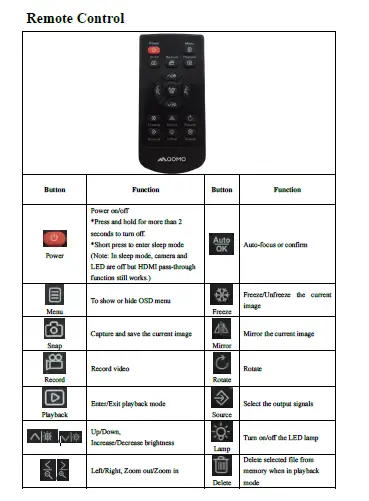
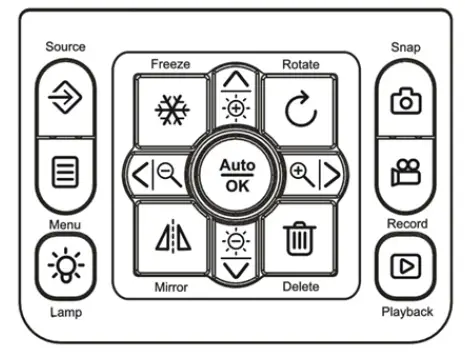
Control Panel
| Button | Function | Button | Function |
|
| Power on/off *Press and hold for more than 2 seconds to turn off. *Short press to enter sleep mode (Note: In sleep mode, camera and LED are off but HDMI pass-through function still works.) |
| Mirror the current image; Press and hold to enter/exit the split screen. |
| Capture and save the current image |
/ | Up/Down, Increase/Decrease brightness | |
| Record video | / | Left/Right, Zoom out/Zoom in | |
| Enter/Exit Playback Mode | Auto-focus or confirm | ||
| Rotate | Select the output signals | ||
| Delete selected file from memory when in playback mode | To show or hide OSD menu | ||
| Freeze/Unfreeze the current image | Turn on/off the LED lamp |
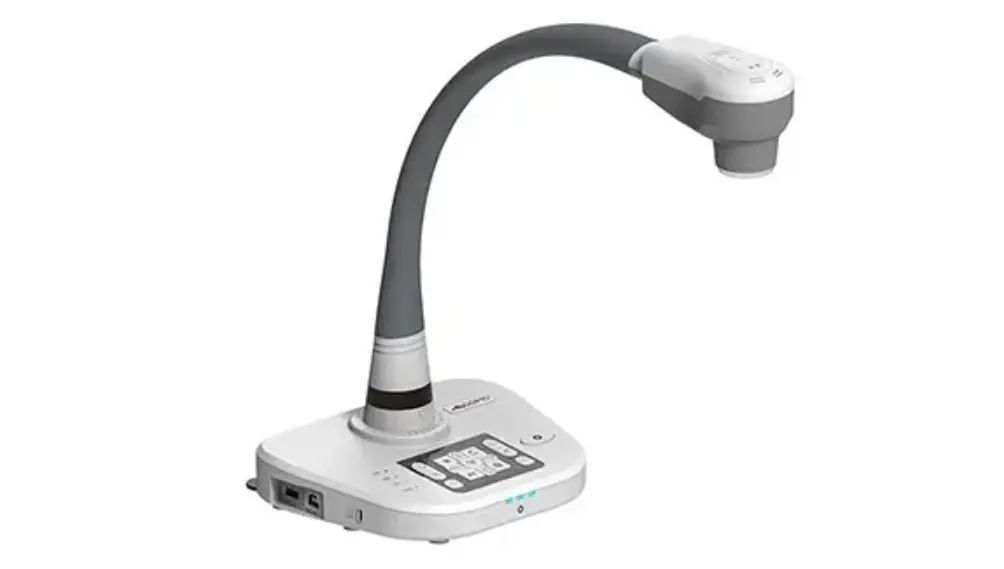
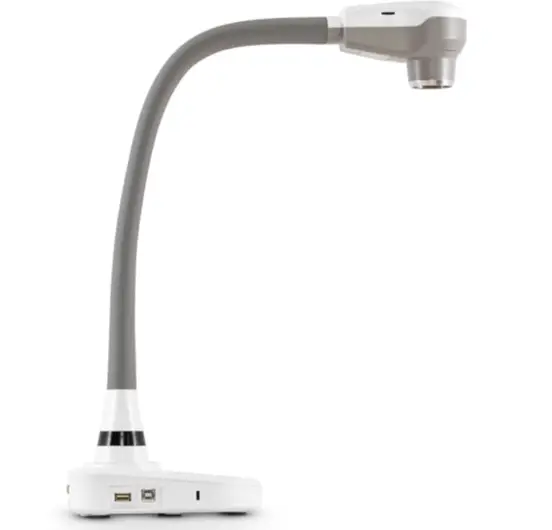
Portable Visualizer
The section explains how to set up, adjust the device to meet your needs.
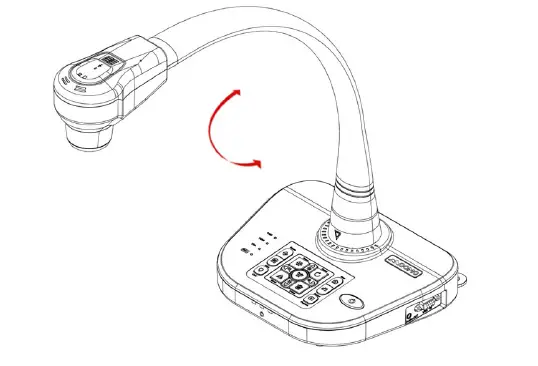
- Camera Head
Please hold the camera head and adjust it to the position where you want to shoot the image. - Gooseneck
Bend the gooseneck flexible tube gently by hand and place the camera head to the preferable height and orientation.
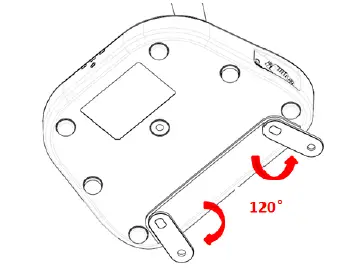
- Support Stand
Unfold the support stand of the base to prevent the device from failing backward.
Recommended Working Environment
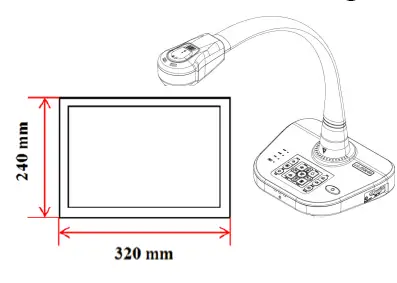
Object distance in Telescope mode: 250 mm~∞; Object distance in Wide mode: 80 mm~ ∞;

If you do not select a working environment and placement according to the
recommendation described above, please use the rotation ( ) key of the control panel or the remote control to adjust the orientation.
USB Thumb Drive
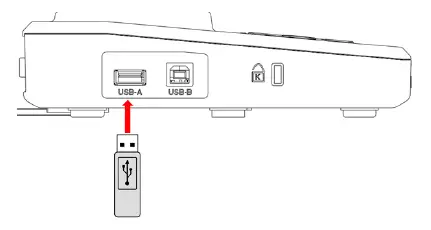
When USB thumb drive plugs in USB Type-A successfully, the capture image and video can be saved in the thumb drive.
Connect Portable Visualizer to external equipment
- System connection diagram
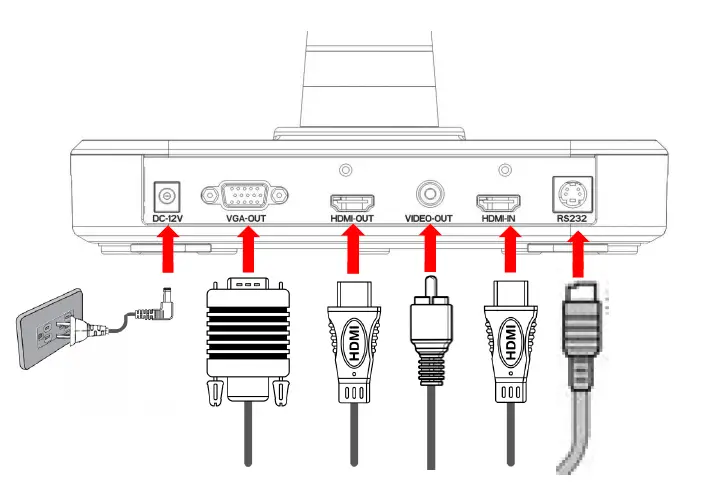
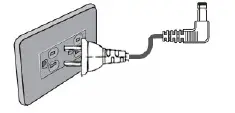
Connecting the power cord
Plug in the power adapter to the device DC 12V IN power socket first and then connect the AC power cord to a 100V~240V AC power source.
Note: The plug type of AC cord varies depending on the countries and regions where you are in.
RS232 control protocol
RS232 Setting
| Baudrate | 9600 bps |
| Parity check | no parity |
| Stop bit | one |
| Data bit | 8 bits |
RS232 Packet 1 (Packet size: 4 bytes)
| 0 | 1 | 2 | 3 | 4 |
| HEADER | LENGTH | CAT | KEY | END |
| 0X48 | 0X02 | 0X14 | 0XXX | 0X54 |
Command list
| FUNCTION | HEADER | LENGTH | CAT | KEY | END |
| UP | 0x48 | 0x02 | 0X14 | 0x04 | 0x54 |
| DOWN | 0x48 | 0x02 | 0X14 | 0x05 | 0x54 |
| LEFT | 0x48 | 0x02 | 0X14 | 0x02 | 0x54 |
| RIGHT | 0x48 | 0x02 | 0X14 | 0x03 | 0x54 |
| ENTER | 0x48 | 0x02 | 0X14 | 0x06 | 0x54 |
| POWERON | 0x48 | 0x02 | 0X14 | 0x10 | 0x54 |
| POWEROFF | 0x48 | 0x02 | 0X14 | 0x11 | 0x54 |
| STANDBY | 0x48 | 0x02 | 0X14 | 0x3E | 0x54 |
| SAVE | 0x48 | 0x02 | 0X14 | 0x12 | 0x54 |
| RECALL | 0x48 | 0x02 | 0X14 | 0x13 | 0x54 |
| LAMP | 0x48 | 0x02 | 0X14 | 0x14 | 0x54 |
| FREEZE | 0x48 | 0x02 | 0X14 | 0x15 | 0x54 |
| NEG | 0x48 | 0x02 | 0X14 | 0x16 | 0x54 |
| MIRROR | 0x48 | 0x02 | 0X14 | 0x17 | 0x54 |
| SPLIT | 0x48 | 0x02 | 0X14 | 0x18 | 0x54 |
| ROTATE | 0x48 | 0x02 | 0X14 | 0x19 | 0x54 |
| XGA | 0x48 | 0x02 | 0X14 | 0x1A | 0x54 |
| B&W | 0x48 | 0x02 | 0X14 | 0x1B | 0x54 |
| TITLE | 0x48 | 0x02 | 0X14 | 0x1C | 0x54 |
| TEXT | 0x48 | 0x02 | 0X14 | 0x1D | 0x54 |
| AUTO | 0x48 | 0x02 | 0X14 | 0x22 | 0x54 |
| NEAR | 0x48 | 0x02 | 0X14 | 0x23 | 0x54 |
| FAR | 0x48 | 0x02 | 0X14 | 0x24 | 0x54 |
| SOURCE | 0x48 | 0x02 | 0X14 | 0x25 | 0x54 |
| WB_RED_UP | 0x48 | 0x02 | 0X14 | 0x2A | 0x54 |
| WB_RED_DOWN | 0x48 | 0x02 | 0X14 | 0x2B | 0x54 |
| WB_BLUE_UP | 0x48 | 0x02 | 0X14 | 0x2C | 0x54 |
| WB_BLUE_DOWN | 0x48 | 0x02 | 0X14 | 0x2D | 0x54 |
| BRIGHT_UP | 0x48 | 0x02 | 0X14 | 0x2E | 0x54 |
| BRIGHT_DOWN | 0x48 | 0x02 | 0X14 | 0x2F | 0x54 |
| RECORD | 0x48 | 0x02 | 0X14 | 0x32 | 0x54 |
| RECORD STOP | 0x48 | 0x02 | 0X14 | 0x33 | 0x54 |
| DELETE | 0x48 | 0x02 | 0X14 | 0x35 | 0x54 |
| ZOOM IN STOP | 0x48 | 0x02 | 0X14 | 0x40 | 0x54 |
| ZOOM OUT STOP | 0x48 | 0x02 | 0X14 | 0x3f | 0x54 |
- Output Resolution and image ratios
According to different resolution and image ratios, various display selections are listed below. Please refer to the table below to select the image output you prefer.
| Output | Image ratio | TV System | Resolution |
| HDMI | 16:9 | – | 1280×720, 1280×800, 1920×1080, |
| 16:10 | 1280×800, 1920×1200 | ||
| 4:3 | – | 1024×768, 1280×1024 | |
| VGA | 16:9 | – | 1280×720, 1280×800, 1920×1080 |
| 16:10 | 1280×800, 1920×1200 | ||
| 4:3 | – | 1024×768, 1280×1024 | |
| Video | – | NTSC | 720×480 |
| – | PAL | 720×576 |
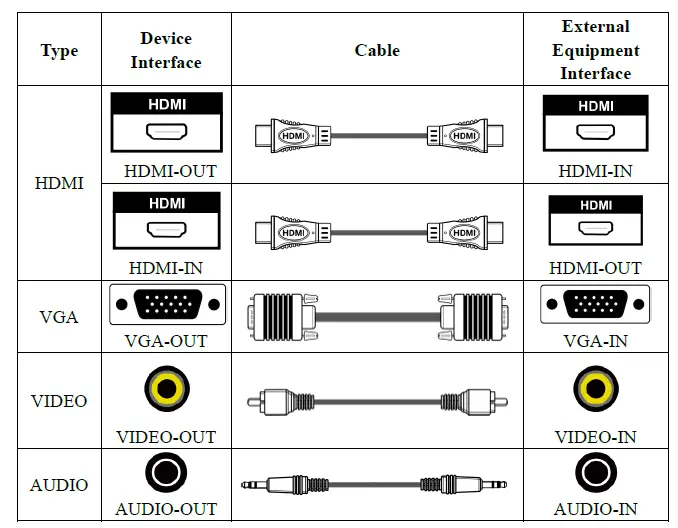
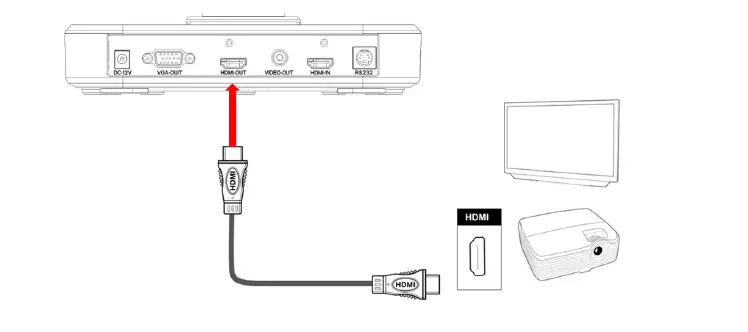
- HD TV
Connecting the HDMI output
Use a HDMI cable to connect the HDMI output port of the device with the HDMI input port of TV or Projector.
- Standard TV
Connecting the VGA output port
Use a VGA cable to connect the VGA OUT port of the device with the VGA input port of TV or projector.
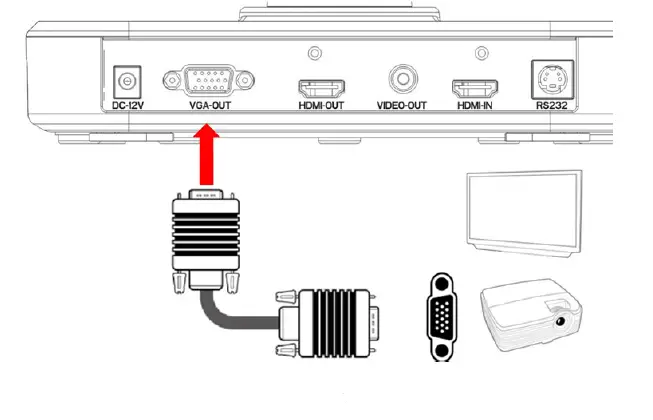
Note: Use Source Button to switch between modes.
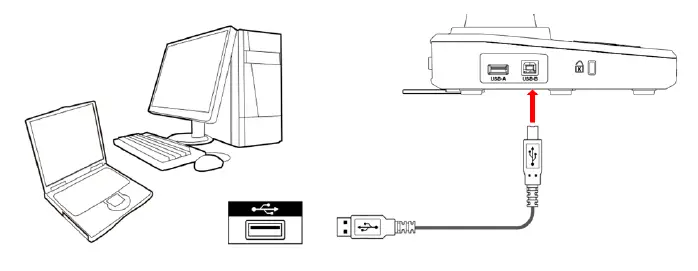
- Using USB connection
Press Menu > System Setting > USB to PC > PC Camera
Basic Operation
- Press MENU ( ) on the control panel or ( ) on the remote control.
- Use ( / / / ) to make a selection and adjust the setting.
- Press OK button () to make the new setting activated.
- Press the MENU ( ) button to hide the OSD menu.
| OSD MENU | |||
| Name | Icon | Selection | Functions Description |
| Function |
|
Resolution | XGA |
| SXGA | |||
| WXGA | |||
| 720P | |||
| 1080P | |||
| 1280*800 | |||
| 1920*1200 | |||
| Focus Mode | Auto Focus | ||
| Manual Focus | |||
| MIC | 1 | ||
| 2 | |||
| 3 | |||
| 4 | |||
| 5 | |||
| OFF | |||
| Image Setting |
| Photo Resolution | 1280*720 |
| 1920*1080 | |||
| 2688*1522 | |||
| Recording Resolution | 1080P@30FPS | ||
| VGA | |||
| Video format | AVI | ||
| System Setting |
| Language | Support Chinese, English, Spanish, Russian, French, German and Italian. |
| System Time | / | ||
| Time Sett | User defined | ||
| Display Information | Set to display the information on top of the display or not. | ||
| Push Button sound | ON | ||
| OFF | |||
| USB to PC | PC Camera | ||
| Mass Storage | |||
| File Manager | Copy to external storage | ||
| Delete all | |||
| Format external storage | |||
| System Reset | Ensure | ||
| Ignore | |||
| Upgrade | Ensure | ||
| Ignore | |||
| NTSC/PAL | NTSC | ||
| PAL | |||
| User Profile | User 1 | ||
| User 2 | |||
| User 3 | |||
| Effect Setting |
| Image Mode | Video |
| Text | |||
| Mirror | Normal | ||
| Left-right Mode | |||
| Up-down Mode | |||
| Effect | Normal | ||
| Black-white Mode | |||
| Negative Mode | |||
| Frame per second | 50HZ/60HZ | ||
| Brightness, Sharpness, DNR, |
| Contrast, Saturation | Use ( / ) to adjust its setting. | ||
| Time-lapse Photo |
| ON/OFF | ON |
| OF | |||
| Interval | User defined | ||
| Information | Firmware version: xxx | ||
| Hardware version: xxx | |||
| Release Date: xxx | |||
Recording videos and capturing images
- Use the Left/Right buttons ( / ) to adjust the image size.
- Use the Auto Focus button to adjust the focus automatically. Use the Manual Focus button to adjust the focus manually.
- Use the video button ( ) to begin recording a video. Press the button again to stop recording.
- Use Snap button ( ) to capture an image.
Note:You need insert USB drive first in order to take a video record.
Play
- Use the Playback button ( ). The latest captured image or video will be displayed.
- Use Left/Right buttons ( / ) to select the file to be displayed.
- Press OK ( ) button.
Advanced Functions
Time-lapse photography
You can produce the time-lapse video with video maker software.
- Use the Menu ( ) button on the control panel or the remote control to show the menu.
- Use the arrow buttons to make your selection: Menu>Delay Photography.
Transfer the captured image to computer
Please note all recorded videos are in AVI format and saved under the file name format of xxxx.avi.
Please turn on the power of the device first.
- Use a USB cable to connect the device with a computer.
- Use MENU ( ) > System Setting > USB to PC > Mass storage to detect USB drive memory.
Use the computer software to view images on the USB drive or simply cut and paste the image to the computer.
Note: When the control panel or the remote control is in operation, please do not unplug the USB cable to prevent the device from malfunction.
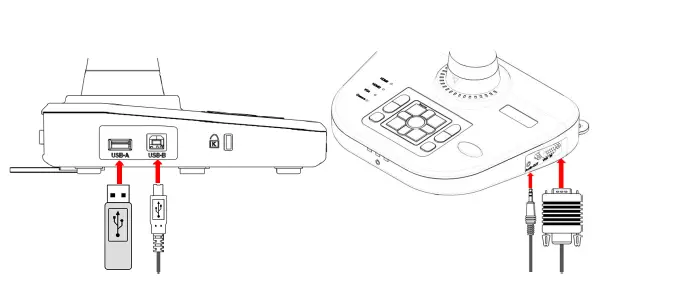
Use the device as a camera
Start the settings
- Connect the device with the computer through USB Type-B: Turn on the power ofyour computer, and use the USB cable to connect the device with the USB port of your computer. Please confirm the USB is connected correctly.
- Press Menu > System Setting > USB to PC > PC Camera
- After connecting the device with your computer, when the computer detects the camera, the connection is therefore successfully established. You may use the installed software and start the camera functions (for example: Skype).
Connecting the microscope
To connect the device with a microscope can display microscopic objects on a large screen.
- Adjust the microscope and the objects to be focused.
- Please select a proper microscope adapter.
- First, install the microscope adapter on the lens of device.
- After the microscope adapter is installed on the camera head, connect the camera head with an ocular lens.
- If the image on the presentation screen is blurry, please adjust the focus of the microscope.
Storage
- Please turn off the power of the device.

- Please unplug and remove the power cord and all other cables from the device.

- Please refer to the diagram to the right to fold the gooseneck flexible tube for storage.

Problems and Solutions
| Problem | Possible causes | Solutions |
| The device does not turn on in normal condition. | The power adapter is not connected correctly to the device or the power socket. | Make sure the power adapter is connected correctly to the device and power socket. |
| The device is unable to capture images or record videos. | The device has insufficient memory. | Remove some files and clear up the memory space of USB drive or built-in memory. |
| The USB drive is protected. | Reset the USB drive to be writable. | |
|
After the device is connected, there is no image output. | The device is not connected to the external equipment correctly. | Re-connect the device with the external equipment. |
| The external equipment is not selected correctly. | Select the correct external equipment. | |
| The resolution of the external equipment is set incorrectly. | Reset the resolution of the external equipment. | |
| The device is not switched to the correct source of signals. | Switch to the correct source of signals. | |
| The computer transfer key (VGA) is activated. | Press the source of signal (CAM). | |
| HDMI is activated. | Press the source of signal(CAM) | |
|
The captured image is too blurry. |
The object to be photographed may be too close to the camera head. | Use Auto Focus or Manual Focus to adjust the focus. |
| If the distance for photographing is less than 20cm, please switch the focus mode to Micro mode. | ||
| The image is upside down. | The objects are not placed in the recommended working environment. | Press the image Rotation key to adjust the display orientation. |
| The image cannot be moved around. | The image cannot be moved around because the Freeze function of the device is activated. | Press again the Freeze function key on the control panel or the remote control to deactivate the function. |
| The remote control does not respond. | The battery runs out. | Please replace with a new battery. |
| Objects are located between the remote control and the device | Please remove the objects that block the |
| and block the communication signals. | communication signals. | |
| The distance between the remote control and the device is too far. | Please shorten the distance between the remote control and the device. |
Specifications
| QPC80H2 | |
| Image Sensor | Omnivision 1/3″ CMOS |
| Lens | 10 x optical zoom, 10 x digital zoom |
| Shooting Area | A3/A4 |
| Video Resolution | XGA(1024*768), XGA(1280*1024), WXGA(1366*768), 720P(1280*720), 1080P (1920*1080), 1280*800, 1920*1200 |
| Total Pixels | 5.0 Mega |
| Frame Rate | 1080p@30fps |
| Input Connector | HDMI 1.4 Compliant: (1) VGA: DB15FLC(1) |
| Output Connector | VGA: DB15FLC(1) C-Video: RCA(1) HDMI: (1) RS232(1) |
| Microphone | Build-in |
| Speaker | N/A |
| DC POWER | 12V/2A |
| USB (UVC) | Yes |
| USB Mouse | Yes |
| USB Thumb Drive | Yes |
| USB Mass Storage | Yes |
| USB Camera | Yes |
| Digital Zoom | Yes |
| Video Merge | N/A |
| Audio Output | Yes |
| Memory | Yes |
| LED Lighting | Yes |
| LCD Preview | N/A |
| AWB/AF/AE | Yes |
| Image Effects | B&W/Negative/Mirror/Freeze/Text/Split |
| Remote Control | Yes |
| Rotate | 90°/180°/270° |


