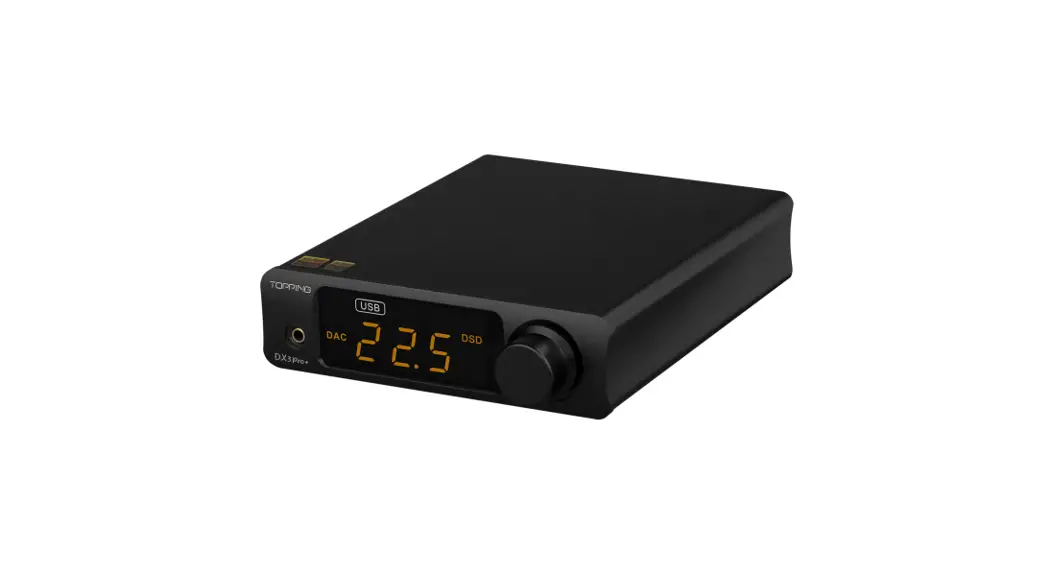
![]() DX3PRO+
DX3PRO+
Desktop DAC and headphone amplifier
User Manual
Thank you for purchasing the Topping DX3 Pro+!
DX3 Pro+ is a high-performance DAC that has Optical, Coaxial, USB, and Bluetooth inputs, it also provides Line out and headphones out. USB of DX3 Pro+ is compatible with 768kHz/32bit and DSD512.DX3 Pro+ is designed to be simple and equipped with an LED display screen. It can be used as not only a DAC + Headphone amp but also a simple DAC or DAC + pre-amplifier. We believe that high-quality DX3 Pro+ could bring you more fun in enjoying HIFI music.
Note: You can download the drivers and user manual at http://www.topping.audio/.
Attribute
| Measured | 12.0cm x 16.5cm x 4.0cm |
| Weight | 420g |
| Power input | DC15V/1A@DC base 5.5*2.1 |
| Signal input | USB/OPT/COAX1/COAX2/BT |
| Line Out output | RCA |
| Headphone amp output | 3.5mm headphone output jack |
| Display | LED |
| Power consumption | <6.0W |
Front panel
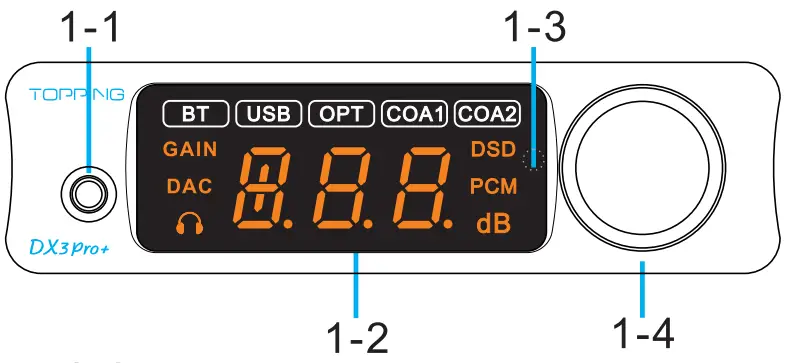
1-1 3.5mmheadphone output
1-2 LED screen
1-3 Remote control receiver
1-4 Volume knob /Multi-function Button
Rear panel
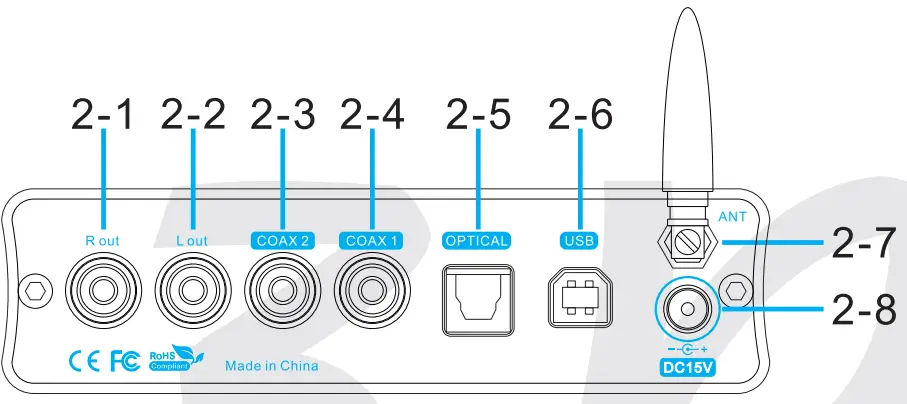
2-1 Right channel single-ended RCA output
2-2 Left channel single-ended RCA output
2-3 Coaxial SPDIF input 2
2-4 Coaxial SPDIF input 1
2-5 Optical SPDIF input
2-6 USB input
2-7 Bluetooth input
2-8 Power input (DC15V)
Display
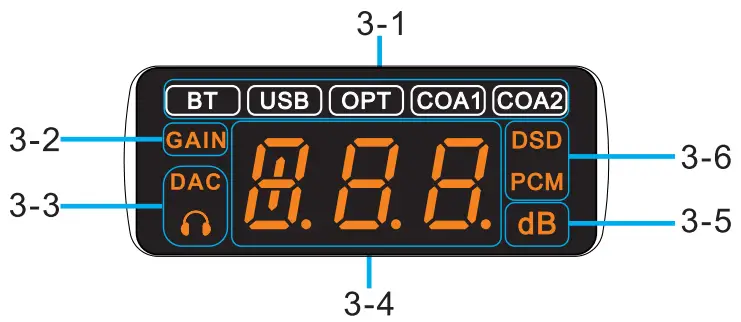
3-1 Signal input indication (if the current input is connected successfully, the current input indication is always on, otherwise, the indication flashes.)
3-2 Gain indication
3-3 Output channel
3-4 Digi display area
3-5 Volume unit
3-6 Decoding format indication
Remote control
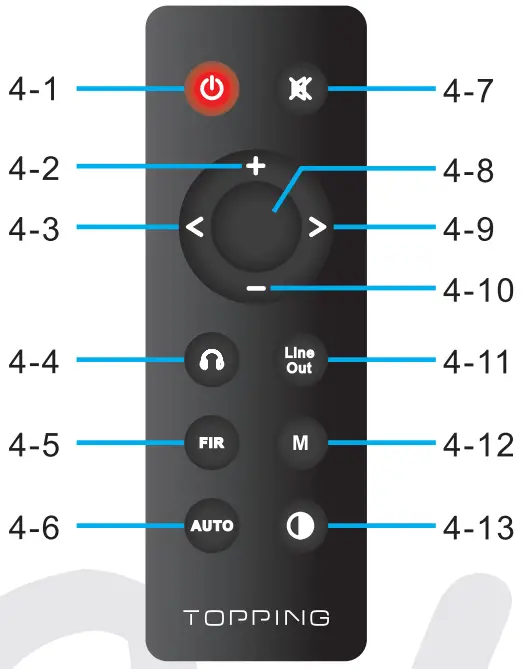
4-1 Standby
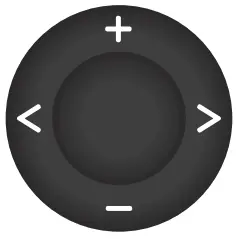
4-2 Volume up
4-3 Switch to previous input
4-4 Headphone amp output
4-5 Filter setting
4-6 Automatic standby
4-7 Mute
4-8 Headphone amp & Line Out output
4-9 Switch to the next input
4-10 Volume down
4-11 Line Out output
4-12 Headphone amp gain
4-13 Brightness*
*Note:
- “L-A” has the same brightness as “L-2”. The differences lie in when there is no operation after 30 seconds under “L-A” mode, the screen will be automatically turned off, and only display the current input. For example, when it is in USB input, DX3 Prot displays as follows. You can press any button to light up the screen.”

- When DX3 Pro? is in Bluetooth input state, keep pressing the brightness button for 3 seconds to disconnect the existing Bluetooth connection and forcibly enter into the Bluetooth pairing state.

Input Range
| USB IN | PCM 44.1kHz-768kHz/16bit-32bit |
| DSD DSD64-DSD512 (Native) . DSD64-DSD256 (Dop) | |
| COAX/OPT IN | PCM 44.1kHz-192kHz/16bit-24bit |
| DSD DSD64 (Dop) | |
| BT IN | AAC/SBC/APTX /APTX LL/APTX HD /LDAC |
Specifications
| DX3 Pro+ Decoding parameters (USB In@96kHz) | |
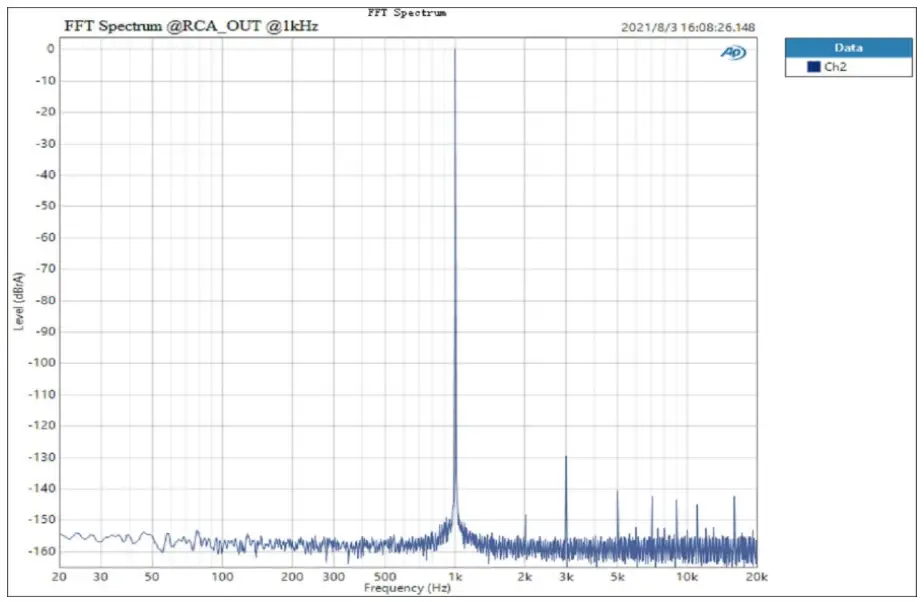
| THD+N@1kHz (A-wt) | <0.00015% |
| THD@20-20kHz (90kBW) | <0.00020% |
| SNR@1kHz (A-we | 122dB |
| Dynamic Range©1 kHz (A-wt) | 122dB |
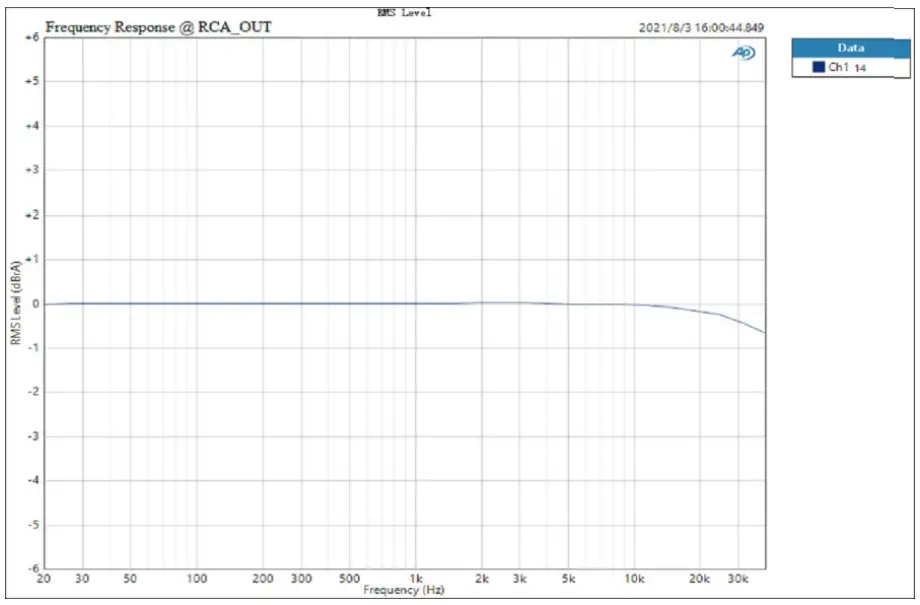
| Frequency Response | 20Hz-20kHz (±0.3dB) |
| 20Hz-40kHz (±0.7dB) | |
| Output Level | 2.1Vrms @OdBFS |
| Noise (A-wt) | <1.8uVrms |
| Channel Crosstalk @1 kHz | -137dB |
| Channel Balance | 0.3 dB |
| Output Impedance | 200 |
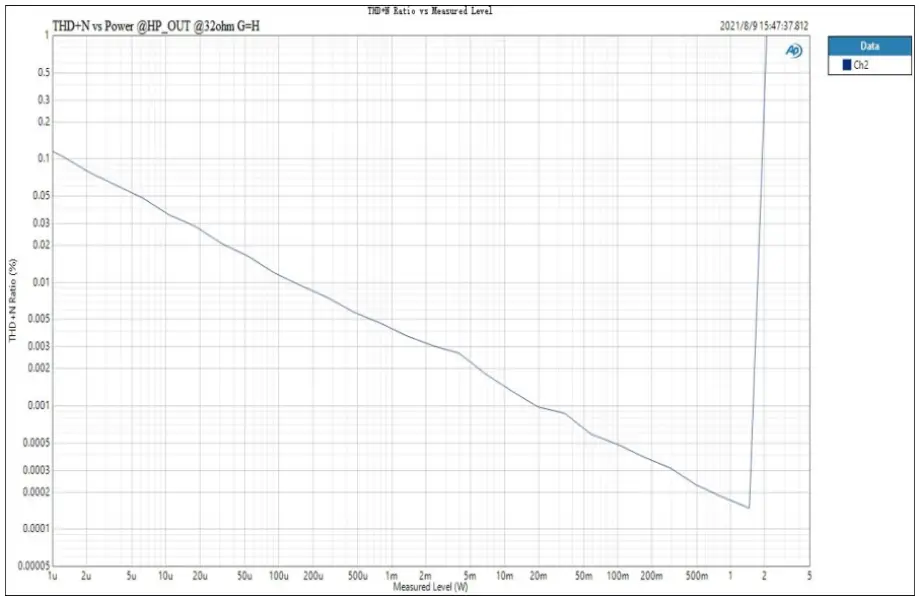
| DX3 Pro+ Headphone Amplifier specifications | |
| THD+N@1kHz (A-wt) | <0.00015% @Output=1500mW (320) |
| <0.00013% @Output=160mW (3000) | |
| THD@20-20kHz (90kBW) | <0.0005% @Output=1500mW (320) |
| <0.0005% @Output=160mW (3000) | |
| SNR@MAX OUT 1kHz (A-wt) | 120dB |
| Dynamic Range@1 kHz (A-wt) | 120dB |
| Frequency Response | 20Hz-20kHz (±0.3dB) |
| Frequency Response | 20Hz-40kHz (±0.7dB) |
| Output Level | 5.5Vpp @G=L |
| 21.5Vpp @G=H | |
| Noise (A-wt) | <2.1uVrms @G=L |
| <7.0uVrms @G=H | |
| Channel Crosstalk ©1 kHz | -90dB |
| Gain | 6.0dB (Vrms/FS) @G=L |
| 19dB (Vrms/FS) @G=H | |
| Output Impedance | < 0.10 |
| Output Power | 1800mW x 2 ©320 THD+N<0.1`)/0 |
| 900mW x 2 @640 THD+N<0.1`)/0 | |
| 250mW x 2 @3000 THD+N<0.1 (Y0 | |
| Adapter Impedance | >80 |
Operation
Power on & off / standby operation:
- Power on: When connected to the power supply, DX3 Pro+ enters the standby state, and the screen displays a bright spot.
- Standby setting: When it is working, press and hold the knob on the front panel to enter the standby state and short press to exit the standby state when it is in standby. Or you can directly press the standby button on the remote control to enter or exit the standby state.
Note: When the automatic standby function is on, if the current input is not connected or the input signal is invalid in 1 minute, it will automatically enter the standby state. Once having detected a valid signal, it will automatically return to a working state.
Volume setting:
- Mute setting and volume restoring: Use the mute button on the remote control to set mute, press the mute button again, or adjust the volume to restore volume.
- Volume adjusting: Adjust the volume by the knob on the panel or the up or down button on the remote control. Long pressing the volume up/down button will quickly adjust the volume, so please be careful in order to protect your hearing.
Note: When Line Out output, volume is fixed to 0dB in DAC mode and volume adjusting is invalid in this mode.
Input channel switching: Press the knob on the front panel or the “Switch to previous input button” and the “Switch to next input button” on the remote control to switch the input in the cycle.
Output channel switching: Double-click the multi-function button on the front panel or use the remote’s Headphone amp output button, Headphone amp & Line Out output button, and Line Out output button on the remote control to set the output mode. The “Line Out Out” allows you to set the DAC mode and the Pre-amplifier mode, please refer to the “Setup Menu” for settings.
Details of output channel
| Output channel | Indicator | 3.5mm Headphone output | RCA output | Adjustable volume | |
| Headphone amp | The headphone indicator is on | √ | X | √ | |
| Headphone amp + Line out | The headphone indicator is on, DAC indicator is on | √ | √ | √ | |
| Line Out | DAC | DAC indicator is on, sampling rate is displaying on the screen | X | √ | X |
| Preamplifier | DAC indicator is on, volume is displaying on screen | X | √ | √ | |
Setup Menu
Enter the setup menu: Press and hold the knob first when the power is off, and then power up to enter the setup menu.
Change and save settings:
- The volume knob on the front panel: press the knob to enter the next setting item, and rotate the knob to set different parameters. Press and hold the knob until “8-8” is displayed on the screen to save the settings.
- The remote control: press the volume up/down button to enter the previous/next setting item, and press the left/right button to set different parameters. Press and hold the middle button until “8-8” is displayed on the screen to save the settings.
Setting descriptions:
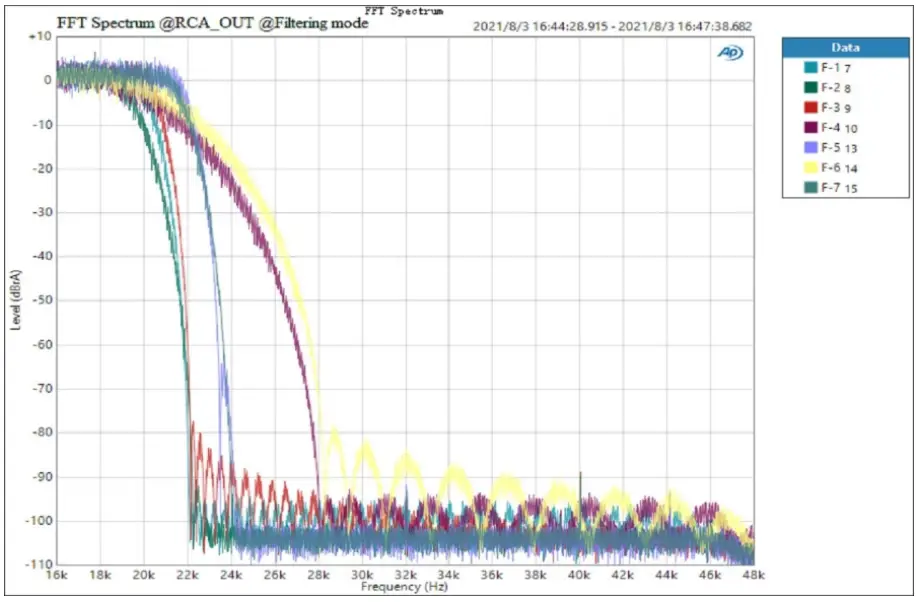
- PCM filter setting (Available for remote control setting, set PCM filter mode when playing PCM)
Screen display Description F-1 Brick-wall F-2 Fast roll-off corrected minimum F-3 Fast roll-off (default) F-4 Slow roll-off minimum F-5 Fast roll-off minimum F-6 Slow roll-off linear F-7 Fast roll-off linear - Screen brightness setting (Available for remote control setting)
Screen display Description L-1 Low L-2 Mid (default) L-3 High L-A Mid brightness and screen will be turned off automatically after 30 seconds of no operation - Automatic standby setting (Available for remote control setting)
Screen display Description A-0 Auto on (default) A-C Auto-off - Line Out channel setting (Available for remote control setting)
Screen display Description 0-1 Line Out output 0-2 Headphone amp output 0-3 Headphone amp & Line Out output (default) - Output mode setting
Screen display Description M-P Per-Amp mode (Volume adjustable) (Default) m-d DAC mode (Volume nonadjustable) - Headphone amp gain (Available for remote control setting)
Screen display Description GAIN +6dB 6dB (Vrms/FS) (default) GAIN +19dB 19dB (Vrms/FS) - Bluetooth setting
Screen display Description BT ON Bluetooth enabled (default) BT OFF Bluetooth disabled
Factory reset:
In the standby state, turn the knob on the front panel counterclockwise until the screen lights up completely, and the factory settings can be restored.
 |  |
 |  |
 |  |
 | |


