
![]() Arc Smart Sound Bar
Arc Smart Sound Bar
Instruction Manual

Overview

The premium smart sound bar for TV, movies, music, and more
- Feel sound all around you with the spacious 3D experience Dolby Atmos
- Stream music. radio, podcas ts and more when the TV is 0ff with
- Effortless setup just two cables and smart Truepl3 y tuning
- Elegant design discreetly mounts to the wall or sits on credenza beneath the TV
- Flexibility to expand your system over time and enjoy true surround $0nd and mutt-room listening
- Control your Sonos system with the $0no$ 3pp (for Android and i0s)
- See Setup when you’re ready to add Arc to your system
Controls and lights
Volume control

- volume up (night )
- Volume down (lief )
Touch for small adjustments Or hold to quickly adjust the volume
Note You can also use the Sons app your voice, Or yOur TV remote.
Play/Pause
 Touch to play pause sound
Next/Previous (music only)

- Swipe night to skip to the next song
- Swipe left to go to the previous song
Note You can’t sip forward 0r go back when listening to a radio station.
Microphone

Tap to turn the microphon e on or off:
- when the microphone light is on, voice control is on and your voice service is ready to respond.
- When the light oft , voice control is off.
Note If you’ve installed a voice service and the microphone off you can still use voice commands Just press and hold $ no need to start is with wen you release the microphon e button. voice control turns off again word a wake
Status light

Displays the product’s connection to Wifi indication when the vulume is muted, and signals errors Learn more.
Note: If you don’t want to allow playback or volume adjustments using the speaker touch controls, you can disable them in the roomin the settings
Connector panel

- HDMI port TV Use to connect Sonos Arc to your Tv.
- Join button Press to connect during setup
- Ethernet port Use an Ethernet cable if you want to connect to a router, computer, or network-attached storage (NAS) device (optional).
- AC power (mains) input Use only the supplied power cord (using a thirdparty power cord wilt void your warranty )
Note Insert the power cord firmly until it is flush with the speaker.
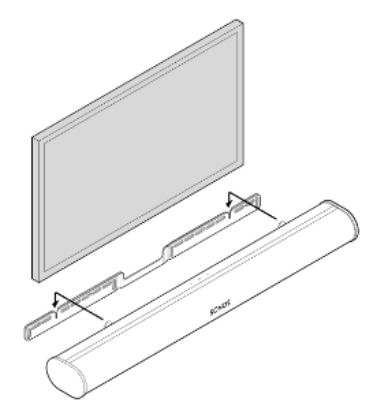
Select a location
You can wall mount Arc below your TV or place it in or on a stand.
TVsland placement
- Place horizontally on a stable and level surface
- Keep4 (102mm) space (minimum) between the top of the soundbar and the bottom of your Tv (f placing soundbar below the TV.
- Don’t place vertically or on its side.
- Make sure th e touch controls are facing up.
Wall mount
You can secure the soundbar to a wa ll with a compatible wall mount We recommend the custom-design ed Sonos Arc Wall Mount (sold separately) See wall mount .
Connect the cables
Before you start
- Disconnect existing home theater or surround sound equipment from your TV.
- Connect any exte rnal devices, like a or cabl e box DVD player, directly to your TV.
- Turn your TV on.
- Connect the power cord and plug ,n the sounbar.
 Note: Use only the supplied power cord (using a third-party power cord wilt void your warranty)
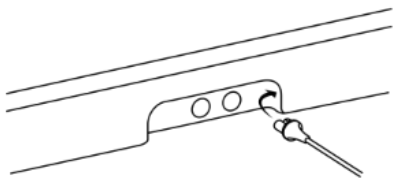
 - Connect the HDMI cable (included) to the soundbar’s HDAMI port
 Connect the HDMI cable to your TV.
 • Ifyour Tvhas an HDMI ARC (or ARC) port connect the HDMI cable to it (HDMI AC is a special port that looks like a standard HDMl port-it may be on the back or side of your TV The ports look similar, but the AC port will be labeled ARC eARC, Of sounbar to a standard HDAMI port instead you wont hear any sound) + Tv doesn’t have an HDMI ARC or eARC port you’ll need to use the optical aapter fyour
• Remove the protective ca p from the optical adapter, the n attach the optical adapter to the HDMI cable
• Connect th e optical adapter to your TV s optical digital OUT port (The TVs optical adapter’s port is D shaped make sure the connector aligns correctly into the port. Inserting the adapter incorrectly may damage the cable)
 Note: Use only the supplied power cord (using a third-party power cord wilt void your warranty)
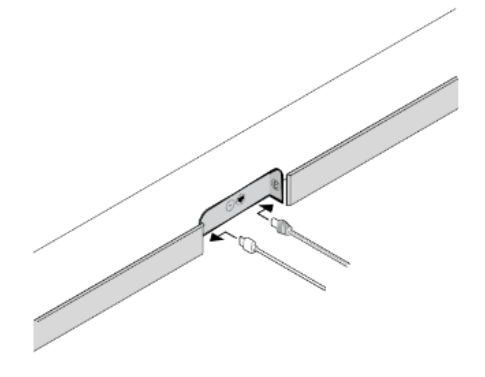 Connect the HDMI cable to your TV.
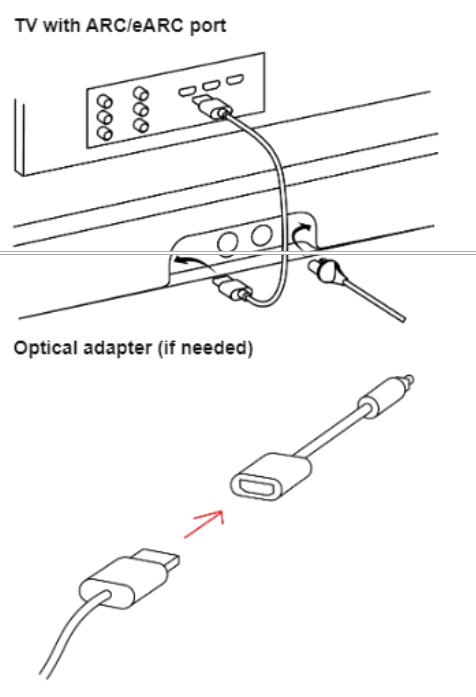 • Ifyour Tvhas an HDMI ARC (or ARC) port connect the HDMI cable to it (HDMI AC is a special port that looks like a standard HDMl port-it may be on the back or side of your TV The ports look similar, but the AC port will be labeled ARC eARC, Of sounbar to a standard HDAMI port instead you wont hear any sound) + Tv doesn’t have an HDMI ARC or eARC port you’ll need to use the optical aapter fyour
Voice services
Use your voice to control your Sonos System with any voice-e nabled Sonos product–play and control cont ent turn the volume up or down, and more .
- Sonos Voice Control control your whole Sonos system with hands-free ease and unmatched priv acy Sonos Voice Control comes ready to use-tt only takes a few seconds to add when you set up your speakers More information
- Amazon Alexa you’ll nee the Sonos app an the Alexa app with the Sonos skill enabled. You’ll make some changes in both apps during setup Lea rn more
- Google Assistant you’ll need the Sonos app and Google Assistant app. You’ll make some changes in both apps during setup Learn more the
- Siri you’ll need the Apple Home app. Add your Airlay2-compa tible Sonos speakers to the Apple Home app and then use an Phone, +Pad, or Apple TV to ask Sini to play music (currently limited to Apple Music) Leamn more
Note Voice control isn’t supported in every country yet-thi s fe ature will be available as Soon as So nos and a voice service launch together in your region.
Microphone on/off
The microphone is used for voice control and for microphone-dependent features hike Trueplay tuning Press $ to turn the microphone on or oft-the microphone LED light wilt let you know when your voice assistant is listening.
when the microphone light is on
- lf you setup avoice service, voice control is on and ready to respond.
- Microphon e-dependent features hike 1reply are available.
When the microphon light is off:
- Ifyou set up a voice service, voice control is off.
- Microphone-dependent features hike Trueplay are unavailable.
Trueplay™
Every room is diff erent Trueplay tuning measures how sound reflects off walls furnishings, and other surfaces in aroom, then fin e tunes your Sonos Speaker to make sure it sounds great no matter where you’ve place it.
Trueplay works on iOS mobile devices running i0S 8 or later During tuning you’ll move around the room holding your mobile device.
- Select>
 System and pick the room you want to tune.
 - Choose Trueplay Tuning to get started.
Note Trueplay tuning isn’t available if VoiceOver is enabled on your iOS device Turn VoiceOver off in your device settings before tuning your speakers.
Auto Trueplay
potable Sonos products bike Sonos Roam and Move can tune themselves automatically. Auto Trueplay uses your speaker’ s microphone to detect the environment and make eriodic tuning adjustments so you get great sound wherever your speaker is and whatever you’re listening to Goto>![]() System and select your portable speaker to tum on auto rueplay.
System and select your portable speaker to tum on auto rueplay.
Product settings
You can customize Sonos products for your surroundings. Go to![]() System and select a product.
System and select a product.
| Room Name | If you move your speaker to a new room, you can change it s name in Settings |
| Turn off WIFi (not on portable products) | You can tum your speaker’s WF when it’s connected to your network with an themnet cable This reduces power consumption and can improve connectivity for ome wired speakers For products hike Amp an Port, turning of wifi can reduce the nternal temperature when they re placed in a rack or stacked Learn more |
| EQ | S0nos products ship with preset equalization settings You can change the sound ettings (0ass, treble balance or loudness) to suit your personal preferences Learn are. |
| Trueplay | Tueplay a0apts the sound for your surroundings and content portable products can tune themselv es automaticall y. Learn more |
| Volume Limit | You can set a maximum volume for each room Learn more |
| status Light | Displays the speaker’s connection to Fi indicates when the volume is muted, and ignals errors Learn more Note If the light is distracting, you can turn it in off Settings |
| Touch Controls | You can disable th e touch control on your speaker You may want to do this to revent a child or curious pet from accidentally adjusting playback or volume Learn ore |
| Battery Saver (portable products) | To life, you can set your portable speaker to power oft automatically instead save attery going to sleep.IE won’t appear in the Sonos app untit it’s powered back of 0n |
| Line-In (products with line-in capability) | Connect an audio device like a turntable or stereo to an Amp , Port, or Five Go to rowse Line-In and sele ct th e source to start playback You can adjust line-in ettings like source name, audio level and auto0play |
Home theater
Sonos products for your TV provide full-theater sound and play music too.Create a home theater system by adding a pair of reat Surrounds and a Suh Home theater settings
Use the Sonos app to adjust sound settings or change th e way your home theater speaker works with your TV.
| TvDialog Sync | If the TV audio is out of sync with the video , you adjust the audio delay (lip sync) n your room’s settings Learn more. |
| Group Audio Delay | If you notice audio issues when playing to a gr0up, you can adjust this setting Learn more. |
| TV Autoplay | TV Autoplay if music or oth er content is playing when you turn on your Ty the udio automatically switches to TV audio (default). If you don’t want this to happen, turn off TV Autoplay in your room’s settings. |
| Speech enhancement | Makes TV @ialog easier to hear Learn more. |
| Night sound | Enhances quiet sounds and reduces the intensity of loud sounds. Turn on to educe the volume while still experiencing proper balance and range Learn more. |
| Remote Control Setup | During setup, you’ll progra m a remote control You can program a different emote control any time Learn more. |
Set up surrounds
lt’seasy to turn two Sonos speakers (same model), or a Sonos Amp and your favorite non-Sonos speakers, into separate night and left channels for your home theater.
- Place ach surround speaker about 10 from your favorit e listening position, angling them toward the seating area.
- Goto>System.
- Select a room with a soundbar and choose Add Surrounds to get started.
Note If you group the rooms or create a stereo pair instead, you won’t have surround sound learn more.
Surround audio settings
During setup, surround sound is optimized for your room. These settings are adjustable.
| Surrounds | Turn surround sound On or Off |
| TVLevel | Adjust surround volume for TV audio |
| Music Level | Adjust surround volume for music |
| Musics Playback | Ambient (subtle) or Fut (louder full range) Doesn’t apply to Dolby almosr musics play back. |
Accessories
Find the perfect accessory for your Sonos system–tailored to perfectly fit your Sonos products For a full selection of Sonos-compatible stands, wall mounts. chargers and ables. see Ac&8300e$ 0n Our website
Wall mount
Guidelines
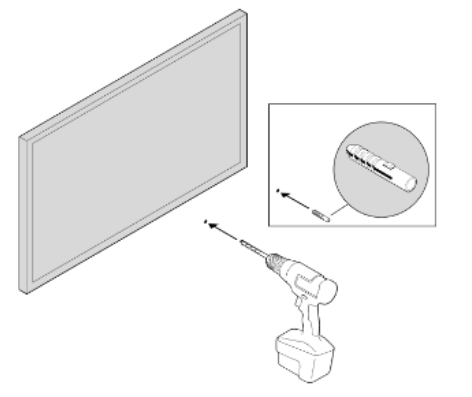
- Use th e Sonos Arc wall mount kit (sold separately on www.sons.om Follow the instructions in th e kit
- Keep40 (102 mm) space (minimum) between Arc/Arc SL and your TV
- Make sure the touch controls are facing up
- For best sound quality keep both ends of the soundbar at least 1′ (30cm) from a wall or other obstructions
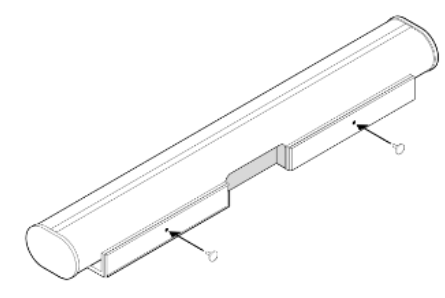
Mount kit contents
- Wall mount bracket
- Positioning guide (don’t discard-it may look hike packing material)
- 2kn0bs
- 6wall anchors
- 6screws
| wall Material | Pre Drill |
| Wood stud | 1/8/3mm bit |
| Drywall (no stud) | 5/16/8mm bit |
| Plaster | 5/16/8mm bit |
| Concrete or bnick | 5/16/8mm bit |
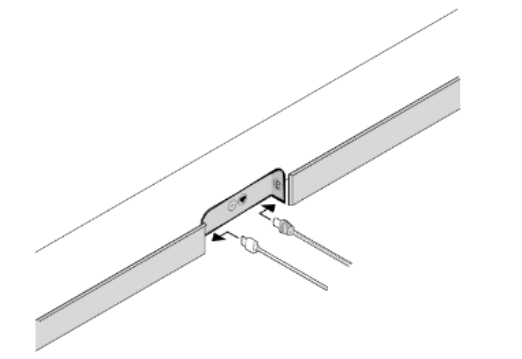
- If your TV is wall-mounted, place the positioning guide against the wait, aligning the top edge wth the bottom of vour T\ There sh0ult pe (140mm) between the top of the all mount bracket and the TV.

- Mark the screw locations and remove the guide.

- If you’re using the included wall anchors. use a 5/16 drill bit to drill the pilot holes and then insert the wall anchors. Don’t use the anchors if you’re drilling into wood or plastic.

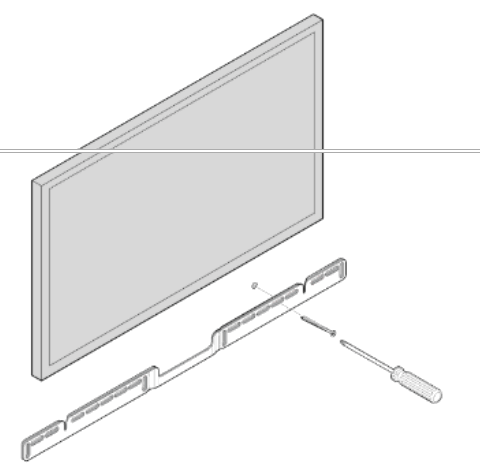
- Position the wall mount bracket over the marked screw locations. using a level to confirm accuracy Use a Phillips head screwdriver or a po wer drill to screw the bracket to the wall, making sure the in arrows the center are pointing up

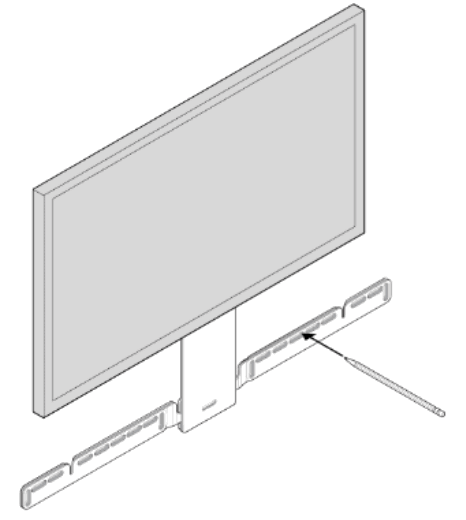
- Screw the 2knobs into the back of the soundbar untit they are fully tightened.

- Connect the power and HDMI cables to th e back of the soundbar
Note If you’re connecting the cables to the TV at this time, be sure to plug the HDAMI cabl e into the HDAMI ARC or eAC port on your TV .
- Slide th e soundbar down so the knobs fit into the slots on the wall bracket. Make sure th e touch control s are facing up and the soundbar is fully seated.


Specifications
| Feature | Description |
| AUDIO | |
| Amplifier | Eleven Class-D digital amplifiers |
| Elliptical woofer | Eight fut-range woofers ensure you’ll hear the faithful playback of mid-range ocal frequencies plus deep ni ch bass |
| Tweeter | Three silk dome tweeters create a crisp and clear high-frequency response |
| Microphones | Four microphone array T17 LED hardwired to voice microphones for privacy control so you know when the microphone is active J29 |
| Voice control | Integrated voice control |
| System requirements | TV with HDMI ARC or optical digital audio output broadband internet, and the Son0s app |
| NETWORKING’ | |
| Wireless connectivity | Connects to wri network wit any 802 11 b/gin , 24GHz broadcast-capable outer |
| Ethernet port | One 10/100Mbps Ethernet port. You can wire directly to your router if your F[is unstable |
| SOFTWARE | |
| Trueplay” | Dynamically tunes the speaker to the unique acoustics of the room or area (i0S evice required ) |
| Speech enhancement | Turn on this home theater setting in the toS0nos app make TV dialogue even learer |
| Night sound | Turn on this home theater setting to reduce the intensity of lou TV sound effects |
| GENERAL | |
| Power supply | Auto-switchi ng 100-240¥. 50-60H2 3.5AAC universal Input |
| Dimensions (H WxD) | 34x45x4.5in. (87 x 1141 7x 115.7mm)y |
| Weight | 13.7800 (6.25kg) |
| Operating temperature | 32F 1 104’F (0C to 400 |
| Storage temperature | -4Fto 122F(20010 500 |
| Control | 34x45x4.5in. (87 x 1141 7x 115.7mm)y 13.7800 (6.25kg) 32F 1 104’F (0C to 400 -4Fto 122F(20010 500 |
| Supported devices | Connects to TV with HDAMI cable (with or without anattached optical adapter) lays sources connected to the Tv including cable boxes and game consoles |
| Package contents | Sonos Arc, power cord, HDMI cable, optical audio adapter, Quickstart Guide |
Important safety information
- Read these instructions.
- Keep these instructions.
- Heed all warnings.
- Follow all instructions.
- Donotuse this apparatus near water .
- Clean only with dry soft cloth Household cleaners or solv ents can damage the finish on your Sons products.
- Do not block any ventilation openings. Install in accordance with the manufacturer’s instructions.
- D0not install near any heat sources such as radiators . heat registers stoves. or other apparatus that produce heat.
- Protect the power cable from being walked on or pinched. particularly at plugs, convenience receptacles and the point where they exit from the apparatus.
- Only use attachments /accessories specified by the manufacturer .
- Unplug this apparatus duning lightning storms or when unused for long periods of time.
- This product does not have any user serviceable part s. Do not open or disassemble or attempt to repair it or replace any components. Refer all servicing to So no s qualifi ed service personnel Servicing is required when th e apparatus has been damaged in any way , such as power-supply cable or plug is damaged, quid has been spilled or objects have fal len into the apparatus. th e apparatus has been exposed to rain or moisture does not operate normally or has been dropped
- The Mains plug should be readily available to disconnect the equipment
- warning To reduce the nisk of fire or electnic shock . do not expose this apparatus to rain or moisture
- Do not expose apparatus to dripping or splashing and do not place objects filed with iquids, such as vases on the apparatus.
![]()


