
![]()

OPERATOR’S MANUAL AND PARTS LIST
16” ELECTRIC CHAINSAW – THECS16
Sales & Helpline 01793 333220
www.thehandy.co.uk
Before use please read & understand this manual, paying particular
attention to the safety instructions.
SAFETY INSTRUCTIONS
![]() Read and understand the owner’s manual and labels affixed to the chainsaw. Learn its application and limitations as well as the specific potential hazards. Retain these instructions for reference.
Read and understand the owner’s manual and labels affixed to the chainsaw. Learn its application and limitations as well as the specific potential hazards. Retain these instructions for reference.
- Use safety footwear, protective clothing, and a helmet with eye and ear protection.
- Do not operate the chainsaw if you are tired, ill, or under the infl uence of alcohol or drugs.
- Ensure that bystanders, children, and pets keep well away when starting or cutting – at least 10m.
- Inspect the chainsaw, and in particular the bar and chain, before use for any worn or damaged parts. Do not use until the parts are repaired or replaced.
- Before starting the chainsaw make sure the chain is not in contact with anything and have a clear work area and secure footing.
- Hold the chainsaw fi firmly with both hands when using it and keep all parts of your body away from the machine. Put the scabbard on for transportation.
 It is recommended only to use heavy-duty extension cables and these should be uncoiled before use. It is also recommended that a Residual Current Device (RCD) Safety Plug be used.
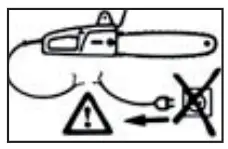
- Do not smoke when using the chainsaw and ensure caution with the electric cable. If the cable becomes damaged or is cut, disconnect from the power supply immediately.
- Always carry the chainsaw with the motor stopped, the bar and chain to the rear, and the muffl er away from your body.
- Beware of small branches and saplings whipping back towards you as you cut. When cutting a limb that is under tension, be alert to the possibility of the limb springing back when the tension is released.
- Do not cut in high wind, bad weather, or poor visibility. Check the tree for dead branches which could fall during operation.
- Do not use in the rain or leave outside in wet weather.
- NEVER operate the chainsaw in a tree unless you are specially trained to do so.
Always shut off the chainsaw before setting it down.
A word about KICKBACK-
Kickback can occur when the nose or tip of the guide bar touches an object, or when the wood closes in and pinches the saw chain.
Do not rely solely on the safety devices built into your chainsaw. - Keep a good grip on the saw with both hands – this will help you maintain control should kickback occur.
- Ensure that the area in which you are cutting is clear and free from obstructions so that the tip does not make contact with another log or
obstruction. - Do not overreach or cut above shoulder height.
- Follow the manufacturer’s guidelines for sharpening and maintaining the chain and only use replacement bars and chains specifi ed.
 It is recommended only to use heavy-duty extension cables and these should be uncoiled before use. It is also recommended that a Residual Current Device (RCD) Safety Plug be used.
ASSEMBLY
Fitting the Guide Bar and Saw Chain:
Ensure that the saw is not connected to the power supply and wear protective gloves.
- Remove the chain cover by unscrewing the nuts on the side casing.
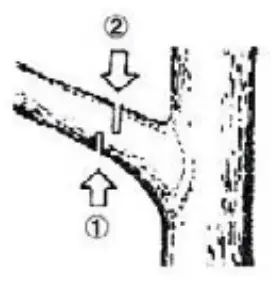
 Locate the guide bar onto the chainsaw making sure that the hole on the lower side of the slot locates over the tensioning pin (12).
- Bring the tensioning pin (12) to its left-hand position by turning the screw (9) anticlockwise.
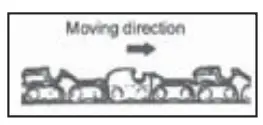
- Fit the chain over the sprocket (13) and into the groove on the guide bar, paying attention to the correct direction of the chain. (The arrows on the chain cover indicate the direction).
- Fit the chain cover to the power unit and fasten the nuts to fi finger tightness.
- Turn the tensioner screw clockwise until the chain fi ts snugly on the underside of the bar.
- Tighten the nuts securely with the bar tip held up (12-15Nm). Using gloves, check the chain for smooth rotation and correct tension while moving by hand. Caution, a chain can only be moved backward by hand, be careful of the cutters. If necessary re-adjust.
 Locate the guide bar onto the chainsaw making sure that the hole on the lower side of the slot locates over the tensioning pin (12).
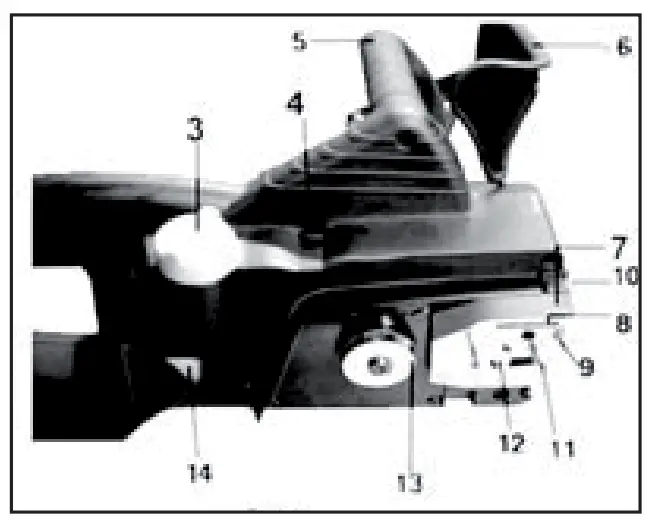
Note: A new chain will stretch during its first use. Check and readjust frequently.
OPERATION
Always follow the safety regulations. The chainsaw must only be used for cutting wood. Do not use to cut other material. Vibrations and kickback vary with different materials and the requirements of the safety regulations would not be respected. Do not use the chainsaw as a lever for lifting, moving, or splitting objects, Do not lock it over fixed stands. It is not necessary to force the saw into the cut. Apply only light pressure while running the chainsaw.
- When the saw chain is caught in the cut, do not attempt to pull it out by force, but use a wedge or a lever to open up the cut.
- Removal of safety devices, inadequate maintenance, or incorrect replacement of the bar or chain may increase the risk of injury due to kickback.
To fell a tree:
- Decide on the felling direction, considering the wind, lean of the tree, location of heavy branches, and ease of completing the task after felling.
- Clear the area around the tree and make sure you have a good foothold and retreat path in the opposite direction to that in which you plan for the tree to fall.
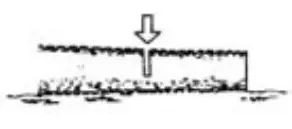
- Make a notch cut one-third of the way into the tree on the felling side.
- Make a felling cut from the opposite side at a slightly higher level than the notch.

Limbing:
- Be alert to the rolling over of a cut log, especially when working on a slope. Stand on the uphill side of the log.
- If the log is lying on the ground, cut down halfway through then turn the log over and cut from the other side.
- If the log is free of the ground, it is sometimes easier to cut from the bottom up and finish the cut from the top down.
Use the same principle when cutting limbs from a fallen tree that are still attached or from a standing tree.
Watch out for the springing back of a cut limb. Do not overreach or cut above shoulder height. Always use both your hands to hold the saw. Do not use this chainsaw from a ladder or any other insecure support.
Chain Oil:
The chainsaw is supplied with a bottle of chain oil which must be added to the oil container
before use. The oil allows the chainsaw to operate at temperatures as low as -15ºC. Further supplies of quality chain oil can be purchased from your Handy Parts stockist or garden machinery dealer.
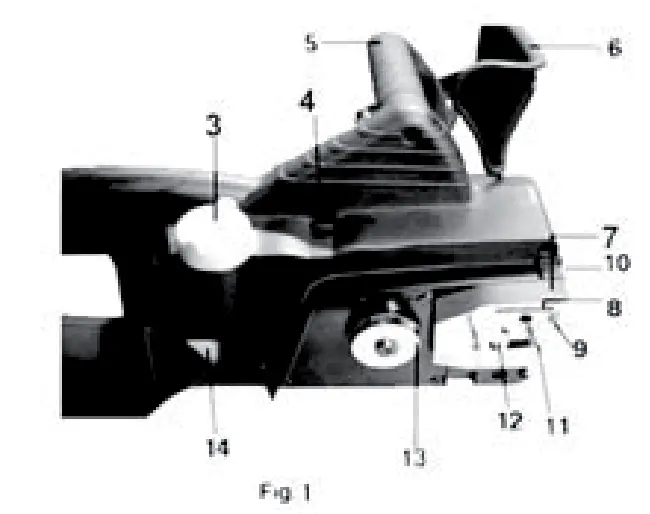
- Unscrew the fi filler cap (3) and fi ll the container.
- By means of the set screw (4), it is possible to vary the quantity of oil delivered to the bar. If sawing hard, dry timber or if using the entire length of the bar, turn the screw anti-clockwise which will deliver a higher quantity of oil. For softer or wet wood, turn the screw clockwise which will deliver a lower quantity of oil.
- Under normal conditions, one fi ll of the oil container should last between 15-40 mins. The capacity is 0.2 liters.
To start the chainsaw:
Before starting the chainsaw, to release the brake, pull up the front guard toward the front handle until a “click” sound is heard. The saw is fi tted with a safety switch to prevent accidentally switching it on.
- Grasp the handle (5) with the left hand.
- Push the locking button on the left side of the switch handle then,
- Squeeze the trigger and release the locking button.
- Allow the saw to run for 2-3 minutes before using it and ensure that the chain tension is correct.
To switch off the chainsaw:
- Release the trigger. The locking button will automatically return to the locked position.
Always cover the chain and bar with the chain cover when carrying the saw and switch off the motor.
 MAINTENANCE
 MAINTENANCE
CHAIN BRAKE
This machine is equipped with an automatic brake to stop the saw chain rotation upon kickback. The brake is automatically operated by inertial force, which acts on the weight fi fitted inside the front guard.
The brake can also be operated manually when the front guard is pushed down to the guide bar. To release the brake, pull up the front guard toward the front handle until a “click” sound is heard.
To confirm brake operation: With chainsaw stopped push brake handle forwards until a “click“ sound is heard. Ensure that the chainsaw will now not operate. Pull the brake handle backward to release the brake. When the brake engages during operation, immediately release the trigger to stop the chainsaw.
CHAIN SHARPENING
Working with a blunt chain causes the chain, guide bar, and drive sprocket to wear and may lead to the chain breaking so it is important to keep the chain sharp. It is advisable to have the chain sharpened by a specialist.
CHAIN LUBRICATION
Running the saw without chain lubrication will quickly damage the chain and guide bar. Check the lubrication by switching on the saw and hold it with the guide bar and chain above some light coloured paper. A steadily increasing stain caused by oil spray indicates that the lubricating system is working correctly.
GUIDE BAR
Use a grease gun to apply a small amount of grease through the grease holes near the four rivets holding the nose sprocket on the guide bar. The bottom edge of the bar is exposed to relatively heavy wear and so the bar should be turned top to bottom whenever the chain is sharpened and the groove in the bar and the oil holes cleaned.
DRIVE SPROCKET
If the teeth of the drive sprocket show any signs of wear, the sprocket should be replaced. In any case, should be changed with every second replacement of the chain.
CARBON BRUSHES
When the saw’s brushes are worn beyond a certain limit, a tripping device automatically stops the motor. The brushes must be replaced by a chainsaw specialist.
PARTS DIAGRAM
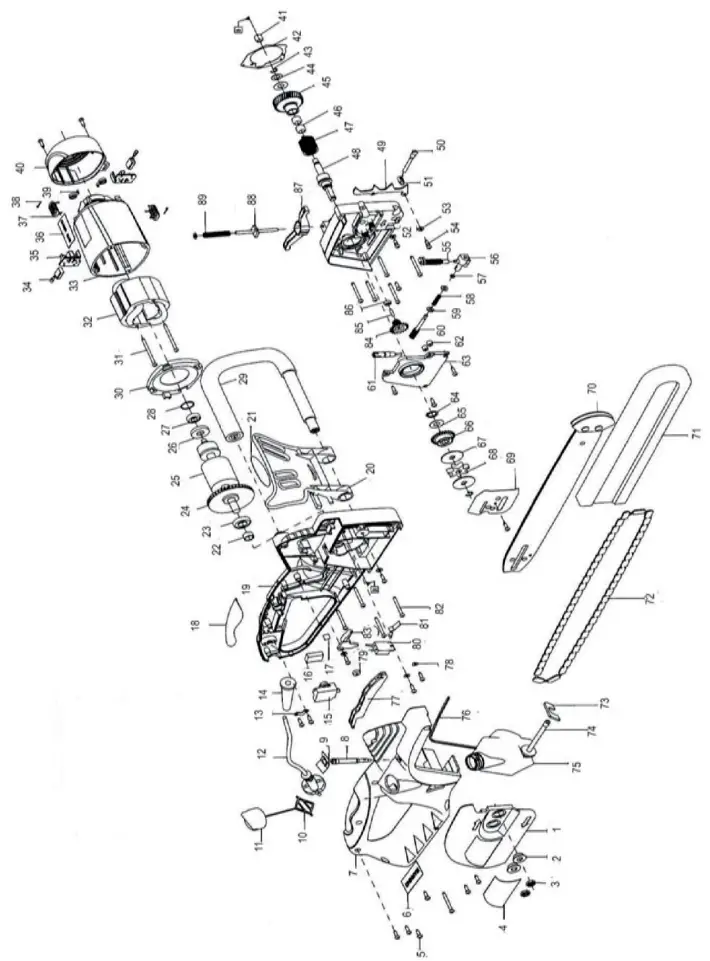
PARTS LIST
| No | Part No | Description | Qty | No | Part No | Description | Qty |
| 1 | TH157–1 | Sprocket Cover | 1 | 45 | TH157-45 | Helical Gear | |
| 2 | TH157-2 | Washer | 2 | 46 | TH157-46 | Needle Bearing | 1 |
| 3 | TH157-3 | Hex Nut | 2 | 47 | TH157-47 | Torsion Ring | 1 |
| 4 | TH157-4 | Plate | 1 | 48 | TH157-48 | Spindle | 1 |
| 5 | TH157-5 | Screw | 18 | 49 | TH157-49 | Spike | 1 |
| 6 | TH157-6 | Warning Plate | 1 | 50 | TH157-50 | Adjust Screw | 1 |
| 7 | TH157-7 | Right Handle | 1 | 51 | TH157-51 | Spigot | 1 |
| 8 | TH157-8 | Indicator | 1 | 52 | TH157-52 | Gearbox | 1 |
| 9 | TH157-9 | Oil Level Mark | 1 | 53 | TH157-53 | Flat Washer | 1 |
| 10 | TH157-10 | Flying Ring | 1 | 54 | TH157-54 | Spring Washer | 1 |
| 11 | TH157-11 | Cover | 1 | 55 | TH157-55 | Injection Pipe | 1 |
| 12 | TH157-12 | Wire | 1 | 56 | TH157-56 | Oil Pipe Link | 1 |
| 13 | TH157-13 | Anchorage | 1 | 57 | TH157-57 | 0 Ring | 1 |
| 14 | TH157-14 | Cable Holder | 1 | 58 | TH157-58 | Spring | 1 |
| 15 | TH157-15 | Switch | 1 | 59 | TH157-59 | Washer | 1 |
| 16 | TH157-16 | Capacitor | 1 | 60 | TH157-60 | Worm Gear | 1 |
| 17 | TH157-17 | Cord Lock | 1 | 61 | TH157-61 | Adjust Link Rod | 1 |
| 18 | TH157-18 | Soft Skin | 1 | 62 | TH157-62 | Elastomer | 2 |
| 19 | TH157-19 | Left Handle | 1 | 63 | TH157-63 | Gearbox Cover | 1 |
| 20 | TH157-20 | Brake Guard | 1 | 64 | TH157-64 | Shield Ring | 1 |
| 21 | TH157-21 | Warning Plate | 1 | 65 | TH157-65 | Washer | 1 |
| 22 | TH157-22 | Plastic Ring | 1 | 66 | TH157-66 | Gear | 1 |
| 23 | TH157-23 | Bearing | 1 | 67 | TH157-67 | Washer | 1 |
| 24 | TH157-24 | Fan | 1 | 68 | TH157-68 | Sprocket | 1 |
| 25 | TH157-25 | Armature | 1 | 69 | TH157-69 | Oil Resistance Plate | 1 |
| 26 | TH157-26 | Shield Ring | 1 | 70 | TH157-70 | Guide Bar | 1 |
| 27 | TH157-27 | Bearing 608 | 1 | 71 | TH157-71 | Guide Bar Sheath | 1 |
| 28 | TH157-28 | 0 Ring | 1 | 72 | HP-111 | Chain | 1 |
| 29 | TH157-29 | Front Handle | 1 | 73 | TH157-73 | Sponge Block | 1 |
| 30 | TH157-30 | Wind Shield | 1 | 74 | TH157-74 | Oil Output Pipe | 1 |
| 31 | TH157-31 | Screw | 2 | 75 | TH157-75 | Oil Bottle | 1 |
| 32 | TH157-32 | Starter | 1 | 76 | TH157-76 | Seal | 1 |
| 33 | TH157-33 | Housing | 1 | 77 | TH157-77 | Switch Button | 1 |
| 34 | TH157-34 | Carbon Brushes | 2 | 78 | TH157-78 | Washer | 1 |
| 35 | TH157-35 | Brush Holder | 2 | 79 | TH157-79 | Roll Wheel | 1 |
| 36 | TH157-36 | Plate | 1 | 80 | TH157-80 | Link Block | 1 |
| 37 | TH157-37 | Spring | 2 | 81 | TH157-81 | Brake Spring | 1 |
| 38 | TH157-38 | Terminal | 2 | 82 | TH157-82 | Screw | 4 |
| 39 | TH157-39 | Clip | 1 | 83 | TH157-83 | Lever | 1 |
| 40 | TH157-40 | Rear Cover | 1 | 84 | TH157-84 | Plastic Gear | 1 |
| 41 | TH157-41 | Needle Bearing | 1 | 85 | TH157-85 | Cylinder Pin | 1 |
| 42 | TH157-42 | Red Paper Washer | 1 | 86 | TH157-86 | Bearing | 1 |
| 43 | TH157-43 | Shield Ring | 1 | 87 | TH157-87 | Brake Link | 1 |
| 44 | TH157-44 | Washer | 1 | 88 | TH157-88 | Brake Rod | 1 |
| 89 | TH157-89 | Brake Spring | 1 |
EC DECLARATION OF CONFORMITY
Declaration of Conformity
Pursuant to the regulations of the following EC Directives;
- Electromagnetic Compatibility Directive 2004/108/EC
- Low Voltage Directive 2006/95/EC
- Machinery Directive 2006/42/EC
- Noise Emissions Directive 2000/14/EC
Handy Distribution Ltd hereby declares that the product:
Machine Type: Electric Chainsaw
Machine Model: THECS16
Rated Power: 2000W
Vo: 12.1m/s
Bar Length: 405mm
Conforms to the main safety requirements of the EC Directives listed above. This conformity is based on the following standards and normative documents:
EN60745-1:2009
EN60745-2-13:2009
ISO 13772:2009
EN55014-1:2006
EN55014-2:1997+A1
EN61000-3-2:2006
EN61000-3-3:1995+A1+A2
The conformity assessment procedure followed was in accordance with Annex III of the Directive 2000/14/EC
Calculated Sound Power Level: 108.3dB(A) K=3dB(A)
Guaranteed Sound Power Level: 112 dB(A)
The responsible person, based within the EC, is identifi ed below:
Name: Mr. Simon Belcher
Title: Managing Director
Company: Handy Distribution Ltd
Address: Hobley Drive, Stratton St Margaret, SWINDON, Wiltshire. SN3 4NS
Signature:
Date: 14th July 2010
To order spare parts and see the complete range of garden
machinery and garden equipment from Handy, visit:
www.thehandy.co.uk
![]()


