![]()
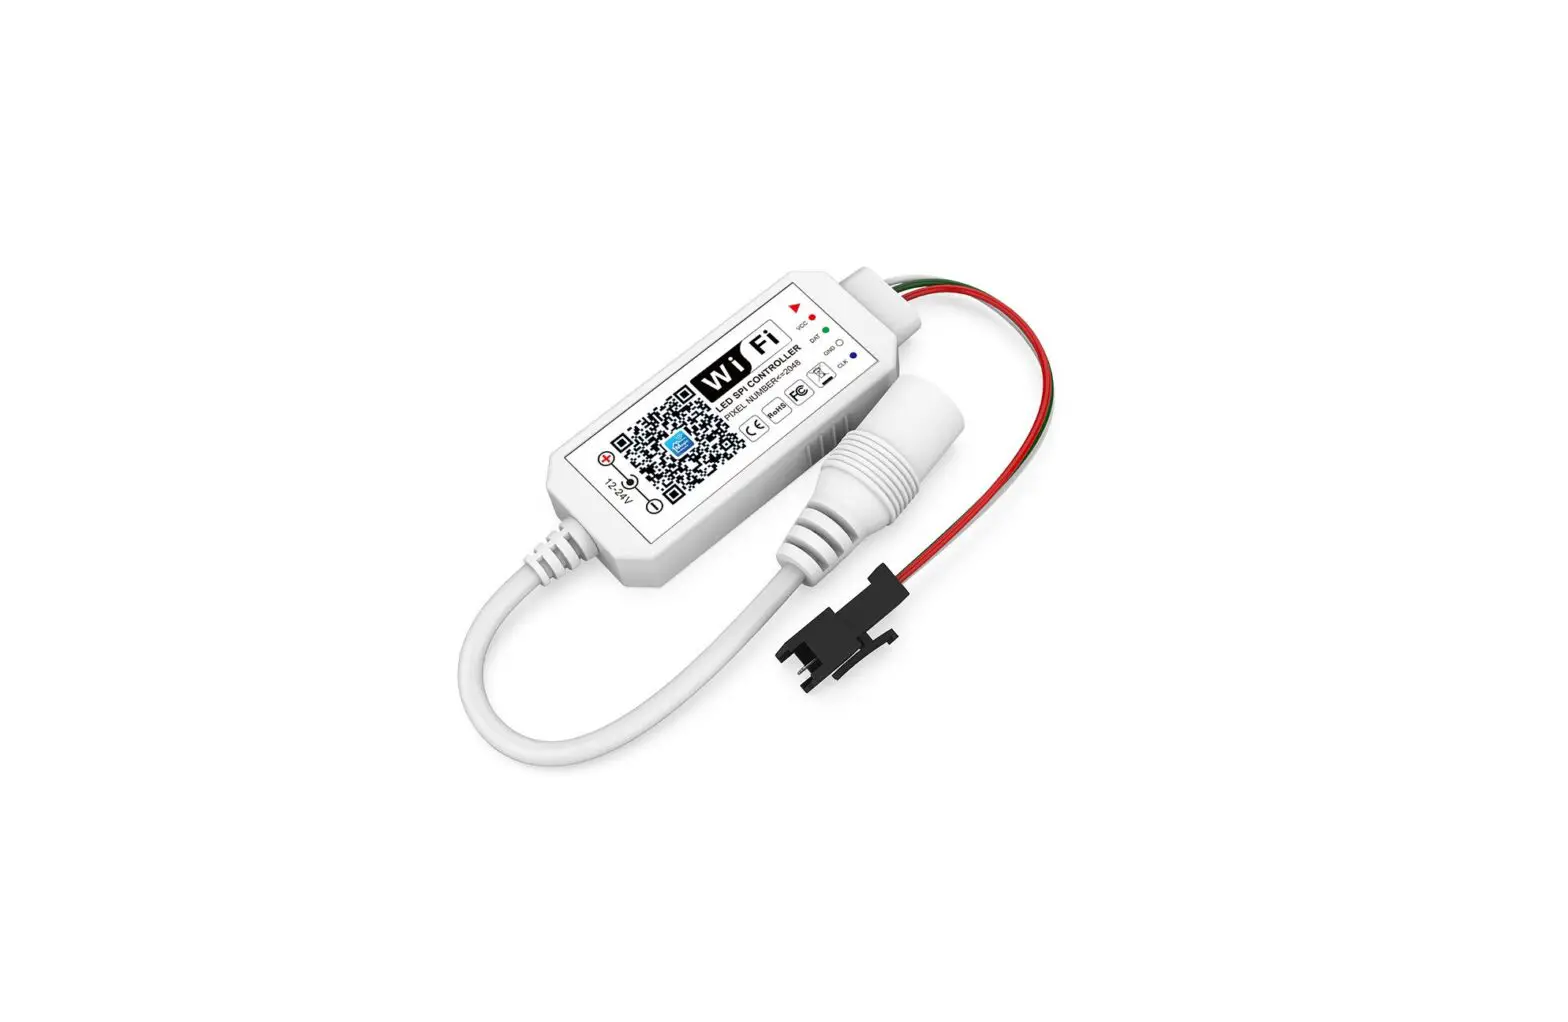
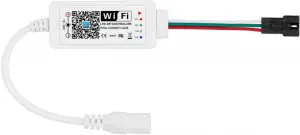
12V~24V Smart Wi-Fi
Addressable LED Pixels Controller
Product Parameter:
Category LED Controller
Domination Principle WiFi
APP Magic Home Pro
Language Chinese, English, Japanese
Operation Platform Android 4.0 or IOS 9.0 or higher
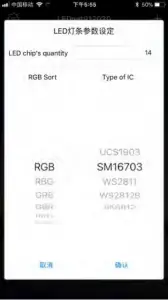
Signal Output Support one-wire driver IC, able to control up to 2048 pixel
Input Voltage DC 12V~24V
Supported Driver IC WS2811, UCS1903, SM16703
IP Rating IP20
Working Temperature -20-55℃
Control Distance Visible distance 30M
Certification CE, RoHS, FCC
Warranty 1 Year
Net Weight 14.5g
Dimension (L*B*H) 53MM*24MM*11MM
-1-
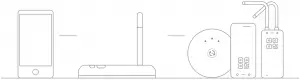
Controller connection mode
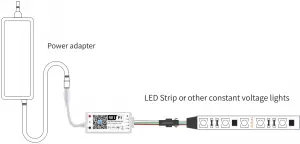
Connection schematic diagram
The connection between the controller and the power supply

Controller and device connection

-2-
Software User Manual for IOS
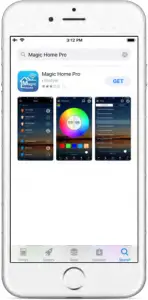
APP installation instructions:
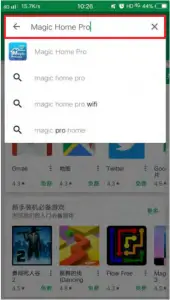
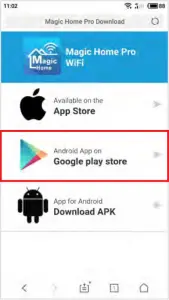
Method 1: Search Magic Home Pro in “APP Store”. Or click the bellow link and download the app.
Magic Home pro
Method 2: Download the APP by scanning the below QR code for free.

Installation details as below.
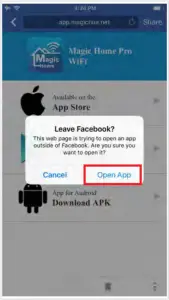
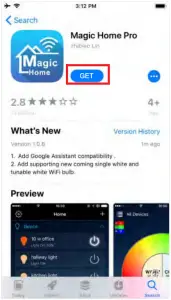
Step 1 Step 2 Step 3
-3-
Software User Manual for Android.
APP installation instructions:
Method 1: Search Magic Home Pro in “Google Play Store” or from browsers.I nstallation details as follow.
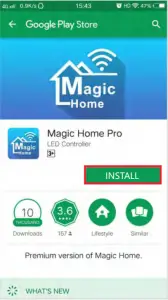
Step 1 Step 2
Method 2: Download the APP by scanning the below QR code for free.

Installation details as below.

Step 1 Step 2 Step 3
-4-
Instructions
There are three different ways to connect the controller after it has been connected to the power supply.
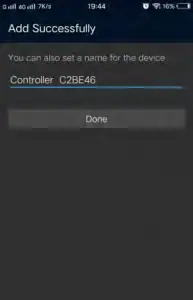
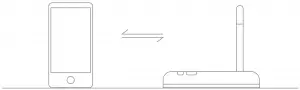
a) Wi-Fi mode: This mode needs register and login after complete 1 to 1 Mode. (Please refer to connection mode c ) Make sure the controller has been powered and never been set, please operate as below steps.
- Click “+” in the upper right corner and click “add device”
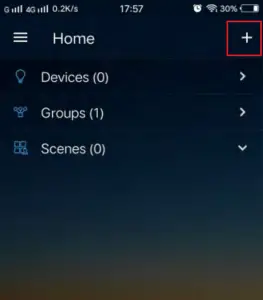
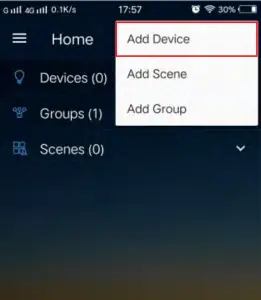
- Register and login account
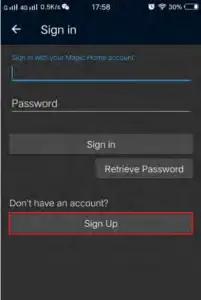
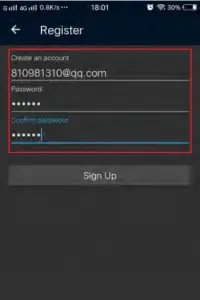
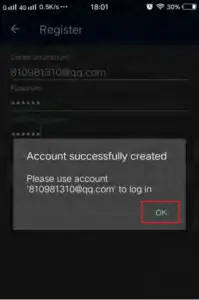
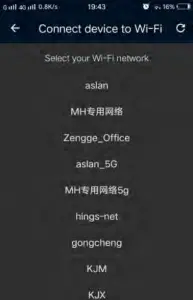
- Connect the device to the router

-5-
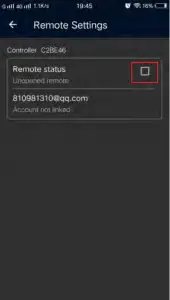
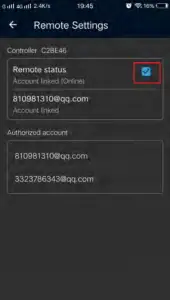
b) Remote control via Internet:
Here you can locate the Wi-Fi controller via the internet from anywhere in the world In Wi-Fi mode (connect mode (a)). Keep the Wi-Fi router online, no matter where you are, you still can control your lights with APP as long as there’s Wi-Fi/3G/4G internet for your smartphone.
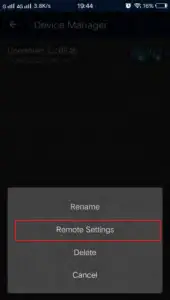
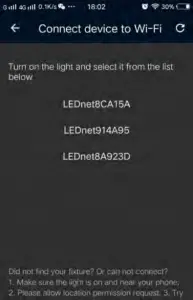
c) 1 to 1 Mode: Open mobile Wi-Fi network signal, find “LEDnet******” signal and connect, then open Magic Home Pro APP.
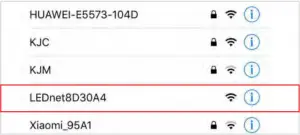
If the network connect successfully you can enter the APP for operation.
-6-

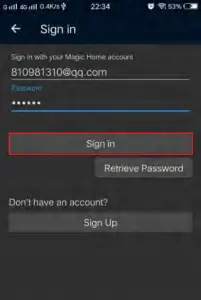
Step 1: Create your Magic Home cloud account
In order to control your smart light with the Google Assistant or control them remotely you need to create a Magic Home cloud account and sign in.
Step 2: Add your light and modify the name
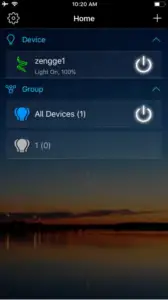
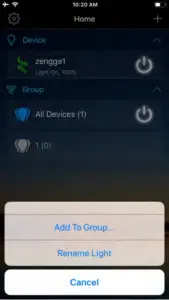
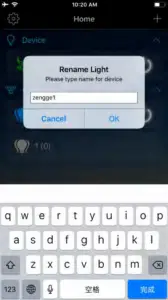
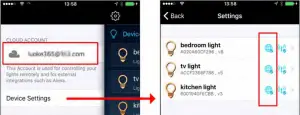
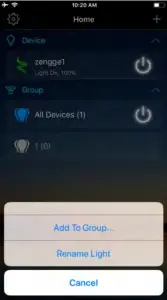
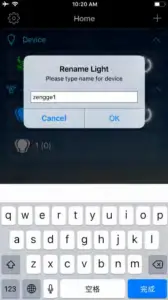
Make sure there is at least one smart light in device list, and enable your lights for remote control. On “Home” page, long press the light to rename.
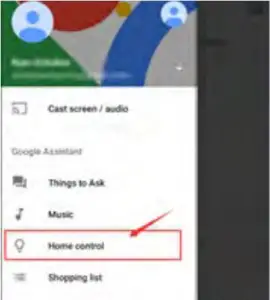
Step 3: Add Home Control Action
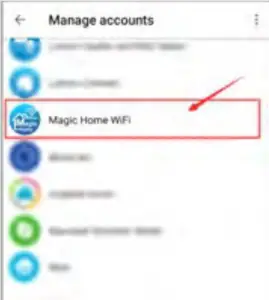
Click “Home control” on”Home”APP. Select “Magic Home WiFi” The account and password must be same as the one you created in Magic Home Pro APP.
-7-
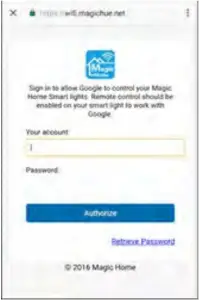
Step 4: Login with your app account
Enter your app account and password to finish the account linking. (Use the Magic Home cloud account you used on step 1). Your lights will be listed on “Home Control” interface.
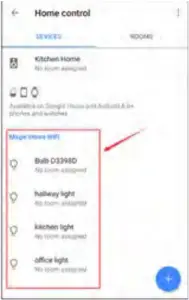
Step 5: Control your light
Here, you finish all setups. You can now control your lights by issuing voice commands.
Supported Commands:
Say “Ok Google” or “Hey Google”, then..
Turn on <light name>
Dim <light name>
Brighten <light name>
Set <light name> to [50%]
Dim/Brighten <light name> by [50%]
Turn <light name> [color]
Turn on/off all the lights
Is <light name> on?
Changing colors on your lights
Color Options for Google Home control of your smart device:
Blue Orange
Crimson Purple
Cyan Red
Fuchsia Salmon
Gold Sky Blue
Green Teal
Lavender Turquoise
Lime Violet
Magenta Yellow
-8-

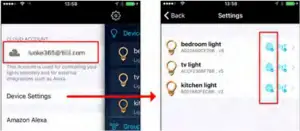
Step 1: Create your Magic Home cloud account
In order to control your smart light with the Amazon Echo or control them remotely, you need to create a Magic Home cloud account and sign in.
Step 2: Add your light and modify the name
Make sure there is at least one smart light in device list, and enable your lights for remote control. On “Home” page, long press light to rename.
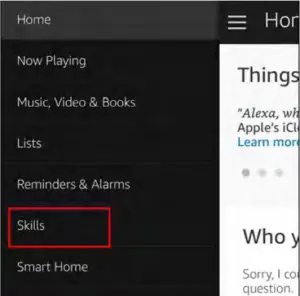
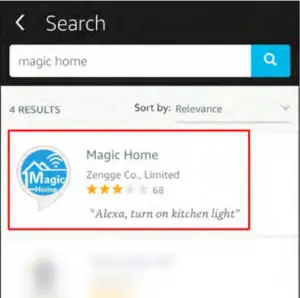
Step 3: Enable Alexa Skill
The next step is to download the Amazon Alexa app, open the Amazon Alexa app and under the skills section, search for the “Magic Home” skill. The account and password must be same as you created in Magic Home Pro APP.
-9-
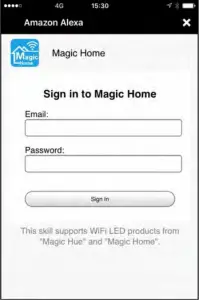
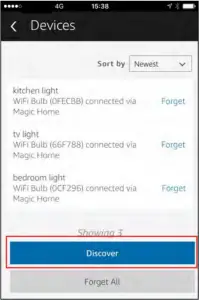
Step 4: Login and Discover Devices
Use your Magic Home cloud account you created in step 1 to sign in to “Magic Home” Skill. The next step is to discover your smart lights from Alexa app. You can say “Alexa, discover devices”.
Once Alexa has completed discovering your smart lights, they will be shown in the Smart Home section in Alexa app.
Step 5: Control your light
Here, you finish all setups. You can now control your lights by issuing voice commands.
Supported Commands:
These are some of the currently supported Alexa voice commands for the smart light.
Alexa, set [light name] to [0-100]%
Alexa, turn [light name] on/off
Alexa, dim/brighten [light name]
Alexa, increase/decrease [light name]
Alexa, set the [light name] light to red
Alexa, change the [light name] to the color blue
Alexa, make the [light name] warm white
Alexa, change the [light name] to the cool white
Alexa, set the [light name] to daylight
Changing colors on your lights
Color Options for Alexa control of your smart device:
Blue Orange
Crimson Purple
Cyan Red
Fuchsia Salmon
Gold Sky Blue
Green Teal
Lavender Turquoise
Lime Violet
Magenta Yellow
-10-
PRODUCT FUNCTION INTRODUCTION
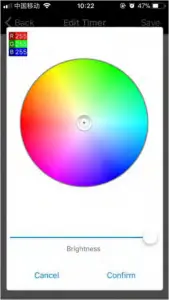
Support 16 million color control and brightness adjustment
You can adjust both the color RGB (Red/Green/Blue) as well as the brightness of the color. It’s likewise possible in this function to adjust and store 5 own created colors and brightness levels. You can save this, if you press long on the “DIY” button.
The adjusted color/brightness will be stored and displayed in the “DIY” button. You can recall the color/brightness if you press shortly on one of the five DIY buttons. On the display top left, the individual channels R/G/B can be called separately and adjusted from 0-255 to obtain the desired color.
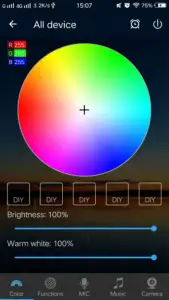
RGBW
In addition to the functions as in RGB mode the warm white channel adjusts separately. (Warm White & RGB channels cannot be used simultaneously.)
-11-
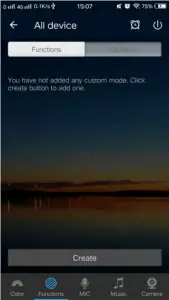
Support for customised colours and preservation
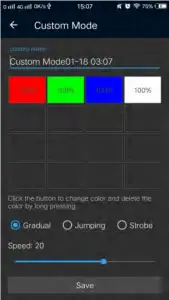
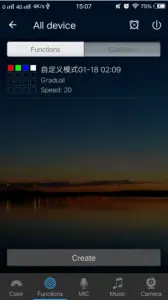
In DIY function, you can select your favorite colors and gradual, jump or strobe between the functions. Press the menu “customs” and then “Add new Mode”. By briefly pressing one of the selection rectangles you can change the color. By pressing long, you can delete the color. It can be defined in a sequence up to 16 different colors. After setting the color, speed and award of the user mode name, press “save” on the top right. Now you see your personal role in the selection mode. You can create unlimited changing modes and they can always be edited or deleted.
Group Feature
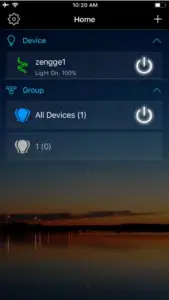
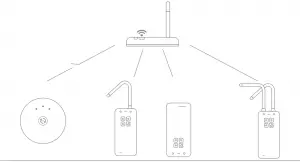
Zengge controllers (Magic Home Pro) allows you to create different groups to control more than one controllers, for example, if you have 2 controller units, you can use one system in your living room & the other out on your patio. The grouping function allows you to either control these systems individually or to group them together as one unit.
-12-
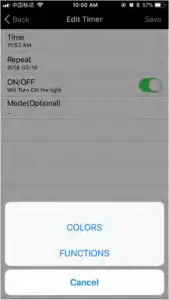
Light timer
You can have your lights automatically turn on or off in a specified time by setting up the timer.
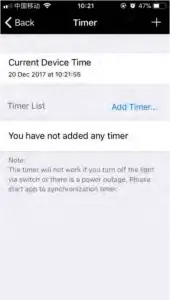
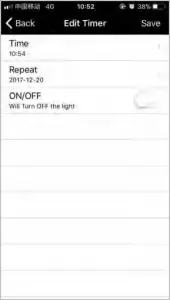
The controller has a build in timer function. To do so, press on the top right, next to ON/OFF, switch the clock icon. Then the selection menu will be shown with time, Repeat (Mon-Sun), ON/OFF switch and the optional Model (color setting, Brightness and 300 gradient programs.) The timer will not operate when the power supply is interrupted. In this case, start the APP to resynchronize.
-13-
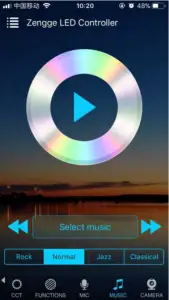
Light and music rhythm synchronization function
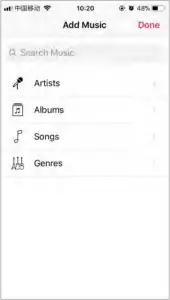
In this function, you can let shine the connected LED in the rhythm of the music will be played on the smartphone or tablet. To do this, select the menu item “select music” and then select your music library on smartphone or tablet the desired music.
There are four main modes for four music styles: ROCK for rock & roll music style, NORMAL for default music style, JAZZ for jazz music style, CLASSICAL for classical music style.
IOS system needs to download music files in iTunes or copy audio files from computer’s iTune to iPhone. After then, you can select the music when you open APP music mode to synchronize the lights and music rhythm. The light color changes automatically with music rhythm.
Android system needs to download the music files to the phone for use.
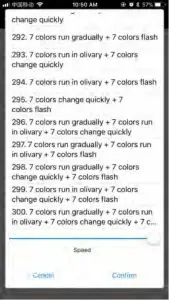
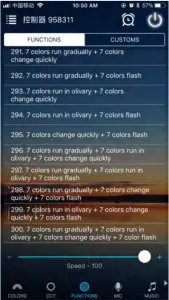
Function
In this capacity, 300 gradients are preset, including overlay, fading out run, flows in olivary and so on. In addition, you can adjust the speed of the gradients with a slider. With the keys M+/M- or scroll up and down you can switch between the gradient modes.
-14-
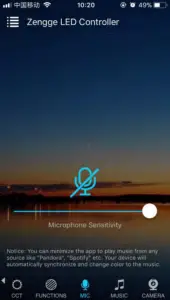
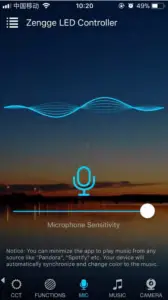
Microphone function
Click/ go to “Disco” interface of the APP.
In this function the connected LED light lights up depending on the volume/noise from the outside like a microphone. This also works when playing music or there is a noise from outside, the light will begin “dancing” base on different rhythm.
The microphone sensitivity can be adjusted by the slider.
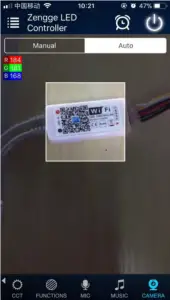
Background color function of camera
In this function, you can select a color with the smartphone or tablet where you point the camera of your smartphone or tablet to an object. The selected color will be display from the connected LED light in the RGB spectrum. This can be done manually transmitted to the LED light with “Manual” “Capture color” or switch to “Auto” and the LED light will show immediately the color which has been selected on the camera.

-15-
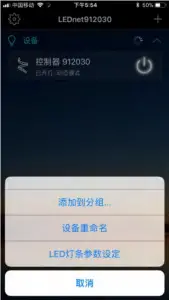
Custom function
Support multiple driver IC, change channel sequence and setting total pixel number. Meet the needs of different products at the same time.
-16-
Remote control
- We have maintained long-term cooperation with the US Ali Cloud Terminal in USA server to provide our customers with better remote control services.
- When and only when you register and login your account in Magic Home Pro APP, No matter where you are, you still can control your home light with APP as long as there’s WiFi/2G/3G/4G internet for your smart phone.
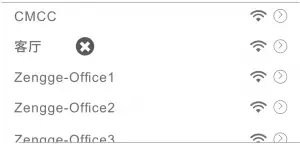
- Note: After the controller is bound to home WIFI, it will not display on your WIFI list anymore.
FAQ
- Why can’t my smart phone find the Wi-Fi signal of controller?
Please check if the controller has been connected with router or not, at the same time the Wi-Fi function of phone works properly. - Why can’t the controller connect with router?
Firstly, please ensure to input the correct Wi-Fi password.
If the password is correct and the controller still fails to connect with router, please shut down the controller and router, then turn on the router and the controller 30 seconds later. And wait for 2 minutes before you start the APP.
If the problem cannot solved after the above operations, please restore factory defaults. - Why doesn’t the controller show in the APP after choose the Wi-Fi signal of the controller in the phone setting?
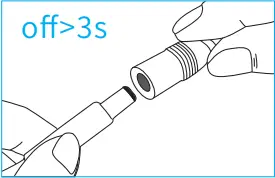
Please refresh the APP device list by sliding down on the screen. If still not find the controller, please try to shut down the function of smart Internet selection of your smart phone settings. This is to avoid automatically exit the controller signal connection because of the unavailable network. - How to reset the controller?
Reset the WiFi controller by plug and unplug connector repeatly for 4 times, wait for 1-3 seconds each time you plug/unplug the connector. (Please refer to the diagram in APP HELPS for more details)
light off


light strobe
-17-
Please pay attention when adding device:
- Make sure that the device is powered on and working.
- Ensure that the equipment is in the state of waiting to be connected.
- Make sure the controller, smart phone & router are closed together.
- Ensure that the phone can be connected with the router.
- Ensure that you have entered the correct password to your router.
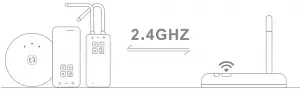
- Make sure the device is connected to the 2.4GHZ Wi-Fi band and is broadcasting. Besides, the router cannot be set to hidden.
-18-
- Make sure that the encryption of router setting is WPA2-PSK and the type of certification is AES or both are set to automatic. Wireless mode cannot be 11n only.

- Make sure that the Wi-Fi name consist of English letters.
- If the router accesses devices number reach the limit, try to shut down the Wi-Fi function of some devices and clear the channel in order to reconfigure.
-19-
- If the router opens wireless MAC address filter, try to remove the device out of router MAC filter list and make sure the router does not forbidden networking of device.

ATTENTIONS
- Please use the product in a dry environment.
- Please use the input voltage at 5-28V DC voltage, must not connect into 220VAC directly.
- The product is requested common anode connection. The wrong connection will cause a malfunction.
How to contact us?
Customer Service Email: [email protected] ; [email protected]
ALITOVE shop on Amazon: www.amazon.com/shops/alitove
ALITOVE official website: www.alitove.net
Scan these QR codes, you can:


Visit ALITOVE shop on amazon Ask a question

Visit ALITOVE website
-20-


