HOVER-1 H1 electric scooter User Manual

WARNING
PLEASE READ THE USER MANUAL THOROUGHLY.
Failure to follow the basic instructions and safety precautions listed in the user manual can lead to damage to your device, other property damage, serious bodily injury, and even death. Thank you for purchasing the Hover-1 H 1 Electric Scooter. Please read all instructions carefully before using and retain this manual for future use and reference. This manual applies to the Hover-1 H 1 Scooter.
- In order to avoid dangers that are caused by collisions, falls, and loss of control, please learn how to ride the Hl safely.
- You can learn operating skills by reading the product manual and watching videos.
- This manual includes all operating instructions and precautions, and users must read it carefully and follow the instructions.
- All users are responsible for any consequences caused by violating warning contents or prompt operations. Hover-1 can not be held liable.
ATTENTION
- Use only the supplied charger with this scooter.
Charger Manufacturer: SHENZHEN FUYUANDIAN POWER CO LTD Model: FY-4202000 - The operating temperature range of the charger is 50° F-77° F (10-25° C).
- The operating temperature range of the Hover-1 is 32-113° F (0-45° C).
- Do not ride on icy or slippery surfaces.
- Read the user manual and warning labels before riding.
- Store the H 1 in a dry, ventilated environment.
- When transporting the H 1, avoid violent crashes or impacts.
LOW-TEMPERATURE WARNING
Low temperature will affect the lubrication of moving parts inside the Hl scooter, increasing internal resistance. At the same time, in low temperatures, the discharge capacity and the capacity itself of the battery will be significantly decreased. Use caution when riding the H 1 in cold temperatures (below 40 degrees F). Operating in low temperatures may increase the risk of mechanical failures of the scooter, which may lead to damage to your device, other property damage, serious bodily injury, and even death.
SAFETY INSTRUCTIONS
- Keep the device away from heat sources, direct sunlight, humidity, and prolonged exposure to water.
- Do not operate the device if it has been exposed to water, moisture or any other liquids to prevent electric shock, explosion and/or injury to yourself and damage to the device.
- Do not use the device if it has been dropped or damaged in any way.
- Repairs to electrical equipment should only be performed by a qualified electrician. Improper repairs may place the user at serious risk.
- Do not puncture or harm the exterior surface of the product in any way.
- Keep the device free from dust, lint, etc.
- Do not use this device for anything other than its intended use or purpose. Doing so may damage the device.
- This product is not a toy. Keep out of reach of children.
- Do not expose batteries, battery packs, or batteries installed to excessive heat, such as direct sunlight, or open flame.
- Do not allow hands, feet, hair, body parts, clothing or similar articles to come in contact with moving parts, wheels or drivetrain, while the engine is running.
- Do not operate, or allow others to operate, the Hover-1, until the user understands all instructions, warnings, and safety features described in this manual.
- Check with your doctor if you have a medical condition that could affect your ability to use the H 1
- Persons with head, back or neck ailments or prior surgeries to those areas of the body should not use the H 1 .
- Persons with any mental or physical conditions that may make them susceptible to injury or impair their physical or mental capabilities to recognize, understand and perform all of the safety instructions and to be able to assume the hazards inherent in unit use, should not use the H 1.
NOTES:
In this manual, the above symbol with the word “NOTES” indicates instructions or relevant facts the user should remember prior to using the device.
CAUTION!
In this manual, the above symbol with the word “CAUTION” indicates a hazardous situation that, if not avoided, can cause minor or moderate injury.
WARNING!
In this manual, the above symbol with the word “WARNING” indicates a hazardous situation that, if not avoided, can cause death or serious injury.
SERIAL NUMBER
Please keep your serial number on file for warranty claims as well as proof of purchase. Your serial number can be found at the base of your H 1 scooter above the holographic UL sticker.
INTRODUCTION
The Hover-1 H 1 is a personal transporter. Our technology and production processes are developed with strict testing for each Hover-1 scooter. Riding without following the contents of this manual may lead to damage to your device, or may cause bodily injury. This manual is designed to give you the information you need for the safe operation and maintenance of your H 1. Please read it thoroughly before riding your H 1.
PACKAGE CONTENTS
- Hover-1 H 1 Electric Scooter
- 3-pin Charge Cable
- Operation Manual (22.04 lb / 10 kg)

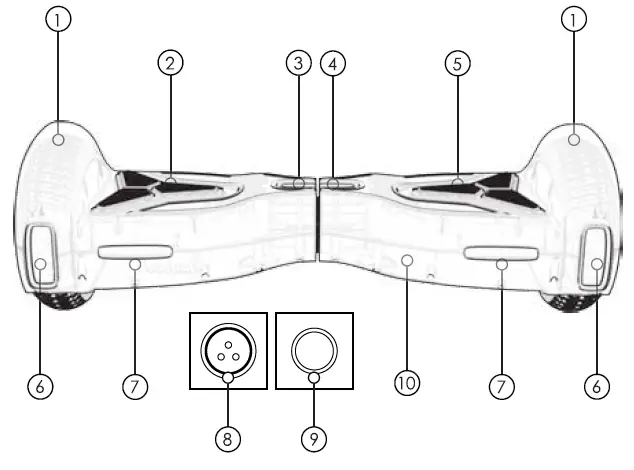
FEATURES/PARTS
- Fender
- Left Foot Mat
- LED Status Indicator
- Power/Battery Indicator
- Right Foot Mat
- Path Illuminating Lights
- LED Light
- Charge Port (Located in rear)
- Power Button (Located in rear)
- Protective Chassis Casing
OPERATING PRINCIPALS
The device uses digital electronic gyroscopes and acceleration sensors to control balance and motion, depending on the user’s center of gravity. The device also uses a control system to drive the motors that are located within the wheels. The device has a built-in inertia dynamic stabilization system that can help assist with balance when moving forward and backward, but not while turning. TIP – To increase your stability, you must shift your weight in order to overcome the centrifugal force during turns, especially when entering a turn at higher speeds.
WARNING
Any H 1 scooter that does not work properly can cause you to lose control and fall. Inspect the entire device thoroughly before every ride, and do not ride it until any problems have been corrected.
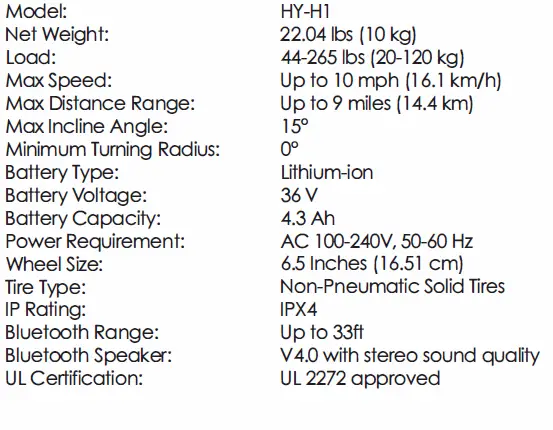
SPECIFICATIONS 
CONTROLS AND DISPLAY
PLEASE READ THE FOLLOWING INSTRUCTIONS CAREFULLY
TURNING YOUR DEVICE ON/OFF
Power On: Take your device out of the box and place it flat on a level surface. Press the power button (located on the rear of your device) once. Check the battery LED indicator (located in the center of your device). The battery indicator light should be lit, indicating the device is powered on. Power Off: Press the power button once.
MAT SENSOR
There are four sensors under the foot mats on your H 1 scooter. When the user steps off the scooter mats, it will automatically initiate self-calibration. When riding the scooter, you must ensure you are stepping on the foot mats. Do not step or stand on any other area of your scooter. Do not put items on the foot mats. Doing so will make the H 1 turn on, and increase the probability of collision and cause injury to people, riders, or damage the device.
BATTERY INDICATOR
The display board is located in the middle of the H 1 scooter.
- A Green LED light indicates the device is charged above 50 percent.
- Yellow LED light indicates the power is under 50 percent.
- The Red LED light indicates the power is down to 20 percent or lower.
When the LED light turns red, please recharge the device.
STATUS INDICATOR
When the operator triggers the foot mats, the LED Status Indicator will light up, which indicates that the Hover-1 is now ready for use. When the system has an error during operation, the status LED light will turn red (for more details see SAFETY ALERTS).
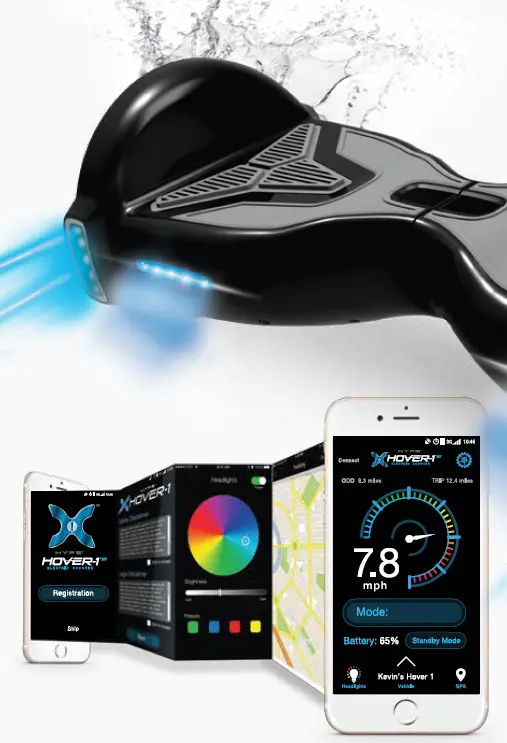
SMARTPHONE APP
Your H 1 is an App-enabled scooter that works with most mobile devices. You must download the Hover-1 opp in order to change certain features of your H 1 such as headlight colors and skill mode. Please download the App from either the App Store or download the App from the Google Play Store.
USING THE APP
Launch the app from your device, you will be directed to the intro page. You may register your Hl by pressing the “Registration”. You may continue to the dashboard by pressing “Skip”. Please note, we encourage you to register your H 1 scooter. For this purpose, the intro page will continue to show every time the App is launched if registration has not been completed. Once registration is completed, the App will open directly to the dashboard.
REGISTRATION
Complete the form by entering your information to register your H 1 . Fields marked with a “*” are required fields and the form cannot be submitted without this information. Once you submit the registration form, the safety, legal, and privacy disclaimers will need to be reviewed and accepted before moving on to the dashboard. Once accepted, press “Next.”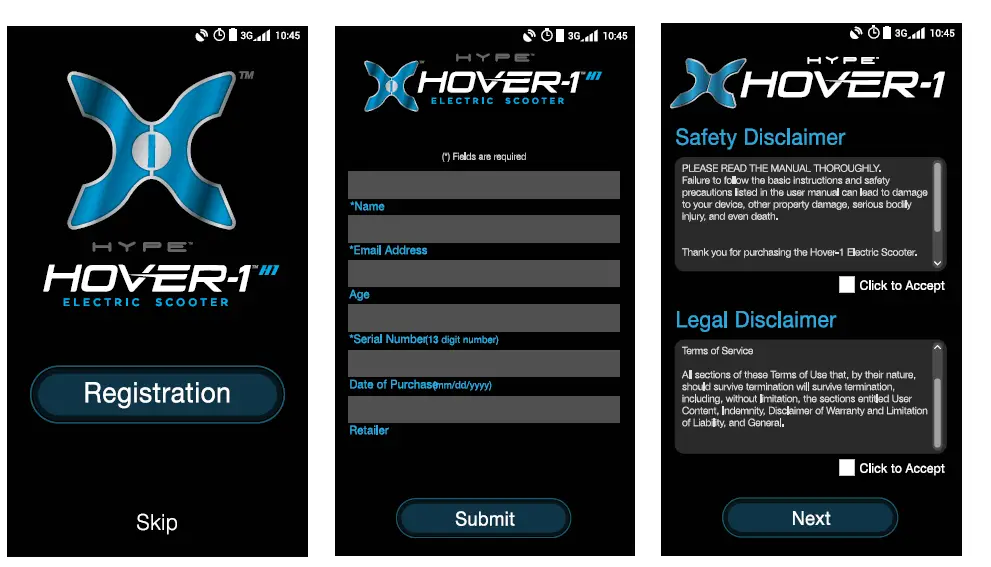
DASHBOARD
Before allowing you to access the dashboard, a safety screen will pop up for 3 seconds. Please review the safety notes in this screen while the dashboard loads. The dashboard will appear as shown below.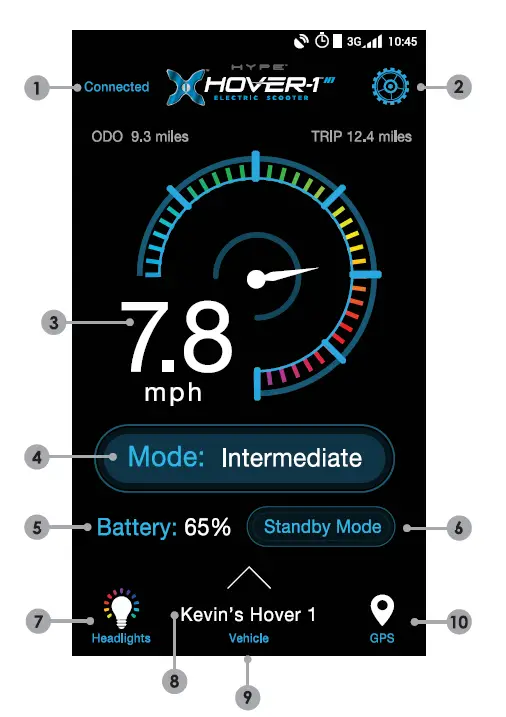

- . Connect Your H 1 – To connect to your H 1 through Bluetooth on your smartphone, press “Connect”. If your H 1 is already paired, this part of the screen will show “Connected” in blue.
- Settings – Press the gear icon to adjust settings.
- Speed – The digital speedometer displays your speed in miles per hour.
- Change Mode -Change safety/skill levels and Hl sensitivity.
- Battery – The percentage displays the remaining battery life of your Hl.
- Standby Mode – Put your H 1 into a low-power mode when not in use.
- Customize Headlights -Change the colors and brightness of your Path Illuminating Lights.
- Vehicle – Displays the name assigned to your H 1.
- Vehicle Info – Swipe up from the bottom of your screen to display more information about your H 1 in real time.
- GPS Tracking – View GPS & tracking to see where you have ridden your H 1 and display your real-time location.
CONNECT
Press “Connect” to have the App begin scanning for any Hover-1 devices. Your Hl must be powered on and your smartphone’s Bluetooth must be enabled. If your Bluetooth is not enabled on your smartphone, the App will remind you to enable it. Once the scanning is complete, all detected Hover-1 scooters will display in a list. Press the select button to pair with a scooter and use the PIN “000000”. If multiple Hover-1 scooters appear, continue attempting to pair until your H-1 is paired. Once paired, the dashboard will display “Connected” in blue. You may now begin using the App with your H 1 .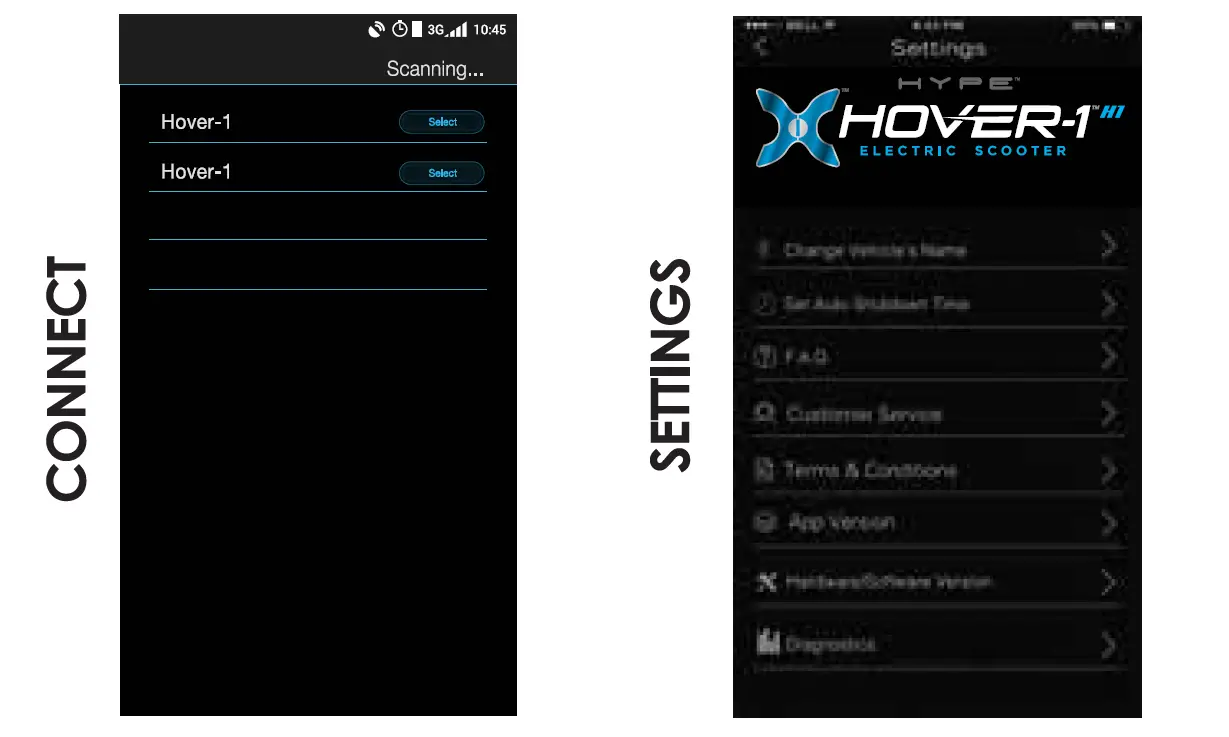
SETTINGS
Press the gear icon to change the settings for your H 1.
- Change Vehicle’s Name – Customize the name for your H 1 here. This name change will reflect in the dashboard and connect pages.
- Set Auto Shutdown Time – This setting allows you to set a time for your H 1 to shut down automatically.
- F.A.Q. – Frequently asked questions and answers are shown here such as basic instructions and troubleshooting.
- Customer Service – View contact information for the Hover-1 customer service team.
- Terms & Conditions – Safety, legal and privacy disclaimers are here for reference.
- App Version – Display the current App version and check for any updates.
- Hardware/Software Version – Display the hardware and software versions of your H 1 . These fields will only appear when connected to your H 1 scooter.
- Diagnostics – Run a diagnostic check on your H 1 and stay informed of any hardware, software and electrical issues that may need to be addressed.
SKILL/SAFETY MODES
Cycle between 3 different skill modes. Each mode has a different top speed and sensitivity. The mode will only change if you are not using your H 1 scooter.
- Beginner Mode – This mode is recommended for first-time Hover-1 scooter users. In this mode, the sensitivity and top speed are very low.
- Intermediate Mode – This mode is recommended for users that are comfortable using Hover-1 scooters but are not ready for full speed and extra sensitive controls. In this mode, the sensitivity and top speed are moderate.
- Expert Mode – This mode is recommended for everyday Hover-1 scooter users. In this mode, the sensitivity and top speed are set to the maximum setting.


NOTE: Skill and safety modes must be selected. The Hover-1 will default to “Beginner” mode if another mode is not selected.
STANDBY MODE
“Standby Mode” allows you to put your Hl into a low-power standby state. Your Hl cannot be used while in standby. You must disable standby mode before you can ride the H 1. When in standby mode, the button will say “Power On”. Press “Power On” to disable the standby mode. Please note, if you have your “Auto Shutdown Time” set, your Hl will turn off completely at the specified time. You will be unable to power it back on from the App. You will have to physically press the power button on your H 1 to turn it back on.
HEADLIGHTS
Press “Headlights” to set a custom color and brightness for your Hl’s Path Illumination Lights. Simply choose your desired color from the color wheel. Slide the “Brightness” bar to adjust brightness. For your convenience, 4 basic colors have also been set as presets below the brightness bar.
GPS
Press “GPS” to open a navigation screen that pinpoints your exact location. From the moment you press “Start”, it begins recording your travel route. Once you press “Finish”, your route is saved in the App. Press the bar icon, in the top right corner of your screen, to view all saved travel routes. By selecting one of the saved routes, you can view the details. Press ” … ” to share or delete the route.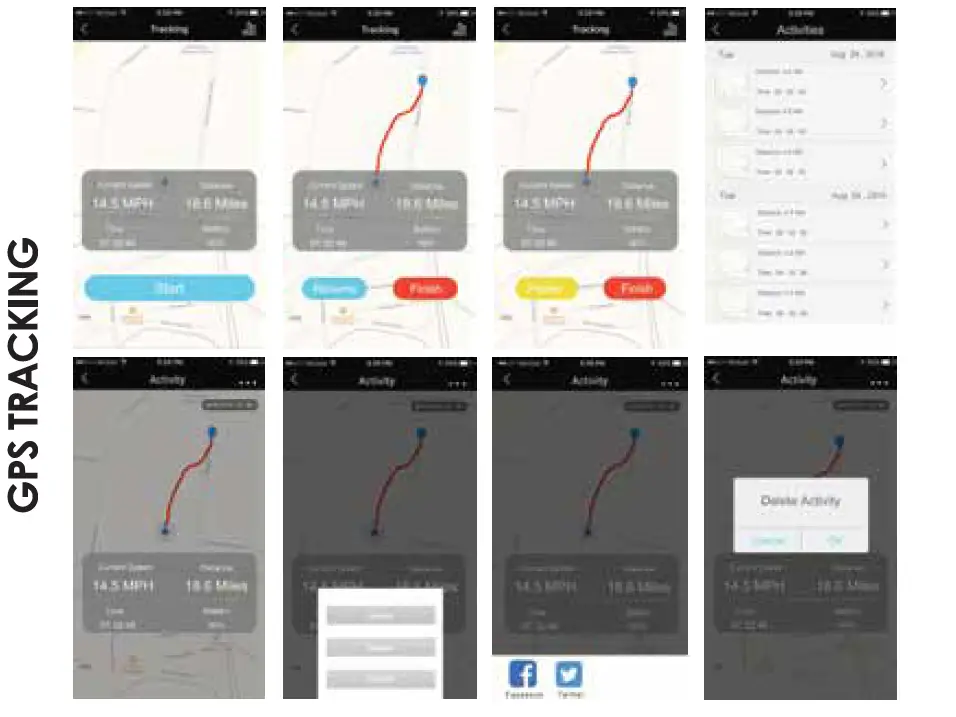
BLUETOOTH SPEAKER
The H 1 has a powerful built-in wireless speaker so you can play your music while riding.
PAIRING THE SPEAKER
- Ensure your H 1 is turned off. If it is not, please turn off your Hover-1 first before pairing.
- Turn on your Hl and the speakers will announce that it’s waiting for a Bluetooth® connection. This will indicate your H 1 speaker is now in pairing mode.
- Place the Hl and the Bluetooth® device to which you would like to pair it within the operating distance. We recommend keeping the two devices no further than 3 feet apart during pairing.
- Ensure Bluetooth® is enabled on your phone or music device. Refer to the manufacturer’s instructions for how to enable Bluetooth® on your device.
- Once you have activated Bluetooth® on your device, select the option “HY-Hl-Speaker” from the list of available Bluetooth® devices.
- If required, enter the PIN code “000000” and confirm the entry.
- Please note, the pairing mode on the Hover-1 will last for two minutes. If no devices are paired after two minutes, the H 1 speaker will automatically return to standby mode.
- If pairing is unsuccessful, turn off the H 1 first and re-pair following the aforementioned steps.
NOTE: Once you have paired the H 1 speaker with a device, the speaker will remember this device and will pair automatically when the device’s Bluetooth® is activated and in range. You do not need to re-pair any previously connected devices.
Your H 1 can pair up to two multi-point devices. You can reconnect a previously paired device without going through the pairing or PIN process on up to two devices.
LISTENING TO MUSIC
Once the H 1 Bluetooth speaker is paired to your device, you can stream music wirelessly through it. Only one speaker will play music as the other speaker is strictly for safety alerts from your Hover-1. Select the track you wish to listen to on your device to listen via the speakers. All volume and track controls will be made using your music device. Should you encounter any problems while streaming, please refer to your device’s user manual.
IPX4 WATER RESISTANCE
Ideal for both indoor and outdoor use, the H 1 scooter features a water-resistant, weatherized case that protects its components from splashing water. This ensures that the high-quality tech within the H 1 is protected while riding around outdoors & indoors and getting caught in the rain.
NOTE: The H 1 scooter should not be subject to prolonged exposure to water or submerged. Doing so will damage your H 1 scooter and invalidate the manufacturer’s warranty.
BEFORE RIDING
It is important that you fully understand all elements of your H 1 scooter. If these elements are not used correctly, you will not have full control of your H 1. Before you ride or ride outside of a controlled environment, learn the functions of the various mechanisms on your scooter. Practice using these elements of your H 1 at slower speeds in a flat, open area before taking the device out in public areas.
PRE-RIDE CHECKLIST
Ensure that your H 1 scooter is in proper working order each and every time you ride. If a part of the scooter does not function correctly, please contact our Customer Support Center.
WARNING
Any H 1 that does not work properly can cause you to lose control and fall. Do not ride an H 1 scooter with a part that is damaged; replace the damaged part before riding.
- Ensure the battery is fully charged before riding your scooter.
- If the H 1 is not to be used for an extended period of time, please recharge the battery every 2 months to maintain the battery life.
- Ensure that the screws on the front and back tires are locked firmly before each ride.
- Please wear all appropriate safety and protective gear as previously mentioned in the User Manual before operating your device.
- Make sure to wear comfortable clothes and flat closed-toe shoes when operating your device.
- Please carefully read the User Manual, which will assist in explaining the basic working principles and provide tips on how to best enjoy your experience.
SAFETY PRECAUTIONS
The first rule in safe riding is to use common sense. A scooter is vulnerable; it cannot protect you in a crash, against impact, or loss of control the way driving a car can. It does not have bumpers or airbags as a car does. This section is a guide of safe riding practices for on and off-road operations. Make sure you are using your H 1 scooter properly. Different localities and countries have different laws governing riding on public roads, and you should check with local officials to ensure you are complying with these laws. Hover-1 is not liable for tickets or violations given to riders who do not follow these regulations.
- For your safety, always wear a helmet that meets CPSC or CE safety standards. In the event of an accident, a helmet can protect you from serious injury and in some cases, even death.
- Obey all local traffic laws. Obey red and green lights, one-way streets, stop signs, pedestrian crosswalks, etc.
- Ride with the traffic, not against it.
- Ride defensively; expect the unexpected.
- Give pedestrians the right of way.
- Do not ride too close to pedestrians and alert them if you intend to pass them from behind.
- Slow down at all street intersections and look to the left and right before crossing.
Your Hover-1 is not equipped with reflectors. It is not recommended that you ride your bike in conditions of low visibility. If you are riding your scooter in low-visibility conditions, ensure your LED lights are turned on, and that you are wearing bright, reflective clothing.
WARNING
When you ride in low-visibility conditions such as fog, dusk, or night, you might be difficult to see, which could lead to a collision. In addition to keeping your headlight on, wear bright, reflective clothing when riding in poor lighting conditions. Think about safety when you ride. You can prevent many accidents if you think about safety. Below is a helpful checklist for Compact riders.
SAFETY CHECKLIST
- Do not ride “double” with more than one rider on the scooter.
- Avoid riding in large groups, as this can force you to ride too close to other riders, making it difficult to see other vehicles and road hazards.
- Do not ride above your skill level. Ensure you have had enough practice with all functions and features of your Hover-1.
- Do not ride too fast — with increased speed comes increased risk. If you are moving at a higher speed, small bumps can turn into large impacts, leading to a higher risk of injury if an accident occurs.
- Do not ride your scooter with any pets.
- Before stepping on your device, make sure it is placed flat on level ground, the power is on, and the Running Indicator light is green. Do not step on if the Running Indicator is red.
- Do not try to open or modify your device, as doing so, voids the manufacturer’s warranty, and may cause failure to your device leading to serious bodily injury or death.
- Do not use the device to place yourself or anyone else and their property in danger.
- If you and your friend(s) are riding Hl scooters together, be sure to keep a safe distance between each other to prevent collisions, property damage, serious injuries or even death.
- Be sure to keep you feet on the pedals at all times. Moving your feet off your device while driving is dangerous.
- Do not operate the device while under the influence of drugs and/or alcohol.
- Do not operate the device when you are restless or sleepy.
- Use your best judgment to keep yourself out of dangerous situations with your device.
- Do not ride your device off of curbs, or ramps, or attempt to operate in a skate park, empty pool, or in any way similar to a skateboard or scooter. The H 1 IS NOT A SKATEBOARD.
- Do not continuously spin in place, it will cause dizziness and increases risk of injury.
- Do not abuse your device, doing so can damage your unit and cause failure to the operating system leading to injury.
- Do not ride in or near puddles of water, mud, sand, stones, gravel, or debris or near rough and rugged terrain.
- The device can be used on paved roads that are flat and even. If you encounter uneven pavement, please lift your Hover-1 over and past the obstruction.
- Do not ride in inclement weather: snow, rain, hail, sleek, on icy roads, or in extreme heat.
- Do not ride in or near pools or other large bodies of water.
- Bend your knees when riding on bumpy or uneven pavement to absorb the shock and vibration and help you keep your balance.
- If you are unsure if you can safely ride on a specific terrain, step off and carry your device. ALWAYS BE ON THE SIDE OF CAUTION.
- Do not attempt to ride over bumps or objects greater than ½ inch even when prepared and bending your knees.
- PAY ATTENTION – look at where you are riding and be conscious of the road conditions, people, places, property and objects around you.
- Do not operate the device in crowded areas.
- Operate your device with extreme caution when indoors, especially around people, property, and narrow spaces.
- Do not operate the device while talking, texting, or looking at your phone.
- Do not ride your device where it is not permitted.
- Do not ride your device near motor vehicles or on public roads.
- Do not climb or travel down steep hills or up steep hills with your device.
- The device is intended for use by a single individual, DO NOT attempt to operate the device with two or more people.
- Do not carry anything while riding the device.
- Individuals with a lack of balance should not attempt to operate the device.
- Pregnant women should not operate the device.
- Young children and the elderly should not operate the device without proper instruction and supervision.
- At higher speeds, always take into consideration longer stopping distances.
- Do not step forward off of your device.
- Do not attempt to jump on or off your device.
- Do not attempt any stunts or tricks with your device.
- Do not ride the device in dark or poorly lit areas.
- Do not ride the device near or over potholes, cracks or uneven pavement or surfaces.
- Do not operate your device off-road.
- Keep in mind that you are 4.5 inches (11.43 cm) taller when operating the device. Make sure to go through doorways safely.
- Do not turn sharply, especially at high speeds.
- Do not exceed the maximum or minimum weight limits.
- Do not step on the fenders of the device.
- Avoid driving the device in unsafe places, including near areas with flammable gas, steam, liquid, dust, and fiber, which could cause fire and explosion accidents.
RIDING YOUR Hl
FAILURE TO FOLLOW ANY OF THE FOLLOWING SAFETY PRECAUTIONS CAN AND MAY LEAD TO DAMAGE TO YOUR DEVICE, VOID YOUR MANUFACTURER’S WARRANTY, LEAD TO PROPERTY DAMAGE, CAUSE SERIOUS BODILY INJURY, AND CAN LEAD TO DEATH. Before using your device, be sure to familiarize yourself with the operating procedures.
OPERATING YOUR DEVICE
Make sure the device is fully charged before your initial use. For charging instructions, please follow the details under CHARGING YOUR DEVICE. Stand directly behind your device and place one foot on the corresponding foot mat (as described in the diagram below). Keep your weight on the foot which is still on the ground, otherwise, the device may begin to move, making it difficult to step on evenly with your other foot. When you are ready, shift your weight to the foot already placed on the device and step on with your second foot quickly and evenly (as described in the diagram below).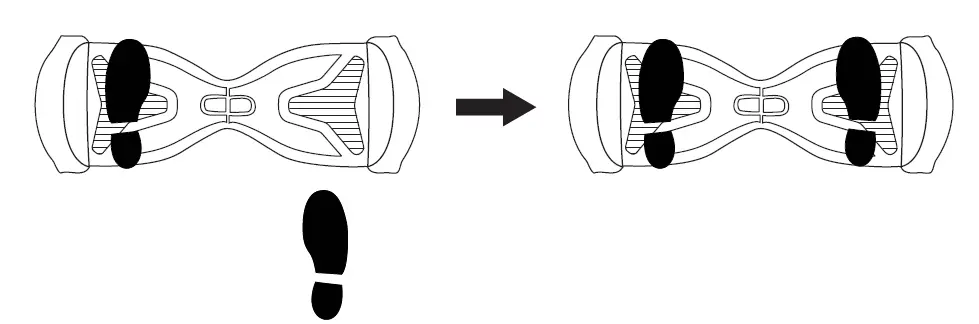
NOTES:
Stay relaxed and step on quickly, confidently, and evenly. Imagine climbing stairs, one foot, then the other. Look up once your feet are even. Find your center of gravity. If your weight is distributed correctly on the foot mats and your center of gravity is level, you should be able to stand on your device just as if you were standing on the ground. On average, it takes 3-5 minutes just to get comfortable standing on your device and maintaining proper balance. Having a spotter will help you feel more secure. The Hover-1 is an incredibly intuitive device; it senses even the slightest bit of motion, so having any anxiety or reservation about stepping on may cause you to panic and trigger unwanted movement. When you first begin using your device, the fastest way to move in your desired direction is to focus in that direction. You will notice that just thinking about which way you would like to go will shift your center of gravity, and that subtle movement will propel you in that direction.
Your center of gravity determines which direction you move, accelerate, decelerate, and come to a complete stop. As described in the diagram below, tilt your center of gravity in the direction you wish to move. To turn, focus on the direction you wish to turn and stay relaxed.
WARNING
Do not tum sharply or at high speeds to avoid danger. Do not turn or ride quickly along slopes, as it may cause injury. As you get comfortable on the device, you will notice it becomes easier to maneuver. Remember at higher speeds, it is necessary to shift your weight to overcome the centrifugal force. For bumps or uneven roads, bend your knees.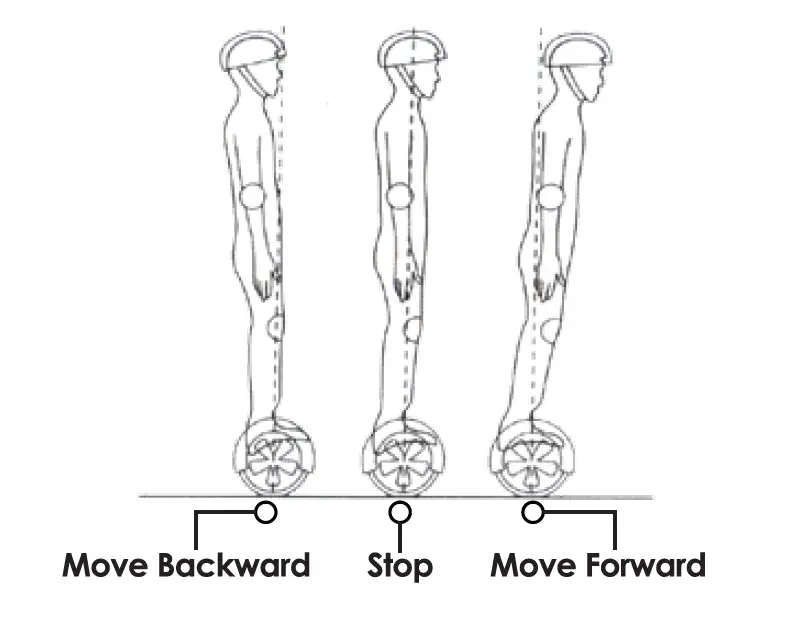
NOTES:
Try staying relaxed and focus on finding your center of gravity to maintain full control of your H 1 scooter. Dismounting your device can be one of the easiest steps, yet when done incorrectly, may cause you to fall. To properly dismount, from a stopped position, lift one leg up and set your foot back down on the ground (STEPPING BACK). Then step off completely as described in the following diagram.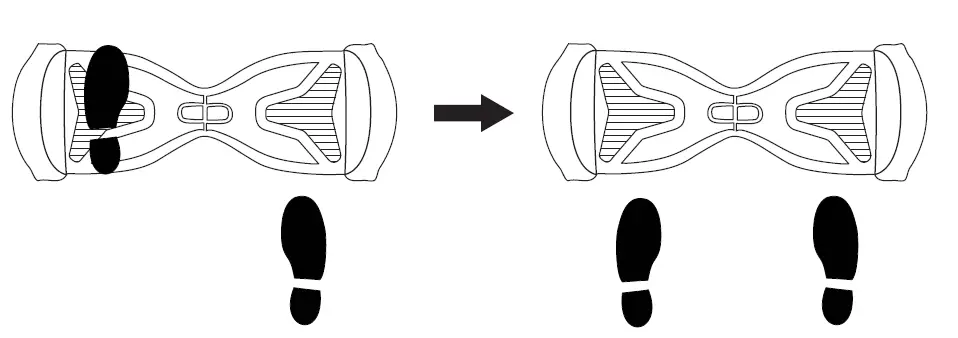
Speed and weight limits are set for your own safety. Please do not exceed the limits listed here in the manual.
- Maximum Weight: 264 lbs
- Minimum Weight: 44 lbs
- Maximum Speed: 10 mph
NOTES:
To prevent injury, when max speed is reached, the H 1 will beep to alert the user and tilt the rider slowly back.
OPERATING RANGE
Please notice the H 1 can travel a distance up to 9 miles on a fully charged battery in ideal conditions. The following are some of the major factors that will affect the operating range of your device.
- Terrain: Driving distance is highest when riding on a smooth, flat surface. Riding uphill and/or on rough terrain will reduce distance significantly.
- Weight: A lighter user will have further range than a heavier user.
- Ambient temperature: Please ride and store the device under recommended temperatures, which will increase driving distance; battery life, and overall performance of your device.
- Speed and Driving Style: Maintaining a moderate and consistent speed while riding produces maximum distance. Traveling at high speeds for extended periods, frequent starts and stops, idling and frequent acceleration or deceleration will decrease the overall distance.
BALANCE & CALIBRATION
If your Hover-1 is unbalanced, vibrating, or not turning properly, you can follow the below steps to calibrate it.
- In order for the balance calibration system to work properly, please place the scooter on a flat, horizontal surface.
- Press and hold the ON/OFF button for a total of 15 seconds. The scooter will turn on, lighting the battery indicator on the board.
- Next, the lights will flash. The board will then announce “calibration successful” at which point you can release the ON/OFF button.
- Turn the board off and then turn the board back on. Calibration will now be completed.
SAFETY ALERTS
While riding your H 1 scooter, if there is a system error or improper operation performed, the device will prompt the user in a variety of ways. You will notice the Running Indicator Light will turn RED and you will hear a beep sound alerting you to take precautions and cease operation. The following are common occurrences where you will hear the Safety Alerts. These notices should not be ignored, but appropriate action should be taken to correct any illegal operation, failure or errors.
- Unsafe riding surfaces {uneven, too steep, unsafe, etc.)
- When you step on the device if the platform is tilted more than 10 degrees forward or backward.
- The battery voltage is too low.
- The device is still charging.
- During operation, the platform self-initiates to tilt due to excess speed.
- Overheating, or motor temperature is too high.
- The device has been rocking back and forth for over 30 seconds.
- If the system enters protection mode, the alarm indicator will light up and the board will vibrate. This typically occurs when the battery is about to run out of power.
- If the platform is tilted forward or backward more than 15 degrees, the device will power off and stop suddenly, possibly causing the rider to lose balance or fall off.
- If any or both tires are blocked, the device will stop after 2 seconds.
- When the battery level has depleted below protection mode, the device engine will power off and stop after 15 seconds.
- While sustaining a high discharge current during use (such as driving up a steep slope for a long period of time), the device engine will power off after 15 seconds.
WARNING
When the H 1 turns off during a Safety Alert, all operating systems will halt. Do not continue attempting to ride the H 1 when the system initiates a stop. Turn your Hover-1 off and back on to unlock it from a Safety Lock.
CHARGING YOUR Hl
CHARGING THE DEVICE
- Ensure that the charging port is clean and dry.
- Make sure that there is no dust, debris or dirt inside the port.
- Plug the charger into a grounded wall outlet.
- Connect the cable to the power supply ( 1 OOV ~ 240V; 50, 60 Hz).
- Ensure the light on the charger is lit GREEN.
- Align and connect the 3-pin charging cable to the charging port of the H-1. DO NOT FORCE THE CHARGER INTO THE CHARGE PORT, AS THIS MAY CAUSE THE PRONGS TO
- BREAK OFF OR PERMANENT DAMAGE TO THE CHARGE PORT. Broken prongs and/or damage to the charge port, are not covered by warranty.
- The charging indicator light should change to RED, indicating that your device is now being charged.
- When the RED indicator light on your charger turns to GREEN, then your device is fully charged.
- A full charge may take up to 2 hours.
- After fully charging your H 1, unplug the charger from your device and from the power outlet.
BATTERY CARE/ MAINTENANCE
- BATTERY SPECIFICATIONS
- Battery Type: Rechargeable lithium-ion battery
- Charge Time: Up to 2 hours
- Voltage: 36V
- Initial Capacity: 4.3 AH
- Working Temperature: 32°F – 113°F
- Charging Temperature: 50°F – 77°F
- Storage Time: 1 year
- Storage Temperature: -4°F – 77°F
- Storage Humidity: 5%-95%
BATTERY MAINTENANCE
- The lithium-ion battery is built into the device. Do not disassemble the device to remove the battery or attempt to separate it from the device.
- When charging the device, please use the enclosed 3-pin charging cable or otherwise ensure that the battery charging conditions are met.
- Do not connect or attach the device or the battery to a power supply plug or directly to a car’s cigarette lighter.
- Do not place the device or batteries near a fire, or in direct sunlight. Heating the device and/or the battery can cause additional heating, breaking, or ignition of the battery inside the device.
- Do not continue charging the battery if it does not recharge within the specified charging time. Doing so may cause the battery to become hot, rupture, or ignite.
- To preserve natural resources, please recycle or dispose of batteries properly. This product contains lithium-ion batteries. Local, state, or federal laws may prohibit the disposal of lithium-ion batteries in ordinary trash. Consult your local waste authority for information regarding available recycling and/or disposal options.
WARNING
- Failure to follow the safety precautions listed below could lead to serious bodily injury and/or death.
- Do not attempt to modify, change, or replace your battery.
- Do not use your device if the battery begins to emit odor, overheat, or begins to leak.
- Do not touch any leaking materials or breathe fumes emitted.
- Do not allow children and animals to touch the battery.
- The battery contains dangerous substances, do not open the battery or insert anything into the battery.
- Use only the charger supplied by Hover-1.
- Do not attempt to charge the device if the battery has discharged or emits any substances. In that case, immediately distance yourself from the battery in case of fire or explosion.
- Lithium-ion batteries are considered to be hazardous materials. Please follow all local, state, and federal laws in regard to recycling, handling, and disposing of Lithium-ion batteries.
WARNING
SEEK IMMEDIATE MEDICAL ASSISTANCE IF YOU ARE EXPOSED TO ANY SUBSTANCE THAT IS EMITTED FROM THE BATTERY.
FCC STATEMENT
This device complies with part 15 of the FCC Rules. Operation is subject to the following two conditions: ( 1 ) This device may not cause harmful interference, and (2) this device must accept any interference received, including interference that may cause undesired operation. Please note that changes or modifications not expressly approved by the party responsible for compliance could void the user’s authority to operate the equipment.
FCC INSTRUCTIONS FOR A CLASS B DIGITAL DEVICE OR PERIPHERAL
Note: This equipment has been tested and found to comply with the limits for a Class B digital device, pursuant to part 15 of the FCC Rules. These limits are designed to provide reasonable protection against harmful interference in a residential installation. This equipment generates, uses, and can radiate radio frequency energy and, if not installed and used in accordance with the instructions, may cause harmful interference to radio communications. However, there is no guarantee that interference will not occur in a particular installation. If this equipment does cause harmful interference to radio or television reception, which can be determined by turning the equipment off and on, the user is encouraged to try to correct the interference by one or more of the following measures:
- Reorient or relocate the receiving antenna.
- Increase the separation between the equipment and the receiver.
- Connect the equipment to an outlet on a circuit different from that to which the receiver is connected.
- Consult the dealer or an experienced radio/TV technician for help.
CARE & MAINTENANCE
- Do not expose the device to liquid, moisture, or humidity to avoid damage to the product’s internal circuitry.
- Do not use abrasive cleaning solvents to clean the device.
- Do not expose the device to extremely high or low temperatures as this will shorten the life of the electronic device, destroy the battery, and/or distort certain plastic parts.
- Do not dispose of the device in fire as it may explode or combust.
- Do not expose the device to contact with sharp objects as this will cause scratches and damage.
- Do not let the device fall from high places, as doing so may damage the internal circuitry.
- Do not attempt to disassemble the device.
WARNING
Avoid using water or other liquids for cleaning. If water or other liquids enter H 1, it will cause permanent damage to the internal components.
WARNING
Users who disassemble the H 1 scooter without permission will void the warranty.
WARRANTY
This product comes with a 30-day limited replacement warranty for manufacturer’s defects. This includes defects to the motor, gyroscopic sensor battery, etc. This product comes with 120-day parts and labor warranty. Shipping & handling costs are not included. The condition of this warranty and our responsibilities under this warranty are as follows: The manufacturer’s warranty is non-transferable. And this warranty is limited to the original purchaser only.
- You must be able to prove the date of the original purchase of the device with a dated receipt.
- Warranty applies to the purchase date, not the date of first use.
- The warranty is not applicable if the product has been subject to physical abuse, improper installation, modification or repair by an unauthorized third party.
- The responsibility of manufacturer shall be limited to the repair or replacement of the product at its sole discretion.
- Specifically exempt from any warranty are limited-life consumable components subject to normal wear and tear such as tires.
- The manufacturer will not take any responsibility if the failure of the unit has resulted from accident, abuse, misuse, or any unauthorized repair, modification or disassembly.
- Modification and repair of the device should be done by authorized and qualified service personnel or returned to the manufacturer.
- This warranty gives you specific legal rights, and you may also have other rights which vary under local laws.
- The following conditions comprise the requirements and scope of our warranty conditions and do not affect our legal and contractual warranty obligations.
We offer a warranty on our products in accordance with the following conditions:
- The warranty does not cover over-charging, or damages due to improperly maintaining the lithium-ion battery installed in the unit. The warranty does not cover tires and other parts, which are considered consumables, parts that break easily such as glass or plastic or defects based on normal wear and tear. There is no warranty obligation in the event of marginal differences compared to the target appearance and workmanship provided these have a negligible effect on the product’s fitness for use, in the event of damage caused by chemical or electrochemical effects, by water or generally from abnormal conditions.
- The warranty will be performed in such a way that we shall decide whether to repair the defective parts or to replace them with working parts free of charge. Hover-1 reserves the right to exchange the product for a replacement product of equal value if the product sent in cannot be repaired within a reasonable time or at a reasonable cost. All repairs are performed at a Hover-1 facility. Parts that have been replaced or exchanged become the property of Hover-1.
- The warranty claim does not apply if repairs or other work is carried out by unauthorized persons or if our products are equipped with additional parts or accessories that are not approved for our product.
- Warranties that have been activated do not cause the warranty period to be extended, nor do they trigger a new warranty period. The warranty period for any replacement parts installed ends with the warranty period for the entire product.
- Any other further claims are excluded, especially those for replacement due to damage caused to the outside of the product, provided there is no obligatory legal liability.
We, therefore, accept no liability for accidental, indirect or other consequential damage of any kind, which leads to usage restrictions, data loss, and loss of earnings or interruption to business.
Asserting a warranty claim:
- To make use of the warranty service for hardware issues, you must contact the Hover-1 Service Center by visiting www.Hover-1.com or emailing [email protected]
- Hover-1 will try to diagnose and solve your problem. If it is determined that a warranty claim exists, you will be given an RMA number (Return Material Authorization) and will be asked to send the product to Hover-1.
- IMPORTANT: Hover-1 will only accept parcels that have an RMA number. Please observe the following when sending the product:
- Send the product suitably packaged with carriage and insurance paid. Use only a carrier and service that provides tracking.
- The charger MUST be included.
- Mark the RMA number on the outside of the package in such a way that is visible and clearly legible.
- You must enclose a copy of the sales slip as proof of purchase.
- Once Hover-1 has received the product, it will meet its warranty obligations in accordance with the warranty conditions and will return the product to the sender. Outbound return shipping will be paid by Hover-1.
SERVICE OUTSIDE OF THE WARRANTY
Hover-1 can refuse any service claim made that is not covered by the warranty. Please contact [email protected] for pricing and availability of repairs, outside of warranty. If Hover-1 agrees to provide a service outside the warranty, the customer will be invoiced for all repair and transport costs. Hover-1 will not accept any packages that have not first been approved by Hover-1 by means of an RMA )Return Material Authorization).
Contact us with questions at: [email protected] or www.Hover-1.com
Hover-1 Edison, NJ 08837 Affix Serial Number Label Here: