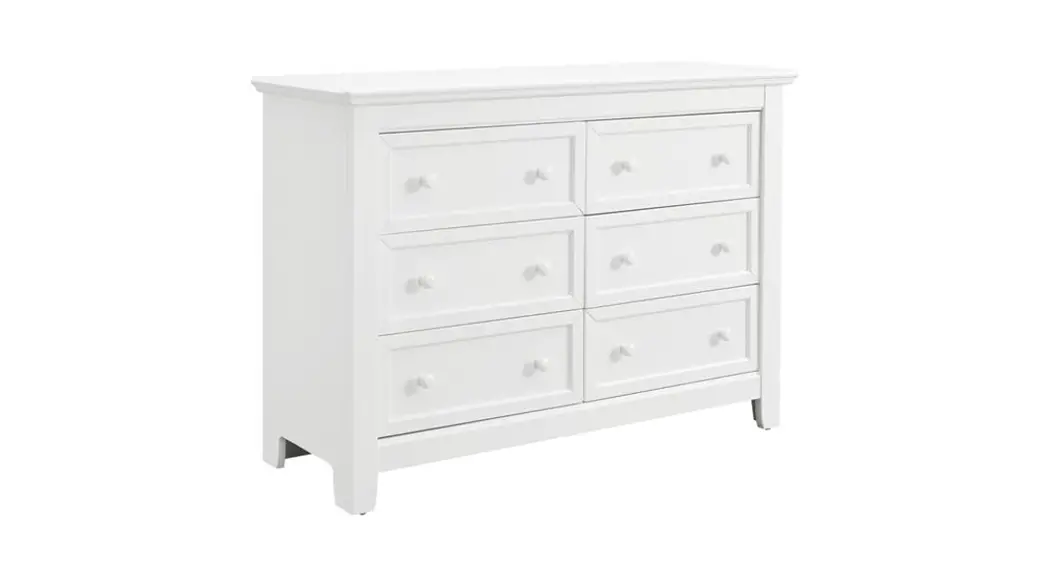
![]() 246479 6 Drawer Dresser
246479 6 Drawer Dresser
Instruction Manual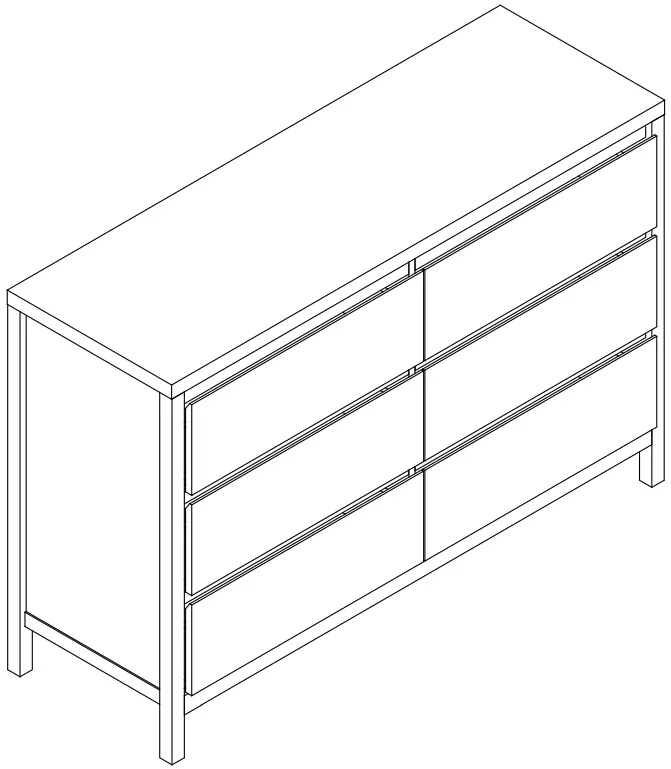 We stand behind we sell. If you are not satisfied with your purchase,
you can return it for a replacement or refund.
For any further question don’t hesitate to contact us.
Email: [email protected]
 Assembly Instruction
Read these instructions and follow steps carefully to ensure you assemble the product correctly and avoid damages. Check that all parts hardware have been provided before assembling the products. Place all contents on a clean, soft-flat surface to avoid scratching the product.
CAUTION:
Only tighten bolts to 80% at first. Once all parts have been assembled, fully tighten all hardware. To prevent damage to threads, do not use a power tool and do not over tighten bolts.
Use two people to lift and turn the product when assembling.
Do not attempt with only one person and do not roll on to legs. Keep all hardware and small parts away from children.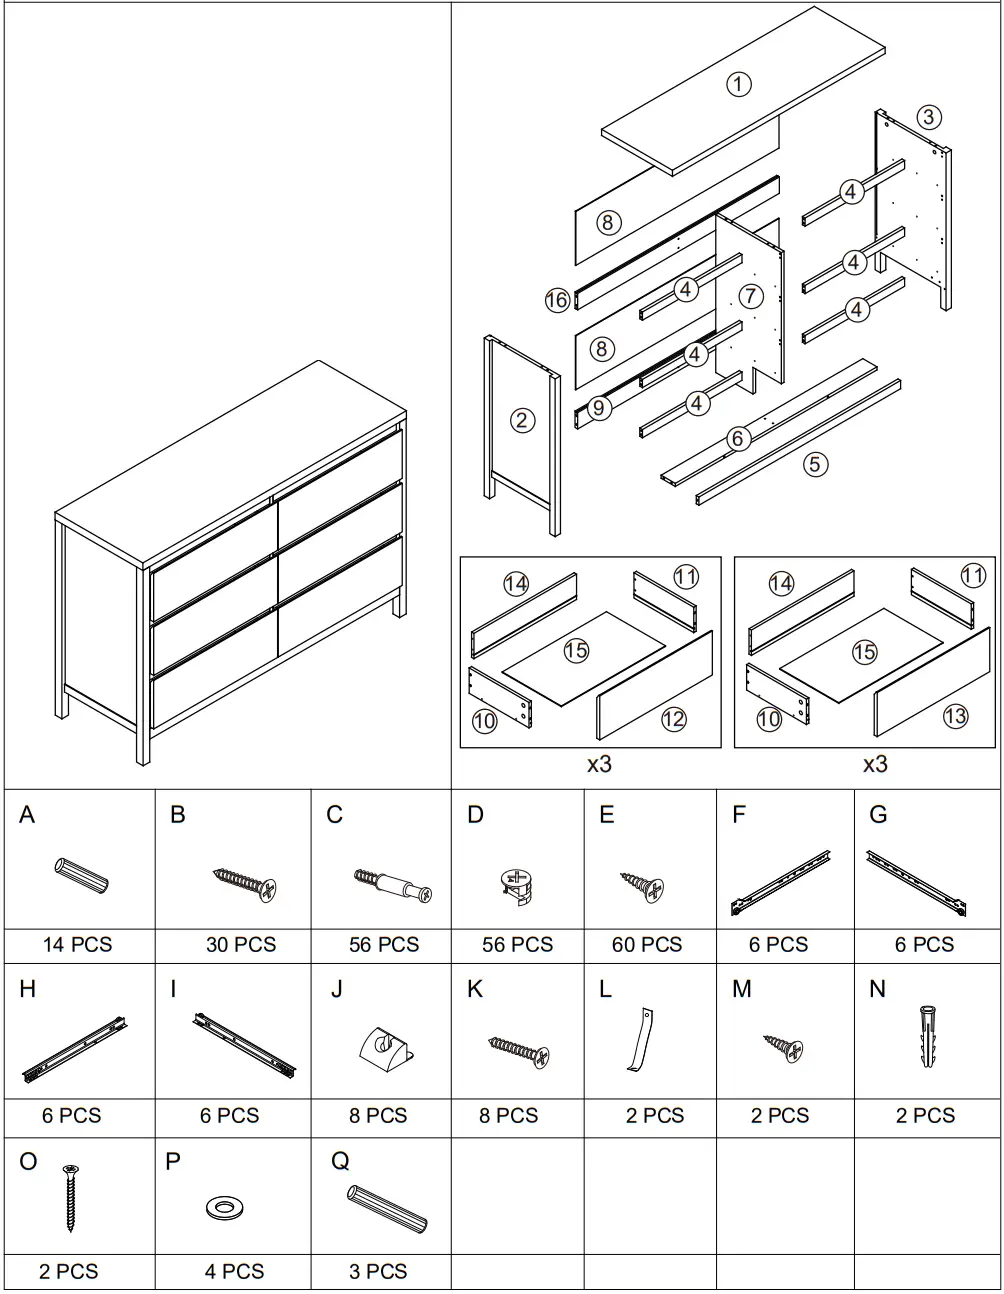 Step 1:
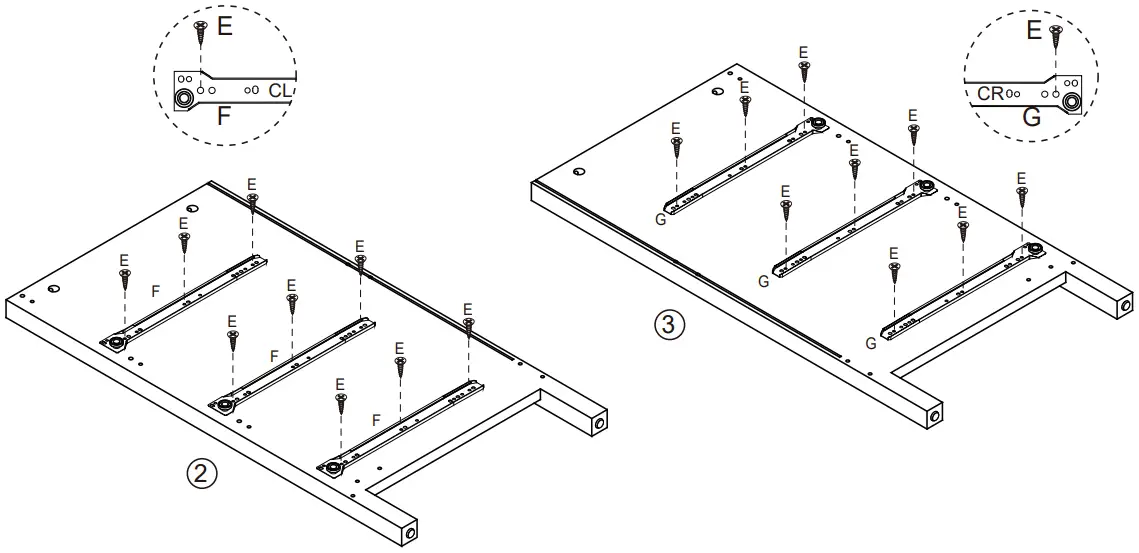 Attach 3 x CL & CR Runner Tracks (F,G) to Left & Right Side Panel (2 & 3) with 18 x Small Screws (E). Tighten with a Phillips Head Screwdriver.
Step 2: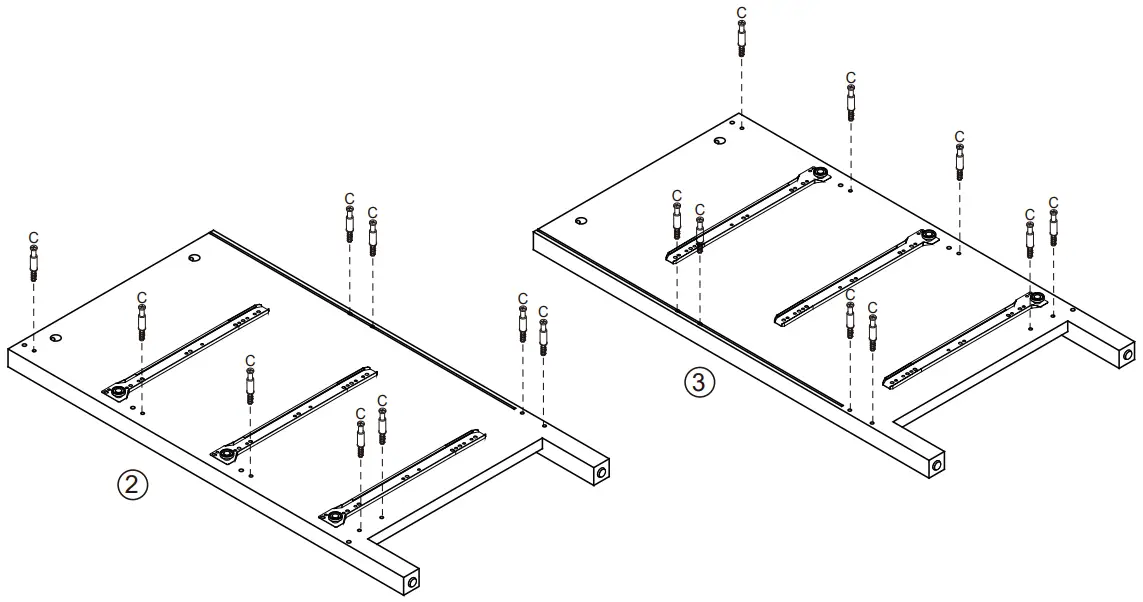 Attach 18 x Cam Bolts (C) to Left & Right Side Panel (2 & 3) as shown. Tighten with a Phillips Head Screwdriver.
Step 3: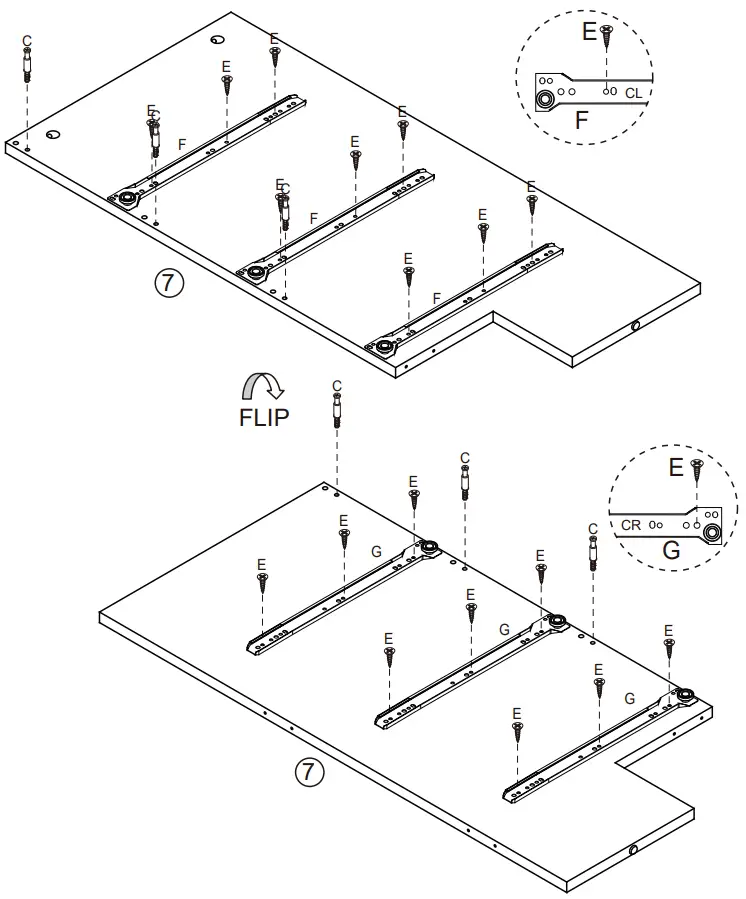 Attach 3 x CL & CR Runner Tracks (F,G) to Divider (7) with 18 x Small Screws (E) as shown.
Tighten with a Phillips Head Screwdriver. Attach 6 x Cam Bolts (C) to Divider (7) as shown.
Tighten with a Phillips Head Screwdriver.
Step 4: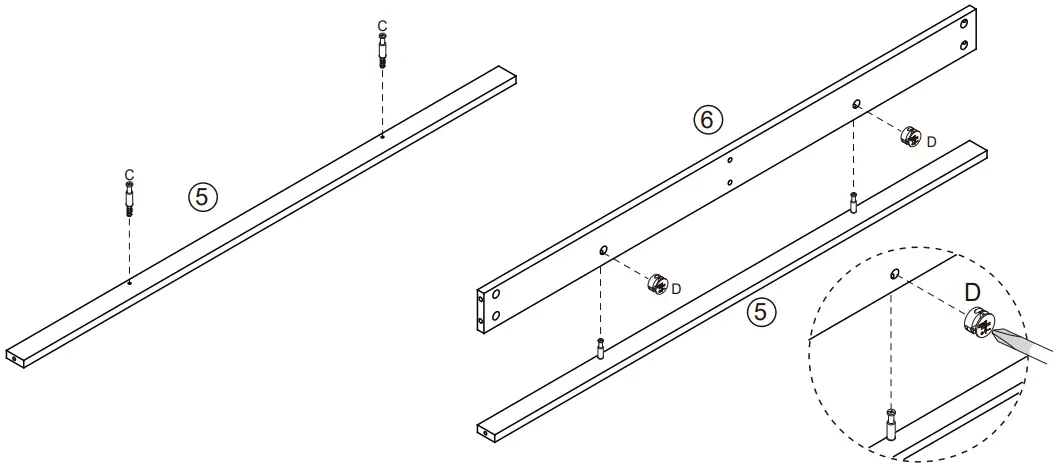 Attach 2 x Cam Bolts (C) to Rail (5) as shown. Tighten with a Phillips Head Screwdriver.
Insert 2 x Cam Nuts (D) into the holes of Rail (6). Rotate the cam nuts so the arrows point towards the incoming cam bolts. Push Rail (5) into place and tighten the cam nuts.
Step 5: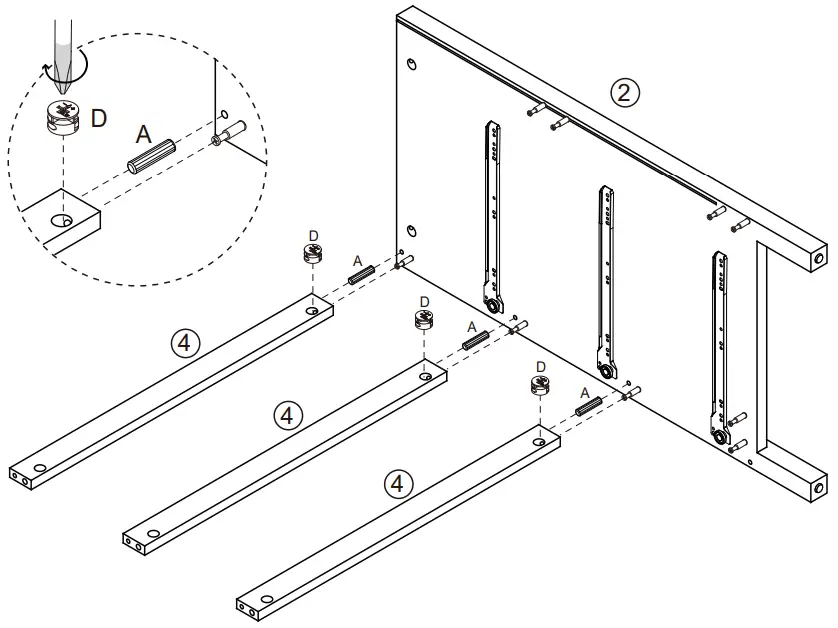 Insert 3 x Dowels (A) into Left Side Panel (2) as shwon. Insert 3 x Cam Nuts (D) into the holes of Rails (4). Rotate the cam nuts so the arrows point towards the incoming cam bolts.
Push Left Side Panel (2) into place and tighten the cam nuts.
Step 6: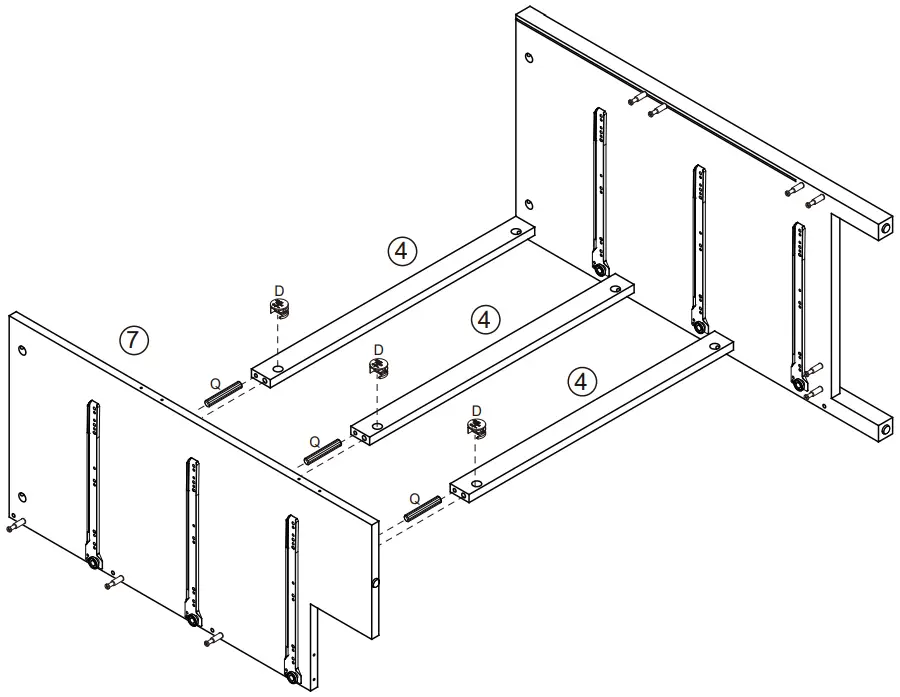 Insert 3 x Large Dowels (Q) into Rails (4) as shwon. Insert 3 x Cam Nuts (D) into the holes of Rails (4). Rotate the cam nuts so the arrows point towards the incoming cam bolts.
Push Divider (7) into place and tighten the cam nuts.
Step 7: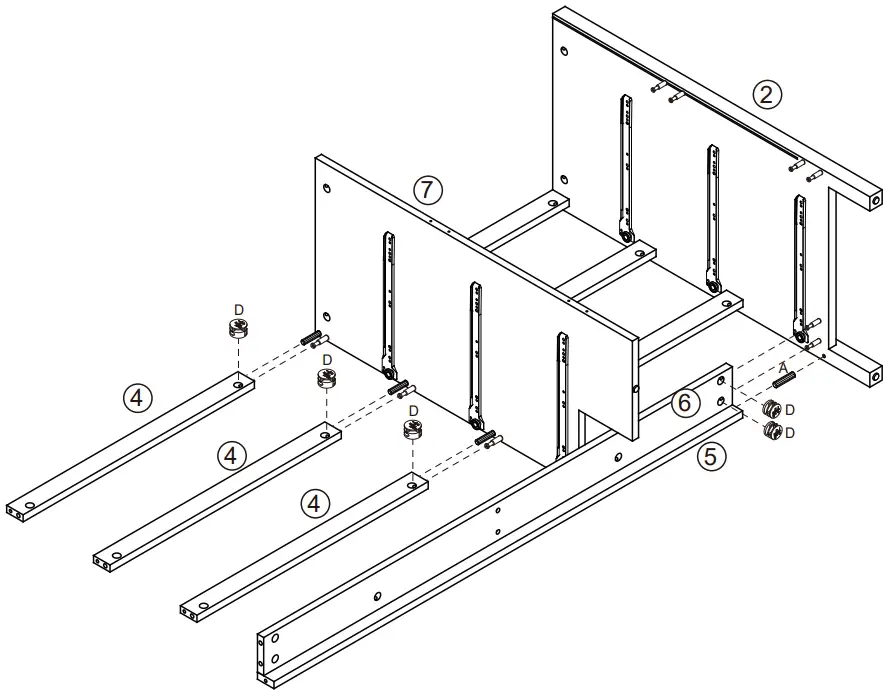 Insert 1 x dowel (A) to Left Side Panel (2). Insert 5 x Cam Nuts (D) into the holes of Rails (4, 6) as shown. Rotate the cam nuts so the arrows point towards the incoming cam bolts. Push Rails (4, 6) into place and tighten the cam nuts.
Step 8: Attach Rail (6) to Divider (7) with 2 x Screws (B) as shwon. Tightening with the Phillips Head Screwdriver.
Step 9: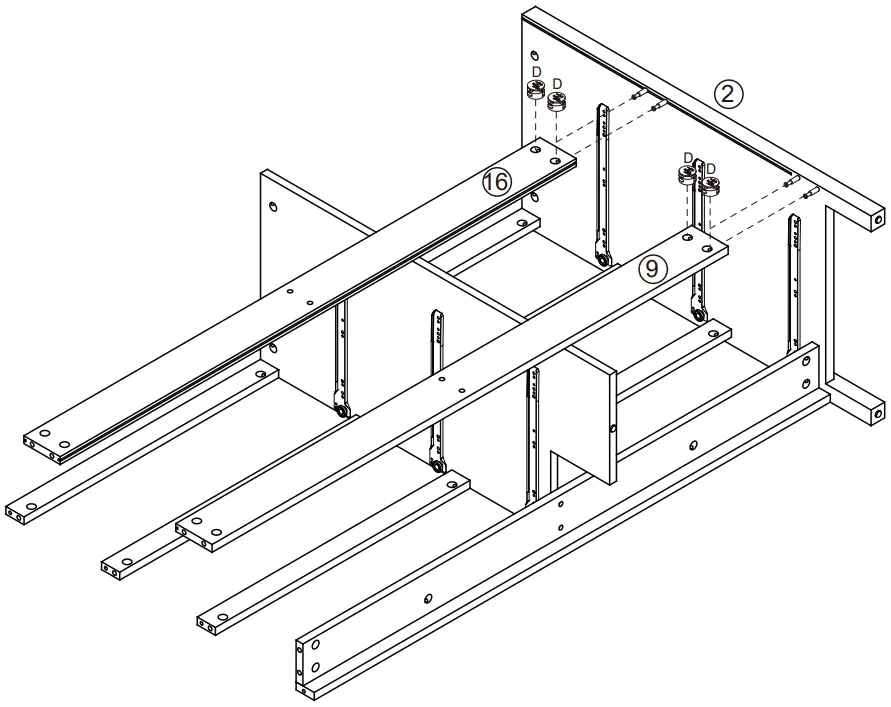 Insert 4 x Cam Nuts (D) into the holes of Rails (9, 16) as shown. Rotate the cam nuts so the arrows point towards the incoming cam bolts. Push Rails (9,19) into place and tighten the cam nuts.
Step 10: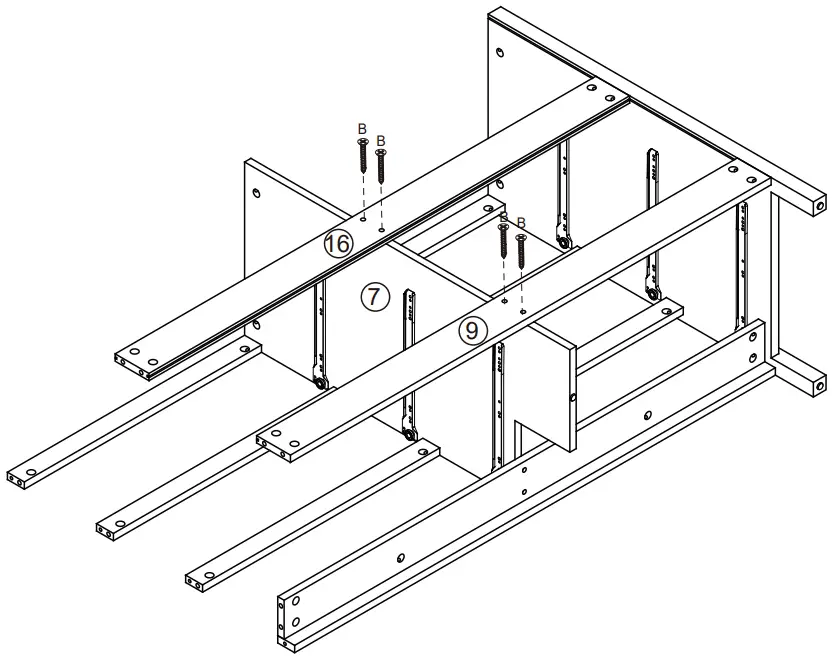 Attach Rails (9,16) to Divider (7) with 4 x Screws (B) as shwon. Tightening with the Phillips Head Screwdriver.
Step 11: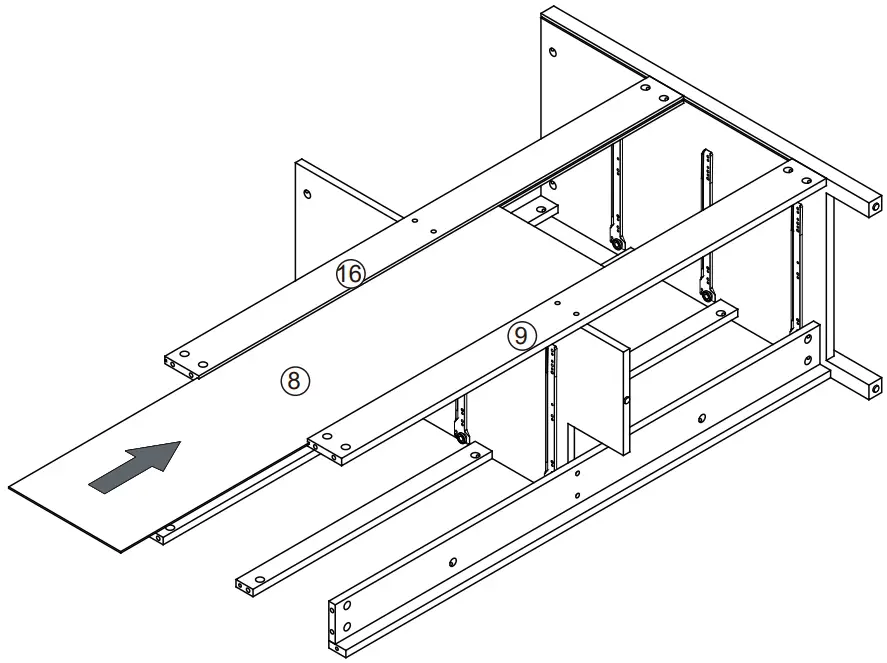 Slide Back Panel (8) into the grooves of Rais (9 & 16).
Step 12: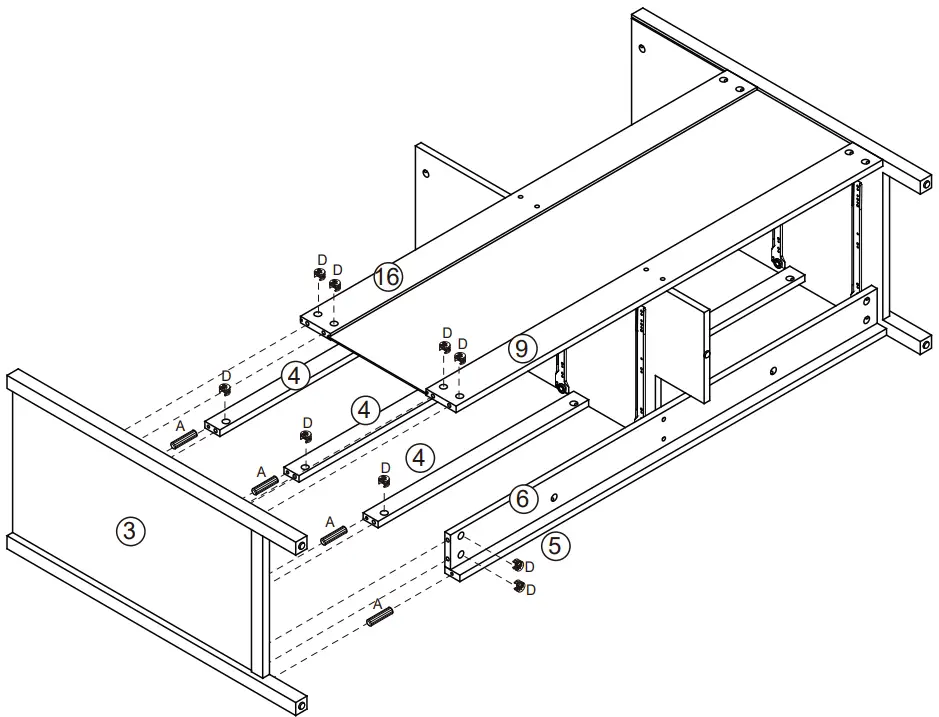 Insert 4 x Dowels (A) into Right Side Panel (3) as shwon. Insert 9 x Cam Nuts (D) into the holes of Rails (4, 6, 9, 16). Rotate the cam nuts so the arrows point towards the incoming cam bolts.
Push Right Side Panel (3) into place and tighten the cam nuts.
Step 13: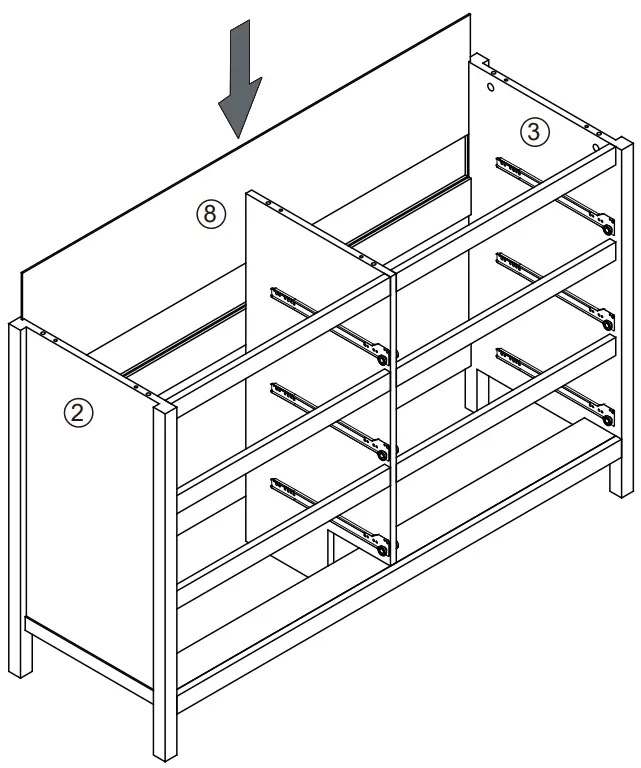 Slide Back Panel (8) into the grooves of Left & Right Side Panels (2 & 3).
Step 14: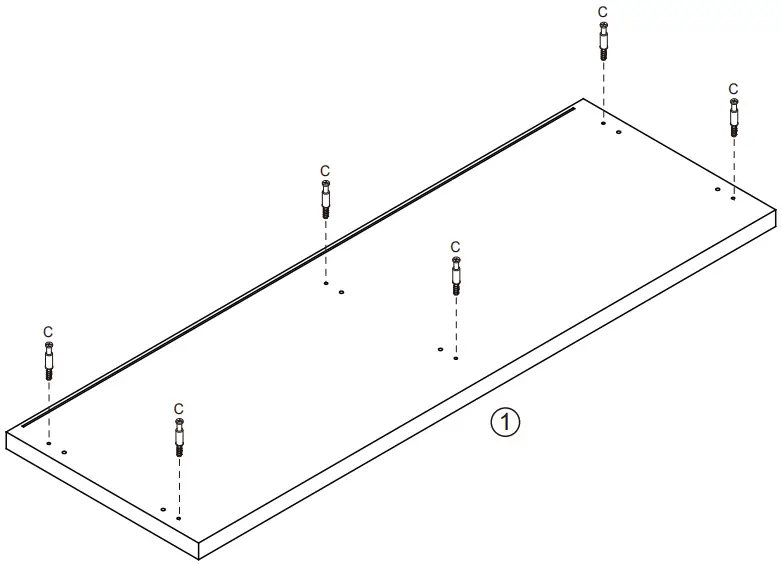 Attach 6 x Cam Bolts (C) to Top Panel (1) as shown. Tighten with a Phillips Head Screwdriver.
Step 15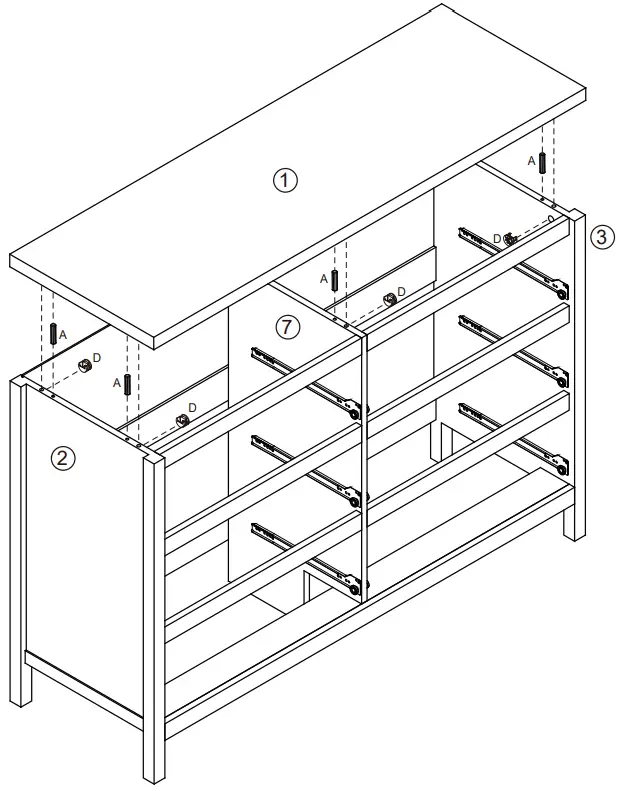 Insert 6 x Dowels (A) into Left & Right Side Panel (2 & 3) and Divider (7) as shwon.
Insert 6 x Cam Nuts (D) into the holes of Left & Right Side Panel (2 & 3) and Divider (7).
Rotate the cam nuts so the arrows point towards the incoming cam bolts. Push Top Panel (1) into place and tighten the cam nuts.
Step 16: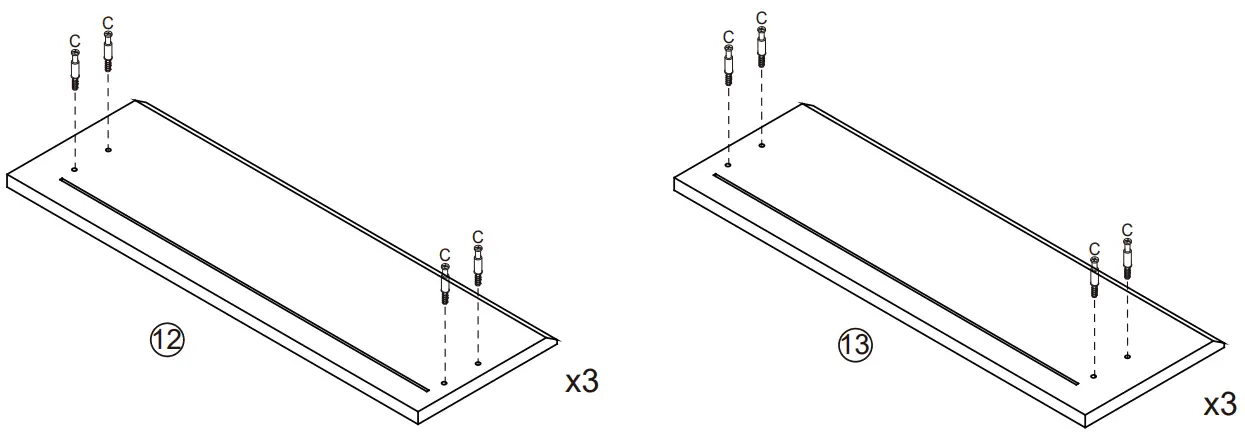 Attach 8 x Cam Bolts (C) to Drawer Fronts (12 & 13) as shown. Tighten with a Phillips Head Screwdriver.
Step 17: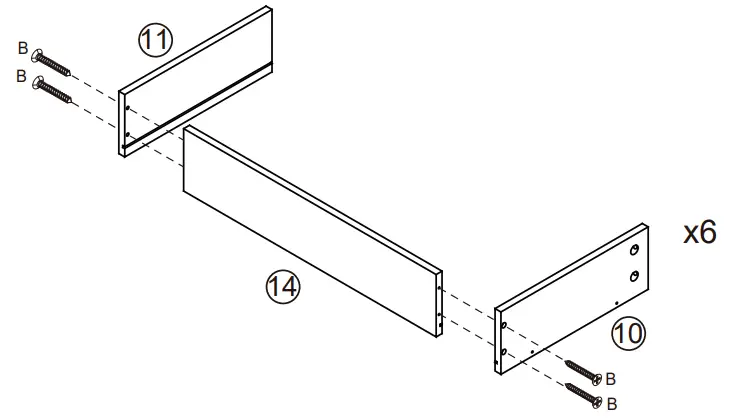 Attach Drawer Back (14) to Left & Right Drawer Sides (10 & 11) with 4 x Screws (B) by tightening with the Phillips Head Screwdriver.
Step 18: Slide Drawer Base (15) into the grooves of Left & Right Drawer Side (10 & 11).
Step 19: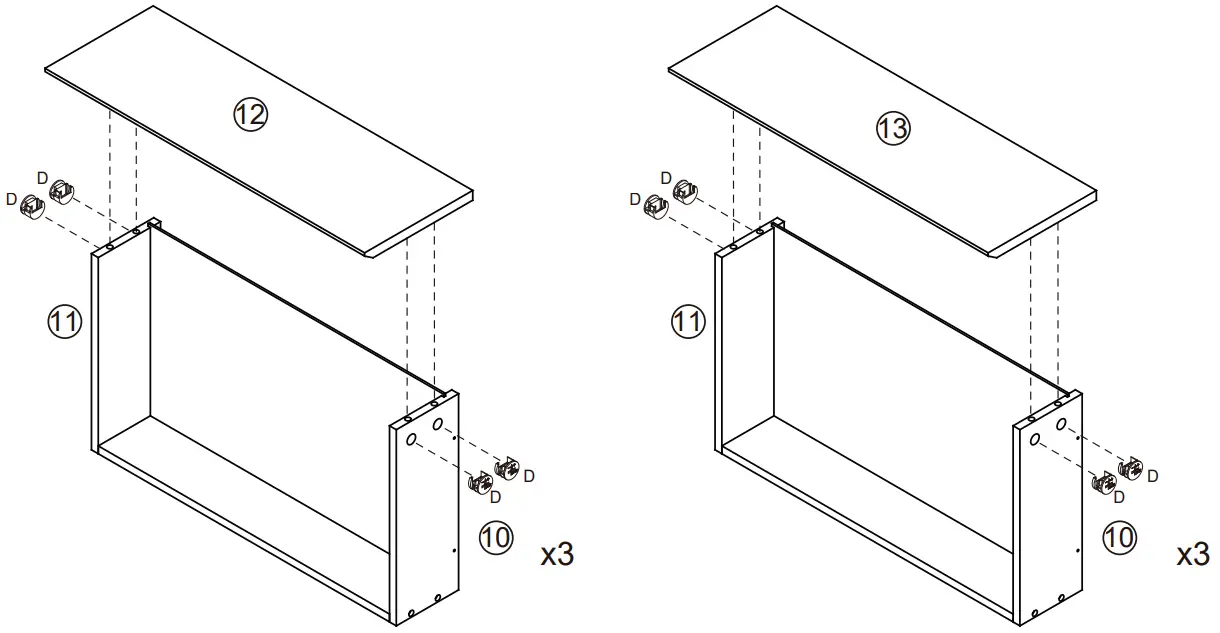 Insert 4 x Cam Nuts (D) into Left & Right Drawer Sides (10 & 11)as shown. Rotate the cam nuts so the arrows point towards the incoming cam bolts. Attach Drawer Fronts (12 & 13) to Left & Right Drawer Sides (10 & 11). Make sure that the groove lines up the whole way around the drawer. Tighten with a Phillips Head Screwdriver.
Step 20: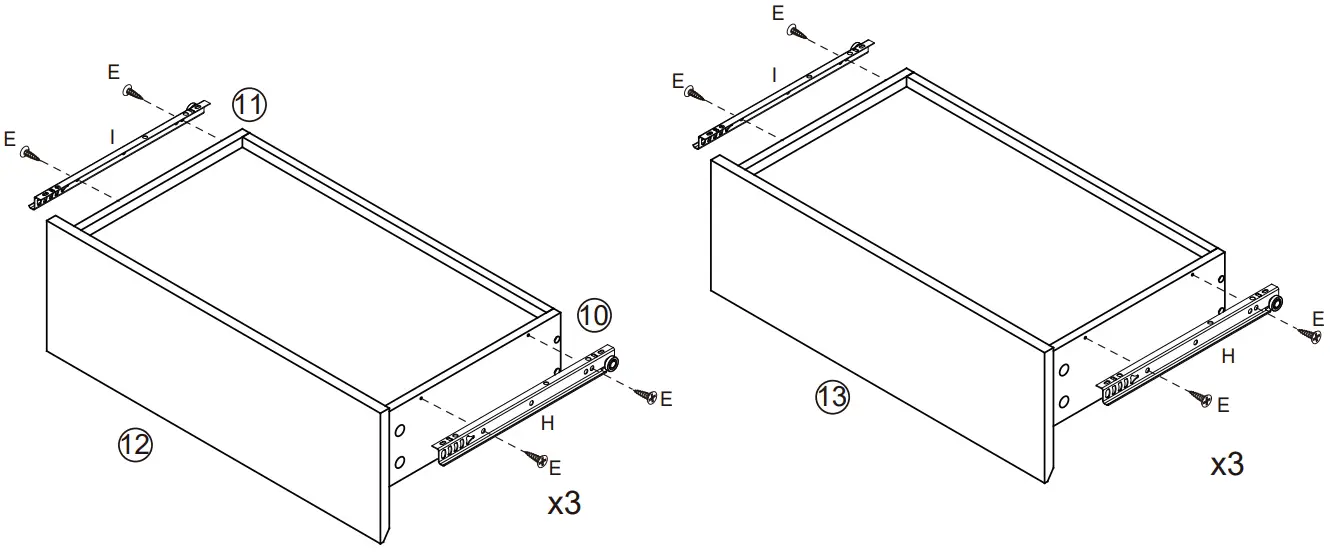 Attach 2 x DL Runners (H) to the bottom of Left Drawer Side (10) and 2 x DR Runners (I) to the bottom of Right Drawer Side (11) with 8 x Small Screws (E) by tightening with the Phillips Head Screwdriver.
Step 21: Carefully insert the drawers into the bedside table by gently guiding the runners into the tracks.
Step 22: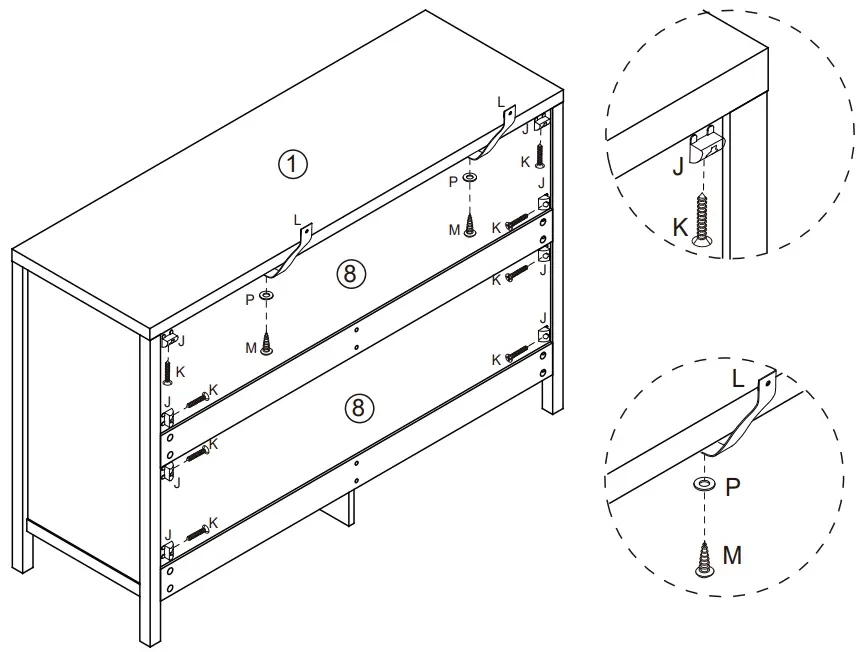 Secure Back Panels (8) in place with 8 x Wedges (J) using 8 x Screws (K). Attach 2x safety straps (L) to the top panel (1) of the back side of the unit as shown using 2x washers (P) and 2x screws (M).
Step 23: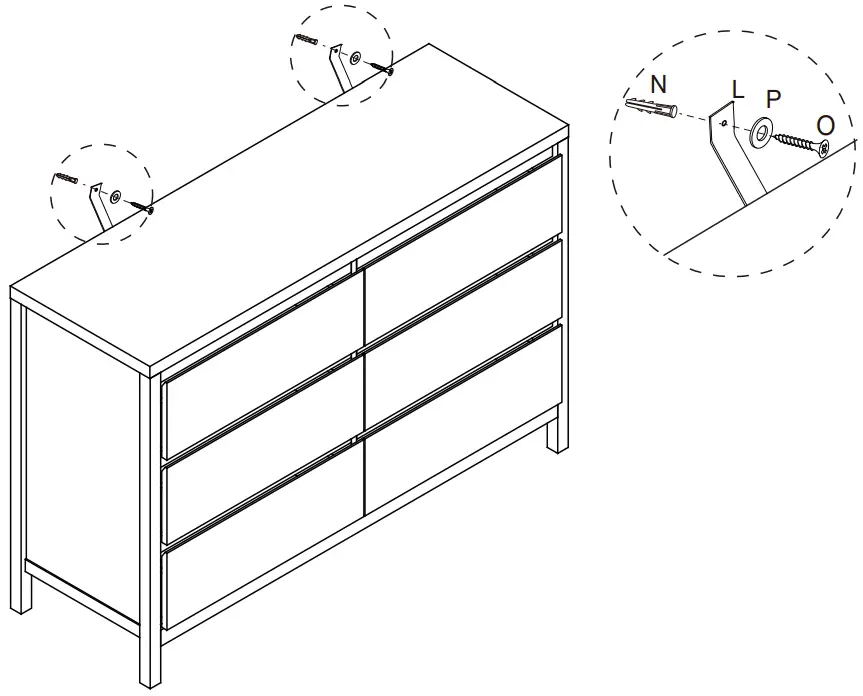 Move the bedside table to the final position, and attach the safety strap to the wall securely. Make sure it is firmly attached and snug fit. If you are unsure, please seek professional advice on how to attach this safety strap to your specific wall.
![]() WARNING
WARNING
It is STRONGLY RECOMMENDED that you ANCHOR this product.
Toppling furniture can cause serious injuries and death.
This product has been provided with an anchor strap. To prevent your furniture from tipping forward it is strongly recommended that you securely attach this product to a wall or other solid surface, using the anchor strap provided and appropriate fixings.
IMPORTANT:
Regularly check that anchors are securely maintained.
Stability of tall items may be affected by thick pile carpet or uneven floors.
CAUTION:
For your safety when attaching the anchor fixings, please note the following:
Check for any electrical wires or plumbing inside the wall before drilling any holes (if you are unsure please seek professional advice from a qualified tradesperson)
Walls are constructed from different materials, for example, masonry (solid brick) or plasterboard lined cavity walls (hollow).
It is important that you use the appropriate wall fixings for your wall type.
Your local hardware store will have the necessary drills and fixings and can offer advice if needed. If in doubt, engage the services of a qualified tradesperson to install and anchor the product.
THANK YOU
TIPS:
Your suggestions and comments are really important to us !
We sincerely solicit you to go back to our shop and leave a good rating in just a simple click. It would be quite encouraging if you could kindly do so like below:
Great product so far ,fast delivery, easy setup, and working without any issues.
With your insplring rating.
We will be more consistent to offer you EASY SHOPPING EXPERIENCE,GOOD PRODUCTS AND EFFICIENT SERVICE!


