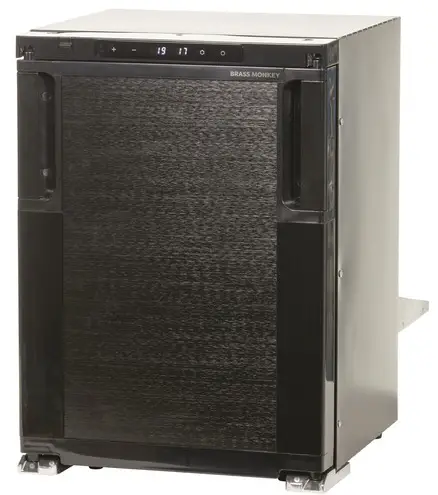
BRASS MONKEY G H-1673 90L Caraven Fridges with Freezer
SAFETY INSTRUCTIONS
WARNING!
- Do not operate the appliance if it is visibly damaged.
- Do not block the gaps of the fridge with things like pin, wire, etc.
- Do not expose the appliance to rain or soak it in water.
- Do not place the appliance near naked flames or other heat sources (heaters, direct sunlight, gas ovens etc.)
- Do not store any explosive substances like spray cans with a flammable propellant.
- Ensure the supply cord is dry and not trapped or damaged. Do not locate multiple portable socket-outlets or portable power supplies at the rear of the appliance.
- Check the voltage specification on the type plate corresponds to that of the energy supply. The appliance is only to be used with the power supply unit provided with the appliance.
- Do not use electrical appliances inside the food storage compartments of the appliance, unless they are of the type recommended by the manufacturer.
- Once unpacked and before turning on, the appliance must be placed on a level surface for more than 6 hours.
- Make sure that the appliance stays horizontally when it is running. The tilt angle must be less than 5° for long time running and be less than 45° for short time running.
- Keep the ventilation openings in the unit casing or in the built-in structure free of obstacles.
- Keep the appliance stable on the ground or in the car; Do not drain upside down.
CAUTION!
- Repairs may only be carried out by qualified personnel. Incorrect repair may cause danger. The lamp and supply cord must be replaced by the manufacturer or qualified persons.
- The installation of DC power in the boat must be handled by qualified electricians.
- Children shall not play with the appliance. Cleaning and user maintenance shall not be made by children without supervision.
- The appliance can be used by children aged from 8 years and above and persons with reduced physical, sensory or mental capabilities or lack of experience and knowledge if they’ve been given supervision or instruction concerning use of the device in a safe way and understand the hazards.
NOTICE!
- Disconnect the power supply before each cleaning and maintenance and after every use.
Do not use sharp tools to defrost; Do not damage the refrigerant circuit. - Risk of child entrapment. Before you throw away your old refrigerator or freezer: take off the doors: leave the shelves in place so that children may not easily climb inside.
- Check if the cooling capacity of the appliance is suitable for storing the food or medicine. Food may only be stored in its original packaging or in suitable containers.
- If the appliance is left empty for long periods, switch off, defrost, clean, dry, and leave the door open to prevent mould developing within the appliance.
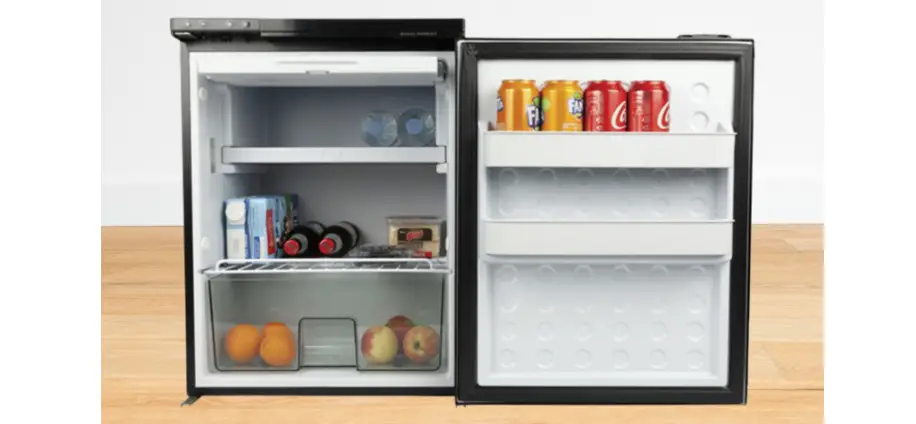
PRODUCT FEATURES
- DC power connection.
- Digital temperature display with adjustable control.
- App control via Bluetooth.
- Fridge door can open Bi-directionally.
- Removable freezer compartment.
- With crisper drawer, coated shelves, and internal LED light, etc.
PRODUCT STRUCTURE
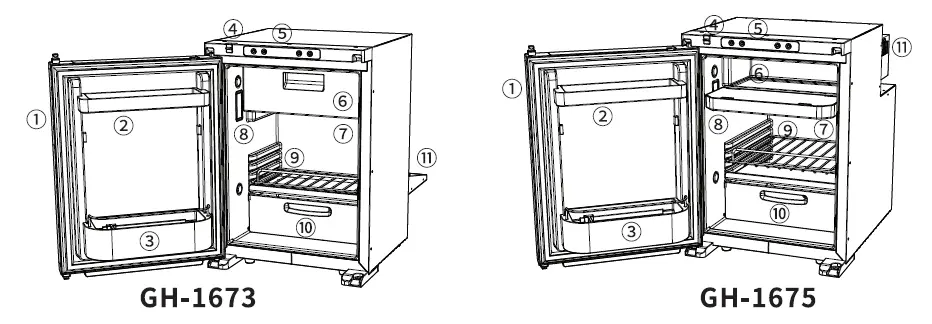
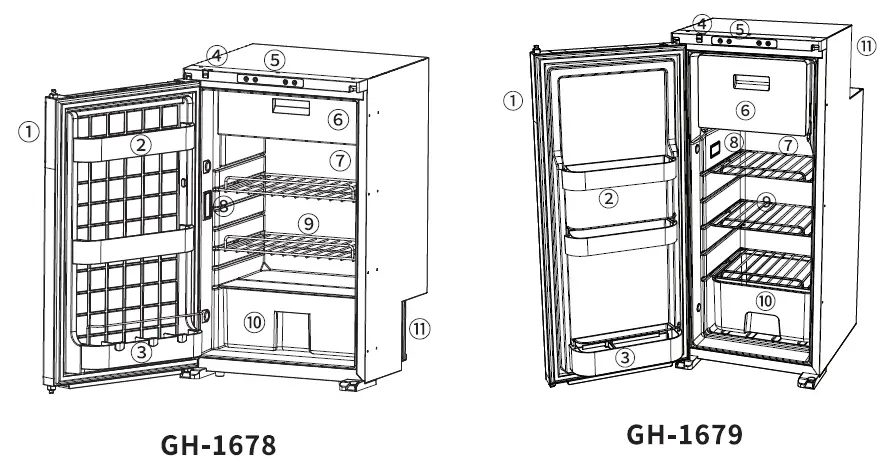
- Door latch
- Door bins
- Storage lock
- Control panel
- Freezer Compartment
- Fridge Compartment
- Internal LED light
- Shelve
- Crisper drawer
- Compressor
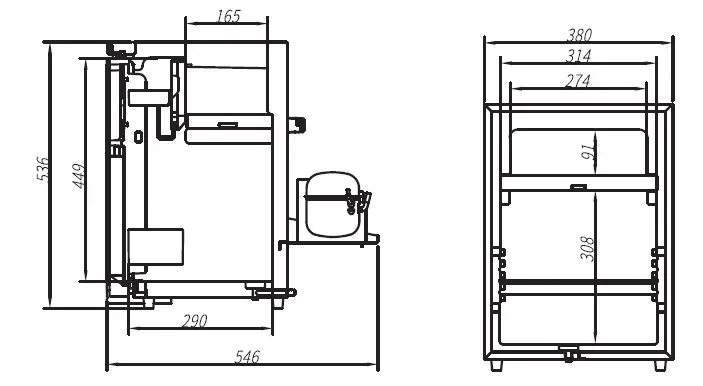
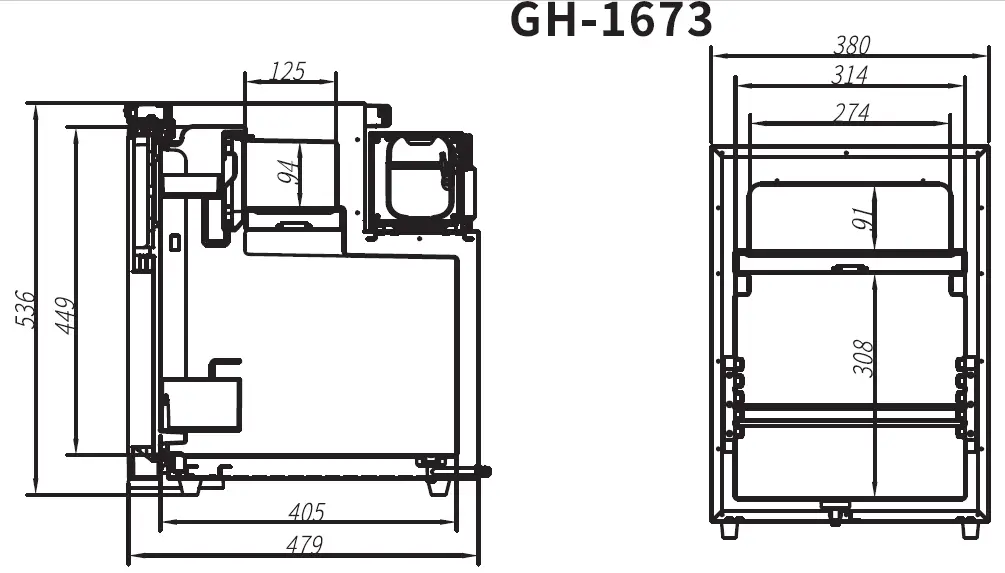
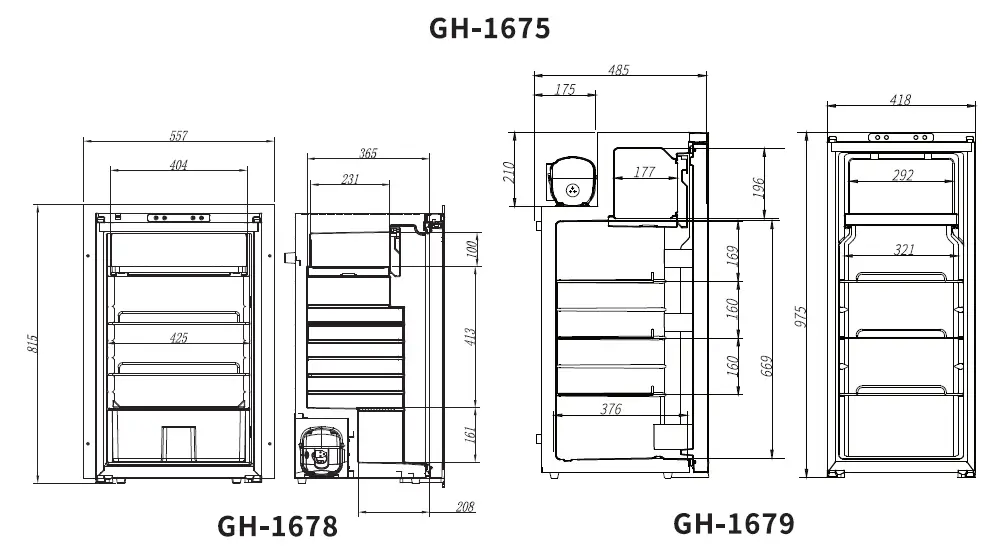
PRODUCT DIMENSIONS
INSTALLATION
- Ensure that the fridge is not damaged when opening the package after receiving the product. Any transportation damage could be reported to the place of purchase. Handle the product with the utmost care and attention.
- Prepare the cabinet: leave some space around the refrigerator to keep good ventilation. Always keep the fridge on a horizontal surface and away from heat sources.
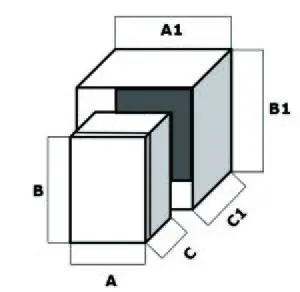 There should be a minimum of 75mm of space at the rear and top of the refrigerator and 7.5mm on each side.
Model Product Dimension (A*C*B) Recommended Installation Dimension(Al *Bl *Cl) GH-1673 380*546*536mm 395*621*6llmm GH-1675 380*479*536mm 395*554*6llmm GH-1679 418*485*975mm 433*560*1050mm - Connect to a power supply: connect the refrigerator to the vehicle 12/24VDC system directly, the minimal cable cross-section as per the below table based on the overall length of wire between the refrigerator and the battery.
It is highly recommended that the installation fridge is carried out by a qualified person. Enough free wire needed to be kept for moving the fridge into the cabinet.Wire Length to Refrigerator Wire Gauge Maximum 6m 14AWG Maximum llm 12AWG Maximum 17m 10AWG - Push the fridge into the cabinet carefully to avoid scratching the floor, and the power cable should be kept loosen.
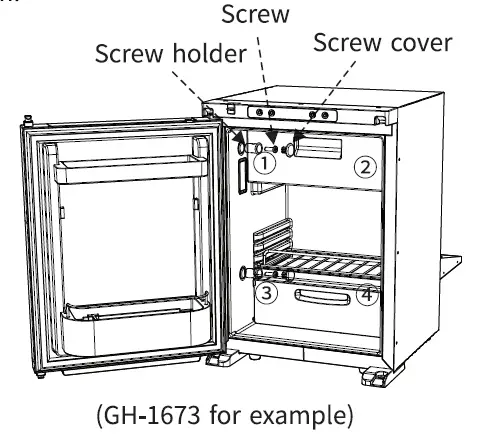
- Mount the fridge with the cabinet wall: the screw holder is built in the side wall of the refrigerator, a hole needs to be drilled through the screw holder into the side metal panel with a screw (MS, 15mm minimal) and fix it on the wall; after that, use the screw cover to cover the hole.(If the refrigerator needs to be drilled through, it should be confirmed before leaving the factory. The screws are not included with the refrigerator.)
- Verify the installation: once the installation had been finished, check the continuity of the earth circuit and carry out all electrical safety testing provided for by current regulations. Protect and fix the cables in order to prevent accidental pulling of the cable from disconnecting it from the connections or coming into contact with hot parts with a temperature above 50° Cor with sharp parts.
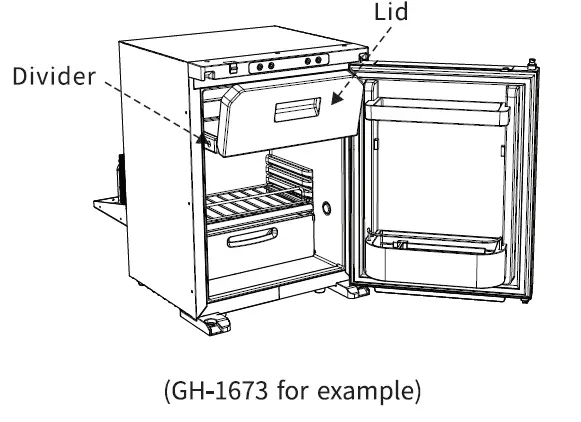
REMOVING THE FREEZER COMPARTMENT
Open the lid and pull out the divider horizontally.
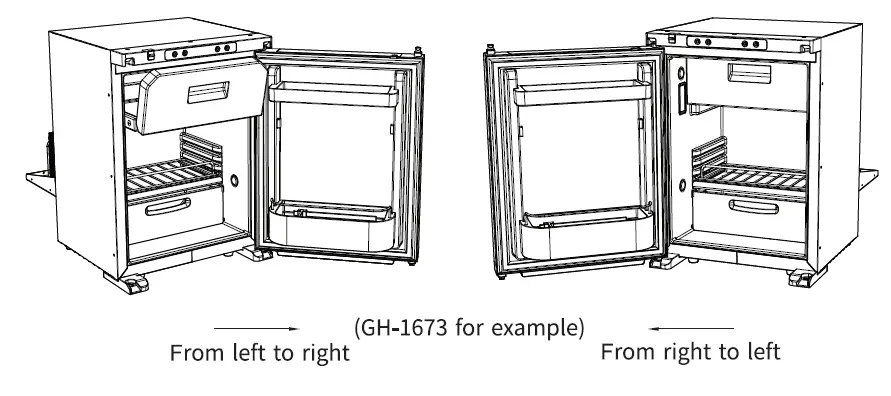
OPERATION OF B1-DIRECTIONAL FRIDGE DOOR
The fridge door can open Bi-Directionally without the use of tools to change the side it hinges from.
FUNCTION AND OPERATION
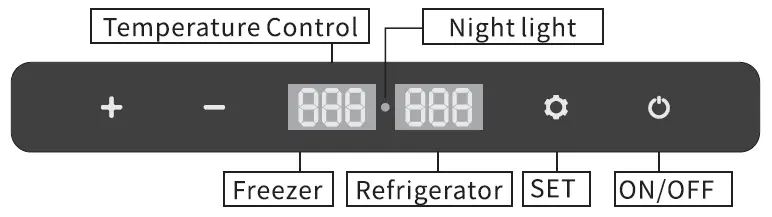
- Power Supply: DC 12V/24V.
- Display Screen Initialization: when the fridge is powered on, the buzzer will make a long beep, and the display will be on for two seconds then enter the normal operation.
- Power ON/OFF: press
 to switch ON/OFF.
 - Night mode: under running state, long press for 3 seconds to enter the night mode, the screen will turn off and the night light will be on. Short press again, The panel returns to normal display.
- Temperature Setting: 1. Press”
 ” , to display ‘FR’ (freezer zone temperature setting) or
‘RE’ (refrigerator zone temperature setting).- Select either the fridge zone or the freezer zone temperature. You cannot select separate temperatures for each zone at the same time; you must choose which zone you want to more accurately control the temperature of. The zone not selected to control the temperature of will be then cooled as a slave zone relative to the temperature set by the other zone.
- Press “+”or “-” to adjust the temperature of the respective zone.
- Battery Protection Mode: under the running state, long press for 3 seconds until the left screen flashes, then pressagain to switch High, Medium and Low (*Factory setting is High).
 From left to right: Low/Medium/High.
Voltage reference:
| INPUT MODE | DC 12V | DC 24V | ||
| CUT OUT | CUTIN | CUT OUT | CUTIN | |
| L | 8.SV | 10.9V | 21.3V | 22.7V |
| M | 10.lV | 11.4V | 22.3V | 23.7V |
| H | 11.lV | 12.4V | 24.3V | 25.7V |
* the voltage is theoretical value, there may be a deviation in different sceneries.
* H should be set when the product is connected to car power, and M or L should be set when it is connected to a portable battery or other back-up battery.
- Temperature Unit Setting: switch off the fridge, long press for 3 seconds until displays El, and switch to ES by pressing again, then press + or – to switch Celsius or Fahrenheit. (*Factory setting is °C.)
- Reset: switch off the fridge, long press for 3 seconds until displays El, under El mode, long press +- at the same time for seconds to reset the settings.
Recommended temperature for common food: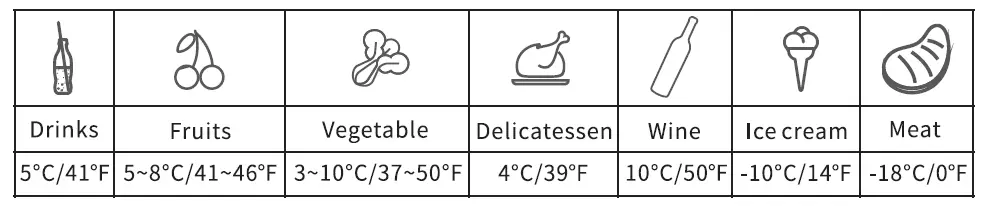
CARE AND MAINTENANCE
Cleaning:
- Unplug the device first to avoid electric shock.
- Use wet cloth to clean the device and dry it.
- Remove the cover and drain from the hole at the bottom of the device.
- Do not soak the device in water and do not wash it directly.
- Do not use abrasive cleaning agents as these can damage the device.
Storage:
If the device will not be in use for a long time, please follow the steps:
- Turn off the power and remove the plug.
- Remove all the items stored in the device.
- Remove the cover and drain from the hole, wipe off excess water with a soft rag.
- Put the device in a cool and dry place.
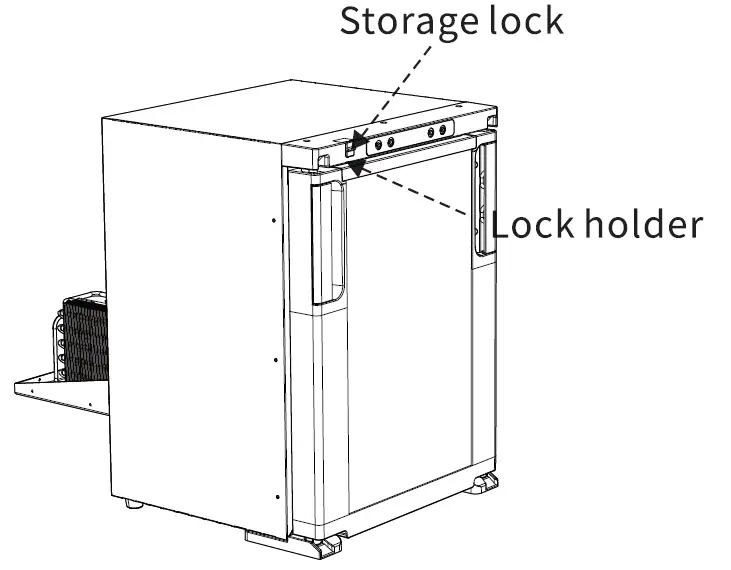
- Press the storage lock into the lock holder, to keep the fridge door ajar, preventing the formation of unpleasant odors and mold when not in use.
Defrosting:
Humidity can form frost in the interior of the cooling device or on the evaporator, which will affect the cooling performance. Defrost the device regularly to avoid this.
- Switch off the device.
- Take out the contents of the device.
- Remove the cover and drain from the hole.
- Keep the door open.
- Wipe off the defrosted water.
⚠A Never use hard or sharp tools to remove ice or to loosen objects which have a frozen in place.
SMART CONTROL – FRIDGE APP INSTRUCTIONS
Downloading the “BRASS MONKEY” Application
- Using a pre-installed QR reader on your hand held smart device scan the QR code in the manual or on the carton, or search for the “BRASS MONKEY” APP in the iTunes App Store (for Apple devices) or Google store (Android Devices)
- Start the application and select the Search function.
- The application will prompt you to pair the fridge by pressing the set button on the fridge’s control panel. Once set button has been activated, the fridge will be paired with your smart device and the application will switch to a control panel allowing you to control the fridge’s functions.
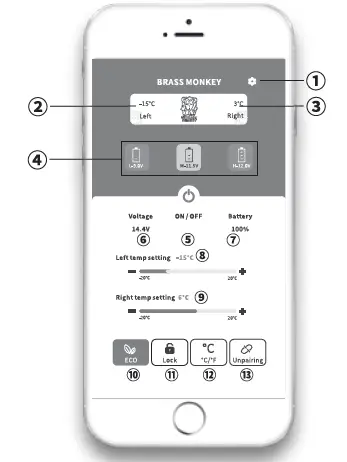
- SET
- Freezer zone current temperature
- Refrigerator zone current temperature
- Battery protection model: High/Medium/Low
- Turn ON/OFF the fridge
- Current voltage
- Battery capacity ( for fridges with optional battery supplies)
- Freezer zone temperature setting
- Refrigerator zone temperature setting
- ECO( Energy-saving) / MAX(Fast cooling) mode switch
- Children’s Lock/ Unlock
- Celsius / Fahrenheit switch
- Unpair the device and return to Search
Note:
* Click the lock icon![]() a on the APP to lock/unlock the control panel on the fridge, if locked, the fridge can only be controlled by the APP.
a on the APP to lock/unlock the control panel on the fridge, if locked, the fridge can only be controlled by the APP.
Please scan the QR code to download APP
QR Code for Apple Devices

QR Code for An raid Devices 
TEMPERATURE GUIDE
This is a guide to what the temperature will be in the secondary compartment, once the first compartment is set. You can either set the target fridge temperature or target freezer temperature. You cannot set a target temperature of both compartments at the same time.
| Temperature Setting | RE (Refrigerator control) | |
| Average temperature in Refrigerator | Average temperature in Freezer | |
| 8 | 8°C | -13°C |
| 5 | 5°C | -15°C |
| 3 | 3°c | -19°C |
| 0 | 0°C | -21°C |
| Temperature Setting | FR (Freezer control) | |
| Average temperature in Refrigerator | Average temperature in Freezer | |
| -12 | goc | -12°C |
| -15 | S°C | -15°C |
| -18 | 3°c | -l8°C |
| -20 | 1°c | -20°C |
TOUBLESHOOTING
| Issues | Cause/Suggestions |
| Refrigerator does not work |
|
| Refrigerator compartments are too warm |
|
| Food is frozen |
|
| There is “water flow” noise from inside the refrigerator |
|
| There are waterdrops around the refrigerator casing or door gap |
|
| The compressor is slightly noisy when starting |
|
| Code Fl displayed |
|
| Code F2 displayed |
|
| Code F3 displayed |
|
| Code F4 displayed |
|
| Code FS displayed |
|
| Code FG displayed |
|
| Code F7 or FS displayed | Possible cause: temperature sensor is faulty. Contact manufacturer for service. |
WARRANTY
The warranty for this product is 3 years from date of purchase.
During the warranty period the following are excluded from coverage:
- Intentional damage.
- Damage by fire, flood, etc.
- Damage or malfunction caused by incorrect usage and not following this user manual.
- Damage or malfunction caused by disassembling.
TECHNICAL INFORMATION
| MODEL | GH-1673 | GH-1675 | GH-167S | GH-1679 |
| RATED VOLTAGE | DC12/24V | |||
| RATED POWER | 60W | 60W | sow | sow |
| CAPACITY | 40L/l.41cu.ft. | 45L/l.59 cu.ft. | SSL/3.0cu.ft. | 90L/3.lScu.ft. |
| NOISE | ,s;4sdB | |||
| TEMPERATURE SETTING RANGE | Refrigeration: 0~S°C(32~46°F) Freezer:-12~-20°C(-4~6S°F) | |||
| CLIMATE CATEGORY | T/ST/N/SN | |||
| DIMENSIONS (W*H*D) | 546*536*3S0mm | 479*536*3S0mm | 437*790*4S4mm | 4S5*975*41Smm |
| NET WEIGHT | l 7.3kg/3S.llb | 16.2kg/35.71b | 25kg/55.11b | 25.4kg/56.21b |
* Due to product improvement, the technical information might be different from actual information, please refer to the rating label on the product.
Distributed by:
TechBrands by Electus Distribution Pty. Ltd.
Address: 320 Victoria Rd, Rydalmere, NSW 2116, Australia
Ph: 1300 738 555 l
Tel: +61 2 8832 3200
Fax: 1300 738 500
Website: www.techbrands.com
Made in China


