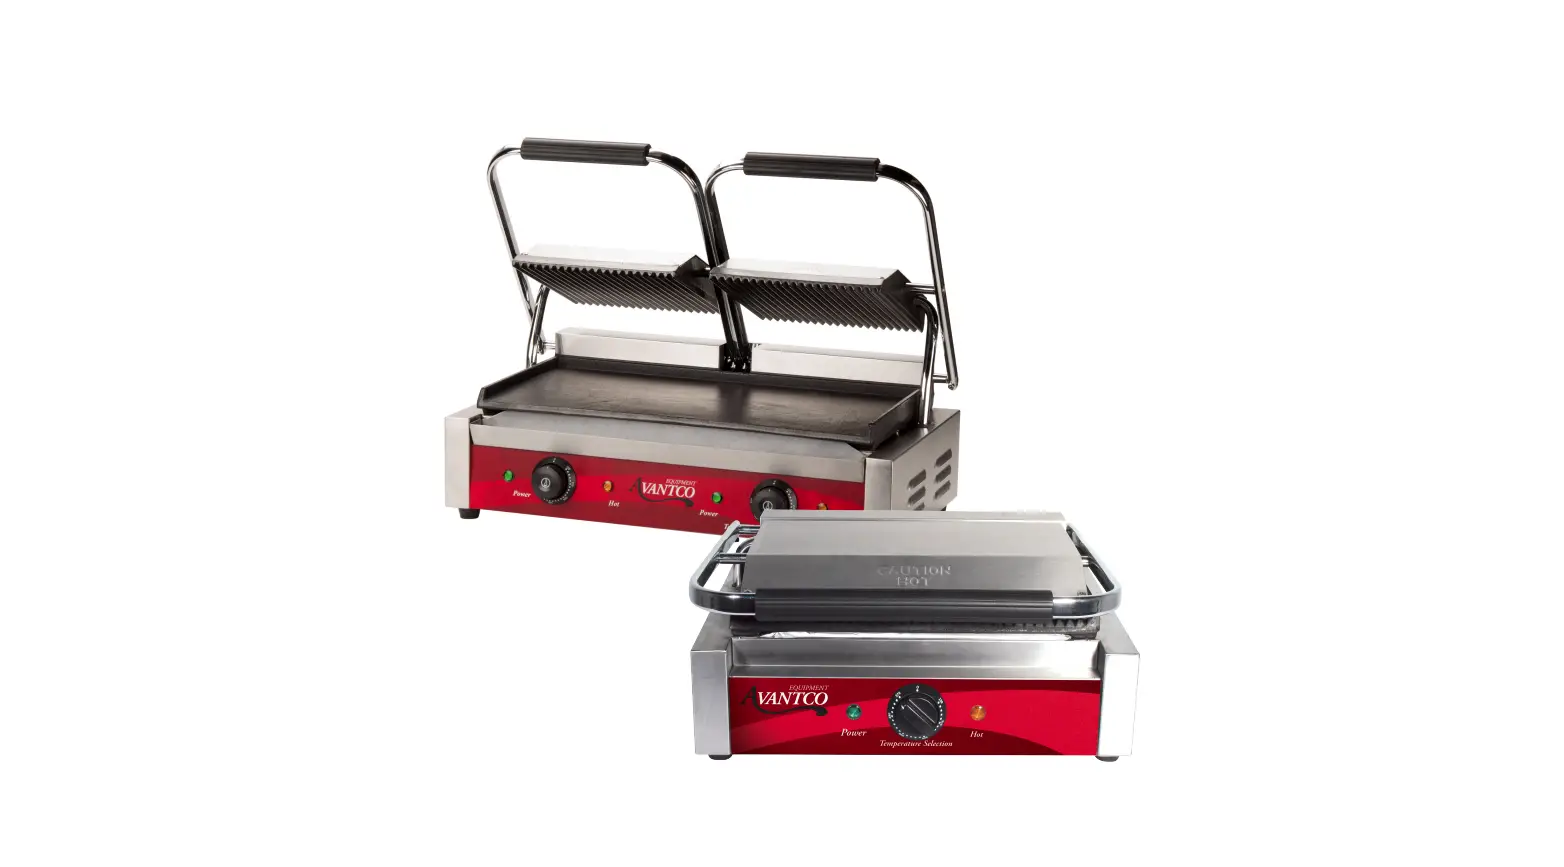
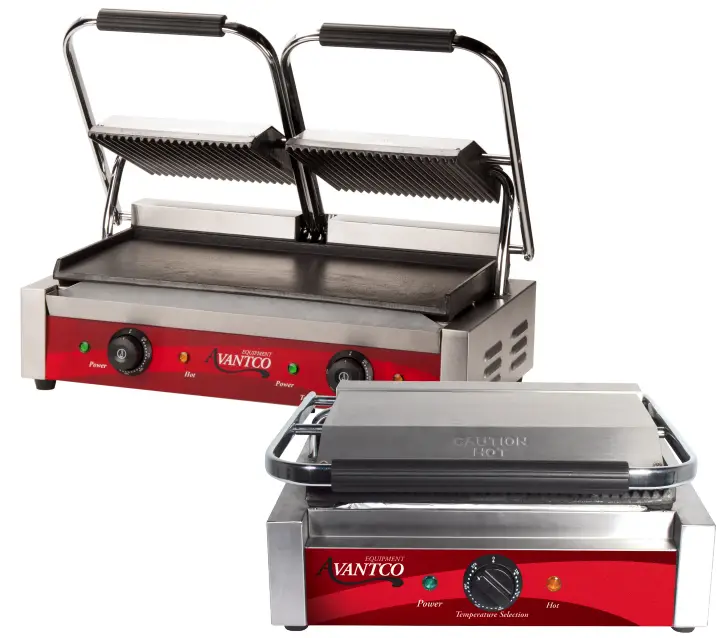
AVANTCO 177P78 Commercial Panini Sandwich Grill
Thank you for purchasing and using our Panini/Sandwich Grill. To make the best use of this product and avoid damage and injury, please read this manual carefully before using the machine, and keep it handy for future reference. The Sandwich Grill design combines the advantages of stylish design, efficient construction, ease of operation, and simple maintenance. The grill temperature can be easily adjusted to suit cooking requirements, and, while mainly used for sandwich grilling, the grill may be used for other foods.
WARNING: Any modifications or incorrect installation, unauthorized adjustments, or maintenance by unauthorized personnel may result in property loss or injury. Please contact the supplier for any
necessary adjustment or repair, which should only be done by trained professionals.
CAUTION: For your safety, do not place or store any flammable liquid or gas items near the sandwich grill.
WARNING: This equipment must be connected to a grounded power outlet for your safety.
Notes
- This product is intended for commercial use only.
- Do not disassemble or modify the machine.
- Lift the upper grill assembly smoothly; jerking it up may cause damage or injury.
- Before cleaning, disconnect the power and allow the machine to cool.
- Do not immerse in water or spray water onto the grills. Water may cause short circuits and injury or damage.
- To avoid damage, do not jam materials onto the grill or place heavy objects there.
- When the machine is in use, the body and grill plates are hot and will cause burns if touched.
- Do not use an ungrounded power supply cord.
Cautions
- It is recommended that the machine be unplugged during thunderstorms to avoid potential damage from nearby lightning strikes.
- Avoid damaging the controls or grill surfaces with sharp or heavy objects.
- Turn off the power after daily use.
- Do not use the machine with a damaged power cord.
- Any internal repair or maintenance should be performed by a factory-authorized repair technician.
Important Features
- Convenient independent temperature controls are easy to set and may result in overall power savings (double unit).
- Grill temperatures may be set for different uses at the same time (double unit).
- The external shell and grease collector tray are stainless steel.
- The grills are designed to be easy to use and maintain.
Specifications
| Single Panini Grill | Single Panini Grill | Double Sandwich Grill | |
| Model Number | P60S, P65SG, P68 | P78, P70S, P75SG | P84, P85S, P88SG |
| Voltage | 120V, 60 Hz | 120V, 60 Hz | 120V, 60 Hz |
| Power | 1.75 kW | 1.75 kW | 2×1.75 Kw |
| Temp. Controls | 1 | 1 | 2 |
| Temp. Range | 120 F – 570 F | 120 F – 570 F | 120 F- 570 F |
| Upper Grill (overall) | 8 1/2″x 8 1/2″ | 13″x 8 3/4″ | 8 7/16″x 16 7/8″ |
| Lower Grill | 8 1/2″x 8 1/2″ | 13″x 8 3/4″ | 9 1/16″x 18 3/16″ |
| Overall Size | 17″x 12″x 10″ | 17″x 12″x 10″ | 22 7/16″x 15 9/16″x 8 1/4″ |
Notes
- This machine is intended for use at 120V 60 Hz only.
- A suitable circuit protector (fuse, circuit breaker, etc. ) should be located near the machine.
- Be certain the cable is properly connected to a voltage source.
- Do not place any hard objects on the grill. Do not slam the grill closed.
- Recommended temperature range for normal use is 392°-482° F.
- The machine is intended for use where room temperature is below 113°F and humidity below 85%.
- Do not use caustic or abrasive products for cleaning.
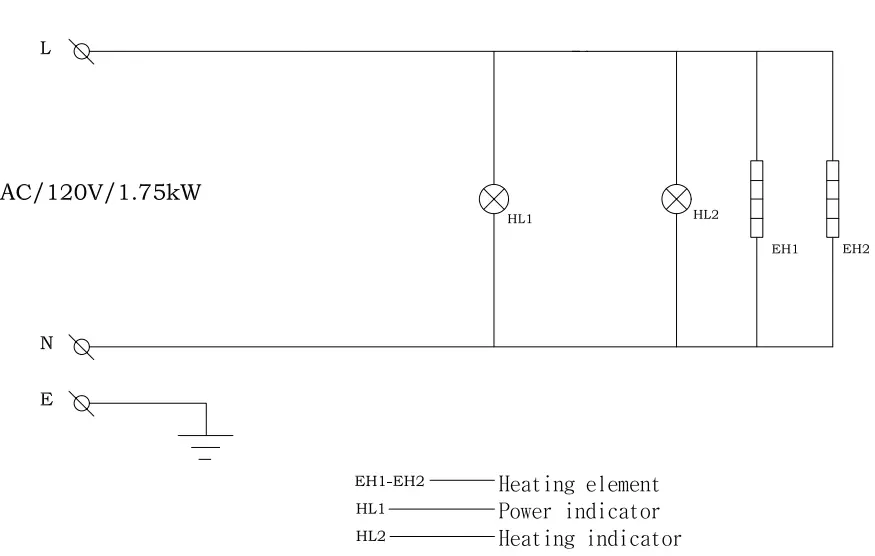
Operating Instructions
- Be sure the power cord is properly connected to a proper source (120V, 60 Hz)
- The power indicator should indicate power available (light on).
- Set to desired temperature (heating indicator will come on). Warm-up time is approximately 20 minutes. A heating indicator will cycle at a set temperature.
- When a set temperature is reached, lift the top grill, using a black handle, and lightly grease grill plates with vegetable oil. Place food on the grill and lightly press the handle down. Excess oil will collect in the grease collection tray. Remove food when cooked. The heating elements will automatically cycle as needed.
- Turn the machine off when no longer needed and unplug from a power source.
Instructions for First Time Use
In order to protect the plates of your new grill during transportation, a layer of food-safe oil was coated on the surface prior to shipment. This oil is harmless, but must be removed before you begin to use it. To remove, preheat the grill until the oil liquefies. Next, carefully wipe away the melted oil with a clean, soft cloth. Once all of the oil is removed you can begin to use your grill
Cleaning and Maintenance
- Disconnect the machine before cleaning and allow it to cool.
- Use only a damp towel with non-corrosive cleaner. Do not immerse or flush with water.
- Wipe down the outside surface to remove any soil.
- Store in a dry clean area when not in use. Attack tough grease, oil, and carbon with this ready-to-use decarbonizer and degreaser. Its unique formula is designed to clean ovens, grills, hoods, and a wide variety of other surfaces.
Daily Check
Before using the machine, visually inspect for any signs of damage or frayed power cord. Be certain the machine is on a level countertop.
After turning it on, check for anything unusual before you use it.
Inspect the machine every day before use.
If there is any question about the operation, do not use it.
Troubleshooting
| Problem | Possible Cause | Action |
| Grill plates do not heat even though power indicators are lit. | Defective controller | Replace controller |
| Defective heater(s) | Replace heater(s) | |
| Temperature can not be controlled. | Defective controller | Replace controller |
| The heating appears normal but power indicators are not lit. | Defective indicator(s) | Replace |
| No action when power is turned on. | Defective fuse or open circuit breaker | Replace fuse or reset circuit breaker |
Do not use the machine if any of the above occur.
Any troubleshooting corrections should be performed by a qualified technician.
Hinge Adjustments
Issue: The opening hinge is too tight, making it difficult to open and shut the top shell. Or the opening hinge is too loose, which can cause the top shell not to close correctly.
Solution: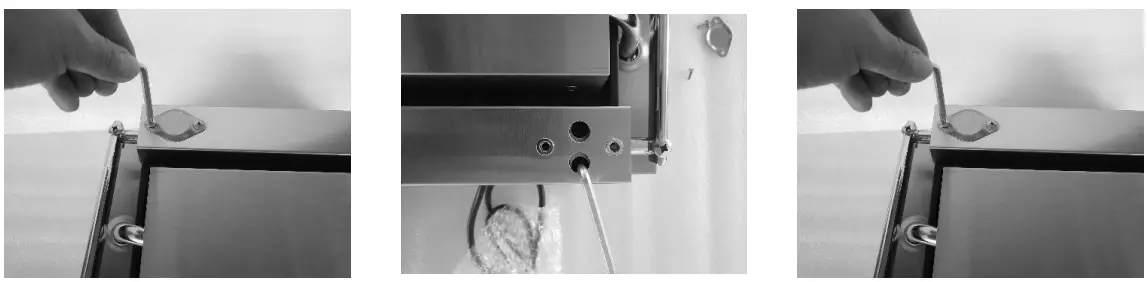
Step 1 Open the back cover using a Philips head screwdriver
Step 2Using an Allen wrench, adjust the tightness to feel. Open and shut the top shell until the tightness feels natural while opening and closing the lid. Your manual bag includes this tool. Add any food-safe grease while moving the top shell to lubricate the hinge.
Step 3 Close the back cover using a Phillips head screwdriver.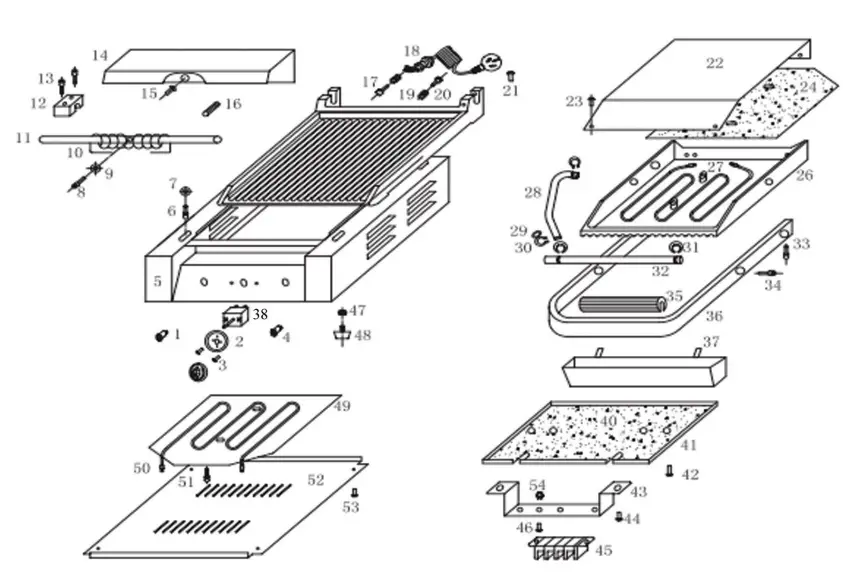
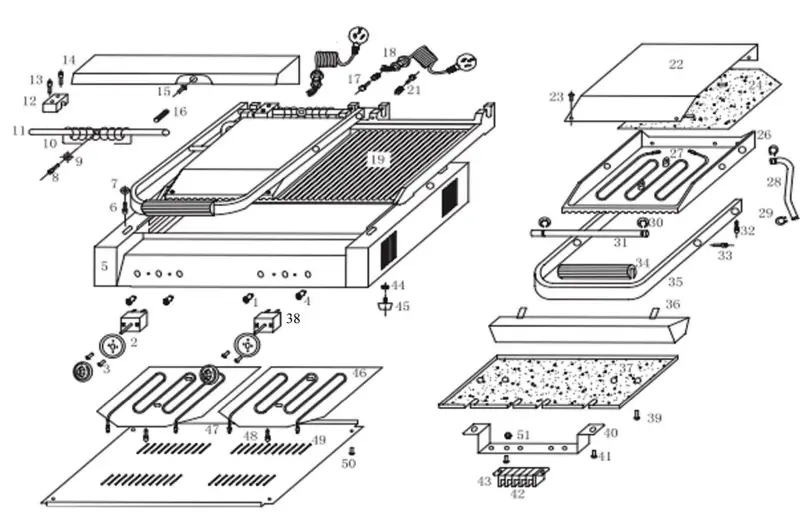
Parts Key Single Grill
| Diagram # and Part Name | Replacement Part Item # |
| 1. Green “Power” Light | 177PLIGHTGRN (P60S, P65SG, P68, P78, P75SG, P70S) |
| 2. Temperature Control Knob | 177PKNOB (P60S, P65SG, P68, P78, P75SG, P70S) |
| 3. Screw M4x6 | |
| 4. Orange “Hot” Light | 177PLIGHTORG (P60S, P65SG, P68, P78, P75SG, P70S) |
| 5. Lower Case | |
| 6. Internal Wrenching Screw M6x10 | |
| 7. Flat Washer | |
| 8. Internal Wrenching Screw M5x25 | |
| 9. Flat Spacer | |
| 10. Spring | 177PSPRING (P60S, P65SG, P68, P78, P75SG, P70S) |
| 11. Rear Shaft | |
| 12. Shaft Retainer | |
| 13. Internal Wrenching Screw M6x40 | |
| 14. Rear Upper Cover |
| Diagram # and Part Name | Replacement Part Item # |
| 15. Slotted Screw M4x8 | |
| 16. Spring Pin | |
| 17. Ground Screw M6x15 | |
| 18. Power Cord | 177FCORD (P60S, P65SG, P68, P78, P75SG, P70S) |
| 19. Bottom Plate | 177P7BTMFLT (flat), 177P7BTMGRV (grooved), (P78, P75SG, P70S) |
| 20. Upper Grill Cover | |
| 21. Slotted Screw M4x8 | |
| 22. Top Cover | |
| 23. Slotted Screw M4x8 | |
| 24. Upper Insulator | |
| 26. Top Grill Plate | 177P7UPRFLT (flat), 177P7UPRGRV (grooved), (P78, P75SG, P70S) |
| 27. Top Heating Element | 177P7TOPELM (P60S, P65SG, P68, P78, P75SG, P70S) |
| 28. Wiring Guide Tube | |
| 29. Wiring Guide Tube Stop | |
| 30. Guide Tube Retainer | |
| 31. Retaining Ring | |
| 32. Upper Plate Shaft | |
| 33. Internal Wrenching Screw m6x8 | |
| 34. Internal Wrenching Screw m6x8 | |
| 35. Handle | 177P7HANDLE (P60S, P65SG, P68, P78, P75SG, P70S) |
| 36. Grease Collector | |
| 37. Drip Tray | 177P6RAY (P60S, P65SG, P68) 177PTRAY (P78, P75SG, P70S) |
| 38. Thermostat | 177PTHERM (P60S, P65SG, P68, P78, P75SG, P70S) |
| 40. Bottom Insulator | |
| 41. Bottom Pan | |
| 42. Slotted Screw M4x8 | |
| 43. Barrier Strip Mounting Plate | |
| 44. Slotted Screw M4x8 | |
| 45. Ceramic Termical Board | |
| 46. Hex Head Screw M6x20 | |
| 47. Hex Nut M4 | |
| 48. Rubber Foot | |
| 49. Rubber Heater Pressure Plate | |
| 50. Bottom Heating Element | 177P7BTMELM (P78, P75SG, P70S) |
| 51. Internal Wrenching Screw M6x8 | |
| 52. Bottom Cover | |
| 53. Philips Head Screw M4x8 | |
| 54. Hex Nut |
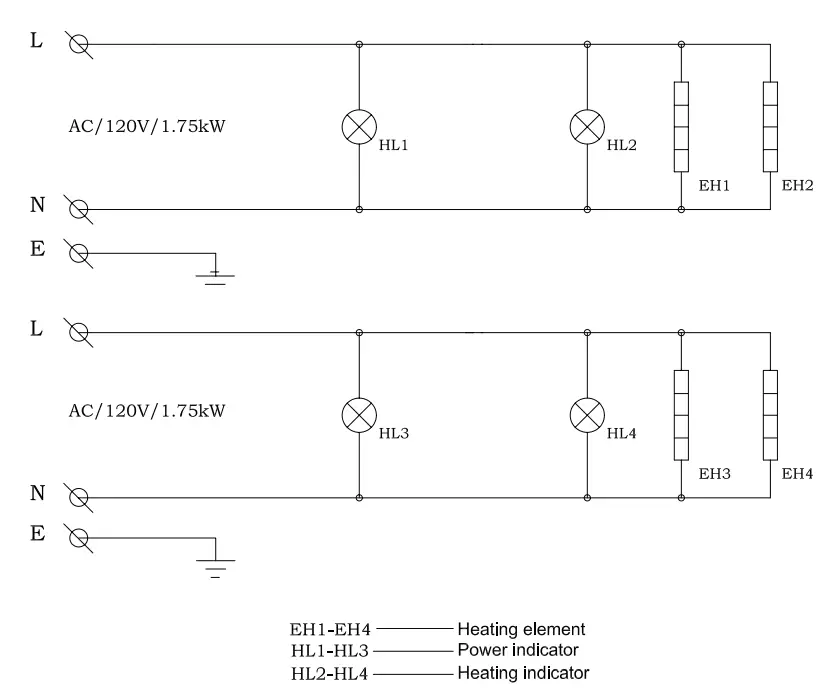
Parts Key Double Grill
| Diagram # and Part Name | Replacement Part Item # |
| 1. Green “Power” Light | 177PLIGHTGRN (P84, P85S, P88SG) |
| 2. Temperature Control Knob | 177PKNOB (P84, P85S, P88SG) |
| 3. Screw M4x6 | |
| 4. Orange “Hot” Light | 177PLIGHTORG (P84, P85S, P88SG) |
| 5. Lower Case | |
| 6. Internal Wrenching Screw M6x10 | |
| 7. Flat Washer | |
| 8. Internal Wrenching Screw M5x25 | |
| 9. Flat Spacer | |
| 10. Spring | 177PSPRING (P84, P85S, P88SG) |
| 11. Rear Shaft | |
| 12. Shaft Retainer | |
| 13. Internal Wrenching Screw M6x40 |
| Diagram # and Part Name | Replacement Part Item # |
| 14. Rear Upper Cover | |
| 15. Slotted Screw M4x8 | |
| 16. Spring Pin | |
| 17. Ground Screw M6x15 | |
| 18. Power Cord | 177FCORD (P84, P85S, P88SG) |
| 19. Bottom Grill Plate | 177P8BTMFLT (flat), 177P8BTMGRV (grooved), (P84, P85S, P88SG) |
| 20. Upper Grill Cover | |
| 21. Slotted Screw M4x8 | |
| 22. Top Cover | |
| 23. Slotted Screw M4x8 | |
| 24. Upper Insulator | |
| 26. Top Grill Plate | 177P8UPRFLT (flat), 177P8UPRGRV (grooved), (P84, P85S, P88SG) |
| 27. Top Heating Element | 177P8TOPELM (P84, P85S, P88SG) |
| 28. Wiring Guide Tube | |
| 29. Guide Tube Retainer | |
| 30. Retaining Ring | |
| 31. Upper Platen Shaft | |
| 32. Internal Wrenching Screw m6x8 | |
| 33. Internal Wrenching Screw m6x8 | |
| 34. Handle | 177P8HANDLE (P84, P85S, P88SG) |
| 35. Handle Frame | |
| 36. Drip Tray | 177P8TRAY (P84, P85S, P88SG) |
| 37. Bottom Insulator | |
| 38. Thermostat | 177PTHERM (P84, P85S, P88SG) |
| 39. Slotted Screw M4x8 | |
| 40. Barrier Strip Mounting Plate | |
| 41. Slotted Screw M4x8 | |
| 42. Ceramic Terminal Board | |
| 43. Hex Head Screw M6x20 | |
| 44. Hex Nut M4 | |
| 45. Rubber Foot | |
| 46. Rubber Heater Pressure Plate | |
| 47. Bottom Heating Element | |
| 48. Internal Wrenching Screw M6x8 | |
| 49. Bottom Cover | |
| 50. Philips Head Screw M4x8 | |
| 51. Hex Nut M6 |
Equipment Limited Warranty
Avantco warrants its equipment to be free from defects in material and workmanship for a period of 1 year. This is the sole and exclusive warranty made by Avantco covering your Avantco brand equipment. A claim under this warranty must be made within 1 year from the date of purchase of the equipment. Only the equipment’s original purchaser may make a claim under this warranty. Avantco reserves the right to approve or deny the repair or replacement of any part or repair request. The warranty is not transferable. Avantco Equipment installed in/on a food truck or trailer will be limited to a period of 30 days from the original date of purchase.
To Make a Warranty Claim:
For Warranty, Inquiries contact the location where you purchased the product.
- WebstaurantStore.com: Contact [email protected]. Please have your order number ready.
- The Restaurant Store: If you purchased this unit from your local store, please contact your store directly.
- TheRestaurantStore.com: For online purchases, call 717-392-7261. Please have your order number ready.
Failure to contact the designated location prior to obtaining equipment service may void your warranty.
Avantco makes no other warranties, express or implied, statutory or otherwise, and HEREBY DISCLAIMS ALL IMPLIED WARRANTIES, INCLUDING THE IMPLIED WARRANTIES OF MERCHANTABILITY AND OF FITNESS FOR A PARTICULAR PURPOSE.
This Limited Warranty does not cover:
- Equipment sold or used outside the Continental United States
- Use of unfiltered water (if applicable)
- Avantco has the sole discretion on wearable parts not covered under warranty
- Equipment not purchased directly from an authorized dealer
- Equipment used for residential or other non-commercial purposes
- Equipment that has been altered, modified, or repaired by anyone other than an authorized service agency
- Equipment where the serial number plate has been removed or altered.
- Damage or failure due to improper installation, improper utility connection or supply, and issues resulting from improper ventilation or airflow.
- Defects and damage due to improper maintenance, wear, and tear, misuse, abuse, vandalism, or Act of God.
Any action for breach of this warranty must be commenced within 1 year of the date on which the breach occurred.
No modification of this warranty, or waiver of its terms, shall be effective unless approved in a writing and signed by the parties. The laws of the Commonwealth of Pennsylvania shall govern this warranty and the parties’ rights and duties under it. Avantco shall not under any circumstances be liable for incidental or consequential damages of any kind, including but not limited to loss of profits.


