![]() MRC-90 Loop Guitar Effect
MRC-90 Loop Guitar Effect
User Manual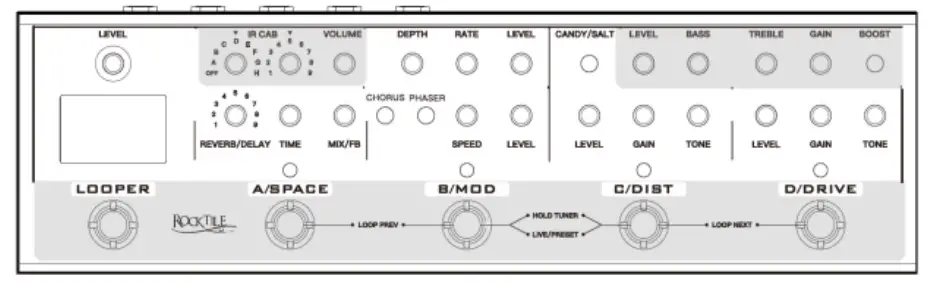
ROCKTILE MRC-90 Loop Guitar Effect
Thank you for purchasing this product. To ensure that you are completely satisfiewith this product, please read and understand this manual carefully.
PLEASE READ CAREFULLY
Please keep this manual in a safe place for future reference. Hand out all documents when passing the product on to third parties. Never leave children unattended with the packaging material. Products packaged in plastic bags present a choking hazard from packaging materials. The product should only be used under adult supervision.
Only use the product if it is in perfect condition. Do not use the product if damage is visible or suspected. We are not liable for damage that occurs as a result of failure to
observe the safety instructions or as a result of incorrect or improper handling.
![]() Observe the operating instructions!
Observe the operating instructions!
| The signal word WARNING indicates hazards that can lead to serious injuries if no precautionary measures are taken. | |
| The signal word NOTE indicates general precautions that should be observed when handling the product. | |
| Images and screen representations in this manual may differ slightly from the appearance of the actual product, as long as this does not negatively affect the technical characteristics and safety of the product. | |
| All person-related formulations in these operating instructions are to be regarded as gender-neutral. |
These operating instructions apply to mature users and to persons who have been supervised or instructed in the operation of the device by a person responsible for their safety and who have proven that they are able to handle the device.
| Children should be supervised to ensure that they do not use this device as a toy. Never allow children to play with the packaging material unsupervised. | |
| Risk of damage to property! We are not liable for accidents that occur as a result of non-compliance with the safety instructions or incorrect handling. |
All information in these operating instructions has been checked to the best of our knowledge and belief. However, neither the author nor the publisher can be held liable for any damages in connection with the use of these operating instructions.
Other product, brand and company names mentioned in this document may be the trademarks of their respective owners. Compliance with all applicable copyright laws is the responsibility of the user of this document.
![]() WARNING
WARNING
Caution
Please observe the following basic instructions to avoid endangering yourself or others and to prevent damage to external devices.
Warnings
Do not disassemble or make any modifications to the product. Doing so could result in injury from electric shock.
If you notice that the power cord shows obvious signs of wear, the unit malfunctions, smells burnt or smokes, unplug the unit immediately and refer servicing to qualified service personnel or your dealer.
Before cleaning the product, turn it off and disconnect it from the power supply.
Always place the product on a flat, stable surface to ensure safe standing.
Do not use the product in a damp or wet environment.
Do not place objects filled with liquids, such as vases, glasses or bottles, on the product.
Do not place small objects on it that could slip in, such as hairpins, sewing needles, or coins.![]() NOTE
NOTE
Precautions
To avoid damage to the product, do not place it in places with high temperatures or a lot of dust, do not place it directly next to an air conditioner, and avoid direct sunlight.
Do not place the item near other electrical equipment to avoid interference.
Do not use force or place heavy objects on the product when handling it.
Disconnect the unit from the mains power supply if you are not going to use it for a long period of time. To disconnect the device from the power supply, please pull the plug, not the cable.
Please handle the power cable with care. It should not be placed near radiators, You should not place heavy objects on it and you should lay it in such a way that no person could step on it or fall over it.![]() WARNING
WARNING
Mains voltage
If an external power supply is required for use, connect it to a power outlet with the correct voltage.
Do not connect the device to a different mains voltage than the one for which your product is intended.
Unplug the AC adapter from the wall outlet when not in use or during lightning storms.![]() NOTE
NOTE
Battery
Make sure that the battery compartment is always securely closed. Observe the correct polarity when inserting the batteries. Batteries do not belong in household waste! Please dispose of empty batteries at appropriate collection points or municipal disposal points. If you are not going to use the device for a longer period of time, please remove the batteries.![]() NOTE
NOTE
Location
Do not expose the product to the following conditions to avoid deformation, discoloration, or major damage:
Direct sunlight, extreme temperature or humidity, excessively dusty or dirty place, strong vibration or shock, strong magnetic fields.![]() NOTE
NOTE
Cleaning
Clean the product only with a soft, dry cloth. Do not use paint thinners, solvents, cleaning fluids or chemically impregnated wipes.![]() NOTE
NOTE
Handling
Do not apply excessive force to controls such as switches, knobs, buttons, mounting screws.
Do not insert paper, metal or other objects inside. If this happens, unplug the AC adapter/power cord from the wall outlet. Then have the device checked by qualified service personnel.
© 2022
This manual is protected by copyright. Copying or reprinting, even in excerpts, is only permitted with the consent of Musikhaus Kirstein GmbH. The same applies to the reproduction or copying of images, even in modified form.
Basic operation
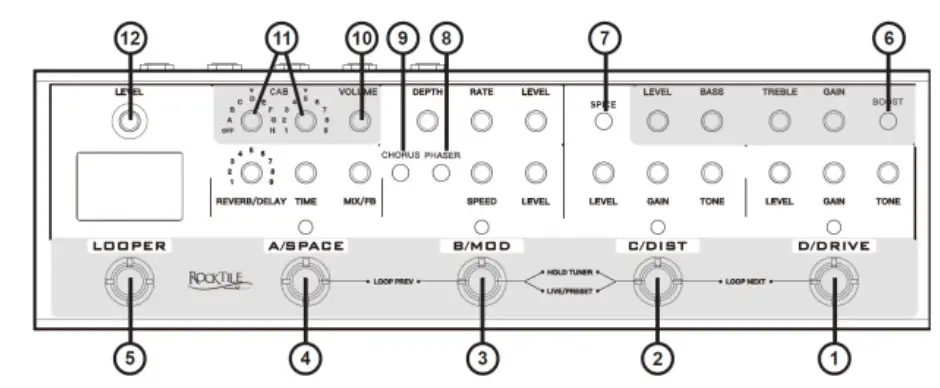
- Switch overdrive on and off / select memory bank D
- Switch distortion on and off / select memory bank C
- Switch MOD effect (CHORUS&PHASER) on and off / select memory bank B
- Switch SPACE effect (DELAY/REVERB) on and off / select memory bank A
- LOOPER
- Switch BOOST effect on and off
- Switching between two different DISTORTION modes (silicon tube/germanium tube)
- Disable/enable PHASER effect
- Disable/enable CHORUS effect
- MASTER-VOLUME
- CAB Speaker Simulation
- LOOPER-LEVEL
2+3.Press briefly for: Switching between LIVE and PRESET operating modes.
Press and hold 2+3 for: Switch TUNER on and off
1+2 LOOPER-Next
3+4 LOOPER Previous
Effect modules
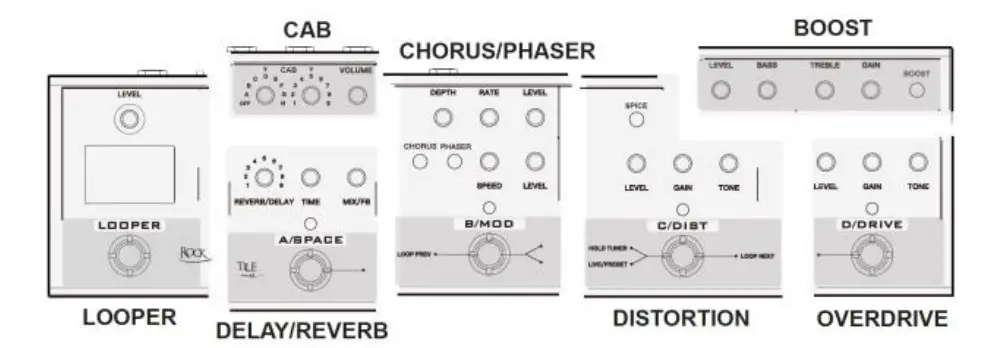
The MRC-90-LOOP is built up of 7 (effect) modules. Each module can be regarded as a single unit.
CAB
The MRC-90-LOOP has a speaker simulation with 72 variations.
Adjust the overall volume with the “VOLUME” knob.
By combining the two CAB controls, you select the individual speaker models.
| Sequence number | Speaker |
| OFF | No speaker simulation |
| A1-A9 | Mshall 1960AV V30 |
| B1-B5 | Spring Pro Junior 1×10 |
| B6-B9/C1-C2 | Spring Champ 25 SE 1×12 against Wall |
| C3-C8 | Spring Champ 25 SE 1×12 mid-room |
| C9 | 5150 4×12 |
| D1-D4 | Onrange 2×12 |
| D5-D9/E1-E9/F1-F6 | MBogie Standard 4×12 V30 |
| F7-F9/G1-G6 | Soldan 2×12 V30 |
| G7 | Frambus 4×12 V30 |
| G8 | Broym |
| G9/H1-H2 | Heywhat |
| H3-H4 | Diesel V30 |
| H5-H9 | VAT Deliverance 2×12 |
SPACE (DELAY/REVERB)
The MRC-90-LOOP has 9 DELAY or REVERB settings.
| Effect | No | Name | Description |
| Reverb | 1 | HALL | Simulates a wide environment and thus long reverberation |
| 2 | ROOM | Simulates a small room with relatively many soft reflections | |
| 3 | ECHO | Simulates an echo effect such as in the mountains | |
| 4 | TILE | Simulates very strong reflections, e.g. in the bathroom/laundry room | |
| 5 | DUCKING | Simulates reverb with NoiseGate. Only slight reverb when playing but strong reverb tail when stopping. | |
| Delay | 6 | CLEAN | Original sound with delay effect |
| 7 | DYNAMIC | Delay effect is lowered while playing. This prevents fast phrases from becoming muddy. | |
| 8 | TAPE | Simulates a tape echo | |
| 9 | REVERSE | Reverse Delay |
MOD(CHORUS/PHASER)
The MRC-90-LOOP features a CHORUS and a PHASER effect. Both are analog effects that can be activated separately within the MOD effect.
CHORUS
The CHORUS effect in the MOD module can be deactivated/activated with the CHORUS toggle switch.
The DEPTH knob adjusts the range of the CHORUS effect.
The RATE knob affects the speed of the CHORUS effect.
LEVEL adjusts the output signal level of the effect.
PHASER
The PHASER effect in the MOD module can be deactivated/activated with the PHASER toggle switch.
The SPEED knob affects the speed of the PHASER effect.
LEVEL adjusts the output signal level of the effect.
DISTORTION
The MRC-90-LOOP features a british-style DISTORTION effect. Two different characteristics can be selected via the SPICE selector switch.
The GAIN control adjusts the amount of distortion.
TONE is used to adjust the tone of the DISTORTION effect.
LEVEL adjusts the output signal level of the effect.
OVERDRIVE
The MRC-90-LOOP has an analog OVERDRIVE, which is based on the famous original from Japan.
The GAIN control adjusts the amount of distortion.
TONE is responsible for the tone control of the OVERDRIVE effect.
LEVEL adjusts the output signal level of the effect.
BOOST
The MRC-90-LOOP has a module for BOOST and SOUND CONTROL. The analog effect can provide up to +15dB signal strength boost.
Use the toggle switch BOOST to activate the BOOST module.
The GAIN control adjusts the signal boost.
BASS and TREBLE are used to control the tone.
LEVEL adjusts the output signal level of the effect.
LOOPER
The MRC-90-LOOP has a LOOPER with 9 LOOP phrases with a maximum storage capacity of 10min. The basic functions of the LOOPER can all be operated by the foot switch (5).
The signal strength of the played LOOPER signal can be adjusted with the VOLUME knob.
When the VOLUME knob is lit in red, this indicates that there is already music data on the selected LOOP phrase.
The following actions apply when the LOOP phrase is empty:
Recording and playback
| Step | Action | Display | Function |
| 1 | Click on LOOP button | A red LED at the top left | Recording |
| 2 | Click on LOOP button | Blue LEDs running | Playback of the first recording |
| 3 | Click on LOOP button | Red LEDs running | Additional recording |
| 4 | Click on LOOP button | Blue LEDs running | Playback of both recordings |
| etc. | |||
| x | Double click on LOOP button | No LEDs | PAUSE |
| X+1 | Click on LOOP button | Blue LEDs running | Playback of all recordings |
Redo
The last recording made can be deleted and replaced by a new recording as follows (this process only works for the last recording made)
| Step | Action | Display | Function |
| 1 | Click on LOOP button | A red LED at the top left | Recording |
| 2 | Click on LOOP button | Blue LEDs running | Playback of the first recording |
| 3 | Click on LOOP button | Red LEDs running | Additional recording |
| 4 | Click on LOOP button | Blue LEDs running | Playback of both recordings |
| 5 | Hold the LOOP button for 2 seconds | During hold red, then blue again | Deleting the previous recording and continuous playback of the remaining recordings |
| 6 | Click on LOOP button | Red LEDs running | Further recording |
| etc. |
Delete
All recordings of a LOOP phrase can be deleted as follows.
The following actions apply to LOOP phrases that already store recorded data:
| Step | Action | Display | Function |
| 1 | Click on LOOP button | Blue LEDs running | Playback of recordings |
| 2 | Double click on LOOP button | No LEDs | PAUSE |
| 3 | Hold the LOOP button for 2 seconds | No LEDs Volume control not lit | All data of the phrase deleted |
Switching between LOOP phrases
The 9 separate LOOP phrases can each be operated as described above. To switch to the next LOOP phrase, press buttons 1+2 simultaneously for 2 seconds. To go backwards, press buttons 3+4 simultaneously for 2 seconds.
LIVE/PRESET mode
The MRC-90-LOOP has two different operating modes.
By briefly pressing the two buttons 2+3, you can switch between the two operating modes.
LIVE Mode
In LIVE mode, the MRC-90-LOOP acts like a pedalboard with 7 effects that can be used separately and combined as desired.
PRESET mode
In PRESET mode, different effect combinations can be stored in four memory locations.
Note: PRESET mode only stores the on/off state of the four effect modules (DELAY/REVERB + CHORUS/PHASER + DISTORTION + OVERDRIVE). Their individual effect parameters as well as the settings of LOOPER, CAB and BOOST are not stored.
With the help of the PRESET mode, fast and comfortable switching times can be realized, e.g. during performances or for recording sessions, even during individual songs.
Saving a Preset
Switch to LIVE mode.
Activate one or more effect modules that you want to use.
Press and hold one of the foot switches 1-4 until the respective LED starts flashing.
The preset is now stored. Four memory locations (A-D) are available.
Recalling a Preset
Switch to PRESET mode.
Tap the respective footswitch (1-4) whose previously stored PRESET you want to recall.
TUNER
The MRC-90-LOOP has a built-in pedal TUNER.
Press both footswitches 2+3 simultaneously for about 3 seconds to activate TUNER.
The output signal is muted and the display switches to TUNER mode.
Now play a single empty string. The tuning tone is now shown in the display. At the
top of the display, several LEDs indicate the tuning status.
Blue LED in the middle at the top of the display -> tuning tone reached
Red LEDs on the left side -> tuning pitch too low
Red LEDs on the right side -> tuning pitch too high
Connections
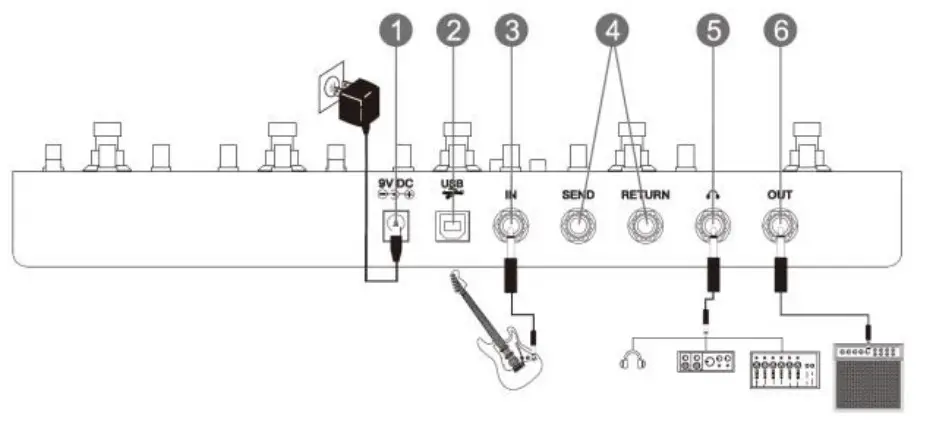
- Power supply socket DC 9V
- USB-B jack. Connect this socket with a USB-A socket of your computer to transfer audio data.
- Input jack for Guitar signal
- Effect loop for looping through external effects
- Headphone jack / Sub-OUT
- Output socket to the amplifier
Technical data
| Input: | 6.3mm mono jack socket |
| Output: | 6.3mm mono jack socket |
| Sample rate: | 44.1K/24bit |
| Power supply: | DC 9V (min. 500mA) MINUS inside |
| Dimensions (mm): | 330 x 96 x 49 |
| Weight (g): | 1200 |
WEEE Declaration
(Waste of Electrical and Electronic Equipment)
Your product has been designed and manufactured with high quality materials and components that can be recycled and reused.
This symbol means that electrical and electronic equipment must be disposed of separately from household waste at the end of its working life.
Please dispose of this device at your local municipal collection point or recycling center.
Please help to preserve the environment in which we live.![]() Technical changes and changes in appearance are reserved.
Technical changes and changes in appearance are reserved.
All information is correct at the time of going to press.
Musikhaus Kirstein GmbH accepts no responsibility for the correctness and completeness of the descriptions, illustrations and information contained therein.
Colors and specifications shown may vary slightly from the product.
Musikhaus Kirstein GmbH – Products are only available through authorized dealers.
Distributors and dealers are not authorized agents of Musikhaus Kirstein GmbH and have no authority to legally bind Musikhaus Kirstein GmbH in any way, either expressly or by conclusive action.
![]() Musihaus Kirstein GmbH
Musihaus Kirstein GmbH
Bernbeurener Str. 11
86956 Schongau – Germany
Phone: 0049-8861-909494-0
Fax: 0049-8861-909494-19