ArubaOS 8.10.0.0
Product Information
The product is ArubaOS 8.10.0.0, and this is the Getting Started Guide for the product. It provides information on the initial setup of an Aruba user-centric network, which includes an Aruba managed device and Aruba Access Points (APs).
Copyright Information
© Copyright 2022 Hewlett Packard Enterprise Development LP.
Open Source Code
This product includes code licensed under the GNU General Public License, the GNU Lesser General Public License, and/or certain other open source licenses. A complete machine-readable copy of the source code corresponding to such code is available upon request. This offer is valid to anyone in receipt of this information and shall expire three years following the date of the final distribution of this product version by Hewlett Packard Enterprise Company. To obtain such source code, send a check or money order in the amount of US $10.00 to:
Hewlett Packard Enterprise Company
6280 America Center Drive
San Jose, CA 95002
USA
Revision History
The following table lists the revisions of this document.
Table 1: Revision History
| Revision | Change Description |
| Revision 01 | Initial release. |
This document describes the initial setup of an Aruba user-centric network that consists of an Aruba managed device and Aruba Access Points (APs).
Following are the topics covered in this guide:
- Installing Mobility Conductor and Managed Devices
- Initial Setup
- Manual Setup
- Automatic Setup
- Configuring the Managed Devices and APs
Related Documents
The following guides are part of the complete documentation for the Aruba user-centric network:
- ArubaOS 8.10.0.0 Getting Started Guide Release Notes
- ArubaOS User Guide
- ArubaOS CLI Reference Guide
- ArubaOS API Guide
- Aruba Mobility Conductor Licensing Guide
- Aruba Virtual Appliance Installation Guide
- Aruba Mobility Conductor Hardware Appliance InstallationGuide
- Aruba Wireless Access Point Installation Guide
Supported Browsers
The following browsers are officially supported for use with the ArubaOS WebUI:
- Microsoft Internet Explorer 11 on Windows 7 and Windows 8
- Microsoft Edge (Microsoft Edge 92.0.902.62 and MicrosoftEdgeHTML 18.19041) on Windows 10
- Firefox (91.0) on Windows 7, Windows 8, Windows 10, andmacOS
- Apple Safari 8.0 or later on macOS
- Google Chrome (92.0.4515.131) on Windows 7, Windows 8, Windows10, and macOS
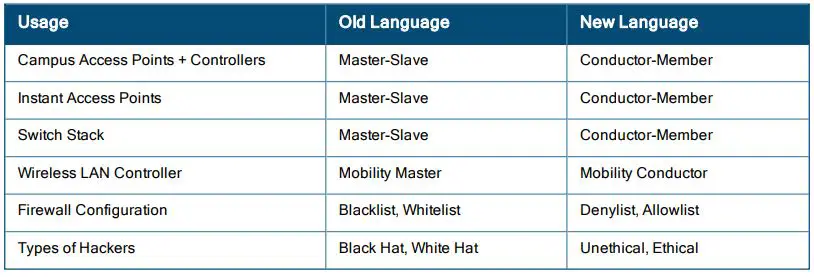
Terminology Change
As part of advancing HPE’s commitment to racial justice, we are taking a much-needed step in overhauling HPE engineering terminology to reflect our belief system of diversity and inclusion. Some legacy products and publications may continue to include terminology that seemingly evokes bias against specific groups of people. Such content is not representative of our HPE culture and moving forward, Aruba will replace racially insensitive terms and instead use the following new language:
Contacting Support
Table 2: Contact Information
| Main Site | arubanetworks.com |
| Support Site | https://asp.arubanetworks.com/ |
| Airheads Social Forums and Knowledge Base | community.arubanetworks.com |
| North American Telephone | 1-800-943-4526 (Toll Free) 1-408-754-1200 |
| International Telephone | arubanetworks.com/support-services/contact-support/ |
| Software Licensing Site | lms.arubanetworks.com |
| End-of-life Information | arubanetworks.com/support-services/end-of-life/ |
| Security Incident Response Team | Site: arubanetworks.com/support-services/security-bulletins/ Email: [email protected] |
Overview
This section provides an overview on how to install the Mobility Conductor and managed devices. Perform the following steps to install the Mobility Conductor and managed devices:
- Launch the WebUI or Console Setup Wizard to configure the managed
- Connect the managed device to the wired
- Configure the managed device to the Mobility The Mobility Conductor – Managed Device topology or stand-alone controller topology is supported.
- If it is a stand-alone controller deployment, installing the Mobility Conductor is not
Install and connect your APs to the network
Installing Mobility Conductor and Managed Devices
To install the Aruba Mobility Conductor and Managed Devices, follow the instructions provided in the documentation.
The Aruba Mobility Conductor provides a 64-bit virtualized software-based managed platform on VM architecture.
The Mobility Conductor is the centralized management platform for the deployment in the virtualized network infrastructure. The Mobility Conductor operates on the VM platforms in the VMware environment and can reside with other virtualized appliances.
Installing the Managed Devices
The WebUI Startup Wizard allows you to configure access to the managed device. The Startup Wizard is available the first time you connect to and log into the managed device or whenever the managed device is reset to its factory default configuration. The serial console setup dialog allows you to configure basic managed device settings through a serial port connection to the managed device.
The Startup Wizard works only on 0/0/1 port on all controllers,
After you complete the Startup Wizard or serial console setup procedure, the managed device reboots using the new configuration information you entered.
Do not connect the managed device to your network when running the Setup Wizard or serial console setup dialog. The factory-default managed device boots up with a default IP address and both DHCP server and spanning tree functions enabled. Once you have completed setup and rebooted the managed device, the managed device should appear on the Mobility Conductor for the management of managed device from the Mobility Conductor.
In addition to the traditional method mentioned above, the 7000 Series controllers running ArubaOS 8.9.0.0 can be configured without user intervention with zero touch provisioning (ZTP). This option automatically configures the managed device using Activate. For more details, see Automatic Setup
Initial Setup
The initial setup process involves manual setup or automatic setup.
You can launch the setup wizard using any PC or workstation that can run a supported Web browser.
The PC or workstation must either be configured to obtain its IP address using DHCP, or configured to have a static IP address on the 172.16.0.254/24 sub-network. The default IP address of the managed device is 172.16.0.254/24. Connect a PC or workstation to 0/0/1 port on the managed device, then enter this IP address into a supported Web browser to launch the Setup Wizard.
To run the Setup Wizard:
- Connect your PC or workstation to 0/0/1 port on the managed
- Make sure that the managed device is not connected to any device on your
- Boot up the managed
- On your PC or workstation, open a Web browser and connect to https://172.16.0.254/24.
- The initial window of the Mobility Controller Setup Wizard asks you to select one of the following deployment Select Standalone or Managed then click Continue.
- Standalone Controller: This is the only controller on the
- Managed Controller: This managed device will be managed by a Mobility
Initial Setup on a Serial Port Connection
The serial port is located on the front panel (back panel in case of 7024 and 7008 controllers) of the managed device. You can start the Initial Setup dialog when you connect a terminal, PC or workstation running a terminal emulation program to the serial port on the managed device.
The serial port connection only allows you to configure the basic configuration required to connect the managed device to the network. The recommended browser-based configuration Wizard allows you to also install software licenses and configure internal and guest WLANs. If you use the Initial Setup dialog to configure the managed device, the browser-based Setup Wizard will not be available unless you reset the managed device to its factory default configuration.
To run the Initial full setup dialog from a serial connection:
- Configure your terminal or terminal emulation program to use the following communication settings:
Table 3: Terminal Communication SettingsBaud Rate Data Bits Parity Stop Bits Flow Control 9600 8 None 1 None - Connect your terminal or PC/workstation to the serial port on the managed devices using an RS-232 serial cable. RJ-45 cable and DB-9 to RJ-45 adapter is You may need a USB adapter to connect the serial cable to your PC.
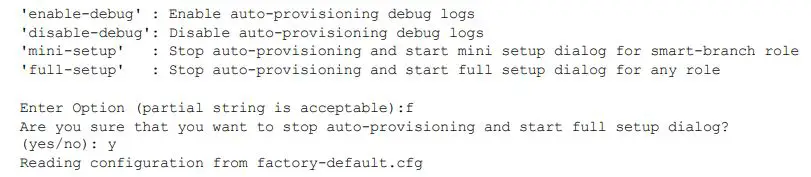
- Boot up the managed After the managed device has booted up, you should see a screen similar to the following setup dialog for managed devices:
Auto-provisioning is in progress. Choose one of the following options to override or debug…
- (Applicable to managed devices using ZTP) enter f to invoke full-setup.
- The Serial Port Configuration Dialog displays the configuration The prompts may vary, depending upon the switch role you choose. Enter the required information at each prompt, then press Enter to continue to the next question.
Manual Setup
To manually set up the system, you need to add system information, Mobility Conductor information, uplink information, and AirWave information. Refer to the documentation for detailed instructions on each step.
Automatic Setup
You can also use Zero Touch Provisioning (ZTP) with DHCP to automatically provision a Managed Device. The documentation provides instructions on how to use ZTP for provisioning.
Configuring the Managed Devices and APs
After the initial setup, you need to configure the Managed Devices and APs. This involves configuring Peer MAC Address for PSK with MAC, identifying the MAC Address on a device, connecting the Managed Device to the wired network, configuring the Managed Device to support APs, and installing the Access Points. Please refer to the documentation for detailed instructions on each configuration step.
Company Information
Hewlett Packard Enterprise Company
6280 America Center Drive
San Jose, CA 95002
USA
References
 HPE Aruba Networking | Enterprise Networking and Security Solutions
-
Contact Support | HPE Aruba Networking
-
End of life | HPE Aruba Networking
-
Security Advisories | HPE Aruba Networking
 Home - Airheads Community
-
Home - Airheads Community
 License Management System
-
HPE Aruba Networking | Enterprise Networking and Security Solutions
-
Contact Support | HPE Aruba Networking
-
End of life | HPE Aruba Networking
-
Security Advisories | HPE Aruba Networking
-
Aruba Support Portal
-
License Management System


