
![]() Strips 700-WL
Strips 700-WL
1104022
ADD
To Add Strips to Your Z-Wave™ Controller
Strips Drip 700 is a SmartStart enabled product and can be added to a Z-Wave network by using SmartStart. Start by scanning the Z-Wave QR Code present on the back label of the Strip, or on the DSK leaflet present in the box. Strips can be added to both secure and non-secure controllers and with or without SmartStart.
a) Add using SmartStart inclusion
You can use this method of inclusion only if your Z-Wave Controller supports SmartStart.
- Open up your Z-Wave Controllers app and select SmartStart inclusion.
- Scan the QR Code (You can find the QR Code on the back of Strips or in the package).
- Remove the magnets from Strips.*
SmartStart will automatically begin 30 seconds after removing the magnets and Strips will be added within 10 minutes when it has been activated within the Z-Wave Controller range. - One long LED blink means Strips has been successfully added to your Z-Wave network.
b) Add using classic inclusion
- Open your Z-Wave Controller application and start pairing mode.
- Remove the magnets from Strips.*
- One long LED blink means Strips has been successfully added to your Z-Wave network.
*If you have previously removed the magnets from Strips, or need to re-add the device, performing a manual wake-up will join the device when the controller is in pairing mode.
To perform a manual wake up

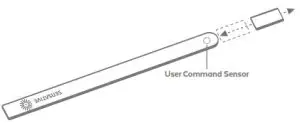
- Take the magnet and move it to the rounded edge and wait for the blink, then move the magnet away.
- Repeat this 3 times. A final short blink will confirm that the user command was successful.
SET-UP

To test the Strips, please follow the steps below:
You may verify that your Z-Wave controller shows Strips Drip reporting correctly by holding it firmly according to the illustration above for >5 seconds. Strips Drip will sense the moisture level and send a leakage alarm. After removing your hand, the water leakage alarm should disappear.![]() Strips Drip includes a mounting plate with built-in moisture detection pads. Strips Drip should be mounted on the mounting plate immediately after completing the inclusion process. This is in order to calibrate the leakage sensor correctly. Keep the moisture detection pads dry for the first 2 hours for a proper leakage sensor calibration.
Strips Drip includes a mounting plate with built-in moisture detection pads. Strips Drip should be mounted on the mounting plate immediately after completing the inclusion process. This is in order to calibrate the leakage sensor correctly. Keep the moisture detection pads dry for the first 2 hours for a proper leakage sensor calibration.
Please note that
Poor network reliability will affect Strips Drip battery life. To make sure you have a good network, place Strips Drip at its intended location and perform a Wake Up (see Table A). If Strips Drip blinks 5 times, this indicates that Strips Drip failed to communicate with the controller. If it happens you may move the Z-Wave controller
closer or add an extender between the controller and Strips Drip.
To mount the Strips, please follow the steps below:
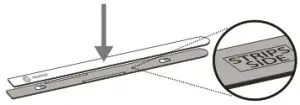
Remove the protective tape from Strips Drip adhesive. Mount Strips
Drip on the marked “Strips Side” of the mounting plate as illustrated above.
You can choose one of the three alternatives for mounting Strips:
a) Place Strips in the intended location.
b) Use the adhesive on the mounting plate to place it firmly in the right place. Please make sure the surface is clean, dry, and at least +10°C (+50°F). Remove the protective tape from the mounting plate and place Strips Drip firmly on the surface.
c) Use screws to mount Strips on its location. Use the plate to mark the holes and use flat screw heads.
Note that the adhesive is permanent and may damage your Strips or surface upon removal. If you need to remove Strips make sure to follow the necessary steps (Find the instructions on our website).
Your Strips Drip is now mounted and added to your Z-Wave controller. It will detect temperature and moisture levels that may, be used for alarms or controlling other devices. Strips Drip analyzes the moisture of the pads to indicate a leak.
You should not remove Strips if a leak occurs. The sensor pods will dry after the water has been removed. You may use a cloth to dry carefully around the soaking pads for faster drying.
UserCommands(TableA)
| Wake Up | To wake up Strips manually for communication with the Z-Wave controller, move the magnet 3 times according to the illustration above. |
| Add/Remove | Place the controller into pairing or exclude mode and perform the “wake up” pattern described in the first section of this manual. |
| Factory Default Reset | You may need to reset Strips if your Z-Wave controller is missing or not responding. Follow the instructions for Wake Up above, but on the 3rd repetition, keep the magnet at the rounded edge for 10 seconds. A long LED signal indicates success. |
Execute user commands according to “Table A” by moving the magnet according to the picture below.
LEDNotifications(TableB)
| 1 Short Blink | -User feedback during commands -Successfully sent a report |
| 2 Short Blinks | The indication when Strips is not added to a network. |
| 1 Long Blink | A user command is successfully executed. |
| 5 Short Blinks | Error (e.g. communication with controller failed) |
Enjoy Strips Drip for years to come!  http://sensative.com/drip700
Visit sensative.com/drip700 to find out more, including instructional videos and for any support inquires.
CONFIGURATION PARAMETERS
| No | Name | Description | Size | Values | DefaultValue |
| 2 | LED alarm event reporting | Turn On or Off LED for specific event indications (ex. alarms) | 1 byte | 0: Off 1: On | 1 |
| 4 | Temperature reporting type | Turn On or Off the temperature sensor value reporting(Does not affect temperature alarms.) | 1 byte | 0: Off 1: On. Reports the actual value when the temperature is changed according to parameter 26 since the last report or at least according to the reporting period set in config parameter 25. 2: On. Reports the actual value periodically based on the config parameter 25. 3: On. The average temperature during the period is sent periodically during every wake-up interval. | 0 |
| 5 | Temperature reporting unit | Select the temperature unit | 1 byte | 0: Celsius 1: Fahrenheit | 0 |
| 6 | Temperature alarms | Turn On or Off the temperature alarm | 1 byte | 0: Off1: On | 0 |
| 7 | High-temperature alarm level | Select a high-temperature alarm level | 1 byte | -20 to +80 (Degree C) | 40 |
| 8 | Low-temperature alarm level | Select a low-temperature alarm level | 1 byte | -20 to +60 (Degree C) | 5 |
| 12 | Leakage/moisture alarm | Turn the Leakage Alarm to On or Off | 1 byte | 0: Off 1: On | 1 |
| 13 | Leakage/moisture alarm level | Set the trigger level at which the Leakage Alarm Notification Report will be sent | 1 byte | 1 to 100 (1: Almost Dry, 100: Wet) | 10 |
| 14 | Leakage/moisture reporting period | Select the number of hours between moisture reports. Report values between -100 to 100. | 1 byte | 0-120 Hours (Hours between reports) | 0 (Off) |
| 15 | Activate supervision | Activate Supervision command for only important alarm events or all events *Supervised commands require a confirmation from the gateway when a notification is received | 1 byte | 0: Off 1: Alarm Report (*) 2: All Reports *Only for alarm events (e.g. Leakage alarm) | 1 |
| 20 | Wake-Up moisture polling workaround for Fibaro Gateway users | Turn On or Off Moisture reporting during polling (applicable only for Fibaro gateway users) | 1 byte | 0: Off 1: On | 0 |
| 23 | Perform leakage/moisture sensor calibration | Should be performed when Drip is mounted correctly and absolutely dry to calibrate the “zero-level”. A MultiLevel Sensor Report with the Moisture value is sent after the calibration is performed. |
1 byte | 0: Device resets to this value after performing capacitance calibration and sends a report with value 0 to the gateway (as recommended by Z-Wave Specifications.) 1: Perform Calibration | 0 |
| 24 | Temperature offset | The offset value is used to calibrate the temperature reports in the actual temperature. | 1 byte | -100 to 100 [=-10.0 to +10.0 (Degree C)] | 0 |
| 25 | Temperature reporting period | Select the number of minutes between the temperature reports (15 minutes to 24 hours) (Used for parameter 4) | 2 bytes | 15-1440 (minutes between reports) | 1440 |
| 26 | Temperature delta | A new temperature report is sent when the temperature has changed more than the delta value. Input value converted to one decimal place. | 1 byte | 5 to 100 [=0.5 to 10.0 (Degree C)] | 20 (=2.0’C) |
| 27 | Temperature hysteresis for temperature alarms | Triggers alarm clear reports (See parameters 7&8). Input value converted to one decimal place. | 1 byte | 5 to 100 [=0.5 to 10.0 (Degree C)] | 20 (=2.0’C) |
For Good Communication:
Strips use low-power radio signals to communicate with your Z-Wave controller. For best results, please consider the following:
- Strips should not be mounted directly on magnetic surfaces or encased within a metal structure as the range will be reduced.
- Strips range is up to 99 meters. (325 feet)
- Any non-battery Z-Wave device will act as a repeater to increase network reliability and range.
| Association | Strips support association group 1 (lifeline), max 1 node, normally used to send Strips’ notification to the Z-Wave Controller. |
| Tamper | Strips will send a tamper alert if it detects that someone tries to wake up or manipulate Strips. |
This product can be operated in any Z-Wave Controller with other Z-Wave certified devices from other manufacturers. All mains operated nodes within the network will act as a repeater, regardless of vendor, to increase the reliability of the network.
For Command Classes and supported Notification Events please see: www.sensative.com/drip700


