
RYZE Tello Drone User Manual
![]()

Searching for Keywords
Search for keywords such as “battery” and “install” to find a topic. If you are using Adobe Acrobat Reader to read this document, press Ctrl+F on Windows or Command+F on Mac to begin a search.
Navigating to a Topic
View a complete list of topics in the table of contents. Click on a topic to navigate to that section.
Printing this Document
This document supports high resolution printing.
Using This Manual

Read Before the First Flight
Read the following documents before using the TELLOTM:
- Tello User Manual
- Tello Quick Start Guide
- Tello Disclaimer and Safety Guidelines
We recommend that you watch all tutorial videos on the official RYZE Tech website https://www.ryzerobotics.com/tello and read the Tello Disclaimer and Safety Guidelines before you fly. Prepare for your first flight by reviewing the Tello Quick Start Guide and refer to this Tello User Manual for more details.
Download the Tello App
Search for “Tello” on the App Store or Google Play or scan the QR code on the right to download the latest version of the app. The Android version of the Tello app is compatible with Android v4.4 and later. The iOS version of the Tello app is compatible with iOS v9.0 and later.

Units of Measurement
This product is designed and tested using metric units. For user convenience US units are also provided in this manual. Figures quoted in US units are conversions from metric units. In some cases they are approximate and they are sometimes rounded to make it easier for users to comply with safety guidelines. All figures quoted in US units should be taken for reference only.
Product Profile
Introduction
Tello is a small quadcopter that features a Vision Positioning System and an onboard camera. Using its Vision Positioning System and advanced flight controller, it can hover in place and is suitable for flying indoors. Advanced features like Bounce mode, 8D Flips, and EZ Shots make using Tello fun. Tello captures 5 megapixel photos and streams 720p live video to the Tello app on a mobile device. Its maximum flight time is approximately 13 minutes*, and its maximum flight distance is 328 ft (100 m).
Failsafe Protection enables Tello to land safely even if you lose connection and its propeller guards can be used to enhance safety.
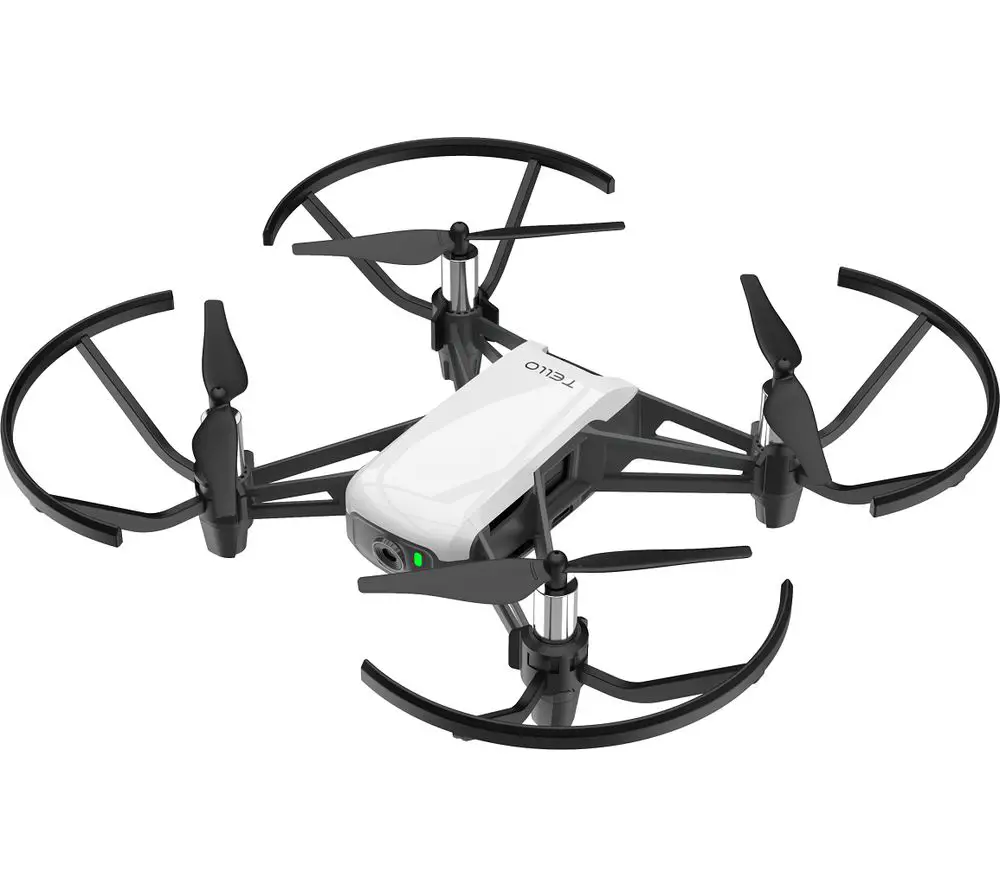
Aircraft Diagram

- Propellers
- Motors
- Aircraft Status Indicator
- Camera
- Power Button
- Antennas
- Vision Positioning System
- Flight Battery
- Micro USB Port
- Propeller Guards
* Maximum flight time was tested in windless conditions flying at a consistent 9 mph (15 kph). This value should be taken for reference only.
Aircraft
The Tello contains a flight controller, video downlink system, Vision Positioning System, propulsion system, and a Flight Battery. Refer to the aircraft diagram in the Product Profile section.
Flight Modes
The Tello can be controlled manually using the virtual joysticks in the Tello app or using a compatible remote controller. It also has various Intelligent Flight Modes that be used to make Tello perform maneuvers automatically. In addition, the Tello has a flight mode that it falls back to in certain circumstances.
The Intelligent Flight Modes are described in detail in the separate Intelligent Flight Modes section. The Aircraft Status Indicator section describes how the Aircraft Status Indicator provides an indication of which mode the aircraft is in.
Flying the Tello Manually
The Tello has two flight speeds that you can select when flying the aircraft manually:
- Slow (default): The maximum flight attitude angle is 9° and the maximum flight speed is 6.7 mph (10.8 kph).
- Fast: The maximum flight attitude angle is 25° and the maximum flight speed is 17.8 mph (28.8 kph).
When flying the Tello manually the aircraft utilizes its Vision Positioning System to automatically stabilize itself. If the conditions are such that the Vision Positioning System is unavailable the aircraft automatically changes to Attitude mode.
![]()
- To switch from Slow to Fast you must read and agree to the disclaimers and warnings that appear in the Tello app. Make sure you understand the differences between the two flight speeds.
- Failsafe Protection automatically initiates landing if the mobile device’s signal is weak or is lost for 50 seconds, or the Tello app crashes.
![]() In the Tello app the flight speed is selected in the settings screen.
In the Tello app the flight speed is selected in the settings screen.
Attitude Mode
The aircraft automatically changes to Attitude mode (ATTI mode) when the Vision Positioning System is unavailable. In Attitude mode the aircraft is not able to position itself and so is easily affected by its surroundings. Environmental factors such as wind can result in horizontal shifting, which may present hazards, especially when flying in confined spaces. When the aircraft enters Attitude mode, land in a safe place as soon as possible to avoid hazards.
![]() The Aircraft Status Indicator blinks yellow slowly when the aircraft is in Attitude mode.
The Aircraft Status Indicator blinks yellow slowly when the aircraft is in Attitude mode.
Aircraft Status Indicator
The Tello’s Aircraft Status Indicator communicates the statuses of the aircraft’s flight control system and Flight Battery. The Aircraft Status Indicator is located on the aircraft’s nose, next to the camera, as shown in the figure below. Refer to the table below for more information about the aircraft states indicated by the Aircraft Status Indicator.

Aircraft Status Indicator States

Vision Positioning System
The Vision Positioning System helps the aircraft maintain its current position. With the help of the Vision Positioning System, the Tello can hover in place more precisely and fly indoors or outdoors in windless conditions. The main components of the Vision Positioning System are a camera and a 3D infrared module located on the underside of the aircraft.

Using the Vision Positioning System
The Vision Positioning System is activated automatically when the aircraft is turned on. No further action is required. The Vision Positioning System is only effective when the aircraft is at altitudes of 1.0 to 32.8 ft (0.3 to 10 m) and works best at altitudes of 1.0 to 19.7 ft (0.3 to 6 m). If the aircraft is beyond this range, the Vision Positioning function may be affected, so extra caution is required.

![]()
- The performance of the Vision Positioning System is affected by the surface being flown over. The aircraft automatically changes to Attitude mode when the Vision Positioning System is unavailable. In Attitude mode the aircraft is not able to position itself. Operate the aircraft with great caution in the following situations, which may cause the aircraft to enter Attitude mode:
a. Flying at high speed below 2 ft (0.5 m).
b. Flying over monochrome surfaces (e.g. pure black, pure white, pure red, pure green).
c. Flying over highly reflective surfaces.
d. Flying over water or transparent surfaces.
e. Flying over moving surfaces or objects. f. Flying in an area where the lighting changes frequently or drastically.
g. Flying over extremely dark (< 10 lux) or bright (> 100,000 lux) surfaces or towards
bright sources of light (e.g. towards sunlight).
h. Flying over surfaces without clear patterns or texture.
i. Flying over surfaces with identical repeating patterns or textures (e.g. tiling).
j. Flying over small and fine objects (e.g. tree branches or power lines).
k. Flying at speeds of over 11 mph (18 kph) at 3.5 ft (1 m) or lower. - If the aircraft’s Vision Positioning system fails for 3 seconds when its flying altitude is above 20 ft (6 m), Failsafe Protection will automatically initiate landing. If the Vision Positioning system recovers during landing, Failsafe Protection will shut off and the aircraft will hover.
- The Vision Positioning System may not be able to recognize patterns on the ground in
very dark (< 100 lux) environments. DO NOT take off if there is a warning prompt in the
Tello app telling you that the environment is too dark. - Keep the cameras and sensors clean at all times. Dirt or other debris may adversely affect their effectiveness.
Intelligent Flight Modes
The Tello features Bounce mode, 8D Flips, Throw & Go, Up & Away, and EZ Shots. To use an
intelligent flight mode, ensure that the aircraft’s battery level is at least 50%, tap ![]() in the Tello app,
in the Tello app,
then select a mode.
Bounce Mode
In Bounce mode the aircraft automatically flies up and down between 1.6 and 3.9 ft (0.5 and 1.2 m) above a flat surface. If the aircraft detects an object below it (such as your hand) it increases its altitude then continues flying up and down.

Using Bounce Mode
- Press the power button once to turn the aircraft on. Launch the Tello app and tap
 to take off.
 - Tap
 and then select Bounce mode. Read the information prompt and then select Start. The aircraft will start flying up and down.
 - Extend your arm and place your palm 1 ft (30 cm) or more below the aircraft, keeping your palm open. The aircraft will increase its altitude then continue flying up and down.
- Tap
 in the Tello app any time to exit Bounce mode.
![]()
- Ensure there is sufficient space when using Bounce mode. Allow a radius of at least 7 ft (2 m) horizontally around the aircraft and allow at least 10 ft (3 m) above the aircraft.
- Before using Bounce mode ensure that the Aircraft Status Indicator is periodically blinking
green twice, indicating that the Vision Positioning System is available. - In Bounce mode, ensure your arm is extended and your palm is flat. DO NOT try to catch the aircraft. The distance between your palm and the aircraft should be at least 1 ft (30 cm).
- Watch out for potential obstacles in your surrounding area (especially on the rear, left, and
right sides of the aircraft) and stay clear of them to avoid accidents. - Be prepared to take control of the aircraft by tapping in the Tello app to exit Bounce mode in case of an emergency.
- Be extra cautious when flying in dark (< 300 lux) or bright (> 10,000 lux) environments.
8D Flips
In 8D Flips the aircraft automatically flips in one of eight different directions.
Using 8D Flips
- Press the power button once to turn the aircraft on. Launch the Tello app and tap to take off.
- Tap and then select 8D Flips. Read the information prompt and then select Start.

- Swipe within the box shown in the app. The aircraft will flip in the direction you swipe.
- Tap in the Tello app any time to exit 8D Flips.

![]()
- Ensure there is sufficient space when using 8D Flips. Allow a radius of at least 7 ft (2 m) horizontally around the aircraft and allow at least 10 ft (3 m) above the aircraft.
- Before using 8D Flips ensure that the Aircraft Status Indicator is periodically blinking green
twice, indicating that the Vision Positioning System is available. - When using 8D Flips, the distance between you and the aircraft should be at least 3.5 ft (1 m).
- Watch out for potential obstacles in your surrounding area (especially on the rear, left,
and right sides of the aircraft) and stay clear of them to avoid accidents. - Be prepared to take control of the aircraft by tapping in the Tello app to exit 8D Flips
in case of an emergency. - Be extra cautious when flying in dark (< 300 lux) or bright (> 10,000 lux) environments.
Throw & Go
Throw & Go lets you launch the aircraft by gently throwing it into the air.
Using Throw & Go
- Press the power button once to turn the aircraft on.
- Tap and then select Throw & Go.

- Place the aircraft in your palm.
- Read the warning prompt and then tap
 to start. The propellers will start spinning slowly. Gently throw the aircraft upward and horizontally away from you, keeping the aircraft horizontal as you throw it. The propellers will start spinning more quickly and the aircraft will automatically hover in place. The propellers will stop if you do not throw the aircraft within 5 seconds of the propellers starting to spin slowly.

![]()
- Only use Throw & Go in an open area and make sure that your flight path is clear of
people, animals, and obstacles. - Throw & Go cannot be used after the aircraft has taken off.
- Be careful when using Throw & Go and make sure you keep your fingers away from the
propellers even when they are spinning slowly. - Hold the aircraft horizontally, and gently throw the aircraft upward and horizontally away
from you. DO NOT throw the aircraft at a speed that exceeds 6 ft/s (2 m/s). DO NOT throw the aircraft at an angle to the horizontal greater than 20° and DO NOT flip the aircraft as you throw it. - Before using Throw & Go ensure that the Aircraft Status Indicator is periodically blinking
green twice, indicating that the Vision Positioning System is available. - Watch out for potential obstacles in your surrounding area (especially on the rear, left,
and right sides of the aircraft) and stay clear of them to avoid accidents. - Be extra cautious when flying in dark (< 300 lux) or bright (> 10,000 lux) environments.
EZ Shots
Using 360
In 360, the aircraft records a short video while rotating 360 degrees.
- Press the power button once to turn the aircraft on. Launch the Tello app and tap to take off.
- Tap and then select 360. Read the information prompt and then select Start.

- The aircraft will rotate 360 degrees and record a video automatically. Tap
 to access the
video. - The aircraft will exit 360 once it has finished recording. You can also tap in the Tello app any time to exit 360.

![]()
- Ensure there is sufficient space when using 360. Allow at least 2 ft (0.5 m) around the
aircraft in all directions. - Before using 360 ensure that the Aircraft Status Indicator is periodically blinking green twice, indicating that the Vision Positioning System is available.
- Watch out for potential obstacles in your surrounding area (especially on the rear, left, and right sides of the aircraft) and stay clear of them to avoid accidents.
- Be prepared to take control of the aircraft by tapping in the Tello app to exit in case of an emergency.
- Be extra cautious when flying in dark (< 300 lux) or bright (> 10,000 lux) environments
Using Circle
In Circle the aircraft records a short video while flying in a circle.
- Press the power button once to turn the aircraft on. Launch the Tello app and tap to take off.
- Tap and then select Circle. Read the information prompt and then select Start.

- The aircraft will fly in a circle around a point approximately 7 ft (2 m) in front of the aircraft nose and record a video.
- The aircraft will exit Circle once it has finished recording. You can also tap in the Tello app any time to exit Circle.

![]()
- Ensure there is sufficient space when using Circle. Allow a radius of at least 10 ft (3 m) around the point 7 ft (2 m) in front of the aircraft nose, and at least 10 ft (3 m) above and below the aircraft.
- Before using Circle ensure that the Aircraft Status Indicator is periodically blinking green
twice, indicating that the Vision Positioning System is available. - Watch out for potential obstacles in your surrounding area (especially on the rear, left,
and right sides of the aircraft) and stay clear of them to avoid accidents. - Be prepared to take control of the aircraft by tapping in the Tello app to exit Circle in
case of an emergency. - Be extra cautious when flying in dark (< 300 lux) or bright (> 10,000 lux) environments.
Using Up & Away
In Up & Away the aircraft records a short video while flying upward and backward.
- Press the power button once to turn the aircraft on. Launch the Tello app and tap to take off.
- Tap and then select Up & Away. Read the information prompt and then select Start.

- The aircraft will record a short video while flying upward and backward.
- The aircraft will exit Up & Away once it has finished recording. You can also tap in the Tello app any time to exit Up & Away.

![]()
- Ensure there is sufficient space when using Up & Away. Allow at least 20 ft (6 m) behind
and 3.5 ft (1 m) above the aircraft. - Before using Up & Away ensure that the Aircraft Status Indicator is periodically blinking
green twice, indicating that the Vision Positioning System is available. - Watch out for potential obstacles in your surrounding area (especially on the rear, left, and right sides of the aircraft) and stay clear of them to avoid accidents.
- Be prepared to take control of the aircraft by tapping in the Tello app to exit Up & Away in case of an emergency.
- Be extra cautious when flying in dark (< 300 lux) or bright (> 10,000 lux) environments.
Propellers
The Tello uses model 3044P propellers. There are two varieties of 3044P propellers, which are
designed to spin in different directions. The presence or absence of marks on the propellers
indicates which type they are and therefore which motors they should be attached to.
Attaching the Propellers
Mount marked propellers on the motors with marked landing gear. Mount unmarked propellers on the motors with unmarked landing gear.
When mounting, ensure that the gap between the bottom of the propeller cap and the motor is no bigger than needed to insert the propeller removal tool.

Detaching the Propellers
Insert the propeller removal tool between the propeller cap and the motor. Be sure to hold the motor while detaching the propeller.

![]()
- Always detach the propellers using the propeller removal tool. DO NOT remove the
propellers by hand as doing so may damage the motors and you may get seriously hurt. - To avoid injury, stand clear of and DO NOT touch propellers or motors when they are
spinning. - Only use original propellers and DO NOT mix propeller types.
- Ensure that the propellers and motors are installed firmly and correctly before each flight.
- Ensure that all propellers are in good condition before each flight. DO NOT use aged,
chipped, or broken propellers.
Propeller Guards
The Tello Propeller Guards can be used to reduce the risk of harm or damage to people or objects resulting from accidental collisions with Tello aircraft.
Mounting the Propeller Guards
Mount each of the propeller guards to the aircraft landing gear beneath the motors. Push each
propeller guard inwards to wrap it around the landing gear. Make sure it clicks into position and that the protruding parts of the landing gear securely fit into the notches on the propeller guards.

Detaching the Propeller Guards
To remove a propeller guard place your finger and thumb as shown in the figure below. With your thumb, gently apply a twisting force to the lip that protrudes from the propeller guard where it wraps around the landing gear.

![]() DO NOT use excessive force when removing propeller guards as doing so may damage
DO NOT use excessive force when removing propeller guards as doing so may damage
the aircraft’s arms and you may get hurt.
Flight Battery
The Tello Flight Battery is a 3.8 V, 1100 mAh battery with charging/discharging protection.
![]() Fully charge the Flight Battery before each flight.
Fully charge the Flight Battery before each flight.
Battery Features
- Overcurrent/Overvoltage Protection: The battery stops charging if an excessive current/ voltage is detected.
- Overdischarge Protection: Discharging stops automatically to prevent excessive discharge.
- Short Circuit Protection: The power supply is cut automatically if a short circuit is detected.
![]() Refer to the Tello Disclaimer and Safety Guidelines before use. Users take full responsibility for all operations and usage.
Refer to the Tello Disclaimer and Safety Guidelines before use. Users take full responsibility for all operations and usage.
Inserting the Flight Battery
Insert the Flight Battery into the aircraft as shown. Ensure the battery is mounted firmly.

To remove the battery pull it out from the aircraft.
Charging the Flight Battery
To charge the Flight Battery connect the Micro USB port on the aircraft to a USB adapter (not
provided) using a standard Micro USB cable.
Charging Time: Approx. 1 hour and 30 minutes.

The Aircraft Status Indicator blinks blue slowly during charging. The battery is fully charged when the Aircraft Status Indicator turns solid blue. Detach the USB adapter when the battery is fully charged.
![]()
- Always use an FCC/CE (depending on location) certified USB adapter that is rated at 5 V
and 1.5 A or above. - Ensure the aircraft is powered off before charging. It cannot be charged when it is
powered on. - DO NOT charge a Flight Battery immediately after flight, because its temperature may be
too high. DO NOT charge a Flight Battery until it cools down to near room temperature. - Charge the Flight Battery in the temperature range 41° to 113° F (5° to 45° C). The ideal
charging temperature range is 72° to 82° F (22° to 28° C).
![]() Before carrying the Flight Battery on an airline flight, it must be discharged to 30% or lower. To discharge the Flight Battery, fly the aircraft.
Before carrying the Flight Battery on an airline flight, it must be discharged to 30% or lower. To discharge the Flight Battery, fly the aircraft.
Checking Battery Level
Press the power button once to turn the aircraft on. Launch the Tello app and check the battery
level in the app.

Camera
The Tello camera captures 5 megapixel photos and 720p videos. The Tello’s Electronic Image
Stabilization feature enables it to consistently capture clear images. The photos and videos can be viewed in the Tello app and copied to a folder in your mobile device.
Tello App
Use this app to control the camera and other aircraft functions. The app is used for configuring your aircraft, viewing your photos and videos, and copying your photos and videos to folders in your mobile device.
Connecting to the Aircraft
Enable the Wi-Fi functionality in your mobile device and then select the TELLO-XXXXXX network. Connection has been established when the live camera view is shown on your mobile device.
Camera View


Controlling the Aircraft
The virtual joysticks are used to control the aircraft’s orientation (yaw), forward/ backward movement (pitch), altitude (throttle), and left/right movement (roll). The function that each virtual joystick movement performs is determined by the choice of virtual joystick mode. Two modes (Mode 1 and Mode 2) are available. The default mode is Mode 2.
In each of the two modes the Tello hovers in place at a constant orientation when both virtual
joysticks are centered. Pushing a virtual joystick away from the center position performs the
functions show in the figure below.
Mode 1

Mode 2

The figure below explains how to use each virtual joystick, using Mode 2 as an example.


![]()
- The area beyond the white circles is also responsive to control commands.
- The Tello is currently compatible with the Gamesir remote controller and Apple MFi
Certified remote controllers. The virtual joysticks are disabled when connected to a
remote controller via Bluetooth.
Flight
Ensure that all flights are carried out indoors or in an open area with no wind. The flight altitude is limited to 32.8 ft (10 m) and flight distance is limited to 328 ft (100 m). Perform a simple test flight the first time you fly the aircraft. Refer to the Test Flight section below.
Flight Environment Requirements
- DO NOT use the aircraft in adverse weather conditions such as rain, snow, fog, wind, smog, hail, lightning, tornadoes, or hurricanes.
- Only fly at locations where you can keep the aircraft at least 33 ft (10 m) away from obstacles, people, animals, buildings, public infrastructure, trees, and bodies of water when in flight.
- DO NOT fly the aircraft on a route that has an abrupt change in the ground level (such as from inside a building to outside), otherwise the positioning function may be disrupted, impacting flight safety.
- Aircraft and battery performance is subject to environmental factors such as air density and temperature. Be very careful when flying 3,281 ft (1,000 m) or more above sea level, since battery and aircraft performance may be reduced.
- DO NOT use the aircraft near accidents, fire, explosions, floods, tsunamis, avalanches, landslides, earthquakes, dust, or sandstorms.
- To avoid interference between your smart device and other wireless equipment, turn off other wireless equipment while you are flying the aircraft.
- DO NOT fly in areas where magnetic or radio interference may occur such as close to: Wi-Fi hotspots, routers, Bluetooth devices, high voltage lines, high voltage power transmission stations, mobile base stations, or broadcasting towers. Flying in areas where interference may disrupt communication between the aircraft and the remote control device may adversely affect flight orientation and location accuracy and may potentially lead to loss of control. Interference may also lead to video downlink errors.
Compliance with Regulations
To avoid serious injury and property damage, observe local laws and regulations during flight. Refer to the Tello Disclaimer and Safety Guidelines for details.
Test Flight
Perform a simple test flight the first time you fly the aircraft:
- Place the aircraft in a flat area with the Flight Battery facing towards you.
- Turn on the aircraft.
- Launch the Tello app and enter the camera view.
- Use auto takeoff.
- Use the virtual joysticks to control the aircraft.
- Use auto landing.
- Turn off the aircraft.
Firmware Updates
When you connect the aircraft to the Tello app you will be notified if a new firmware update is available. To start updating, connect your mobile device to the Internet and follow the on-screen instructions.
![]()
- Firmware updates take around 5 minutes.
- Before performing an update ensure the Flight Battery has at least 50% charge.
Specifications


After-Sales Information
Visit https://www.ryzerobotics.com/support to learn more about after-sales service policies, repair services and support.

Ryze Tech Support
http://www.ryzerobotics.com/support
This content is subject to change.
Download the latest version from
http://www.ryzerobotics.com
Copyright © 2018 Ryze Tech. All Rights Reserved.
![]()
![]()
![]()
![]()
![]()
![]()
![]()
Read More About This Manual & Download PDF:
Documents / Resources
 | RYZE Tello Drone [pdf] User Manual Tello Drone |


