
![]()
User Manual
Thank you for choosing Better Bathrooms. Please read this manual before installing your product and keep for future reference.
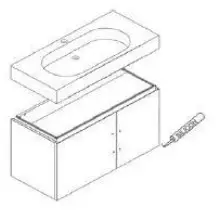
Vanity Basin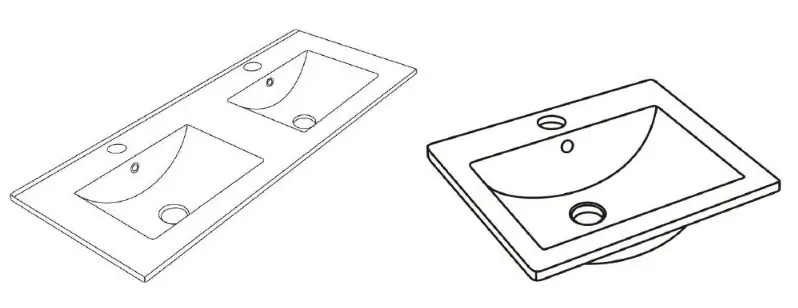
Please note:Image is for illustrative purposes only and may differ slightly to the actual product
- Single-person assembly
- Tools required
- We always recommend using professional tradespeople to install your product
V3_12.10.21
Congratulations on your purchase
And welcome to our growing gang of savvy shoppers
We’re on a mission to bring you extraordinary bathroom products, for less. From modern to traditional style ceramics, plus the gorgeous fixtures, fittings and furniture to match. So, you can fall in love with your space every single day.
As one of the UK’s largest independent bathroom stores, we’ve received countless awards; including the National Business Awards UK, the Digital Entrepreneur Awards and being placed on The Sunday Times Fast Track 100.
We hope your new product goes above and beyond your expectations. However, should any problems occur, please:
- log in to your account and contact our customer services team via your self-serve portal – betterbathrooms.com/CustomerAccount/Login
- contact us via betterbathrooms.com/content/contact-us
Important information
- Please read these instructions thoroughly and retain for future reference
- Always check for pipes and cables before drilling
Contents
- Basin x 1
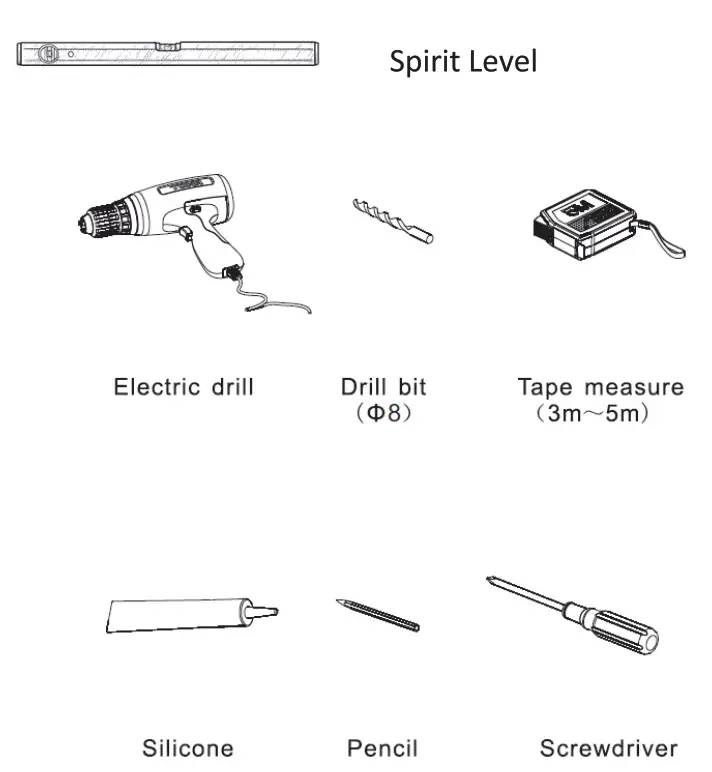
Tools required
Silicone,Drill ,Spanner
Installation
- Check the wall for pipes and wires before drilling, drill through the back plinth Into the wall in the desired location, ensuring the unit is level

- Secure the unit to the wall using a suitable wall fixing for your wall type (fixings not supplied with unit) le plug and screw for solid walls
 On receipt of the product check for damage prior to commencement of any installation. Damage notified after or during installation will be deemed as Installation damage
 - Apply a bead of silicone between the basin and the unit Place the basin/top onto the unit, again ensuring all parts are level Also apply silicone at any join between the basin and walls


- It is recommended to silicone around the base of the unit, to prevent water from passing between the unit and the floor

 On receipt of the product check for damage prior to commencement of any installation. Damage notified after or during installation will be deemed as Installation damage
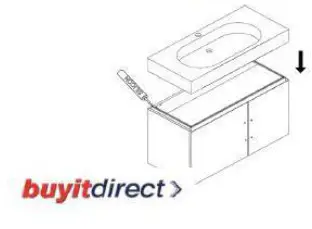

Maintenance
The basin and any chrome components should be cleaned using a soft damp cloth, no abrasive cleaning agents or materials should be used, as this can affect the surface finish.
Use of any abrasives can invalidate your guarantee.
Cleaning
To maintain the surface finish of your product, wipe clean after every use, using a clean damp cloth, a mild detergent mixture can be used. Do not use abrasive cleaning agents or materials which can strip and scratch the surface; the use of these agents or materials can invalidate your guarantee.
INSTALLATION MANUAL
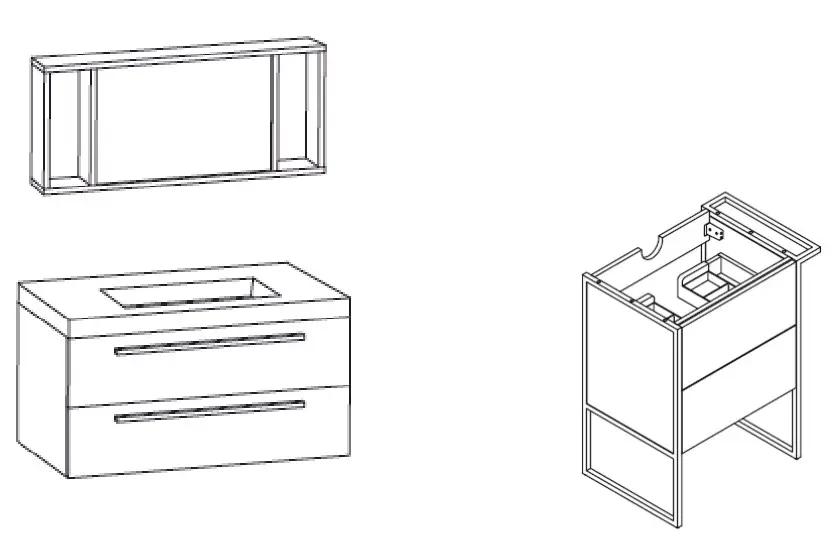
Non-Illuminated Bathroom Mirror and Furniture
Thank you for choosing a Better Bathrooms Product
Please read this user manual before installing and using this product Keep it safe for future reference.
Visit our page www.betterbathrooms.com/for our entire range of Mirrors and Furniture
INSTALLATIOn TOOLS
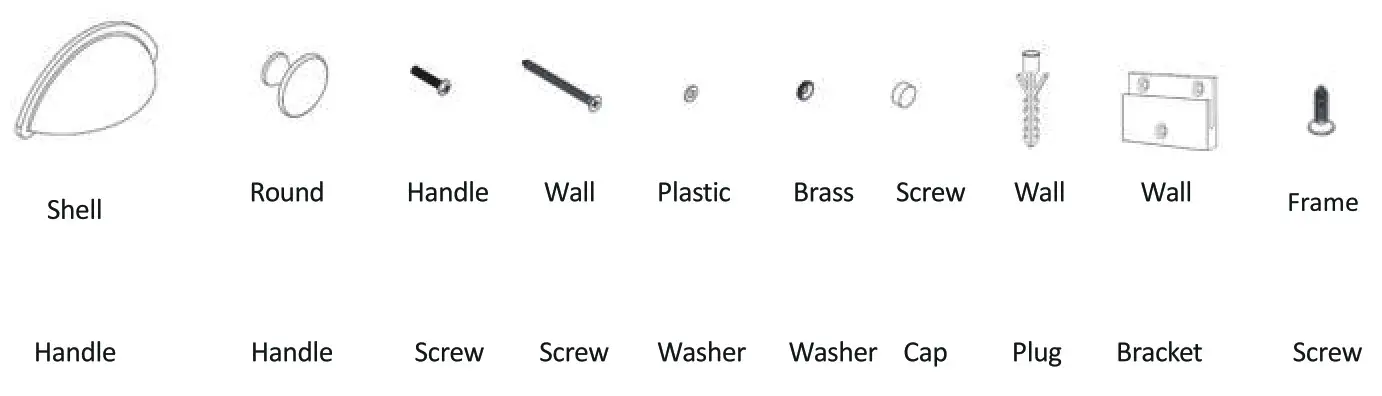
PARTS LIST
| Product | Description | Qty | Description | Qty | Description | Qty | Description | Qty | Description | Qty | Description | Qty | Description | Qty |
| 2497524976 | Wall Screw | 6 | Wall Plug | 6 | Wall Bracket | 2 | Round door | 2 | Round handle | 2 | Shell Door | 2 | Shell Handle | 4 |
| 24977 | handle | screw | Handle | Screw | ||||||||||
| 2497824979 | Wall Screw | 6 | Wall Plug | 6 | Wall Bracket | 2 | Round door | 2 | Round handle | 2 | Shell Door | 2 | Shell Handle | 4 |
| 24980 | handle | screw | Handle | Screw | ||||||||||
| 24981 | ||||||||||||||
| 24982 | Wall Screw | 2 | Wall Plug | 2 | Brass washer | 2 | Plastic washer | 2 | Screw Cap | 2 | ||||
| 24983 | ||||||||||||||
| 2498424985 | Wall Screw | 6 | Wall Plug | 6 | Wall Bracket | 2 | Round door | 2 | Round handle | 2 | ||||
| 24986 | handle | screw | ||||||||||||
| 25008 | ||||||||||||||
| 25039 | Wall Screw | 6 | Wall Plug | 6 | Wall Bracket | 2 | ||||||||
| 25010 | ||||||||||||||
| 2501125012 | Wall Screw | 6 | Wall Plug | 6 | Wall Bracket | 2 | ||||||||
| 25013 | ||||||||||||||
| 2501425015 | Wall Screw | 6 | Wall Plug | 6 | Wall Bracket | 2 | ||||||||
| 25016 | ||||||||||||||
| 2501725018 | Wall Screw | 2 | Wall Plug | 2 | Brass washer | 2 | Plastic washer | 2 | Screw Cap | 2 | ||||
| 25019 | ||||||||||||||
| 2582625827 | ||||||||||||||
| 2582825829 | Wall Screw | 6 | Wall Plug | 6 | Wall Bracket | 2 | Frame Screw | 12 | ||||||
| 2583025831 | ||||||||||||||
| 2583225833 | ||||||||||||||
| 2584125842 | Wall Screw | 6 | Wall Plug | 6 | Wall Bracket | 2 | ||||||||
| 25843 | ||||||||||||||
| 25838 | Round door | Round handle | Shell Door | Shell Handle | ||||||||||
| 25839 | Wall Screw | 6 | Wall Plug | 6 | Wall Bracket | 2 | 1 | 1 | 1 | 2 | ||||
| 25840 | handle | screw | Handle | Screw | ||||||||||
| 26938 | ||||||||||||||
| 2E839 | Wall Screw | 2 | Wall Plug | 2 | Brass Washer | 2 | Plastic Washer | 2 | Screw Cap | 2 | ||||
| 26940 | ||||||||||||||
| 27465 | Wall Screw | 2 | Wall Plug | 2 | Brass washer | 2 | Plastic washer | 2 | Screw Cap | 2 | ||||
| 27466 | ||||||||||||||
| 27799 |
INSTALLATION – Check the product for damage prior to installation
Before any drilling is carried out, please check for pipes and wires within the wall which could be damaged.
MIRROR INSTALLATION
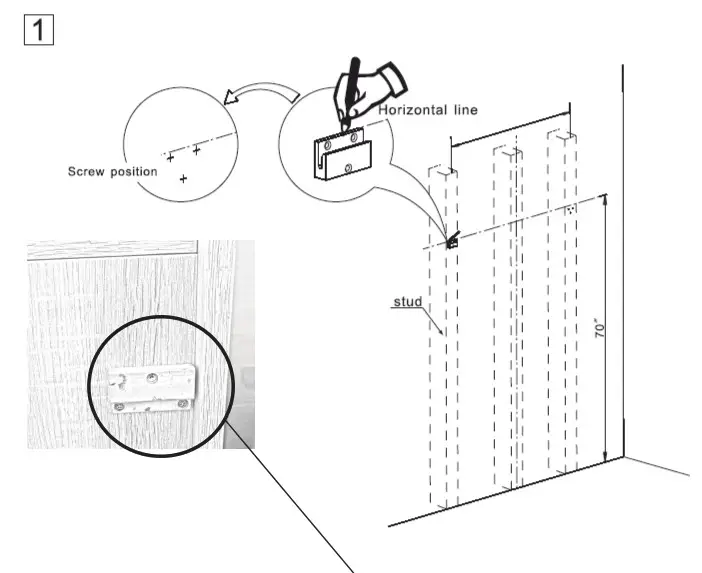
Fitted to the rear of the unit are x 2 fixing brackets, measure the distance between the two brackets and mark this distance on the wall, ensuring this horizontally aligned, using a spirit level.
We recommend a height for the brackets of 70″ (1778mm) from the floor, but this is customer choice.
It is recommended to install to a solid wall, but if fitting to a stud wall, the fixings must be secured into a stud, not only into the plasterboard.
MIRROR INSTALLATION
After the position of the brackets is marked, drill the holes in the wall, using an 8mm drill bit (not supplied), to a depth of approx 40mm.
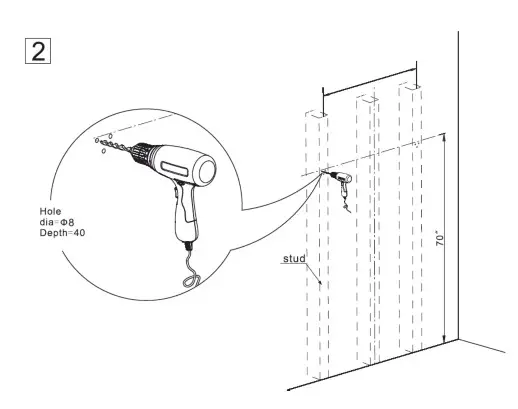 Insert the wall plugs and tap flush with the wall surface.
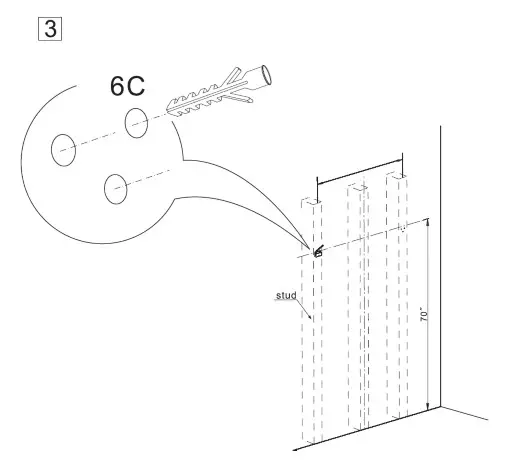 MIRROR INSTALLATION
Hold the bracket up to the wall over the drilled holes and secure using the screws provided.
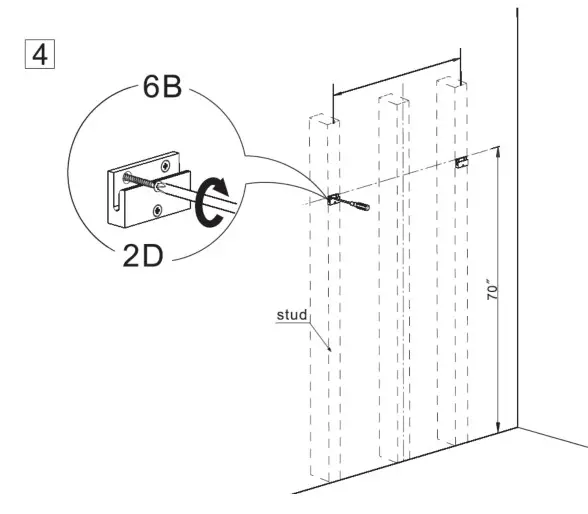
Ensure the brackets on the rear of the unit are fully tightened.
Lift the product on the wall mounted brackets to engage both sections of the brackets.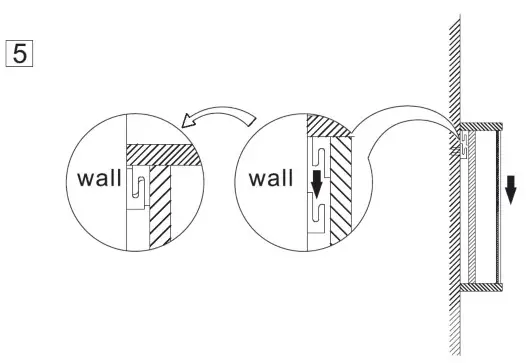 Once installed a bead of silicone can be applied around the edges of the unit if required.
CABINET INSTALLATION
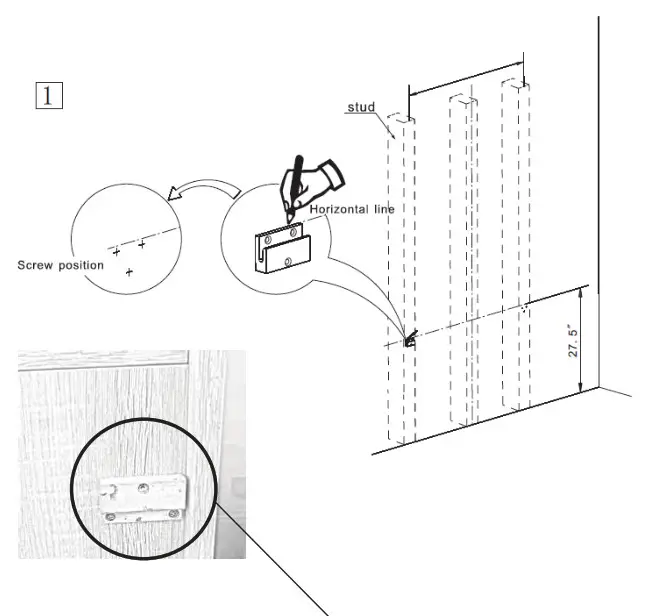
Fitted to the rear of the unit are x 2 fixing brackets, measure the distance between the two brackets and mark this distance on the wall, ensuring this horizontally aligned, using a spirit level.
We recommend a height for the brackets of 27.5” (698mm) from the floor, but this is customer choice.
It is recommended to install to a solid wall, but if fitting to a stud wall, the fixings must be secured into a stud, not only into the plasterboard.
It is also recommended to set up the unit before installing the basin not the unit, so any adjustment can be made, via the fixings on the unit.
CABINET INSTALLATION
After the position of the brackets is marked, drill the holes in the wall, using an 8mm drill bit (not supplied), to a depth of approx 40mm.
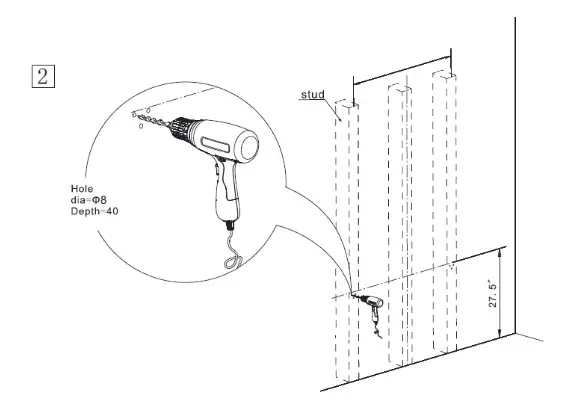
Insert the wall plugs and tap flush with the wall surface and secure the wall brackets into place.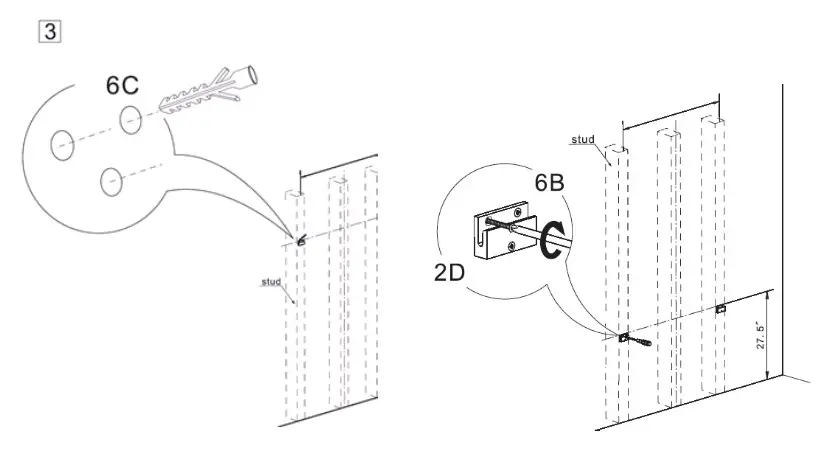
CABINET INSTALLATION
Check the brackets fitted to the unit are fully tightened.
Lift the unit onto wall fitted brackets.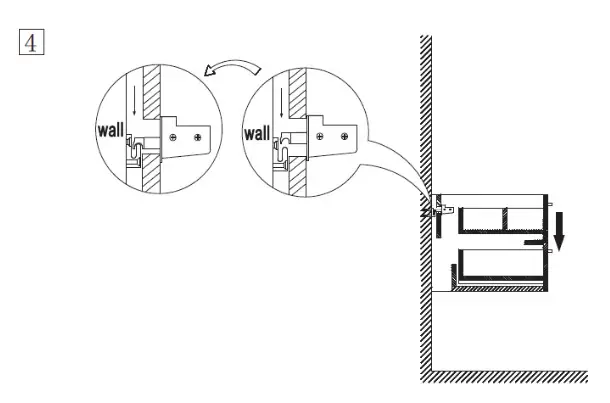 If any adjustment forward or backward / up or down is required this is possible via the fitted adjusters on the inside of the unit.
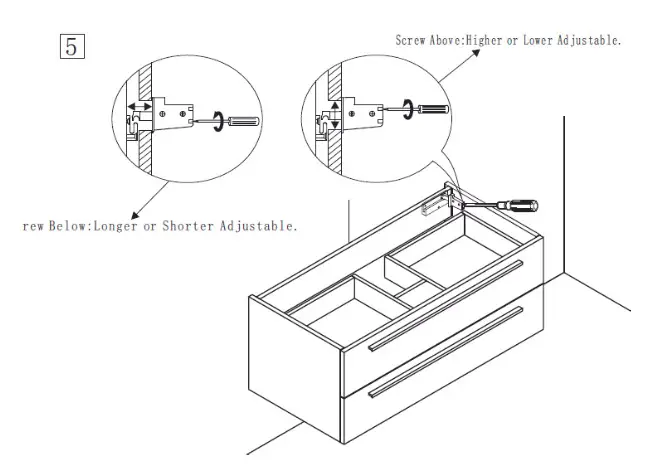
CABINET INSTALLATION
After any adjustment of the unit has been made the basin can be fitted to the unit, by applying a bead of silicone between the unit and basin to provide a seal and fixing for the basin to the unit.
Also run a bead of silicone along the back edge of the base where it meets the wall.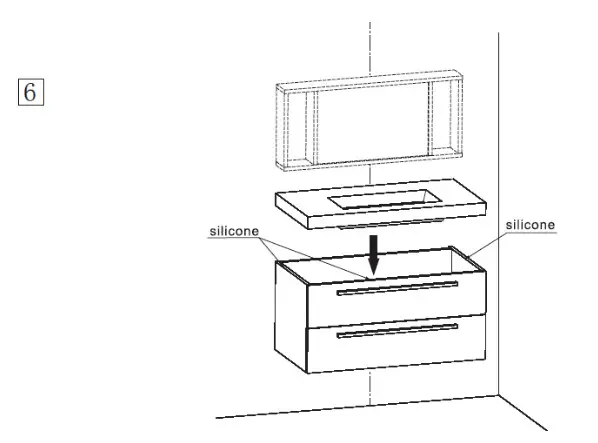
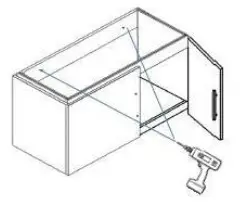
DOOR HANDLE INSTALLATION
The doors which are to be fitted with handles, either the round or shell type are provided with pilot holes which should be drilled to allow fitting of the handle screw through the door and into the handle.
Drill the holes, then place the screw through the unit from inside the door, connect this to the handle and tighten
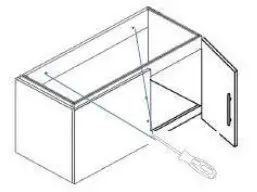
FRAMED FURNITURE ASSEMBLY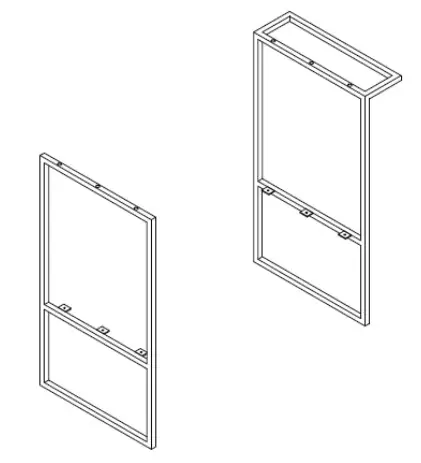 Place the frame onto the unit and screw the frame to the unit through the holes in the frame, ensuring this is aligned with the unit edge.
Ensure this is fully secured before use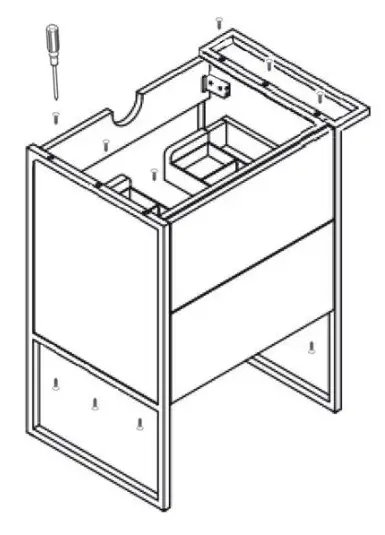
WC UNIT INSTALLATION
Drill into the wall through the rear plinth of the WC unit.
Fit the wall plug
Place the screw through the washers and secure to the wall.
Fit brass screw cap to brass washer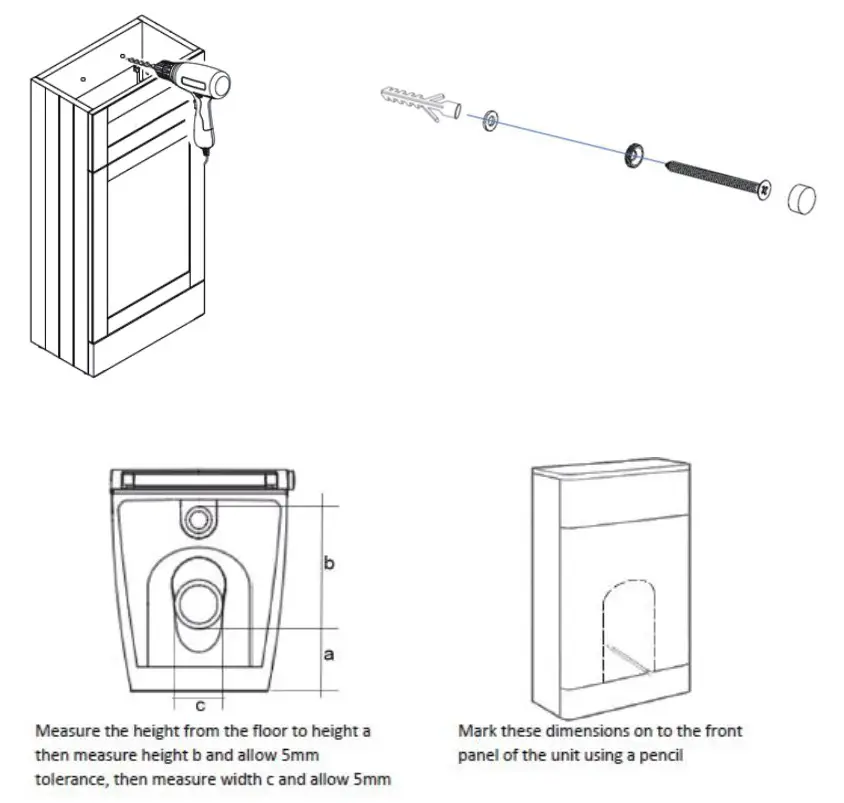
WC UNIT INSTALLATION
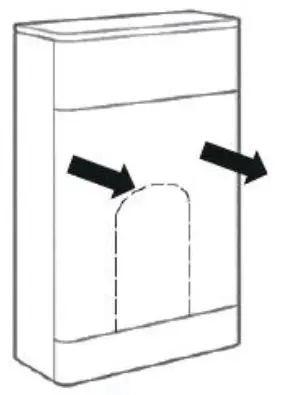
Remove the front panel from the unit and cut the hole to allow the waste pipe and flush pipe to pass from the cistern it is recommended to seal the cut edge and bottom edge of the unit, to protect against moisture ingress
CLEANING AND MAINTENANCE
Wipe the product clean and dry regularly, especially when the product is subject to steam or splashes.
Do not use harsh chemicals or materials on the product, as this will damage the product and invalidate your guarantee.
To clean and maintain the product, wipe using a clean damp cloth and wipe dry with a soft cloth.
We hope your new product goes above and beyond your expectations. However, should any problems occur, please:
- log in to your account and contact our customer services team via your self-serve portal — betterbathrooms.com/CustomerAccount/Login
- contact us via betterbathrooms.comfcontent/contact-us
For more information
« visit betterbathrooms.com
* email [email protected]
« call0330 390 3062
« write to Trident Business Park, Neptune Way, Huddersfield, HD2 1UA pe
Part of the BuyltDirect Group


