Contents hide

Specification
| Specifications |
| Brand Name: Ea ch ine |
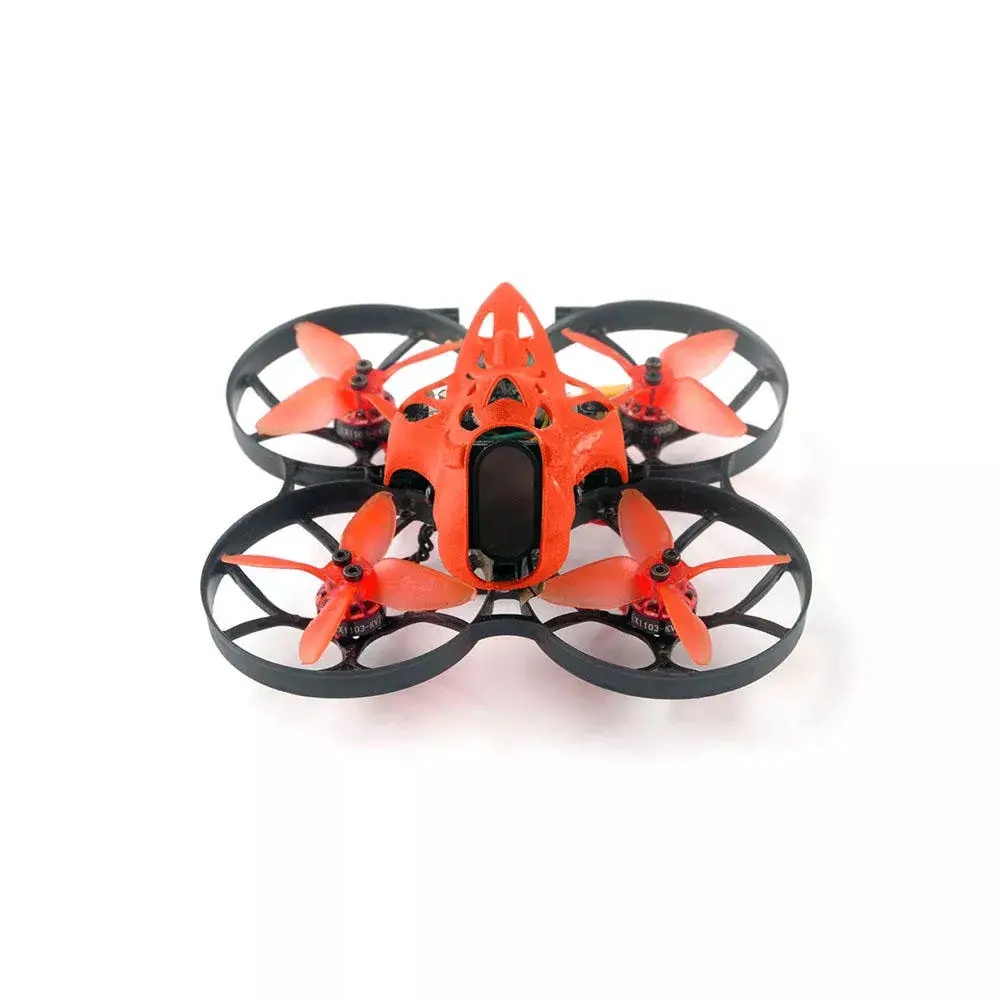
| I tem Name : Cinecan 85mm 4K Cine whoop |
| Wheelbase: 85mm |
| Size : l l Smm *ll Smm *SSmm |
| We ig ht : 63.Sg(without battery) |
| Weight:89g(with Original 3s 300ma h Lipo batter y ) |
Package Include
| Item Name | Qty |
| Cinecan 85mm Frame | 1 |
| Opt ionl : Crazybee F4FR V3.0 PRO FC bui lt – in Frsky NON – EU RX | 1 |
| Option 2: Crazybee F4FS V3.0 PRO FC builHn Flysky RX | |
| Option3 : Crazy bee F4 V3.0 wit h extern al TBS Crossfire Nano RX | |
| Opt i on4: Cr azy bee F4 V3.0 PRO FC no RX verion | |
| 1103 KV7000 motor | 1 |
| 2″ propeller(4cw+4ccw) | 1 |
| Caddx Tar s ier | 1 |
| 5.SG 40ch 25mw-200mw VTX | 1 |
| 3S 11.4 v 300 mah 30 C/60C battery | 1 |
| Propeller disassemble too l | 1 |
| Screwdriver | 1 |
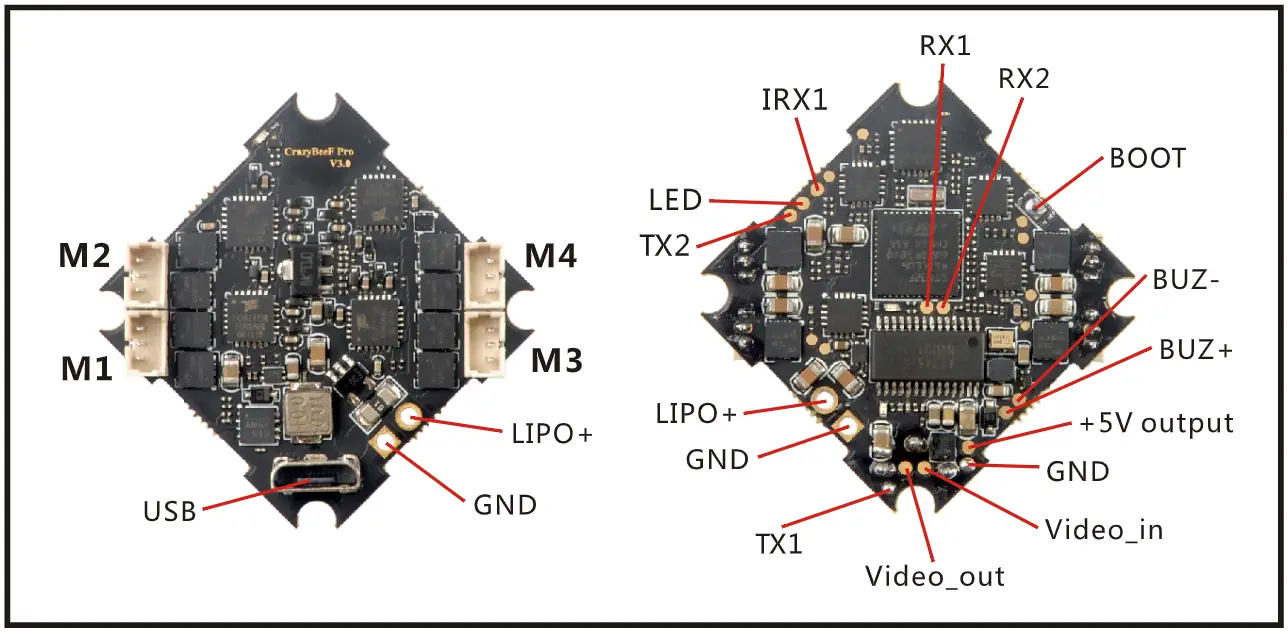
Flight controller connection diagram 


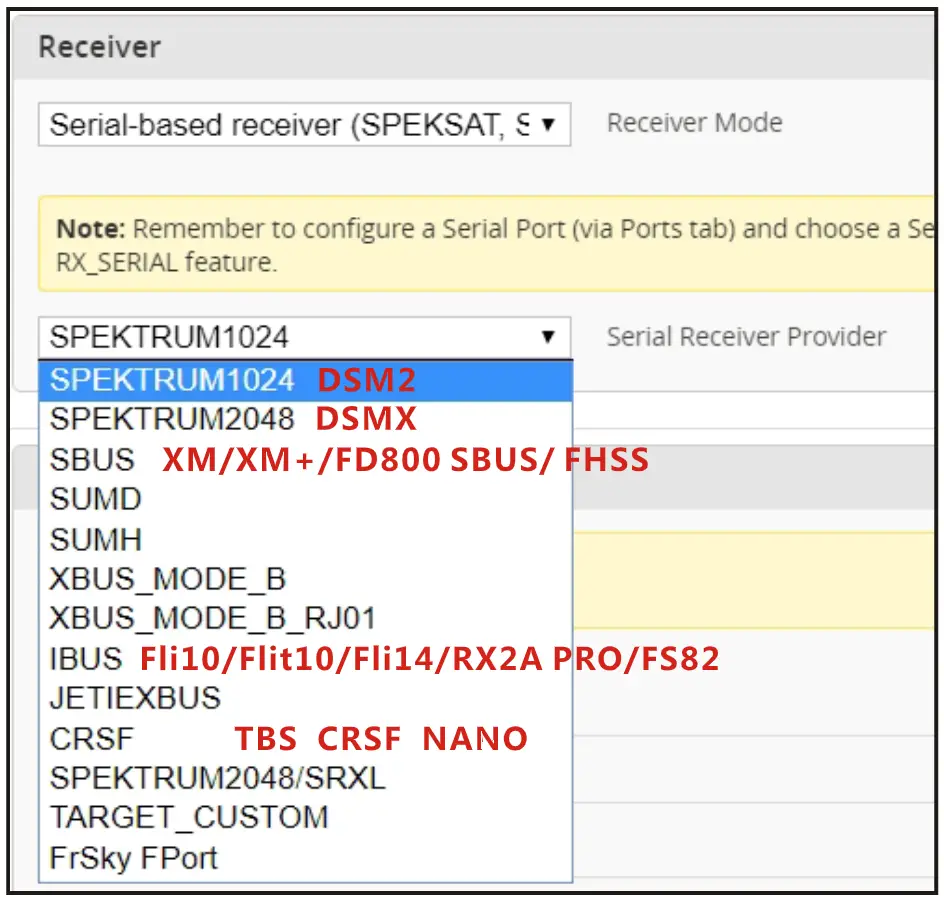
Receiver configuration
- Connect your Serial-based receiver to the Crazybee F4 PRO flight controller according to the bellowing connection diagram table
| XM/XM+ / FHSS/ FDB00 RX | Flil0/Flit14/Flil4+/SP09X RX | TBS Crossfire Nano | |
| Crazybee F4 PRO | |||
| Rl(RXl
No in ver ter ) | IBUS/DSM 2/ DSMX | ||
| IRl (RXl
With inverter) | SBUS | ||
| +5V | +SV | +SV | +5V |
| GND | GND | GND | GND |
| TXl | Smart aud io control (VTX support) | ||
| TX2 | Smart audio control (VTX support) | Smart audio control (VT)( support) | RX |
| RX2 | TX |
- Enable Serial RX for UARTl ( Sbus/lBUS/DSM2/DSMX receiver) or Serial RX for UART2(TBS crossfire Nano receiver) , then choose the correct serial Receiver provider based on the protocol of your receiver
 SBUS signal connect to IRl pad and enable Serial_RX for UARTl IBUS/DSM2/DSMX signal connect to Rl pad and enable Serial_RX for UARTl
 SBUS signal connect to IRl pad and enable Serial_RX for UARTl IBUS/DSM2/DSMX signal connect to Rl pad and enable Serial_RX for UARTl
TBS CRSF NANO connect CHl(TX) to RX2 and CH2(RX) TO TX2 (Make sure telemetry in the configure is enable)
Receiver
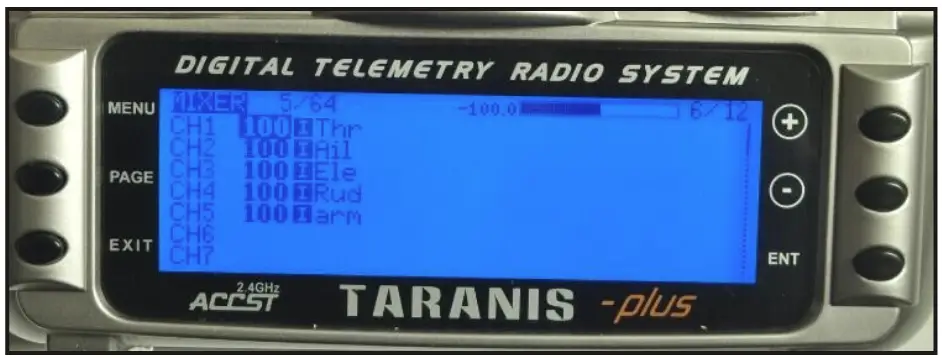
Arm/Disarm the Motor Use frsky x9d as an example
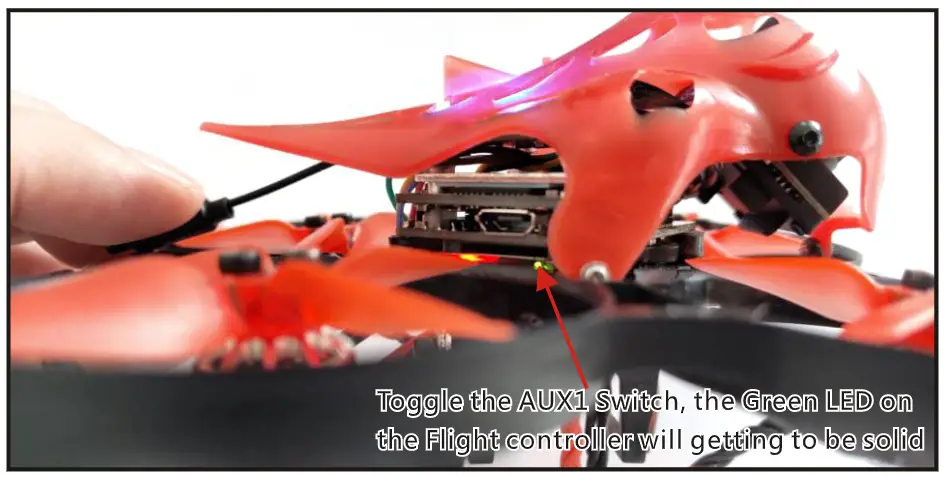
- 1. The Default Arm/Disarm switch for Cinecan is AUXl(Channel 5),and you can also customize it with Betaflight Configurator.

- Turn on the Frsky transmitter (Use X9D+ as an example) and move to the MIXER interface, Set “SA” or “SB” switch etc. for Ch5 to ARM/DISARM the motor.

- The default channel map for Cinecan PNP version is TAER1234, please make sure your transmitter is matched, otherwise it will can’t be armed. Toggle the AUXl Switch ,the Green LED on the flight controller will getting to be solid, this indicates the motor was armed . And also you can found “Armed” displayed on your FPV Goggles or the FPV Monitor. Please make sure keep the Cinecan level before arming .Be careful and enjoy your flight now!


VTX Bands and Channels setup
- Blue LEDS and Red LEDS light on,indicating frequency 5917MHZ( BANDS and CHS)
- Blue LEDl and Red LED2 light on,indicating frequency
- 5845MHZ(BAND1 and CH2)

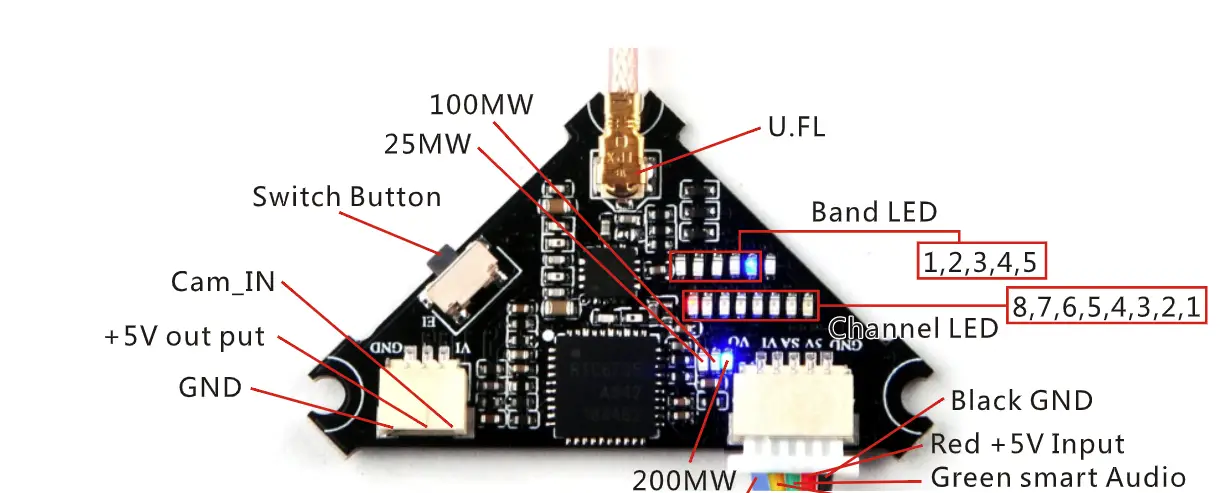
Frequency Table:
| FR CH | CHl | CH2 | CH3 | CH4 | CHS | CH 6 | CH7 | CH S |
| Bandl (A) | 5865M | 5845M | 5825M | 5805M | 5785M | 5765M | 5745M | 5725M |
| Band2(B) | 5733M | 5752M | 5771M | 5790M | 5809M | 5828M | 5847M | 5866M |
| Band3(E) | 5705M | 5685M | 5665M | 5665M | 5885M | 5905M | 5905M | 5905M |
| Band4(F) | 5740M | 5760M | 5780M | 5800M | 5820M | 5840M | 5860M | 5880M |
| BandS(R) | 5658M | 5695M | 5732M | 5769M | 5806M | 5843M | 5880M | 5917M |
There are 3 ways to switch the vtx channels:
- Long press the switch button to change the Band of the VTX, shorter press the switch button to change the channels of the VTX.
(Can’t save ,it will lost the channel while re-power for the Cinecan since the Smartaud io funciton enalbed) - Go to Betaflight CLI ,type the command:
Set vtx_band=3 Set vtx_channel=l Set vtx_fr eq=5705 save
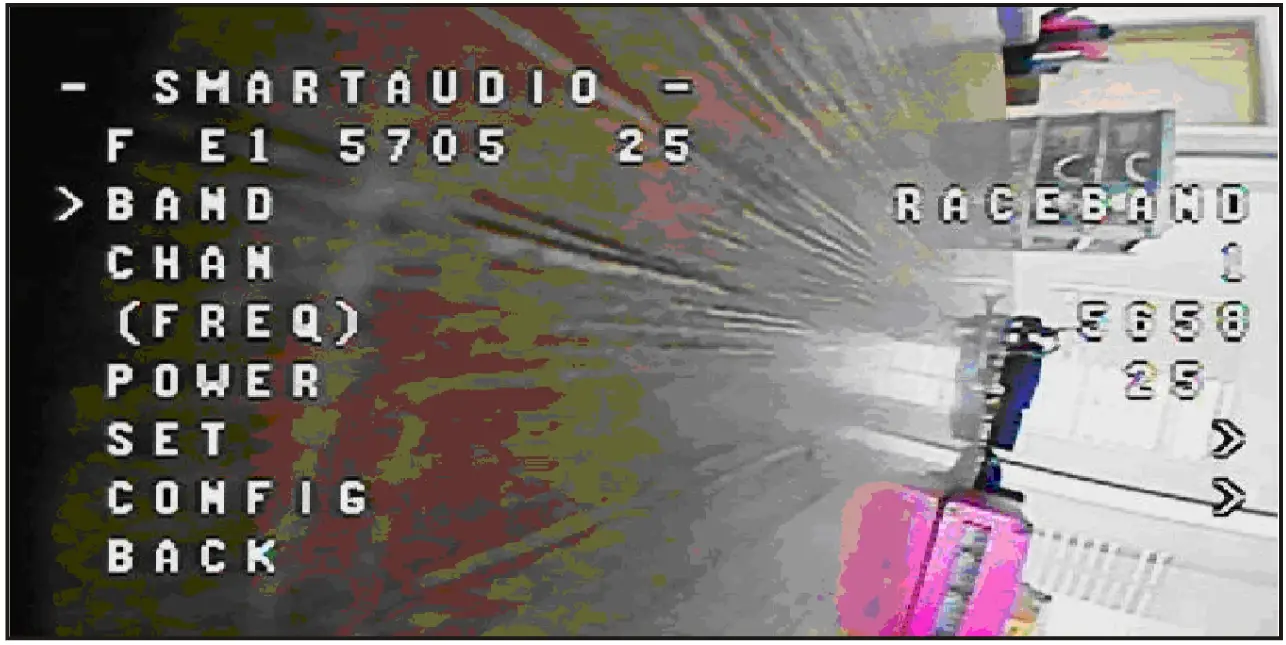
Notes : The vtx_fr eq should match the vtx_b and and vtx_channle as the VTX Channel list shows. For example, if you set vtx_freq =573 2, you should set vtx_band =S and vtx_channel=3 - Enable Smartaudio for UART2, then move the stick of the transmitter (THR MID+YAW LEFT + PITCH UP) to enter OSD Menu , Enter to Feature s, then enter to VTX SA to set VTX Band and channel

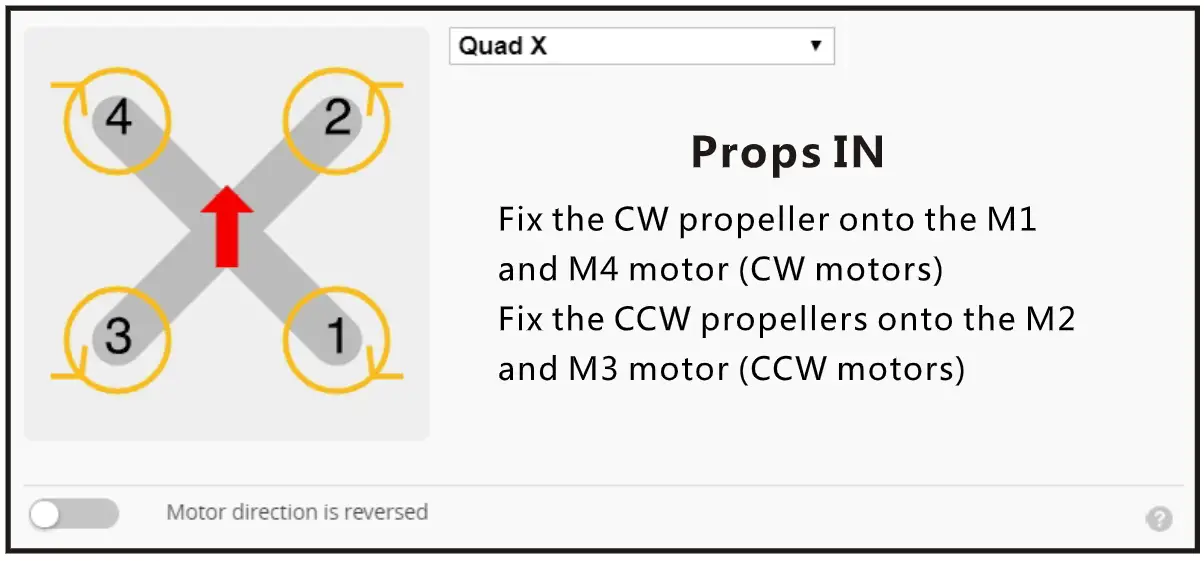
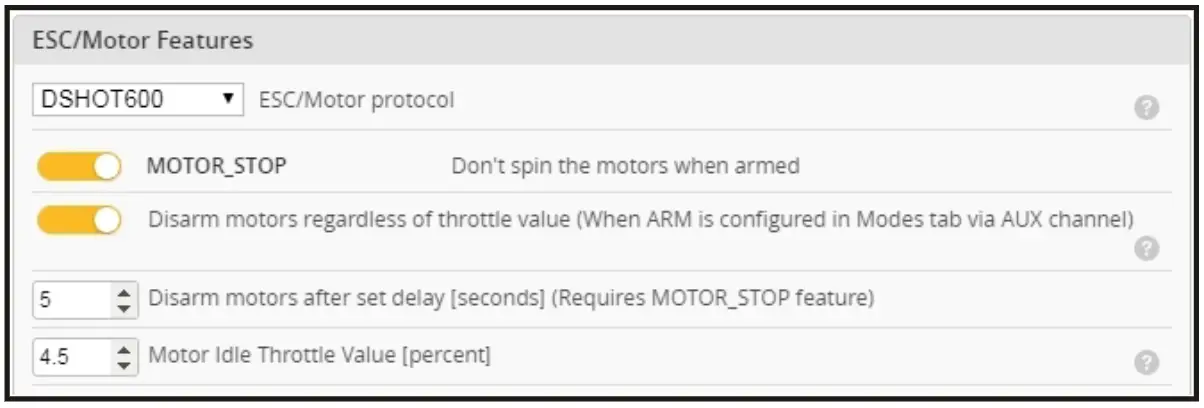
Mixer type and ESC/motor protocol 
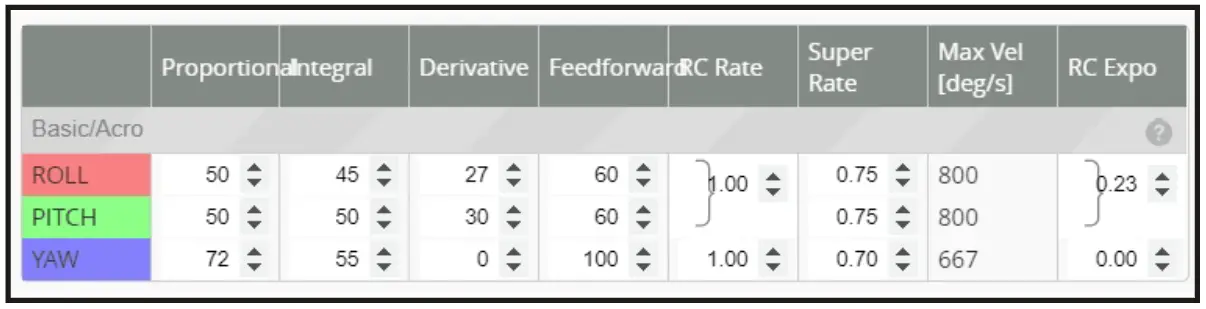
Default PID setting 
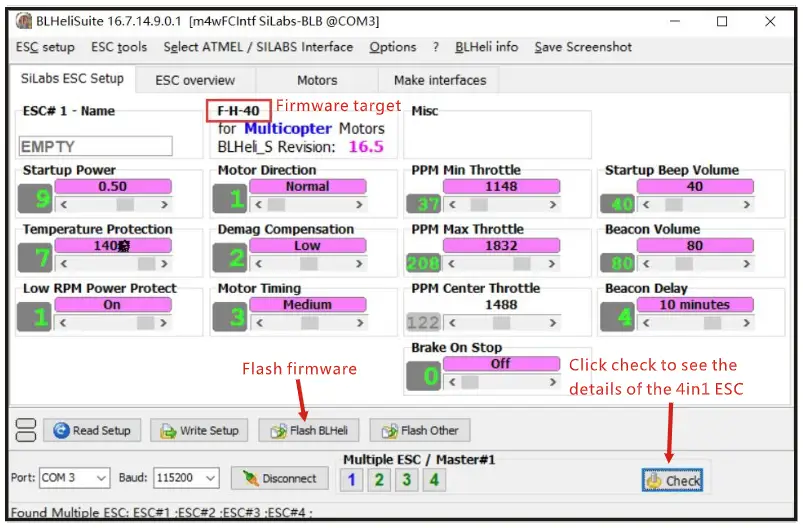
ESC Check and Flash firmware
- Download New release Blhelisuite from:
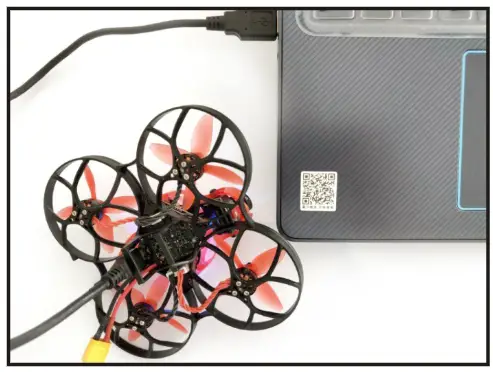
https://www.mediafjre.com/folder/dx6kfaasyo24I/BLHeliSuite - Connect the Crazybee F4 PRO flight controller to computer and power for it with battery

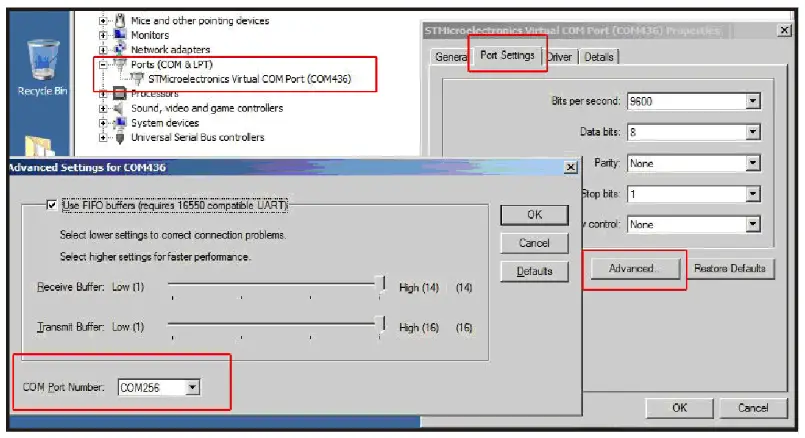
- Open the Device Manager of your computer, find the Ports, please make sure the Com port Serial Number is under 255, otherwise it will can’t connect to the BLHELISUITE. You can change the port serial number like the bellowing step :

- Open the BLHELISUITE, Select SI LABS BLHeli Bootloader (Clean/light) from the third tab on the top side. Then Select the right Serial com port and Click connect. You can also Flash the new release BLHeli_s firmware via the BLHEILISUITE, the firmware Target is “F-H-40”

Flight controller firmware update
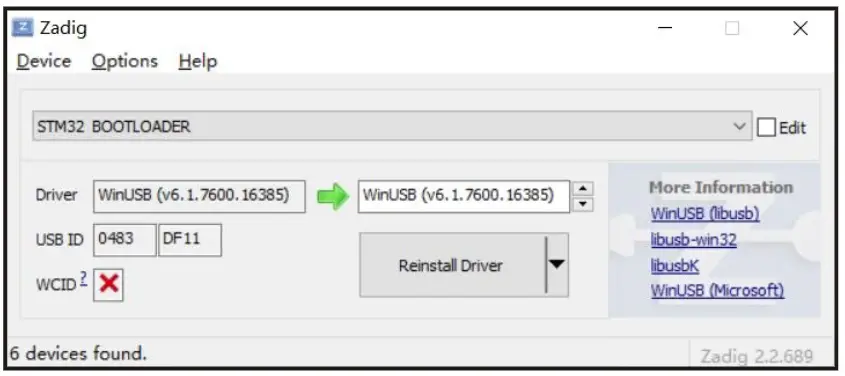
- Install latest STM32 Virtual COM Port Driver http://www.st.com/web/en/catalog/tools/PF257938
- 2. Install STM BOOTLOAD Driver (STM Device in DFU MODE)
- Open Betaflight configurator and choose firmware target “CrazybeeF4DX” ,then select the fireware version.
- There are 2 ways to get in DFU Mode: 1). solder the boot pad and then plug USB to computer 2). loading betaflight firmware and hit “flash” , then it will getting into DFU Mode automatically.
- Open Zadig tools to replace the drivers from STM32 Bootloader to WINUSB Driver.
- Reconnect the flight controller to the computer after replace driver done , and open Betaflight Configurator, loading firmware and flash.

“Flip over after crash” procedure
Set one channel of your radio transmitter to activate the Flip over function in the Mode tab of Betaflight configurator. 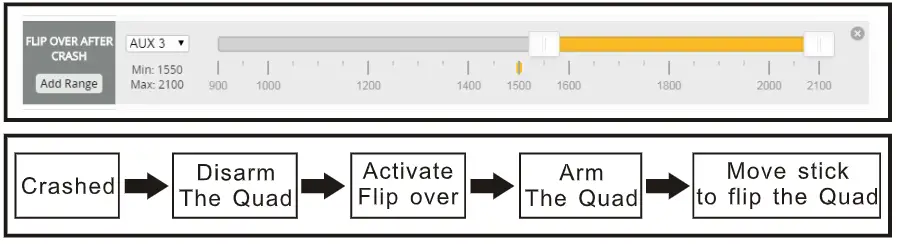
Notes: If only plug the usb , there is no video display on the goggles , need to plug the battery
Eachine Cinecan 85mm 3s 4K Cinewhoop PNP Version Mini Drone User Manual – Download [optimized]
Eachine Cinecan 85mm 3s 4K Cinewhoop PNP Version Mini Drone User Manual – Download


