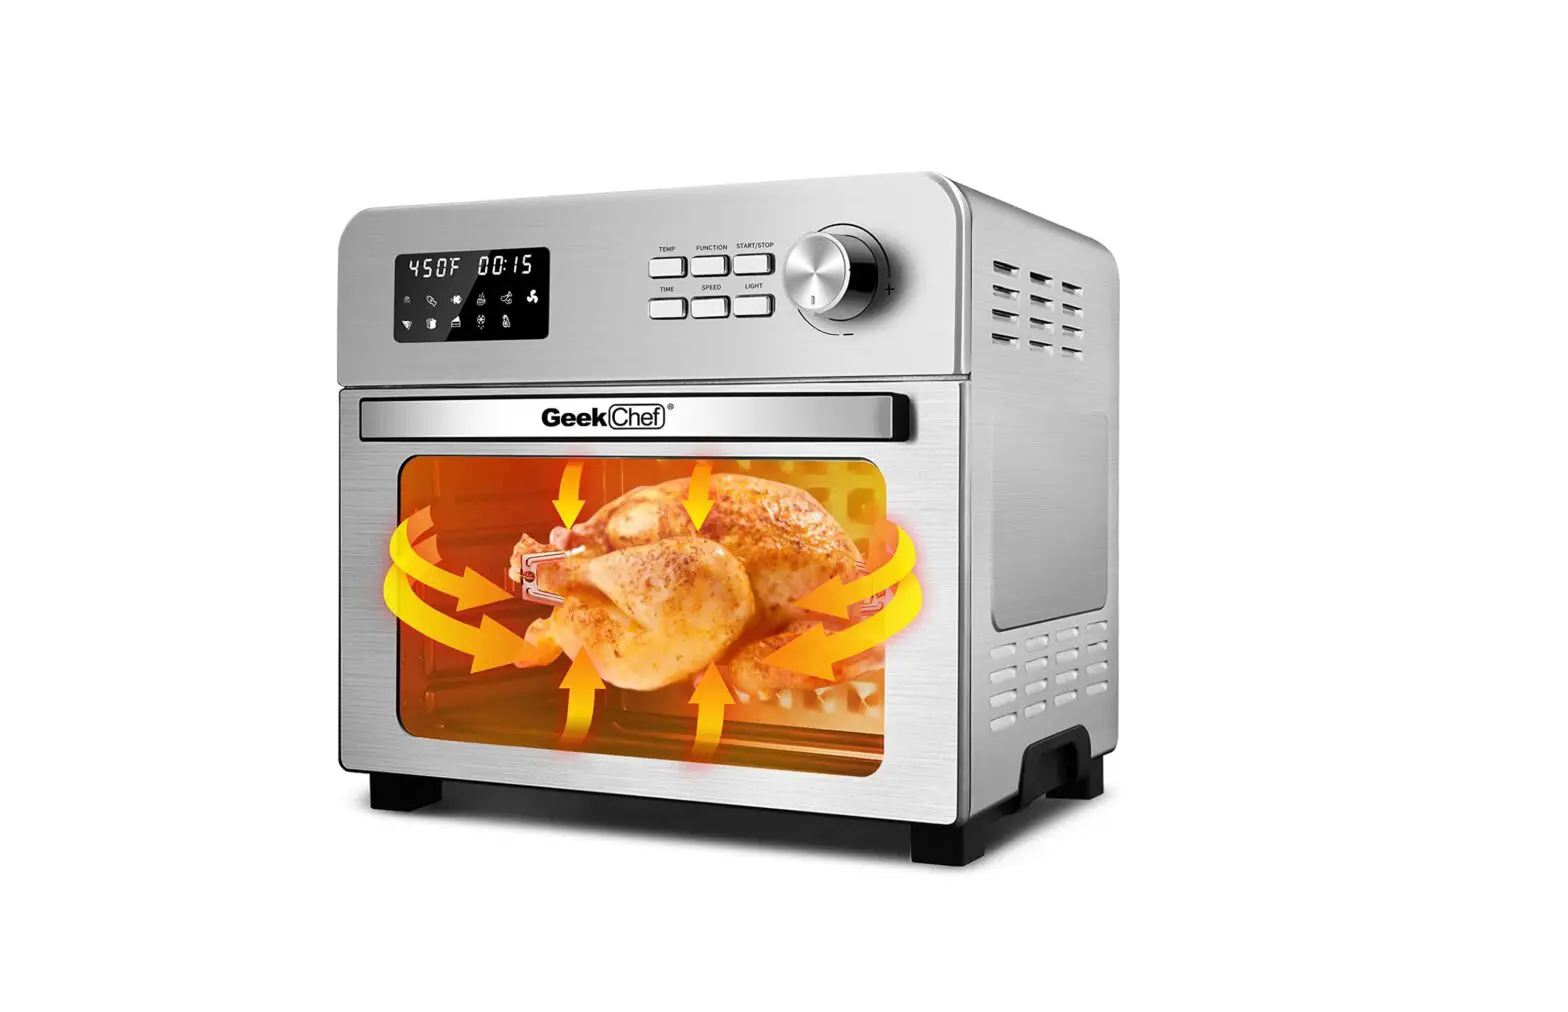
GeekChef GTO30A Digital Air Fryer Oven Instruction Manual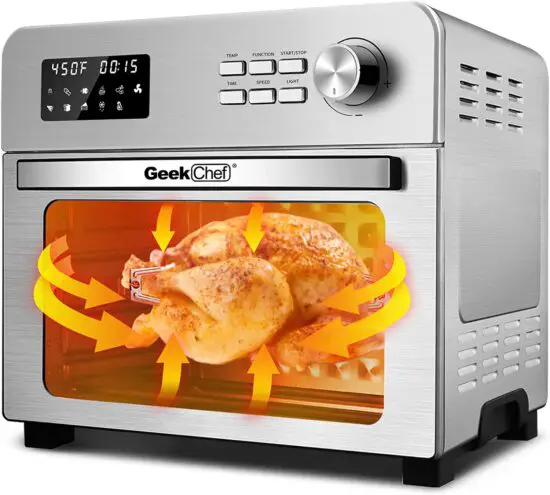
IMPORTANT SAFETY INSTRUCTIONS
Always follow basic safety precautions when using your Air Fryer Toaster Oven.
![]() READ ALL INSTRUCTIONS BEFORE USE
READ ALL INSTRUCTIONS BEFORE USE
- Unplug from outlet when not in use and before cleaning. Allow to cool before cleaning or handling, putting on or taking off parts.
- Do not store any materials other than manufacturer’s recommended accessories in this appliance when not in use.
- Do not immerse cord , plug or any parts of Air Fryer Toaster Oven in water or other liquid to prevent against electrical hazard.
- Do not place any of the following materials in this appliance: cardboard, plastic, paper, or anything similar.
- Do not clean with metal scouring pads. Pieces can break of the pad and touch electrical parts, involving a risk of electric shock.
- Do not rest cooking utensils or baking dishes on glass door.
- Do not operate your appliance in an appliance garage or under a wall cabinet. When storing in an appliance garage, always unplug the unit from the electrical outlet.
- Check if the voltage indicated on the appliance corresponds to the local main voltage before connecting the appliance.
- To avoid potential hazards, please do not put the product next to or used by children.
- Do not touch hot surfaces without using heat-protective gloves to avoid burns, use extreme caution when removing hot accessories or disposing of hot grease.
- Do not let the cord hang over the edge of a surface where the potential of child or pet interaction is present.
- Extreme caution should be exercised when using containers constructed of materials other than metal or glass in the Air Fryer Toaster Oven.
- Over sized foods and utensils must not be inserted in an Air Fryer Toaster Oven as they may involve a risk of fire or electric shock.
- A fire may occur if the appliance is covered or touching flammable materai Is such as curtains, draperies or walls when in operation.
- Do not store any items on top of the appliance when in operation.
- Warning: To avoid possibility of fire, never leave the appliance unattended during use.
Use recommended temperature settings for all function. - Do not use outdoors.
- Do not use this appliance for other than intended use.
- Do not place on or near a hot gas or electric burner.
- Do not operate any appliance with a damaged cord or plug. If the appliance is dropped or damaged, please return product to original store or retailer for proper inspection and repair.
- To avoid potential injury, do not use accessories or attachments not recommended for the unit.
FOR HOUSEHOLD USE ONLY SAVE THESE INSTRUCTIONS
BEFORE USING YOUR AIR FRYER TOASTER OVEN
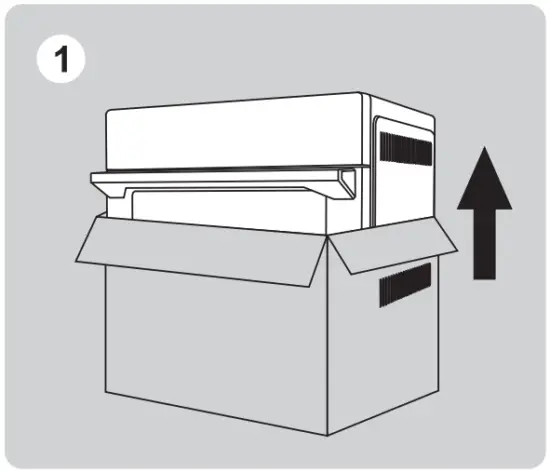
- Remove all packaging around and inside the oven.

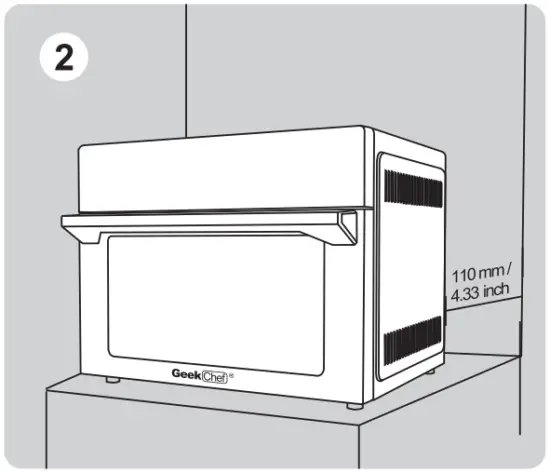
- Place on a stable, level, heat-resistant surface, away from anything that can be damaged by heat. Keep at least 110 mm / 4.33 inch distance between the electrical outlet and the wall, furniture etc.
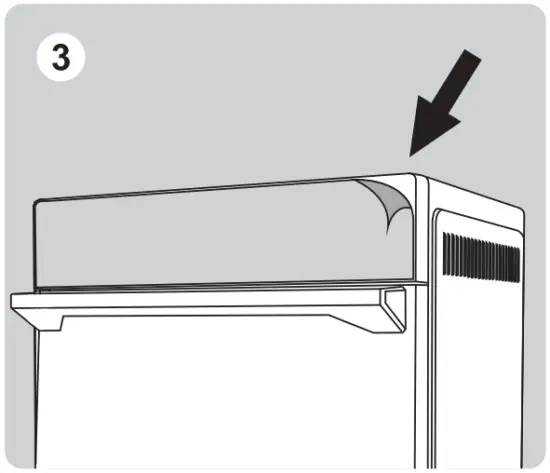
- Remove the protective film from the control panel. (This film is to protect the panel, you can tear it off or keep it)
- Wash all accessories and clean the interior of the Air Fryer Toaster Oven. Dry and place accessories back in oven.
- Before use, ensure that the power and outlet meet the requirements to operate this product ( input power requirements ).

- Upon first use, it is necessary to run the oven for 18 minutes at the highest temperature ( 450°F ) in order to sterilize and remove any manufacturing odor. The Air fryer Toaster Oven may emit an odor or smoke due to the heater’s protective film.

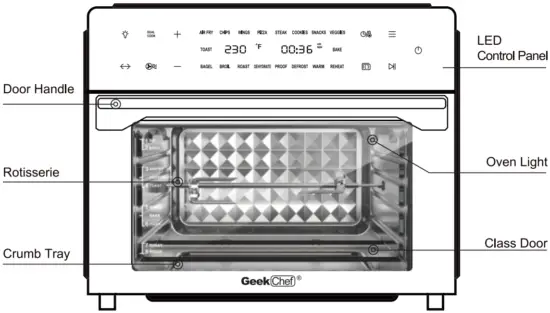
PRODUCT COMPONENTS
ACCESSORIES
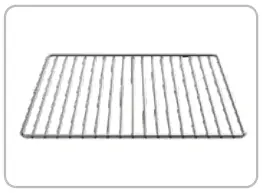
- Wire Rack
Use for meat, bread, pizza etc.
- Air Fryer Basket
Use the Air Fryer Basket in conjunction with the Air Fry function to optimize cooking results. Use for fries, chicken wings, onions etc. It also could be used as the dehydration basket. - Baking Pan
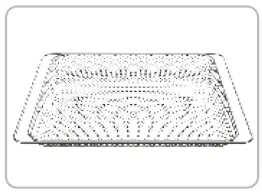
Use for cookies, cake, turkey etc.
It can also hold the drippings from the food or oil when air frying. - DOOR SENSOR
If the doors opened during cooking, the cooking will pause and the light will turn on The panel will show When the door is closed, the light will turn of fand resume cooking. Please make sure to keep the oven door closed during cooking.
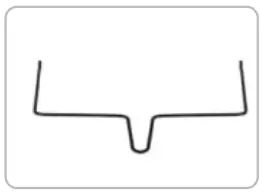
 - Fetch Rack
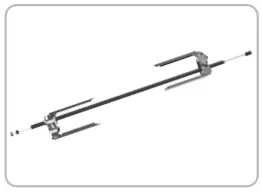
Use to remove the rotisserie shaft from the oven. - Rotisserie
Use for chicken, turkey, meat.

TECHNICAL SPECIFICATIONS
| Power | Voltage | Frequency | Capacity |
| 1800W | 120V | 60Hz | 31Qt / 30L |
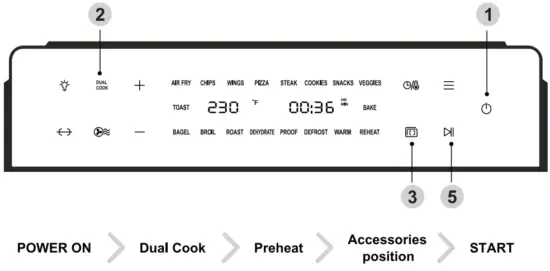
CONTROL PANEL
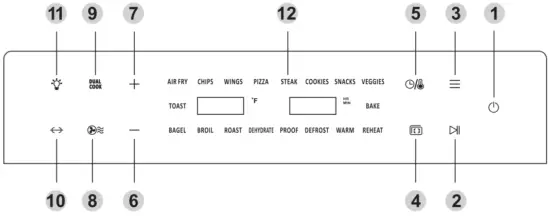
 POWER ON / OFF
Touch POWER ON / OFF icon to turn the Air Fryer Toaster Oven On / Off. START / PAUSE
Touch “START / PAUSE” icon to start or stop the program MENU
MENU
You can select the menu by continuously touching the menu icon, or you can select the menu by touching the “+” or “—” icon on the left. PREHEAT
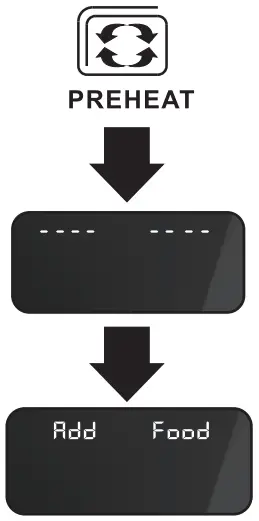
After selecting a program and adjusting the temperature, touch ” PREHEAT ” icon to preheat the Air Fryer Toaster Oven. ( No need to touch the START / PAUSE icon to start the preheat program. After preheating, the oven will beep 5 times and “Add food “will be showed on the display.) TIMER / TEMPERATURE SWITCH
 MINUS
MINUS
Touch this icon to select the menu or decrease the time or temperature. PLUS
PLUS
Touch this icon to select the menu or increase the time or temperature. AIR FRY
This icon is for display only If the program with fan running is adopted, the icon will keep flashing during operation. DUAL COOK
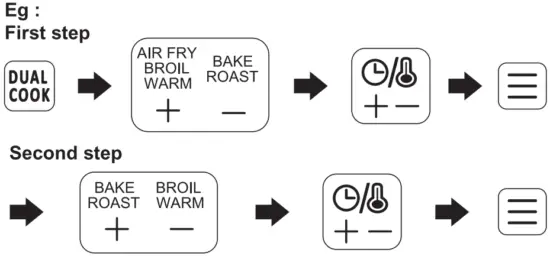
Advanced dual function cooking technology allows you to program your Air Fryer Oven to start cooking with one preset, then automatically transition to a second preset for a perfect cook on any meal. For example, put a breadcrumb-topped casserole in the oven, set it to bake then broil, and it will cook through with a golden crisp topping to finish. Just set it and forget it. Enjoy your favorite fried food without any extra operation. ROTISSERIE
It is used to cook all the foods that need to be rotated. After selecting the desired program and setting the temperature / time, touch the START icon to start cooking and then touch the rotisserie icon. OVEN LIGHT
Touch ” LIGHT ” icon to turn the oven light On / Off. ( After manual selection, it will automatically turn off 5 minutes later.
TEMPERATURE INCREASE:
Touch the “” icon and the temperature display flash and then touch “” icon to increase the temperature as needed. Long press “” icon for rapid increase operation of setting.
TEMPERATURE DECREASE:
Touch the ” then touch ” Long press “” icon and the temperature display flash and “” icon to decrease the temperature as needed. Long Press “” icon for rapid decrease operation of setting.
TIME INCREASE:
Touch the “” icon and the temperature display flash and then touch “” icon to increase the time as needed. Long press “” icon for rapid increase operation of setting.
TIME DECREASE:
Double-click the “” icon until the time display flash and then touch “” icon to decrease the time as needed. Long press “” icon for rapid decrease operation of setting.
LED CONTROL PANEL- AIR FRYER TOASTER OVEN FUNCTIONS OVERVIEW
PRESET DEFAULT TEMPERATURE DEFAULT TIME TEMP RANGE TIME RANGE AI R FRY (Fried Food)
400°F 10MINS
200-450°F Up to 2 HOURS ROAST 30MINS SNACKS 18MINS CHIPS (Frozen French Fries)
18MINS WINGS 18MINS P IZZA 11 MI NS STEAK 450°F 7MINS VEGG I ES 15MINS BROIL 10MINS BAG EL 13MINS COOK I ES 360°F 15MINS BAKE 350°F 25MINS RE HEAT 200°F 5MI NS DEFROST 120°F 20MINS 90-180°F WARM 4HOU RS 90-250°F Up to 8 HOURS PROO F 94°F 45M INS 90-104°F DEHYD RATE 140°F 5HOU RS 90-180°F 1-12 HOU RS TOAST 1-7 1-7MINS The above default data are for reference only, the user can adjust the desired temperature and time as required.


HOW TO USE


- Plug in, touch the POWER ON / OFF icon to turn on the Air Fryer Toaster Oven, screen will illuminate and ” ” icon will blink.
 Touch the menu icon, and then select the program you want by touching ” ” or ” ” minus icon ( Or continuously touch the menu icon until the desired menu is selected Screen will display the default temperature and default time for this menu, users can also adjust the temperature and time as desired with the ” ” icon.
Note: The temperature on the ” Toast ” function cannot be adjusted.
Touch the ” ” icon and adjust the time duration for level 1 – level 7 of the toast by ” ” or ” ” icon. Touch the ” PREH EAT ” icon in order to preheat the Air Fryer Toaster Oven.
When the internal temperature reaches 300°F the “Add Food ” signal willt appear.
After preheating, put the food into oven and close the door, the program will start cooking automatically.
Note The Toast, Dehydrate, Proof, Deforest, Reheat and Warm programs do not require preheating.- Accessories Position: Insert the accessories with food into the desired position then close the door.
There are four groove positions, please refer to the below rack position diagrams to place the accessories.
Note: If you need to use the rotisserie, fork the food and place it in the air fryer oven.
Note: When cooking fatty foods (e. g. Chickens wings ) with the oven rack, air fryer basket or rotisserie, place the baking pan in the slot underneath in order to prevent oil from dripping on to the heating elements.  If you skip the preheat function of step 3, please touch the START / PAUSE icon to begin cooking, and the display will show the timer counting down. When cooking is done ,the oven will beep 5 times, the display will show ” END” and all menu icons will light up.
Note: To use the rotisserie, touch the rotisserie icon after touching START / PAUSE icon. Note: The display will continue to show ” END ” until the menu icon is pressed. After cooking is complete, the fan will keep running for 4 minutes in order to properly cool the appliance.
 Touch the ” PREH EAT ” icon in order to preheat the Air Fryer Toaster Oven.
 If you skip the preheat function of step 3, please touch the START / PAUSE icon to begin cooking, and the display will show the timer counting down. When cooking is done ,the oven will beep 5 times, the display will show ” END” and all menu icons will light up.
DUAL COOK
- Plug in, touch the POWER ON / OFF to turn on the Air Fryer Toaster Oven, screen will illuminate and “” icon will blink.
- DUAL COOK: Touch the DUAL COOK icon, five lights AIR FRY / BAKE / BROIL / ROAST /WARM will turn on, touch the ” ” icon to select the first program AIR FRY, and the selected program AIR FRY light flash ( but the other four will still keep on ), then touch the ” ” icon and adjust the desired time and temperature by touching ” ” or ” ” icon, finally touch the menu icon to confirm the first program AIR FRY; The remaining four icons will keep on, repeat the above operation to adjust the second program.
Note If you want to cancel the DUAL COOK function, you can touch the START / PAUSE icon, and then touch the DUAL COOK icon to return to the general menu.
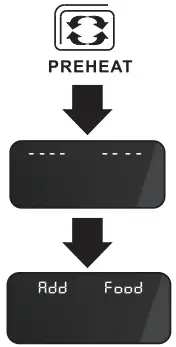
 Touch the ” PREHEAT ” icon in order to preheat the Air Fryer Toaster Oven.
When the internal temperature reaches 300°F, the ” Add Food ” signal will appear. After preheating, put the food into oven and close the door, the program will start cooking automatically.- Accessories Position: Insert the accessories with food into the desired position then close the door.
There are four groove positions , please to the above rack position diagrams to place the accessories.
Note: If you need to use the rotisserie, fork the food and place it in the air fryer oven. - If you skip the preheat function of step 3, please touch the START / PAUSE icon to start cooking, and the display will show the timer counting down, the selected first program light will be on for a long time, and the selected second program will not be displayed until the first program is completed. When cooking is done, the oven will beep 5 times, the display will show ” END “, and all menu icons will light up.
Note: To use rotisserie, touch the rotisserie icon after touching START / PAUSE icon. Note: The display will continue to show ” END ” until the menu Icon icon pressed. After cooking is complete, the fan will continue to run for 4 minutes in order to properly cool the appliance.
 Touch the ” PREHEAT ” icon in order to preheat the Air Fryer Toaster Oven.
COOKING FUNCTIONS QUICK REFERENCE CHART
| FUNCTION | PEHEAT | Suggested Amount of Food | Suggested Accessory | Rack Position |
| AIR FRY | Yes | Base on the food you select | Air Fryer Basket | 2 |
| CHIPS | 550g / 1.2 lb | |||
| WINGS | 1038g / 2.3 lb (28pcs) | |||
| PIZZA | 13 inches | Baking Pan or Oven Rack | 3 | |
| STEAK | 190g / 0.4 lb | 2 | ||
| COOKIES | Base on the food you select | Baking Pan | ||
| SNACKS | Baking Pan or Oven Rack | 3 | ||
| VEGGIES | 6 pcs | Baking Pan or Air Fryer Basket | ||
| TOAST | No | Oven Rack | 2 or 3 | |
| BAKE | Yes | Baking Pan or Oven Rack | 3 | |
| BAGEL | Baking Pan or Air Fryer Basket | 2 | ||
| BROIL | Baking Pan or Oven Rack | |||
| ROAST | Baking Pan or Rotisserie | 4 or Rotisserie position | ||
| DEHYDRATE | No | Base on the food you select | Air Fryer Basket | 1 or 2 or 3 |
| PROOF | Baking Pan | 3 | ||
| DEFROST | Baking Pan | 2 | ||
| REHEAT | Oven Rack | 3 | ||
| WARM | Baking Pan | 2 |
It is a normal occurrence that some moisture may occur on the oven door during cooking process.
We would like to recommend you to preheat the Air Fryer Toaster Oven before cooking.
DUAL COOK FUNCTIONS QUICK REFERENCE CHART
| FUNCTION 1 | FUNCTION 2 | PREHEAT | Suggested Amount | Suggested Accessory | Suggested Rack Position |
| AIR FRY | WARM | Yes | Base on the food you select | Air Fryer Basket | 2 |
| BAKE | BROIL | Baking Pan or Oven Rack | 3 | ||
| AIR FRY | WARM | Baking Pan or Rotisserie Fork | 4 or Rotisserie fork position | ||
| ROAST | AIR FRY | ||||
| AIR FRY | BROIL | Ai r Fryer Basket or Oven Rack | 2 or 3 |
It is a normal occurrence that some moisture may occur on the oven door during the cooking process.
We would like to recommend you to preheat the Air Fryer Toaster Oven before cooking.
REPLACING THE OVEN BULB
![]() ATTENTION : Be sure to unplug the Air Fryer Toaster Oven and allow it to cool down completely before replacing the oven light.
ATTENTION : Be sure to unplug the Air Fryer Toaster Oven and allow it to cool down completely before replacing the oven light.
- Rotate the light cover clockwise to remove it.

- Remove the used bulb by pulling it directly.
- Insert the new bulb
- Rotate the light cover counterclockwise to tighten it.

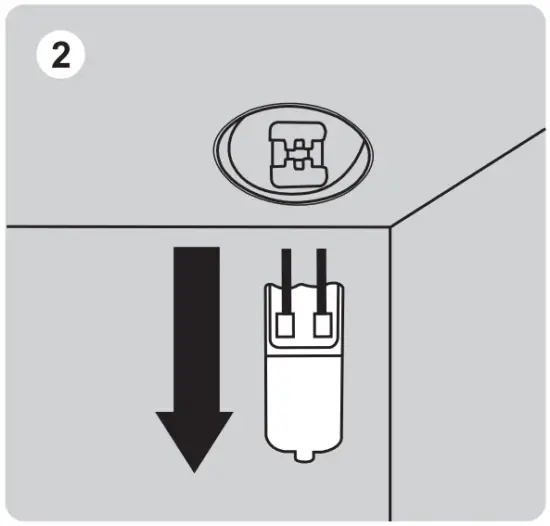
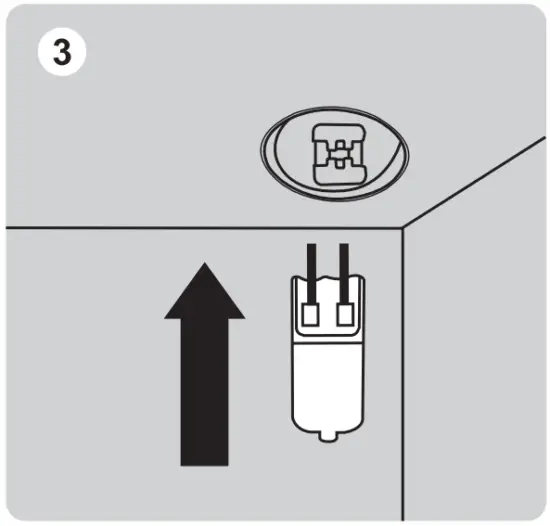

SPECIFICATION : 25W halogen bulb
DISASSEMBLING THE INNER GLASS DOOR FOR CLEANING
![]() ATTENTIONS: Before cleaning, remove the power plug from the power outlet. Allow the oven and all accessories to cool down completely before disassembling and cleaning.
ATTENTIONS: Before cleaning, remove the power plug from the power outlet. Allow the oven and all accessories to cool down completely before disassembling and cleaning.
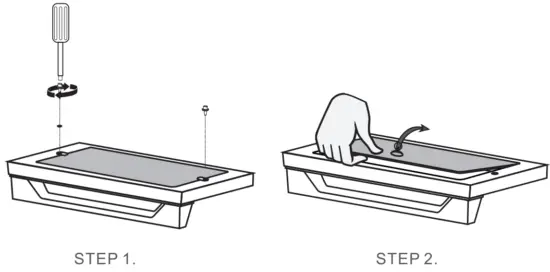
CAUTION : Outer glass and inner glass of the oven door can be cleaned directly by using a soft, damp sponge or soft plastic scouring pad with glass cleaner or mild detergent. If there is a large amount of food residue or grease accumulated between two glasses, inner door glass can be disassembled and cleaned following below instruction. Please be sure to install it back after cleaning. It is not recommended to disassemble the glass frequently.
- Loose the screws on the glass door, suck up the glass with a Suction Cup, and then take it out with hand carefully.
ATTENTION: Do not take out the glass with Suction Cup, otherwise the glass will fall off.
- To clean the door, use a glass cleaner or mild detergent and a soft damp sponge or soft plastic scouring pad. Do not use an abrasive clean er or metal scouring pad as these will scratch the glass.
- After cleaning and drying the glass, put the glass back and tighten the screws.
CLEANING AND MAINTENANCE
Before cleaning, unplug your Air Fryer Toaster Oven. Allow the oven and all accessories to cool down completely before disassembling and cleaning.
CLEANING THE HOUSING AND DOOR
- Wipe the housing with a soft, damp sponge. A non-abrasive liquid cleanser or mild spray
solution may be used to avoid build-up of stains. Apply the cleanser to the sponge, not the
ovens surface, before cleaning. - To clean the glass door, use a glass cleaner or mild detergent and a soft , damp sponge or soft plastic scouring pad. Do not use an abrasive cleanser or metal scouring pad as these will scratch the oven’s surface.
- Wipe the LED screen with a soft, damp cloth. Apply cleanser to the cloth, do not apply cleanser directly on to the LED. Cleaning the LED screen surface with a dry cloth and / or abrasive cleaners may produce scratches.
 Warning: To prevent electrocution, do not immerse the appliance or power cord into water or any other liquid.
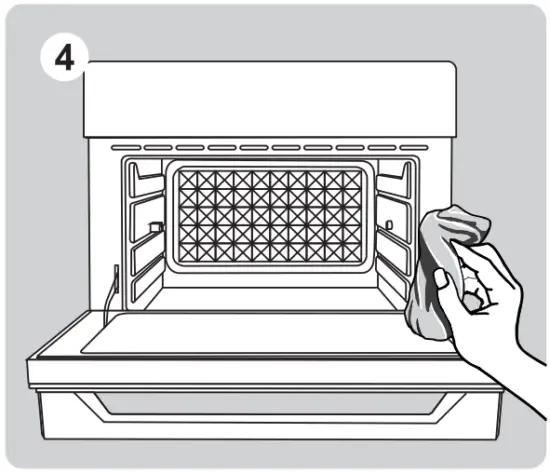
CLEANING THE INTERIOR
To clean any spattering that may occur while cooking, wipe the walls with a soft, damp sponge.
A non-abrasive liquid cleanser or mild spray solution may be used to avoid build-up of stains. Apply the cleanser to the sponge, not the interior, before cleaning.
![]() WARNING: Use extreme caution when cleaning the heating elements. Allow the oven to cool down completely, and then gently rub a soft, damp sponge or cloth along the length of the heating element. Do not use any type of cleanser or cleaning agent. Let all surfaces dry thoroughly prior to inserting the power plug into a power outlet and turning the oven on.
WARNING: Use extreme caution when cleaning the heating elements. Allow the oven to cool down completely, and then gently rub a soft, damp sponge or cloth along the length of the heating element. Do not use any type of cleanser or cleaning agent. Let all surfaces dry thoroughly prior to inserting the power plug into a power outlet and turning the oven on.
CLEANING THE CRUMB TRAY
- After each use, slide out the crumb tray and discard crumbs. Wipe the tray with a soft, damp sponge. A non-abrasive liquid cleanser or mild spray solution may be used to avoid build-up of stains.
Apply the cleanser to the sponge, not the tray, before cleaning. Dry thoroughly. - To remove the baked-on grease, soak the tray in warm soapy water then wash with a soft sponge or soft plastic scouring pad .Rinse and dry thoroughly.
- Always ensure to re-insert the crumb tray into the oven after cleaning and prior to inserting the power plug into a power outlet and turning the oven on
CLEANING THE OVEN RACK, BAKING PAN, AIR FRYER BASKET, ROTISSERIE AND FETCH RACK.
- Wash all accessories in warm soapy water with a soft sponge or soft plastic scouring pad. Rinse and dry thoroughly . Do not use abrasive cleansers, metal scouring pads or metal utensils to clean any of the accessories as they may damage the surfaces.
- To extend the life of your accessories, cleaning them in the dishwasher is not recommended.
STORAGE
- Ensure the oven and all accessories are clean and dry.
- Ensure the door is closed.
- Store the appliance in an upright position, standing level and on its supporting legs Do not store appliance when wet or hot. Do not store in a wet or hot environment.
TROUBLESHOOTING
| Possible Problem | Possible Cause | Solution |
| The oven does NOT work | The appliance is not plugged in | Make sure the oven is plugged in. |
| You have not turned on the oven | Touch the POWER ON / OFF icon to power one. | |
| The door is not closed properly | Make sure the door is closed well. | |
| Steam is coming out from the top of the oven door | You are cooking high moisture content foods | This is normal . The door is vented to release steam created from high-moisture content foods such as frozen breads. |
| White smoke is coming out of the oven | This is the first time using the oven | This is normal upon first use . We suggest setting the oven to the highest temperature and letting it run empty from 18-20 minutes. |
| You’re cooking greasy food | This is normal when cooking greasy foods This will not affect the cooking process. | |
| The baking pan , crumb tray , or heaters still contain grease or oil residue from previous use | Ensure each component is properly cleaned after each use. | |
| Dark smoke is coming out of the oven | Food is burning | Immediately turn off the oven , be careful when you take out the food. |
| The ingredients cooked with the oven are not done | Too much food in the oven at once | Reduce the amount of food in the oven when cooking. |
| Setting temperature too low OF time too short | Set the temperature higher or time longer. | |
| Choose the incorrect function | Make sure you cook with the proper function. | |
| Foods are cooked unevenly | Ingredients are stacked or close to each other during cooking | Make sure food and ingredients are spread out evenly. |
| Baking pan , Air Fry basket or oven rack position is not adjusted | Adjust oven inserts into the proper position. Take caution as these components may be hot. | |
| Foods are not crispy after Air Frying | Ingredients with high moisture | Spraying or brushing a small amount of oil on food evenly can Increase crispiness. |
| Display shows Error Code ”E1 “ | There is a short circuit in the temperature monitor | Remove the power cord from the power outlet . Contact Customer Support. |
| Display shows Error Code “E2 “ | The temperature monitor or heaters is Inoperative | Remove the power cord from the power outlet , reconnect and operate again . If it cannot be solved , then Contact Customer Support. |
LIMITED WARRANTY
GEEK TECHNOLOGY LTD warrants to the original consumer or purchaser this Geek Chef Air Fryer Countertop Oven is free from defects in material or workmanship for a period of One (1) year from the date of purchase. If any such defect is discovered within the warranty period, GEEK TECHNOLOGY LTD, at its discretion, will repair or replace the Product at no cost. This limited warranty is good only to the original purchaser of the product and effective only when used in United States.
For warranty or repair service: Call 1-844-801-8880 and choose the appropriate prompt, or email [email protected]. Please have your Product’s model number, your name, address, city, state, zip code and phone number ready.
NO OTHER WARRANTY IS APPLICABLE TO THIS PRODUCT. THIS WARRANTY IS IN LIEU OF ANY OTHER WARRANTY, EXPERSS OR IMPLIED. INCLUDING WITHOUT LIMITATION, ANY WARRANTY OF MERCHANTABILITY OR FITNESS FOR A PARTICULAR PURPOSE. TO THE EXTENT ANY IMPLIED WARRANTY IS REQUIRED BY LAW. IT IS LIMITED IN DURATION TO THE EXPRESS WARRANTY PERIOD ABOVE. NEITHER THE MANUFACTURER NOR ITS U.S.DISTRIBUTOR SHALL BE LIABLE FOR ANY INCIDENTAL, CONSEQUENTIAL, INDI RECT, SPECIAL, OR PUNITIVE DAMAGES OF ANY NATURE. INCLUD ING WITHOUT LIMITATION. LOST REVENUES OR PROFITS, OR ANY OTHER DAMAGE WHETHER BASED IN CONTRACT, TORT, OR OTH ERWISE, SOME STATES AND / OR TERRITORIES DO NOT ALLOW THE EXCLUSION OR LIMITATION OF INCIDENTAL OR CONSEQUENTIAL DAMAGES OR LIMITATIONS ON HOW LONG AN IMPLIED WARRANTY LASTS. SO THE ABOVE EXCLUSION OR LIMITATION MAY NOT APPLY TO YOU. THIS WARRANTY GIVES YOU, THE ORIGINAN PURCHASER, SPECIFIC LEGAL RIGHTS AND YOU MAY ALSO HAVE OTHER RIGHTS THAT VARY FROM STATE TO STATE OR TERRITORY TO TERRITORY.
Live Your Best Geek Life!
Geek
Geek Facebook
Geek Technology Ltd. 1275 Bloomfield Ave Fairfield, NJ 07004
www.geektechnoIogy.com


