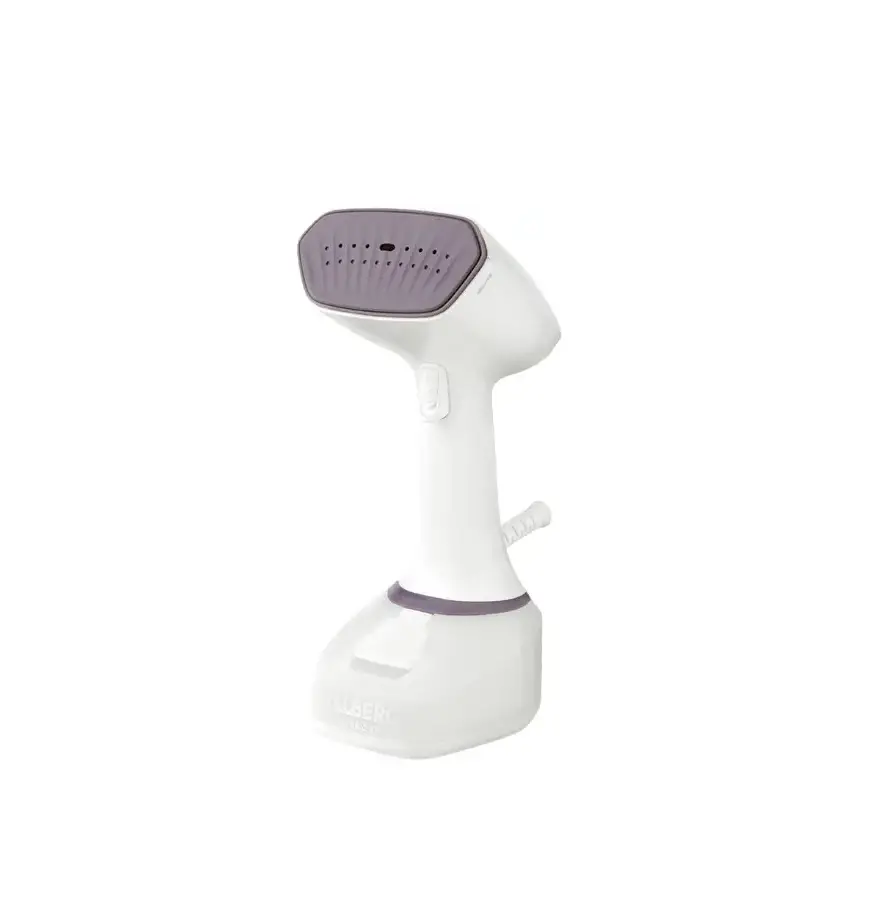
VALBERG 972929 Steamer

INTRODUCTION
Thank you!
Thank you for choosing this VALBERG product.
VALBERG products are chosen, tested, and recommended by ELECTRO DEPOT, so you can be sure you are getting a top-quality, easy-to-use product that won’t let you down.
We’re confident your new device will be a pleasure to use every day!
Welcome to ELECTRO DEPOT.
A Product overview
Before using the unit, carefully read both the Manual and Regulatory Warnings booklet.
Keep these instructions for future reference and pass them onto any new owners of the unit
List of parts
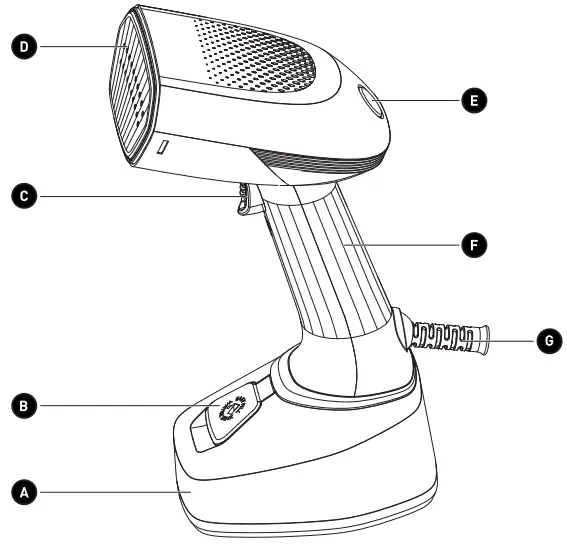
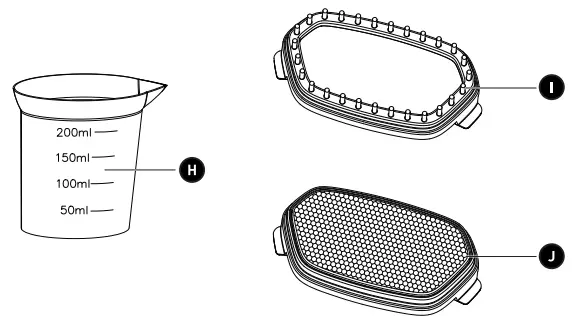
A Water tankB Water tank lidC Steam button with Lock switchD SoleplateE Indicator light (Blue ON/Red ready)F HandleG Cable protectorH Measuring cupI Fabric brush attachmentJ Delicate fabrics attachment
Product overview
- Unpack and remove all labels from the unit. Please check that all of the unit’s parts are included and intact. If the unit is damaged or faulty, do not use it and take it to your retailer or after-sales service centre.
- Keep all packaging out of the reach of children. There is a risk of accidents if children play with packaging materials.
Intended use
- This unit is intended for household use only. It is not designed for industrial, commercial or outdoor use. This unit is designed exclusively for vertical garment steaming.
- Use the unit indoors, in a dry and well-ventilated place.
- Any other use may damage the unit or result in fire, electric shock or injury
Technical specifications
| Model: | 972929 – EXPRESS V2 |
| Operating voltage: | 220-240 V ~, 50-60Hz |
| Rated power: | 1400W |
| Continuous steam: | 20g +/-5 g |
| Water tank capacity: | 320 ml |
| Protection class: | Class I |
B Product usage
Before first use
- Remove any label or protective cover from the steamer head, and fully extend the power cable before use.
- Steam on an old garment for about 10 minutes to clear any factory residue from the water tank. Observe the instructions in the next sections
Use
Filling the water tank
The steamer is designed to be used with tap water. However, if you live in an area with very hard water, limescale can quickly build up inside the unit. In that case, we recommend using a mixture of 50% tap water and 50% distilled water, to prolong the lifespan of your steamer.
- Before filling the water tank, unplug the steamer from the mains socket.
- Lift the bottom of the water tank lid to open it and fill the tank with a measuring cup.
- The water tank can be detached to fill under the tap. To detach the water tank, hold the water tank with one hand and turn the steamer handle anti clockwise with the other hand.
Remove the water tank and open the lid to fill. - Fill the water tank with tap water up to the “MAX” level mark (320 ml). Make sure the water tank is at least one third full and does not exceed the “MAX” level mark.
- Close the lid and dry off any moisture.
- To reattach the water tank, align the steamer handle on the water tank and turn the handle clockwise
 Important:
- Do not add any substances into the water tank, such as starch, fabric softener,
chemical additives, scented oils, descaling agent, or vinegar. - Do not use the steamer when the water tank is empty to avoid damage to the unit.
Using the steamer
The steamer is designed to be used vertically on hanging garments.
 WARNING – Risk of burns:
- The soleplate and surfaces of the steamer marked with this sign become hot during use and can remain hot for some time after use. Do not touch hot surfaces. Always use the handle.
 The steamer generates high temperatures of steam. Never direct the steam or soleplate towards people or pets.
- Never steam while wearing the garment.
- Never use the steamer in a horizontal position or tilted backwards, as it can cause a discharge of hot water.
 The steamer generates high temperatures of steam. Never direct the steam or soleplate towards people or pets.
- Hang the garment on a clothes hanger, away from walls, furniture and any item to avoid damage by steam.
- Place the steamer upright on a flat, level and stable surface.
- Make sure the water tank is filled.
- Attach a brush attachment if needed (→Using a brush attachment).
- Plug the steamer into a suitable mains socket. The indicator light will light up blue,
indicating that the steamer is on and heating up to the set temperature. - When the indicator light turns red, the steamer is ready to use. Always wait until the
indicator light turns red before steaming. - Hold the steamer upright and press the Steam button to produce steam. Release the button to stop.
- Move the steamer up and down over the garment to steam out wrinkles. If the fabric is delicate and the steamer is used without the Delicate fabrics attachment, keep a distance of at least 5 cm between the soleplate and the fabric.
- Pull the sides of the garment with one hand to stretch it slightly. Use a heat protective glove to protect your hand from steam if required.
- To have continuous steam, hold down the Steam button and slide the Lock switch down to lock the button. This allows you to steam garments without the need to hold down the Steam button.
- To stop the continuous steam, slide the Lock switch up.
- Unplug the unit and refill the water tank when the water level is below one-third of the tank (→ Filling the water tank). If the unit makes a loud humming sound and no steam is produced, this may indicate that the water tank is empty.
- Once finished using the steamer, wait for 15 seconds until no steam is generated, and then unplug the steamer from the mains socket to turn it off.
- Clean the unit (→ Cleaning and maintenance).
 WARNING: Never leave the unit unattended while it is plugged into the mains socket. Unplug the unit immediately after each use.
Using a brush attachment
- Before attaching or removing a brush attachment, unplug the steamer and allow it to cool down.
- Align the desired brush attachment to the soleplate and carefully press on both sides of the attachment until it “clicks” into place. To remove the brush attachment, gently pull the side tabs of the attachment.
- The Fabric brush attachment opens the weaves of heavy fabrics for better steam
penetration. Use this attachment to remove hair, dust and lint. - The Delicate fabrics attachment helps protect delicate fabrics from the direct heat of the iron. Use this attachment as an ironing cloth to protect fabrics from scorching or shine marks.
Low temperature protection
The steamer is designed with low temperature protection. When the temperature in the steamer is not high enough to generate steam, the pump will be deactivated until the indicator light turns red. This feature prevents hot splashes if the Steam button is pressed when the indicator light is blue.
Steaming tips
- Before steaming a garment, always check the label to make sure that the fabric is suitable for steaming.
- Always test on a small corner of the garment before steaming the whole garment.
- Turn delicate fabrics inside out before steaming.
- Check clothing pockets to make sure they are empty before steaming.
- When pressing the Steam button, you will feel a slight vibration and hear a subtle buzzing sound. This is normal.
- Do not steam metal accessories to avoid discoloration.
Anti-calc system
A special resin filter inside the water tank softens the water and prevents scale build up in the soleplate. The resin filter is permanent and does not need replacing.
Note:
- Only use tap water in your steamer. Distilled or demineralized water makes the Anti-calk system ineffective by altering its physicochemical characteristics.
- Do not use chemical additives, scented substances, decalcifies, or any other substance. Failure to follow the instruction will void the warranty.
C Cleaning and maintenance
Cleaning and maintenance
WARNING:
- Before cleaning, always unplug the unit from the mains socket and allow it to cool down completely.
- Never immerse the unit, power cable or plug in water or any liquid. Never rinse them under the tap. Keep all electrical parts dry.
- Never use solvents, chemical or abrasive cleaning agents, wire brushes, sharp objects or scouring pads to clean the unit.
- Empty the water tank after each use. Detach the water tank, open the lid and pour the water into a sink or bucket
- Wipe the soleplate and exterior of the steamer with a soft cloth, moistened with water. Dry well after cleaning.
- Remove any brush attachment from the soleplate. Clean the brush attachments with a soft damp cloth. Allow to air dry
- Reattach the water tank after cleaning and store the steamer upright.
Troubleshooting
Follow this troubleshooting guide to solve common problems that you may encounter with the unit. If the problem persists, stop using the unit and contact an authorized Service Centre for examination or repair.
| Problem | Possible Cause | Solution |
| The steamer does not heat up. |
|
|
| The steamer is not producing steam. |
|
|
| The water tank is leaking. |
|
|
| The steamer makes a loud pumping sound. |
|
|
| Discoloration of metal accessories |
|
|
Storage
- Always unplug the unit before storing it. Wait for the iron to completely cool down before putting it away.
- Store the unit in a fresh, dry and dust-free place, out of the reach of children and pets.
- Please retain the packaging and use it to store your unit when it is not in use for an extended period of time.
WARRANTY CONDITIONS
This product is guaranteed against faults caused by defects in manufacturing or the materials used for a period of two years, starting from the date of purchase.* This warranty does not cover defects or damage caused by failure to install the device correctly, incorrect use of the product, or excessive wear and tear.
*proof of purchase required.
ELECTRO DEPOT
1 route de Vendeville
59155 FACHES-THUMESNIL – FRANCE