![]() Game/ Surveillance Camera 24 MP
Game/ Surveillance Camera 24 MP
Art. No. 9633106 Instruction Manual
9633106 Game/ Surveillance Camera 24 MP
Visit our website via the following QR Code or web link to find further information on this product or the available translations of these instructions.
 http://www.bresser.de/P9633106
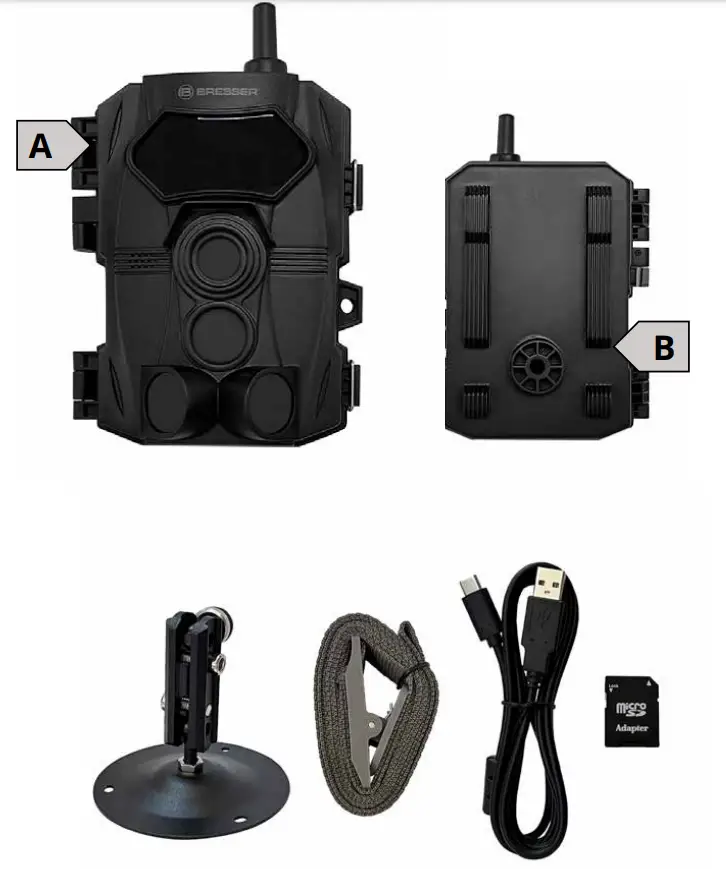
INTRODUCTION
Congratulations on purchasing your new device. This user manual contains important information about safety and use. Before using the product, please familiarize yourself
with all operating and safety instructions. Use this product only as described and only for specified areas of application. This device is intended only for recording digital photos and videos, and particularly for observing wildlife. It is not intended for any other use or for uses extending beyond those stated. This device is not intended for use in commercial or industrial environments.
The manufacturer accepts no responsibility for damage caused by failure to observe these instructions, improper use, incompetent repairs, making unauthorized modifications or for using unapproved replacement parts. The user alone bears liability under these circumstances. Please note, when the device is placed outdoor, extreme and rapid weather changes could lead to errors.
IMPRINT
Bresser GmbH
Gutenbergstr. 2
46414 Rhede
Germany
www.bresser.de
For any warranty claims or service inquiries, please refer to the information on “Warranty” and “Service” in this documentation. We ask for your understanding that unsolicited returns cannot be processed.
Errors and technical changes excepted.
© 2022 Bresser GmbH
All rights reserved.
The reproduction of this documentation – even in extracts – in any form (e.g. photocopy, print, etc.) as well as the useand distribution by means of electronic systems (e.g. imagefile, website, etc.) without the prior written permission of the manufacturer is prohibited.
The designations and brand names of the respective companies used in this documentation are generally protected by trade, trademark and/or patent law in Germany, the European Union and/or other countries.
VALIDITY NOTE
This documentation is valid for the products with the following article number:
9633106
MANUAL VERSION: 0622
MANUAL DESIGNATION:
Manual_9633106_Wildkamera-24MP_ende_BRESSER_v062022a Always provide information when requesting service.
ABOUT THIS INSTRUCTION MANUAL
These operating instructions are to be considered acomponent of the device. Read the safety instructions and the operating manual carefully before using this device. Keep this instruction manual in a safe place for future reference. When the device is sold or given to someone else, the instruction manual must be provided to the new owner/user of the product.
GENERAL WARNINGS
![]() DANGER OF BODILY INJURY!
DANGER OF BODILY INJURY!
Do not use in the presence of children or animals. Store out of reach of children and animals.
Never touch parts of the device during operation or before it has cooled down completely (approx. 45 min. after switching off)!![]() RISK OF GLARE!
RISK OF GLARE!
Make sure that people and animals do not look into the light. The high luminosity can cause glare to the eyes and afterimages. This impairment of vision can lead to accidents.![]() RISK OF MATERIAL DAMAGE!
RISK OF MATERIAL DAMAGE!
Make sure that no one can trip over connection cables of the device. The device could be knocked over. The manufacturer accepts no liability for damage to property caused by improper or insufficiently safe installation! Only use the recommended power supply unit or the recommended rechargeable batteries for the power supply!
The manufacturer accepts no liability for voltage damage caused by the use of an unsuitable power adapter!
To prevent decreasing the strength of the magnets, do not attach this device or the magnets to any surface hotter than 80C°. Do not touch the device with wet or damp
body parts.![]() FIRE/EXPLOSION HAZARD!
FIRE/EXPLOSION HAZARD!
Always place the device in such a way that it cannot tip over and ensure that it is stored in a reasonably safe place.
- Keep children and animals away from the device! They could knock the device over.
- Make sure that no one can trip over connection cables. The device could be knocked over.
- Do not expose the device to high temperatures. Do not short-circuit the device or dispose of in fire! Excessive heat and improper handling can cause short circuits, fires and even explosions!
- Never cover the ventilation slots or cooling fins of the device during operation or until it has cooled down completely!
- Only use the recommended power supply unit or batteries!
![]() DANGER OF AN ELECTRIC SHOCK!
DANGER OF AN ELECTRIC SHOCK!
This device contains electronic parts that are powered by a power source (power adapter). Only use the device as described in the manual. Otherwise, you run the DANGER of an ELECTRIC SHOCK. Never bend, squeeze or pull power cables, connecting cables, extensions or connectors. Protect cables from sharp edges and heat. Check this device, cables and connections for damage before use. Never attempt to operate a damaged device, or a device with damaged electrical parts! Damaged parts must be eplaced
immediately by an authorized service agent. Operate the device only in a completely dry environment and do not touch the device with wet or damp body parts.![]() IMPORTANT NOTE!
IMPORTANT NOTE!
Do not disassemble the device! In the event of a defect, please contact your dealer. They will contact the Service Center and can arrange the return of this device for repair if necessary. Disconnect the power supply by pulling the mains plug when the appliance is not in use, in case of a longer interruption of operation and before any maintenance and cleaning work. Place your device so that it can be disconnected from the power supply at any time. The power outlet should always be near your appliance and should be easily accessible, as the plug of the power cord serves as a disconnect device from the mains supply. To disconnect the unit from the mains, always pull the mains plug and never pull the cable! Do not subject the device to excessive vibrations.
ABOUT THE CAMERA
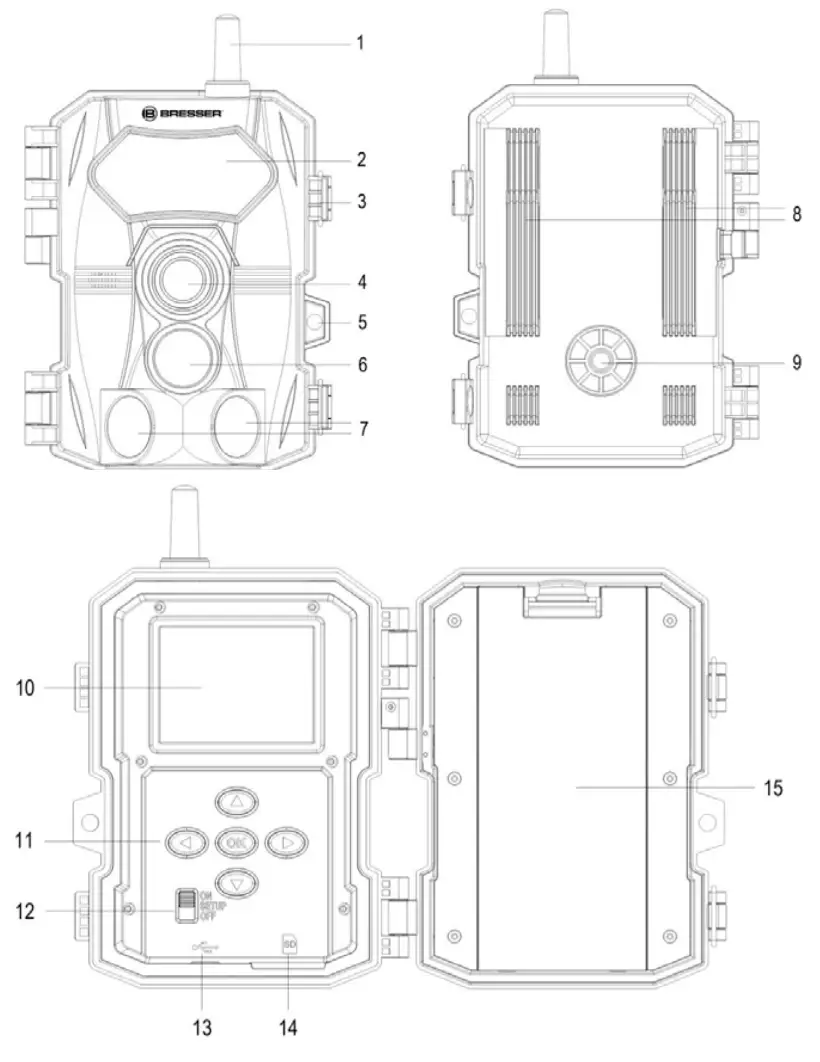
| 1. Antenna 2. Infrared LED 3. Cover Latch 4. Lens 5. Lock Holder | 6. PIR Sensor (Center) 7. PIR Sensors (Side) 8. Strap Hook 9. Screw for Stand 10. LCD Screen | 11. Operating Buttons 12. Switch Button 13. Type C USB Port 14. SD Card Slot 15. Battery Cover |
POWER SUPPLY
- To insert batteries, open the latches (3) and then open the battery cover (15).
- Insert 8 AA 1.5V batteries into the battery compartment. Ensure that the polarity is correct.Note: please use only Alkaline batteries.
- Close and secure the battery cover. Ensure that the cover closes firmly in place.
INSERTING SD-CARD
Since the camera has no built-in memory, it can only work if an SD card is inserted.
A 32GB SD card has been inserted into the camera upon purchase.
- To insert a SD card, push it into the card slot (14) until you hear the clicking sound.The side with wording must face up.
- To remove the SD card, push the card slightly to pop it out. Then remove the card.
- The device supports SD cards with capacity up to 512 GB.
- To avoid malfunctions, keep the SD card away from moisture and avoid vibration, dust, heat sources and direct sunlight.
- Insert the SD card as indicated. Never force the card into the slot. Never bend or twist the SD card.
Default settings in bold: - After transport, wait until the SD card has reached room temperature before using it for the first time. Major fluctuations in temperature or humidity can lead to condensation and electrical short-circuit. Keep the SD card in a protective case when not in use.
- When the SD card is full, it will automatically stop taking pictures and videos.
SETTING UP THE CAMERA
Push the switch button (12) to SET UPto set up the camera. Once powered on, press ◄ to call out the settings menu. First press▼multiple times to find Language, press OK, and choose your preferred language. Once selected, you can continue with other settings.
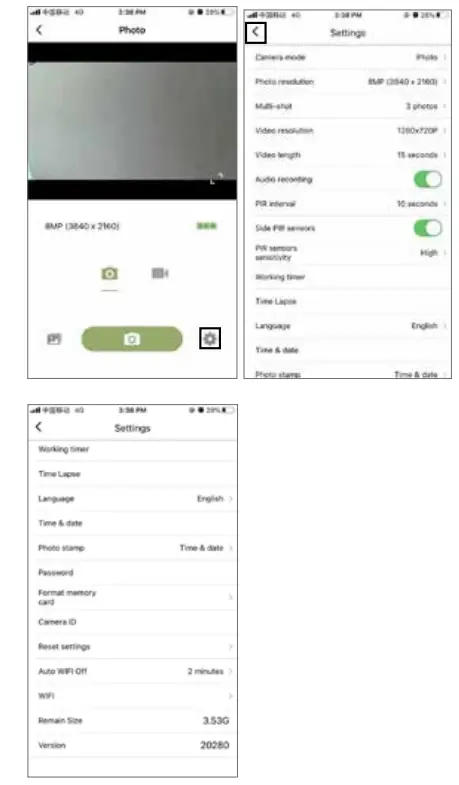
Below is a list of all setting items, and the bold highlights are the default settings. You can simply change the settings that you wish to change.
| Camera Mode: | Photo, Video, Photo+Video |
| Photo Resolution: | 24MP, 16MP, 8MP, 4MP |
| Multi-Shot: | 1 photo- 9 photos |
| Video Resolution: | 3840 x 2160P Lite, 2688 x 1520P, 1920 x 1080P, 1280 x 720P |
| Video Length: | 05 seconds- 3 minutes |
| Audio Recording: | ON, OFF |
| PIR Internal: | 00 Minutes, 01 second-60 seconds, 01 minute- 60 minutes |
| Side PIR Sensors: | ON, OFF |
| PIR Sensor Sensitivity: | Low, Medium, High |
| Working Timer: | ON, OFF |
| Time Lapse: | ON, OFF |
| Language: | English, Deutsch, Espanol, Francais, Italiano, Nederlands |
| Time & Date: | Set Time & Date, Time Format, Date Format |
| Photo Stamp: | Time & date, Date, OFF |
| Password: | ON, OFF |
| Format Memory Card: | Yes, No |
| Camera ID: | ON, OFF |
| Reset Settings: | Yes, No |
| Auto WiFi Off: | 1 minute, 2 minutes, 3 minutes |
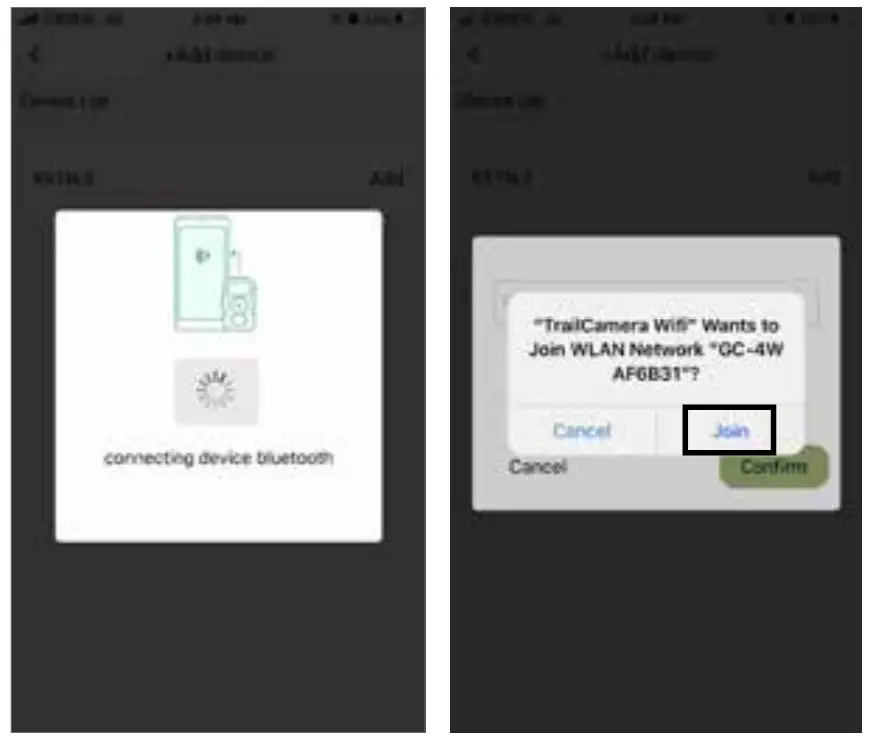
| WiFi SSID: | GC-4W |
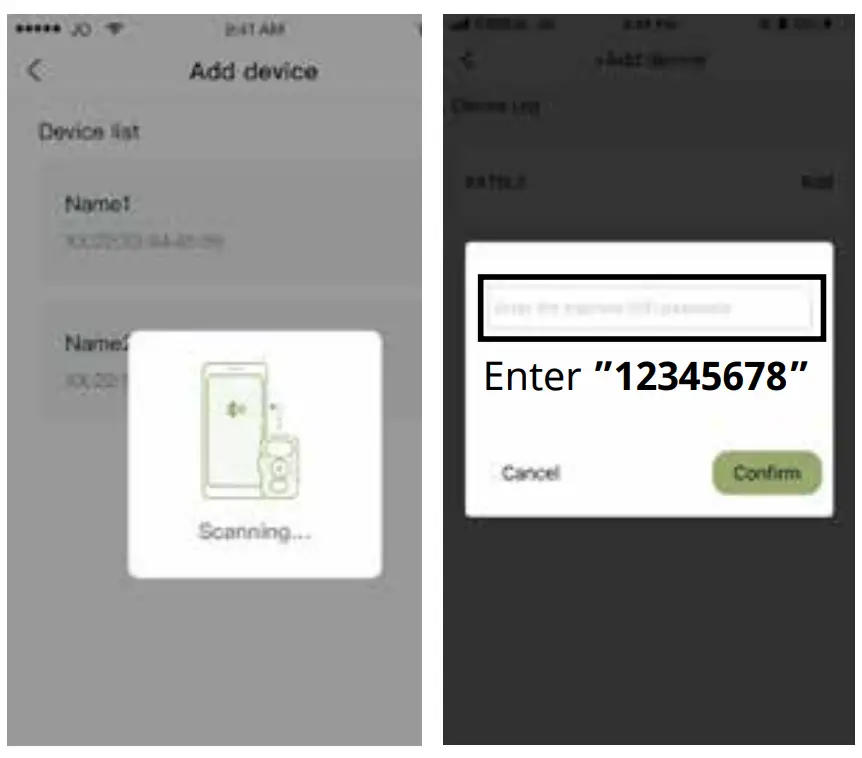
| WIFI Password: | 12345678 |
| Version: | 20096 (This cannot be changed) |
Once the settings are done, push the switch button (12) to ON. The camera will start counting from 10 to 0, and the screen turns black. This means that the camera is on
standby to take photos or videos, and you are all set.
SETTING UP THE CAMERA USING THE APP![]()
- Download the App “Bresser EagleEye Trail Camera” in the app store:
 www.bresser.de/9633106
- On the camera, turn the switch button (12) to ON.
- In the App, add device and follow these steps to connect the phone with the camera. Please make sure the Bluetooth on your phone is on first.


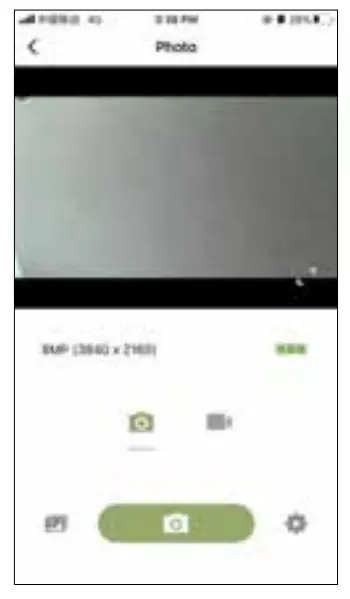
- It can take up to 90 seconds for the connection. When this following screen shows up, the connection is successful.What you see now on the App screen is what the camera lens sees. The camera screen (10) will also display “WIFI connected”.

- Adjust the Settings if needed.
 When the setting is done, press the < icon on the top left OR the power button on the top right to exit the App. The screen will show Please wait and turn dark. The camera is now ready to take photos and videos. Please make sure the switch button (12) is pushed to ON.
Note: If at any time of the connection, the camera or the app got stuck, please turn off the camera (by pushing the switch button to OFF), and wait for about 30 seconds, and turn it on to try again.


 When the setting is done, press the < icon on the top left OR the power button on the top right to exit the App. The screen will show Please wait and turn dark. The camera is now ready to take photos and videos. Please make sure the switch button (12) is pushed to ON.
ACCESSING PHOTOS & VIDEOS VIA SD CARD
- Eject the SD card from the camera and insert it into a card reader that is connected to a computer.
- Open [My Computer] or [Windows Explorer] and double-click the removable disk icon that represents the Micro SD card.
- Copy images from the card into your computer.
VIA USB CABLE
- Connect your camera to a computer with a
USB cable.
- Open [My Computer] or [Windows Explorer] and double-click the removable disk icon that represents the camera.
- Copy images from the folder into your computer.
VIA APP
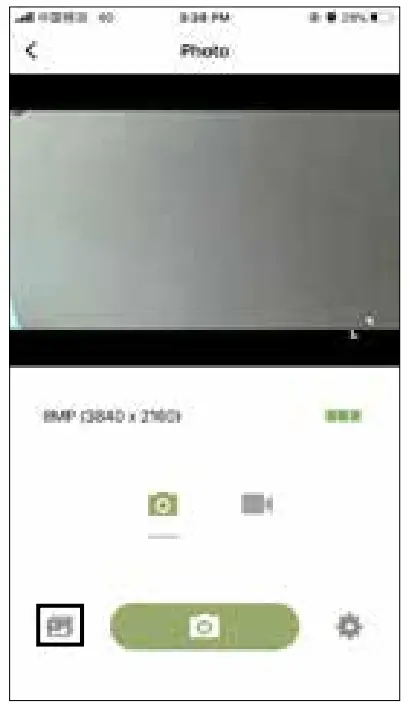
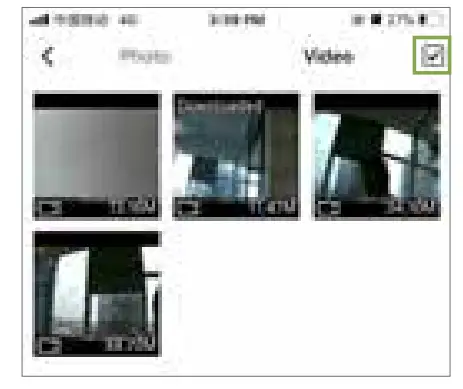
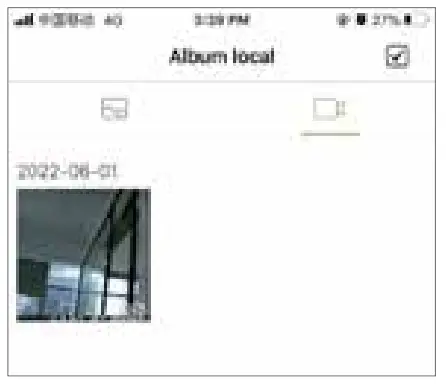
- In the App, click on the photo icon below to enter the photo album, where you can see all the photo and videos taken.

- You can select photos and videos to delete, delete all, or download.

- You can also download selected photos and videos to your phone. Once downloaded to your phone, you can access the files in the photo album of your phone.

SPECIFICATIONS
| Image sensor | 4 MP |
| Photo resolution | 4MP (sensor) 8MP, 16MP, 24MP (interpolated) |
| Image Format | JPEG |
| Video Resolution | FHD e3Ofps, HDO30fps |
| Video Format | AVI |
| Video Length | 5 secs to 3 mins |
| Audio Recording | Yes |
| Lens | f=3.8mm, F=2.0, FOV=105° |
| Display | 2.4″ TFT |
| File Review on Camera | Yes |
| Internal memory | 16M x 16 DDR |
| External memory | SD/TF card up to 512GB |
| IR Filter | Automatic |
| IR LED | 850nm |
| Range of IR flash | 18M |
| Trigger Mode | PIR trigger |
| PIR sensing angle | Center: 350-40° Lateral: 30°(L & R) Total: 100° |
| Triggering distance | 18M (Below 25°C at the Normal Level) |
| Triggering time | <0.5 sec |
| PIR Interval | 0 sec- 60 minutes, selectable by user |
| Multi-Shot | 1-9 frames, selectable by user |
| Picture Information Stamp | Time & Date, Date, Off |
| File Protection | Password Protection |
| Effectiveness | Daytime: 1M-infinitive Night time: 3M-18M |
| Auto-distinguish images | Color images in daytime Black & white night images |
| WiFi Connection | Photo and Video Transfer to mobile device via App Camera System Setting via App |
| WiFi Distance | 15M approx. |
| App Supporting OS | from iOS 9.0 | from Android 5.0 with Bluetooth LE |
| Power | AA Alkaline batteries (8 pcs.) |
| Low Battery Alarm | Yes |
| PC Interface | USB 2.0 Type C |
| Stand by | 6 months |
| Standby current | 0.5 mA |
| Water Proof | IP 54 |
| Operating Temperature | -20°C to +60°C |
| Camera Color | Black |
| Camera Size | 13.66cm x 6.09cm x 9.5cm (approx.) |
| Camera Weight | 280g (approx.) |
| Accessories | Wall mount, mounting strap, USB data transfer cable, 32GB Micro SDHC memory card with SD adapter, Operating instructions |
MOUNTING
We recommend mounting cam on a sturdy tree with a diameter of about 6 in. (15 cm). To get the optimal picture quality, the tree should be about 16-17 ft (5 meters) away from the place to be monitored, with the camera placed at a height of 5 – 6.5 ft. (1.5 ~ 2 m). Also, keep in mind that you will get the best results at night when the subject is within the ideal flash range, no farther than 60‘ (19 m) and no closer than 10‘ (3 m) from the camera.
SENSING ANGLE AND DISTANCE TEST
To test whether the camera can effectively monitor the area you choose, this test is recommended to check the sensing angle and monitoring distance of the camera. To perform the test:
- Switch camera to SETUP mode.
- Make movements in front of the camera at several positions within the area where you expect game or subjects to be. Try different distances and angles from camera.
- If motion indicator LED light blinks, it indicates that position can be sensed.
The results of your testing will help you find the best place where to mount and aim the camera. The height from the ground for placing the device should vary with animal size appropriately. In general, 3 to 6 feet is preferred. You can avoid potential false triggers due to temperature and motion disturbances in front of the camera by not aiming it at a heat source or nearby tree branches or brush (especially on windy days).
DISPOSAL
 Dispose of the packaging materials by type. Contact your local waste-disposal service or environmental authority for information on the proper disposal.
![]() Do not dispose of electronic devices in the household garbage! According to the European Directive 2012/19/EU on Waste Electrical and Electronic Equipment and its transposition into national law, used electrical equipment must be collected separately and recycled in an environmentally sound manner.
Do not dispose of electronic devices in the household garbage! According to the European Directive 2012/19/EU on Waste Electrical and Electronic Equipment and its transposition into national law, used electrical equipment must be collected separately and recycled in an environmentally sound manner.![]() In accordance with the regulations concerning batteries and rechargeable batteries, disposing of them in the normal household waste is explicitly forbidden. Please make sure to dispose of your used batteries as required by law — at a local collection point or in the retail market. Disposal in domestic waste violates the Battery Directive. Batteries that contain toxins are marked with a sign and a chemical symbol.
In accordance with the regulations concerning batteries and rechargeable batteries, disposing of them in the normal household waste is explicitly forbidden. Please make sure to dispose of your used batteries as required by law — at a local collection point or in the retail market. Disposal in domestic waste violates the Battery Directive. Batteries that contain toxins are marked with a sign and a chemical symbol.![]() 1 battery contains cadmium
1 battery contains cadmium
2 battery contains mercury
3 battery contains lead
EC DECLARATION OF CONFORMITY
A “Declaration of conformity” in accordance with the applicable directives and corresponding standards has been prepared by Bresser GmbH. This can be viewed at any time upon request at www.bresser.de/download/9633106/CE/9633106_CE.pdf
UKCA DECLARATION OF CONFORMITY
![]() A “Declaration of conformity” in accordance with the applicable directives and corresponding standards has been prepared by Bresser GmbH. This can be viewed at any time upon request at www.bresser.de/download/9633106/UKCA/9633106_UKCA.pdf BRESSER UK Ltd. • Suite 3G, Eden House Enterprise Way, Edenbridge, Kent TN8 6HF, GB
A “Declaration of conformity” in accordance with the applicable directives and corresponding standards has been prepared by Bresser GmbH. This can be viewed at any time upon request at www.bresser.de/download/9633106/UKCA/9633106_UKCA.pdf BRESSER UK Ltd. • Suite 3G, Eden House Enterprise Way, Edenbridge, Kent TN8 6HF, GB
WARRANTY
The regular warranty period is 2 years and begins on the day of purchase. You can consult the full warranty terms as well as information on extending the warranty period and details of our services at: www.bresser.de/warranty_terms.

Service
Please contact the service centre fi rst for any questions regarding the product or claims, preferably by e-mail.
E-Mail: [email protected]
Telephone*: +44 1342 837 098
BRESSER UK Ltd.
Suite 3G, Eden House
Enterprise Way
Edenbridge, Kent TN8 6HF
United Kingdom
*Number charged at local rates in the UK (the amount you will be charged per phone call will depend on the tariff of your phone provider); calls from abroad will involve higher costs.
Bresser GmbH
Gutenbergstraße 2
46414 Rhede · Germany
www.bresser.de![]() @BresserEurope
@BresserEurope![]() Bresser UK Ltd.
Bresser UK Ltd.
Suite 3G, Eden House
Enterprise Way, Edenbridge,
Kent TN8 6HF, Great Britain
Errors and technical changes reserved.
Manual_9633106_Observation-camera_en-de_BRESSER_v062022a
References
 IBERIA.COM en United States - the best prices for Iberia flights
-
Bresser | Startseite | Expand Your Horizon mit BRESSER
-
index · powered by h5ai 0.26.1 (http://larsjung.de/h5ai/)
-
index · powered by h5ai 0.26.1 (http://larsjung.de/h5ai/)
-
bresser.de/garantiebedingungen
-
Bresser | BRESSER 100° WLAN Wild-Beobachtungskamera 4-24 MP 20m | Expand Your Horizon
-
bresser.de/warranty_terms


