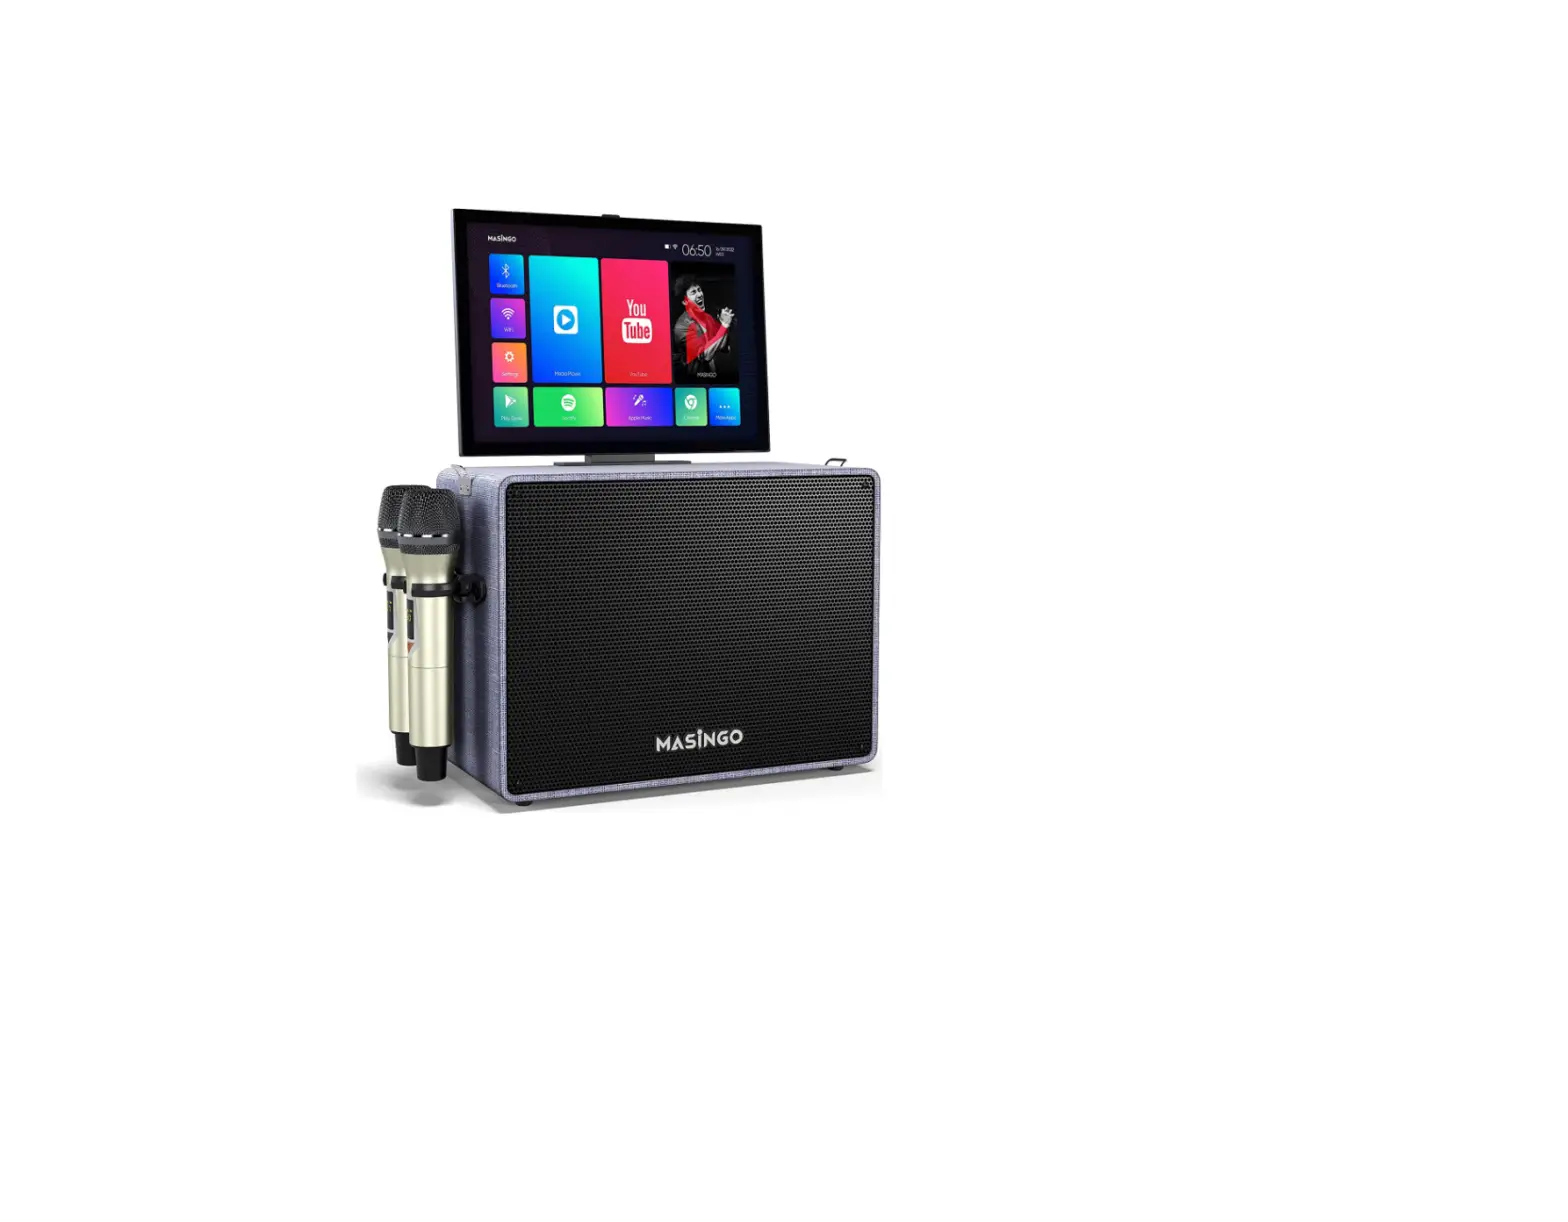

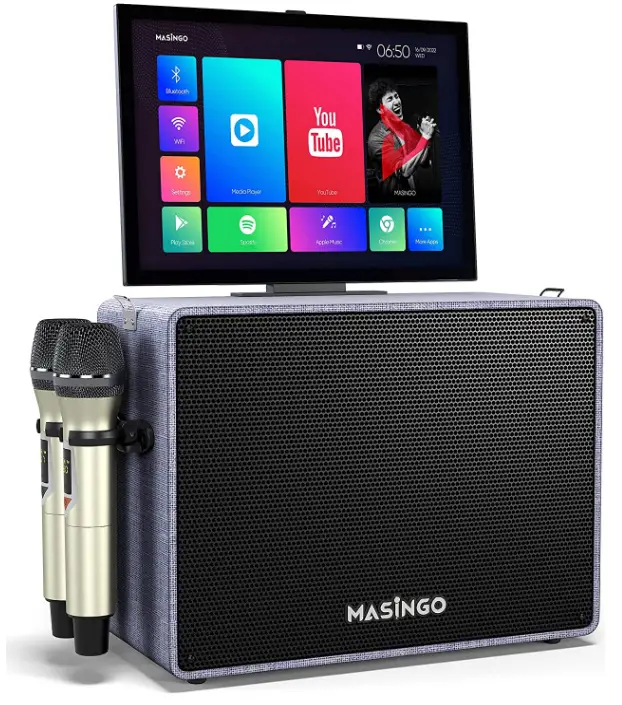
MASINGO Professional Karaoke Machine
Specifications
- BRAND: MASINGO
- SPECIAL FEATURE: Portable, Cordless, Wireless
- COLOR: Gray
- POWER SOURCE: Battery-Powered
- CONNECTIVITY TECHNOLOGY: Bluetooth
- SPEAKER OUTPUT: 20 Watts
- BATTERY LIFETIME: 3-4 Hours
- ITEM WEIGHT:3 pounds
- PRODUCT DIMENSIONS:09 x 11.73 x 15.55 inches
Introduction
On the greatest karaoke machine for both adults and children, it’s a magical sing-along for every fiesta! Why not just get a karaoke machine with a screen, one with two mics, or one with Bluetooth? Get all of these along with a 32 GB Bluetooth karaoke tablet that works flawlessly! The entire video karaoke display experience is provided by automatically installed apps (or your preferred downloads). The X6 is a professional karaoke machine with all you need, more than just a lovely face. Two excellent cordless microphones (2022 model! ), an AUX wire, a charging cable / plug, a device remote, a manual, and a 60-day warranty are all included in your entire, professional karaoke setup. An ideal birthday present for both boys and girls. The best mobile karaoke system!
The tablet locks into place for safe transportation, while the strapping speaker karaoke machine is portable. You can belt out your battery wherever thanks to the karaoke machine’s screen’s 4-hour rechargeable battery. Tablet, Bluetooth, USB, AUX-out, Micro-SD, HDMI, or PA are the 7 available playback modes. The powered 20-watt Bluetooth speaker with microphone also functions as a wireless portable PA system with two microphones! The 2 rechargeable, wireless microphones for kids and adults each have a separate display, allowing you to precisely manage your karaoke pitch by adjusting the microphone’s volume, echo, and EQ. It’s time to sing on the magic mike. ‘Magic Mode’ lets you alter your voice.
PARTS & FEATURES
WHAT’S INCLUDED
- 1x Masingo Karaoke Machine 2x Wireless Microphones
- 1x Remote Control
- 1x AUX Cable
- 1x Charging (DC15V) Cable 1x Shoulder Strap
- 1x Performer’s Manual
FUNCTION BOARD
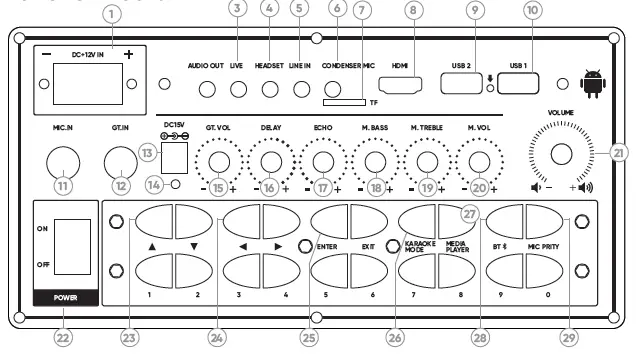
- DC12V Car Charging Port
- 5mm AUX Line Out
- 5 mm Live Audio Port
- 5mm Headset Port
- 5mm AUX Line In
- 5mm Condenser Mic Input
- TF Slot (MicroSD)
- HDMI Line Out
- USB Slot
- USB Slot
- 5mm Mic Input
- Guitar Input
- DC15V (regular) Charging Port
- Charging Indicator Light
- Guitar Volume
- Voice Delay
- Audio Echo
- Mic Bass
- Mic Treble
- Mic Volume
- Master Volume
- Machine Power
- Up/Down
- Left/Right
- Enter/Exit
- Karaoke Mode
- Media Player
- Bluetooth
- Mic Priority
- Sound Effects/Manual Numerical Input
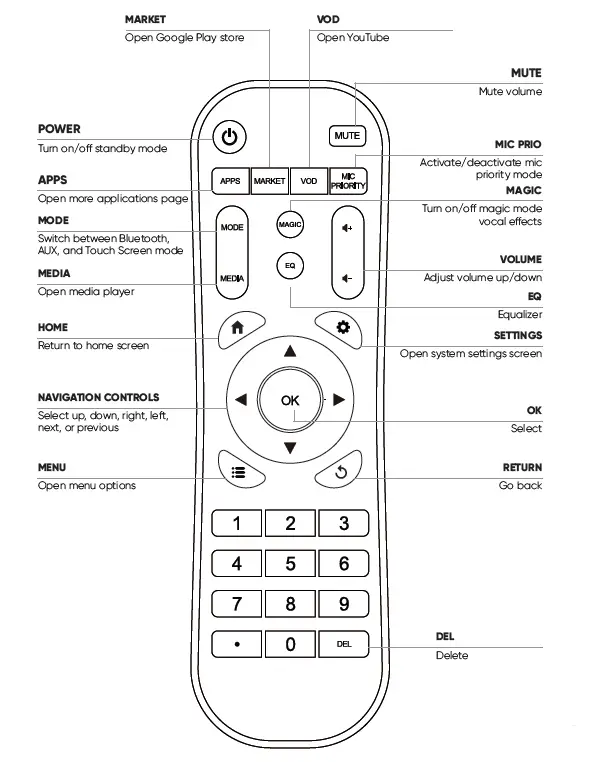
REMOTE CONTROL
REVIEW BEFORE USING
- Keep this manual for future reference.
- Adhere to all warnings.
- Keep ventilation openings clear; do not block any of this machine’s vents/ openings.
- Install and set up the machine according to the manufacturer’s instructions provided in this manual.
- Do not install near any heat sources (i.e. radiators, heat registers, stoves, amplifiers, or any other objects that produce heat).
- Use the polarized plug (or grounding plug) carefully. These plugs are made for safety purposes. A polarized plug has two blades with one wider than the other. A grounding type plug has two blades and a third grounding prong. The wider blade and the third prong are provided for your safety. Please consult an electrician if the provided plug does not fit into your outlet.
- Protect the machine’s power cord. Prevent the power cord from being walked on or pinched – particularly at the plug, wall outlet, and the connection to the machine.
- Unplug the machine during lightning storms or when unused for long periods of time.
- Refer all technical services to qualified personnel. Servicing is required when the machine has been damaged in any way, such as damage to the power-supply cord or plug, contact with liquid, exposure to moisture or rain, if the machine has been dropped, or anything else which may cause the machine to fail to operate normally.
- Do not force the SD card into its slot. It can only be inserted in one di- rection. If the card does not insert easily, remove it and try reinserting in the opposite direction.
- To maintain peak performance and battery longevity, fully charge the karaoke machine at least once every three months and before storing it away for a long period of time.
QUICK START GUIDE
- Charge the machine and insert two AA batteries into each microphone.
- Undock the tablet, and gently rotate it to the desired angle.
- Power on the machine and microphones. #4 Select your preferred playback mode. #5 Display your lyrics and rock on!
NOTE
See the “Detailed Usage Guide” section of this manual for more information on how to operate your machine.
- Check the machine for damage before each use.
- Do not expose this product to water, moisture, heat, or steam. Do not place objects filled with liquid on this product.
- Do not use the machine with attachments not approved by the manufacturer.
- When using the machine outdoors, do not use it in wet or very hot weather. Do not run charging cable through puddles or other moisture.
- Clean and store the machine after each use.
- Do not expose battery to excessive heat such as sunshine, fire, or other heat sources to reduce risk of fire or explosion.
DETAILED USAGE GUIDE
MACHINE
HOW TO CHARGE THE MACHINE
Plug in the machine’s charging cable into the DC15V machine charging port (13) on the function board and into a polarized wall outlet. Be sure to charge fully before each use. The indicator light will turn on to indicate charging.
HOW TO TURN THE MACHINE ON/OFF
Push down the Power switch (22) towards the side labeled On to turn the machine on.
To turn it off, push down the same switch towards the side labeled Off.
HOW TO ADJUST THE MACHINE’S TOUCH-SCREEN TABLET
- The touch-screen tablet is attached to the karaoke machine and can- not be removed. In order to adjust its position, simply flip it up from its resting position and turn it to your desired angle.
- Please note that while the screen has the flexibility to rotate in any direction, it cannot turn an entire 360 degrees. Once the screen can no longer rotate easily, it should not be yanked or pushed. Doing so may cause damage or even break the screen off from the machine.
Note: While the tablet can face in a direction of the user’s choosing, when first unlocked from its docking station, it is facing the *back* of the machine. To have the tablet face front, gently rotate it 180° so that it faces the same direction as the speaker.
MICROPHONE
HOW TO TURN THE MICROPHONE ON/OFF
Press down on the triangular button with a Power symbol on each of the microphones to turn them on or off.
HOW TO REPLACE THE MICROPHONE BATTERIES
Screw off the bottom half of the microphone and insert two AA batteries (not included) into the slots. Screw the covering back on and proceed to power on the microphone as directed above.
HOW TO ADJUST THE MICROPHONE VOLUME
To adjust the volume level for the microphones, turn the knob labeled
Mic Vol (20) on the machine’s function board to your desired volume level.
HOW TO USE PA AND MIC PRIORITY MODES
When there is no music playing, this machine will automatically start in PA Mode. Simply speak into the microphone by ensuring that it is properly connected as instructed above.
Mic Priority mode automatically lowers the volume of the music to an almost inaudible level when someone begins speaking into the microphone.
To turn Mic Priority mode on or off, press the Mic Priority (29) button on the machine’s function board. The music’s volume will return to normal as soon as the person stops speaking into the microphone.
MUSIC
HOW TO SET UP PLAYBACK
Your machine has six different playback options: Bluetooth, Micro- SD, AUX, USB, HDMI, & PA. Each has its own set-up method. See the “Content/Parts’’ section above for hook-up locations and the relevant subsection below for more information on how to set up your preferred playback mode.
HOW TO CONNECT TO BLUETOOTH
PLAYING MUSIC FROM YOUR DEVICE
To use Bluetooth, press the Bluetooth & AUX app on the touch-screen tablet or the BT (28) button on the machine’s function board. Search for the machine name (“Masingo”) under your device’s Bluetooth connection settings and click to connect.
Note that once you exit the Bluetooth app on the tablet, the Bluetooth mode will no longer be connected.
CAUTION
Do not turn your smart device volume to maximum or da- mage to speakers may occur. Place your device volume at midrange and then adjust the volume using the volume control on the machine (21). You may however use either the controls on your device or the controls on the machine to play, pause, or switch between tracks.
HOW TO USE SD MODE
Plug your MicroSD card into the designated slot (TF Slot) (7) on the machine’s function board. Once inserted, an icon will appear on the tablet screen indicating that the SD card has been plugged in. To activate this mode, enter the Media Player app, press the SD icon, and choose which file you’d like to play.
HOW TO USE AUX (OUT) MODE
Playing music *to* an AUX-compatible device, such as an external speaker.
Plug an AUX or AUX-RCA cable into the Audio Out (2) port on the machine’s function board and into the designated input on the device you wish to connect. Next, enter the Bluetooth & AUX app on the tablet and press the Line-out icon to activate AUX mode.
HOW TO USE AUX (IN) MODE
Playing music *from* an AUX-compatible device (such as phone or MP3 player):
When the machine is on, plug an Aux Cable into the Line In (5) port on the machine’s function board and into the designated input on the device you wish to connect. Next, enter the Bluetooth & AUX app on the tablet and press the Line-in icon to activate AUX mode.
CAUTION
Do not turn your external device volume to maximum or damage to speakers may occur. Place your device volume at midrange and then adjust the volume using the volume control on the X6 machine. You may, however, use either the controls on your device or you may use the controls on the machine to play, pause, or switch between tracks.
HOW TO START USB MODE
Playing music from a USB drive
Plug a USB stick or cable into a USB slot (9 or 10) on the machine’s function board. Once inserted, an icon will appear on the touch screen indicating that the USB has been plugged in. To activate this mode, enter the Media Player app, press the USB icon, and choose which file you’d like to play.
HOW TO CONNECT TO A TV (HDMI MODE)
Plug an HDMI cable into the HDMI Out slot (8) on the machine’s function board and into your TV. Enter the Media Player app on the ma- chine’s tablet and press the HDMI icon. The audio and video output will now come from both the machine and TV simultaneously.
To limit the audio output to the machine only, simply mute the audio on your TV. Similarly, to limit the audio output to your TV only, turn down the volume on the machine (21).
*Note* that regardless of the audio output coming from the TV, the microphone’s audio output will only come from the machine.
CAUTION: Do not turn your TV volume to maximum or damage to speakers may occur. Place your device volume at midrange and then adjust the volume using the volume control on the X6 machine.
HOW TO USE KARAOKE MODE
Karaoke mode allows you to instantaneously convert a song into a karaoke version by muting the vocals. In order to operate karaoke mode,
- Connect your music via USB as instructed in the “How to start USB mode” section. Make sure your music is in RMVB file format recorded in a 2.0 channel system.
- Press the Karaoke Mode (26) button on the machine’s function board until the song’s vocals are muted. To restore vocals, simply press the Karaoke Mode (26) button again.
HOW TO CONNECT A GUITAR TO THE MACHINE
Plug a guitar cable into the GT.IN jack (12) on the machine and into the guitar.
To adjust the guitar’s volume on the machine’s speakers, simply rotate the GT.VOL (15) knob to set your desired volume level.
*Note* You may wish to download a guitar equalizer app to assist you in balancing your guitar’s sound.
HOW TO USE THE LIVE PORT TO BROADCAST LIVE WITH YOUR PHONE
- Install your preferred broadcast app (such as Facebook, TikTok, YouTube, etc.) and register
- Connect your phone to the Live port (3) using a 3.5 mm Aux cable.
- Open the app on your phone. You can now use the Alto X6’s microphone to broadcast live online.
HOW TO SING KARAOKE USING YOUR MACHINE’S TABLET
- Ensure the mics are set up correctly and that mic priority mode is off
- On the tablet, pick one of the pre-installed music apps OR download your own favorite music app.
- Search your preferred app for karaoke tracks (i.e. songs with the vocals removed).
- Belt that ballad like it’s your birthday!
*Note*: Both paid and some free karaoke tracks are readily available on most popular music apps. Many also include lyrics that display in sync with the music. For instance, by searching “Sing King” (or simi- lar) on YouTube you can find dedicated karaoke channels with lyrics displayed.
*Note*: Some music apps are specifically karaoke apps, and thus will offer you these features for their entire library.
TABLET
HOW TO CONNECT TO WIFI
Click on the WIFI icon on the home screen and then select a WIFI network from one of the available options.
HOW TO USE THE SLIDE-UP MENU ON THE TABLET
- The Slide-Up menu is located at the bottom of the tablet’s touch-screen and offers shortcut options that give you access to Bluetooth, Volume Down, Volume Up, Active Applications, Home Screen, Back, and Scroll Down.
- Bluetooth allows you to easily access the Bluetooth & AUX app where you can connect to or disconnect from Bluetooth and AUX mode.
- Volume Down and Volume Up allows you to adjust the volume of the machine’s audio output. Note that the microphone volume can only be adjusted on the machine’s function board.
- The Active Applications feature shows you all of the apps that you are currently using. You can scroll through them to easily access and move from one app to another.
- The Home icon returns you to the home screen where you can access apps, settings, and more.
- The Back function returns you to your most recent previous screen.
- The Scroll Down option allows you to hide the slide-up menu from your screen. In order to view it again, simply slide-up from the bottom of the screen.
- HOW TO USE MAGIC MODE AND EQ SETTINGS
- EQ and Magic Mode settings can be accessed through the DSP Adjuster app. Access the app by swiping from the right edge of the screen towards the center or by clicking on the DSP Adjuster app in the “More Apps” section.
- Magic Mode allows you to add special effects to your voice instantaneously through the microphones. To use Magic Mode, select your preferred setting under the “Mic Effects” menu in the DSP Adjuster App.
- The EQ Settings allow you to adjust your audio balance for different types of music. You can select from preset EQ settings under “Music Effects” or adjust your sound balance manually under the “Music EQ” menu. Both can be found in the DSP Adjuster app.
HOW TO ACCESS NOTIFICATIONS
To view the notification bar, swipe down from the top left of the tablet’s touch screen.
HOW TO USE THE ONE CLEAN UP APP
If your tablet is running slowly, click the One Clean Up app on the home screen to clear out old files. Once processed, the machine should function more quickly and smoothly.
HOW TO USE THE LYCOO WALLPAPER APP
The Lycoo Wallpaper app allows you to change the background of your touch-screen tablet. In order to view other wallpapers, scroll through the options by swiping left. Press the option of your choice to select a new wallpaper.
REMOTE
OPERATING AND AIMING THE REMOTE
- Install two (2) AAA batteries in the remote.
- Identify the speaker grill:
The remote sensor is located behind the machine’s speaker grill. The speaker grill is the gray mesh located on the front of the machine. - Ensure you are directly in front of the machine:
The remote’s sensor has a range of 60°, which means that a user cannot be more than 30° to one side of (or more than 30)° above the speaker grill. - Ensure you are within 4 meters (13 feet) of the machine. The remote has a range of 4 meters.
- Aim the remote directly at the speaker grill and press the desired command.
*Note: Pointing the remote at the touch screen will NOT achieve the desired results.*
HOW TO ADJUST MAGIC MODE WITH THE REMOTE
The remote’s Magic feature allows you to add special effects to your voice instantaneously through the microphones.
In order to use it, press the Magic button on the remote to open the DSP Adjustor app. Use the navigation buttons on the remote to cycle through the options available for changing your voice until you reach the desired effect. Speak or sing into the microphone for real-time voice distortion!
HOW TO CHANGE EQ SETTINGS WITH THE REMOTE
The EQ settings allow you to adjust your audio balance for different types of music. You can select from preset EQ settings under “Music Effects” or adjust your sound balance manually under the “Music EQ” menu.
To access via the remote, press the EQ button to open the DSP Adjustor app. Use the navigation buttons on the remote to adjust your settings, and press OK to confirm.
HOW TO SWITCH MODES USING THE REMOTE
To switch the modes between Bluetooth, AUX and Touch Screen using the remote control, press the Mode button.
Note that you do not have to be in the Bluetooth & AUX app for this function to work.
MAINTENANCE
HOW TO CLEAN
Turn the machine and microphones off. Unplug the machine’s power cord and disconnect any AUX, HDMI, or USB plug-ins
Gently wipe the outside of the machine using a clean, dry cloth. Keep all vents, buttons, and openings free of lint and dirt. Do not immerse the machine in water and do not use any harsh cleaners.
HOW TO STORE
- Charge the machine and microphones so that they are ready for next use. Dock the wireless microphones in their holsters. Make sure that the machine is clean and dry.
- Bind the power cord and AUX cable individually and gently with electrician-approved fasteners. (Note: Do not wrap or fold against the natural bend of the cords or cable. Do not wrap the cord around the machine). Store the machine in a cool, dry place away from damaging elements.
- For best results, clean and store the machine after each use.
HOW TO TRANSPORT
- The Alto X6 was designed intentionally for easy transport and mobility.
- Begin by unplugging all wires from the machine and swiveling the touch-screen tablet into its built-in resting mount.
- Place the microphones in the two holders attached to the side of the machine.
- Using the included shoulder strap, feed the ends of each side through the hooks attached to the top of the machine. Ensure that it is tightly and securely in place by looping it over the hooks and through the plastic fastener connected to the strap.
TROUBLESHOOTING GUIDE
| Problem | Solution |
| Machine is not turning on | The battery is depleted. Be sure to charge the machine after each use. |
| Microphone is not turning on | The Microphone battery is low or depleted. Replace the AA batteries in the microphone. |
| Touch-screen tablet is not turning on | Turn off the power and then turn it back on. |
|
USB or MicroSD mode is not working | Ensure that the tablet is set to the right mode by going to the Media Player app and pres- sing the icon for your selected input.
Alternatively, try unplugging either the USB or MicroSD from the machine and turning it off. Turn the machine back on, plug the USB or MicroSD back in, enter the Media Player app on the tablet, and press the icon for your selected input. |
|
Machine is not playing microphone vocals | Ensure that the Power button on the mi- crophone has been turned on and that the microphone volume (20) is up on the machi- ne’s function board.
If there is still no audio output from the mi- crophone, unscrew the bottom and insert two new AA batteries. Then proceed with the step above. |
|
The remote control is not working | Ensure you are close enough to the machine and standing directly in front of it. (See “Ope- rating and aiming the remote” above). Aim the remote directly towards the speaker grill. Aiming the remote towards the tablet will NOT achieve desired results.
If this does not rectify the issue, please check the remote’s batteries. |
| Next song is not playing | The loop setting of the music has been set to play one song and must be reset to play all in order for the next song to play. |
| Song name is garbled | The title of the song file cannot be read. Manually edit the song title on your computer and retransfer the edited file to your device. |
| Machine powers on and then shuts down | Battery is low. Please charge the machine or replace the battery if needed. |
| No sound is playing from the speaker | Ensure that the volume on the machine, remote, and your device (if applicable) are all turned to an audible level.
Also check to see whether you are on mute by pressing Mute on the remote control to see if the audio resumes. |
| Button or knob on the machine/remote control is not working properly | |
| In Karaoke Mode, only the microphone output is playing with no music | Mic Priority mode is turned on. Exit this mode by pressing Mic Priority (29) on either the re- mote control or the machine’s function board. |
| Karaoke Mode is not working. | Ensure your music is connected via USB and that your machine is in USB playback mode. (Please see the “How to start USB mode” section).
Ensure your music files are in RMVB format. (The file names of music in this format end in “.rmvb” when viewed on your computer or de- vice). Make sure the file also was recorded as a 2.0 system (i.e. left and right stereo). Karaoke mode can only mute the vocals of songs in this file format. |
| Machine is not con- necting to WiFi | Please ensure that the WiFi router and the machine are in close proximity to one another and that the WiFi network is functioning pro- perly.
If the WiFi still won’t connect, try restarting your router and reconnecting to the network afterwards. |
Frequently Asked Questions
The battery can last for 3 hours once it’s full charge. And the battery that came to the microphone is just a sample that will only last you for a few minutes, you have to replace the microphone batteries.
Yes, you can change the language on the tablet settings.
You can’t record a tape using this machine, but you can use a separate tape recorder to record your voice while signing using this machine.
Yes you can, once the machine is connected to a WIFI, you can use YouTube to play a Gospel song and you can also choose the karaoke version of the Gospel song and sing along. The speaker of this machine is pretty strong, but if you like to add an external speakers, you can though the audio out option.
Yes, once you connect the machine to your WIFI, you can open the APP YouTube and search for any karaoke song available. We personally really like the channel called Sing King.
Yes they work beautifully!
Yes. You can connect it to a larger TV through the HDMI port on the function board and to add additional AMPS, it would be possible through an HDMI Audio Extractor.
I’m sorry to hear that the machine did not have the manual in it, please contact our customer support so that they can send it to you.
Yes the built-in rechargeable battery for this machine can be replaced, but you need to contact customer support for assistance.
The machine’s battery is lithium, one advantage of lithium ion batteries is that there is no requirement for it to receive their first charge, you can use the machine right away. And yes, you can use the machine while it is charging, however, it’s not the best practice, doing so will result in a lower rate of charge, which means it will take longer to charge the machine in the long run.
Yes. It should connect via Bluetooth to your TV for audio output.
The machine has a screen that will be able to provide words to sing along, however you can’t connect a guitar to the machine. You can check out the Karaoke machine model Allegro X8, that machine has a Guitar Input and also a screen.
The Machine has a 40-watt speaker.
Yes I paired up my phone with the machine.
Yes, both mics work at the same time.
Yes, you can expand the number of microphones in your karaoke machine. Please buy a wireless microphone with a receiver, connect the receiver to the mic input on your function board, and set the microphones to different frequencies and channels so they can all work together. Please contact our customer service if you require any additional assistance.


