![]()
START HERE
We’ll let you know when it’s time to refer to your antenna installation guide.
This is one of those rare instances when you really should use the instructions. It’s not that it’s complicated, it’s just that the process will go much smoother and you’ll end up with the best reception and all the channels you expected. Don’t wait until 30 seconds before game time either!
Ready? Okay, let’s get going.
WHAT’S IN THE BOX
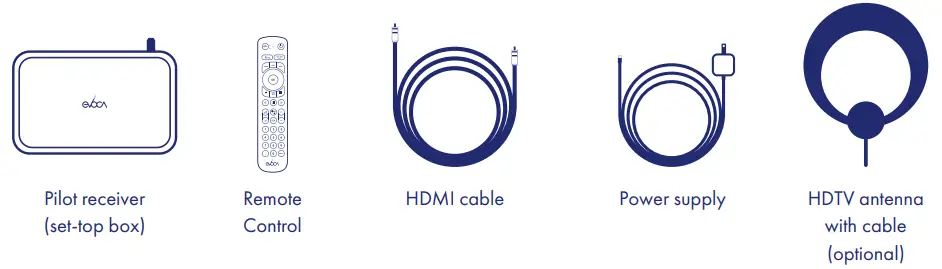
Here’s what you’ll need:
- An available power outlet for Pilot.
- If your antenna is powered, a second outlet will be required.
- An available HDMI input on your TV (take note of the HDMI input number).
- The remote that came with your TV.
- An antenna with a coax cable (either your own or one you ordered).
- A good initial location to place your antenna.
Important Product Information
FCC Compliance Information
- Model: Evoca Pilot
- This device must be installed at least 20cm (~8 inches) from typical person locations per FCC RF exposure guidelines.
Do not make any modifications to this device, doing so may void your authority to operate it.
NOTE: This device complies with part 15 of the FCC Rules. Operation is subject to the following two conditions: (1) This device may not cause harmful interference, and (2) this device must accept any interference received, including interference that may cause undesired operation.
However, there is no guarantee that interference will not occur in a particular installation. If this equipment does cause harmful interference to radio or television reception, which can be determined by turning the equipment off and on, you are encouraged to try to correct the interference by one or more of the following measures: 1) Reorient or relocate the receiving antenna. 2) Increase the separation between the device and receiver. 3) Connect the device to an outlet on a circuit different from that to which the receiver is connected. 4) Consult the dealer or an experienced radio/TV technician for help. If using an outdoor antenna follow NEC guidelines included with the antenna for grounding of the coaxial cable.
Responsible Party US Contact Information: Evoca, 9605 S. Eisenman Road, Boise, Idaho 83716. www.evoca.tv. Warranty information can be found at Avoca. tv/warranty. All other legal and safety information can be found on evoca. tv.
The device contains FCC ID: ACQ-VIP7802ATSC.
© 2022 Evoca. All rights reserved. Other products and companies mentioned are the trademarks of their respective owners and not of Evoca.
Still, have questions?
Scan the QR Code or visit Evoca.tv/SetUp or call 1-877-EVOCATIVE (1-877-386-2288) Monday – Friday between 6 AM and 8 PM EST.
Use your camera phone to scan the QR code >

REMOTE CODES
TV BRAND | CODES |
| AUDIOVOX | 576, 720, 800, 807, 808 |
| BROKSONIC | 338, 450, 702, 707, 738, 742 |
| COBY | 154, 232, 769, 770, 771, 788, 817 |
| CRAIG | 129, 242, 576, 606, 754 |
| DAEWOO | 813, 99, 698, 711, 715, 725, 754, 762 |
| DYNEX | 314, 1, 128, 179, 247, 335, 336, 337, 338, 339, 340, 341, 625 |
| ELEMENT | 294, 154, 239, 129, 513, 586, 513 |
| EMERSON | 563, 154, 682, 686, 690, 715, 335, 376, 576, 672, 689, 702, 709, 745, 814 |
| FUJITSU | 745, 805 |
| FUNAI | 335, 340, 563, 682, 686, 690, 709, 745, 576, 754 |
| GE | 396, 122, 154, 668, 705, 755, 816 |
| GOLDSTAR | 99, 154, 682, 709 |
| HAIER | 297, 589, 154, 157, 175, 513, 179, 628 |
| HISENSE | 154, 296, 386, 513, 157, 635 |
| HITACHI | 250, 167, 346, 513, 682, 152, 289, 709, 717 |
| INSIGNIA | 314, 340, 339, 337, 294, 341, 513, 680, 128, 690, 782, 338, 179, 1, 154, 335, 336, 625 |
| JC PENNEY | 99, 157, 360, 396, 668, 735, 755 |
| JVC | 245, 152, 157, 282, 167, 513, 692 |
| LG | 154, 682, 717, 99, 396, 709 |
| MAGNAVOX | 368, 1, 150, 309, 335, 340, 513, 686, 690, 695, 811 |
| MITSUBISHI | 99, 750, 717, 745 |
| NEC | 602, 99, 153, 264, 374, 472 |
| PANASONIC | 12, 370, 651, 694, 360, 775 |
| PHILIPS | 368, 1, 513, 690, 686, 717, 740 |
| PHILIPS-MAGNAVOX | 1, 792, 150, 695 |
TV BRAND | CODES |
| PIONEER | 289, 685, 153, 495, 724 |
| POLAROID | 189, 464, 277, 1, 122, 129, 179, 360, 642, 763, 810 |
| PROSCAN | 282, 157, 154, 129, 294, 333, 347, 374, 512, 601, 655, 458, 577, 396, 189, 368, 627, 632, 678, 758, 764 |
| QUASAR | 1, 12, 512, 668, 671, 714 |
| RCA | 630, 333, 638, 122, 150, 154, 157, 289, 346, 347, 358, 396, 458, 483, 513, 577, 626, 646, 673 |
| ROKU TV | 513, 635, 150, 314 |
| SAMSUNG | 157, 739, 2, 158, 737, 759, 99, 360, 374, 784 |
| SANSUI | 338, 129, 335, 347, 450, 742 |
| SANYO | 376, 155, 513, 654 |
| SCEPTRE | 392, 374, 282, 790 |
| SEARS | 1, 150, 154, 157, 335, 360, 376, 396, 450, 591, 686, 690, 745 |
| SEIKI | 294, 154, 239, 360 |
| SHARP | 154, 249, 150, 634, 513, 470, 635, |
| SONY | 374 |
| SUPERSONIC | 129, 188, 641, 644, 647, 672 |
| SYLVANIA | 563, 340, 686, 709, 1, 198, 335, 338, 631, 682, 686, 690 |
| SYMPHONIC | 335, 576, 682, 686, 690, 709 |
| TCL | 346, 513, 382, 1, 309, 512 |
| TOSHIBA | 360, 122, 377, 294, 450, 455, 670, 737, 153, 376, 472, 717, 785 |
| VIEWSONIC | 378, 141, 309, 543, 578, 590, 591, 592, 593, 594, 595, 1, 289, 549, 629 |
| VIZIO | 371, 628, 591, 594 |
| WESTINGHOUSE | 374, 157, 277, 294, 513, 594, 612, 639, 780, 513 |
| WHITE-WESTINGHOUSE | 338, 392, 483, 682, 699, 709 |
| ZENITH | 747, 38, 150, 152, 154, 603, 669, 682, 695, 709, 713, 727, 737, 742, 804, 814, 722 |
SETUP
SET UP YOUR ANTENNA & INTERNET.
- Mount your antenna.
A. If you already have your own antenna installed, skip to Step 2.
B. Identify an initial location to place your antenna – upper interior wall, on a window or exterior wall is usually the best.
C. Mount your antenna (keep in mind that you may want to move your antenna after we check your reception in POWER UP PILOT, Step 3).
D. Refer to the antenna installation instructions now, but don’t connect the cable to your TV. You’ll read more about that in a moment.
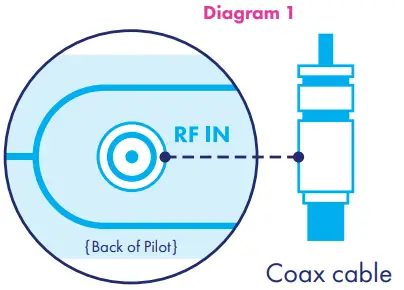
- Connect your antenna to Pilot.
A. Using the coax cable connect your antenna to the antenna connector on Pilot (Diagram 1).
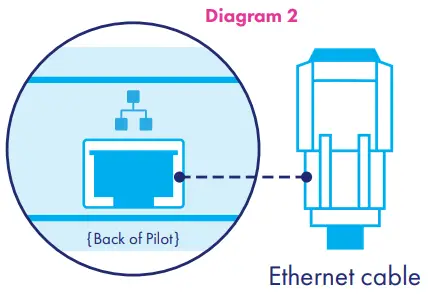
3 Choose an internet connection to Pilot.
A. If using your Wi-Fi network, you can skip this step. You’ll connect later as a part of the on-screen setup.
B. If connecting Scout directly to a modem or router, do so now using your Ethernet cable (Diagram 2).
CONNECT PILOT TO YOUR TV.
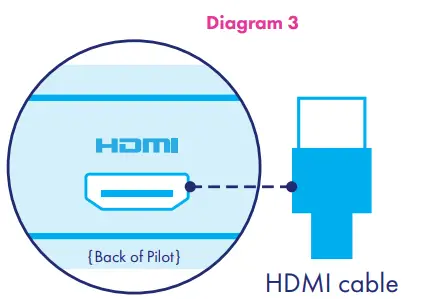
- Connect HDMI cable.
A. Connect the supplied HDMI cable from the HDMI port on Pilot to the HDMI input that you’ve identified on your TV (Diagram 3).
B. Some TVs have multiple HDMI ports, so take note of which HDMI input you are using.
C. If you’d like, you can write it down here HDMI #___________
- Turn on your TV.
A. Using your TV’s remote control, turn on the TV and select the HDMI input you noted in Step 1C.
POWER UP PILOT
- Connect Pilot to power.
A. Using the Pilot power supply and power cable, connect the Pilot to the power supply.
B. Plug the power supply into a working power outlet.
C. After a few seconds you should see the light on the bottom of your Pilot begin blinking.
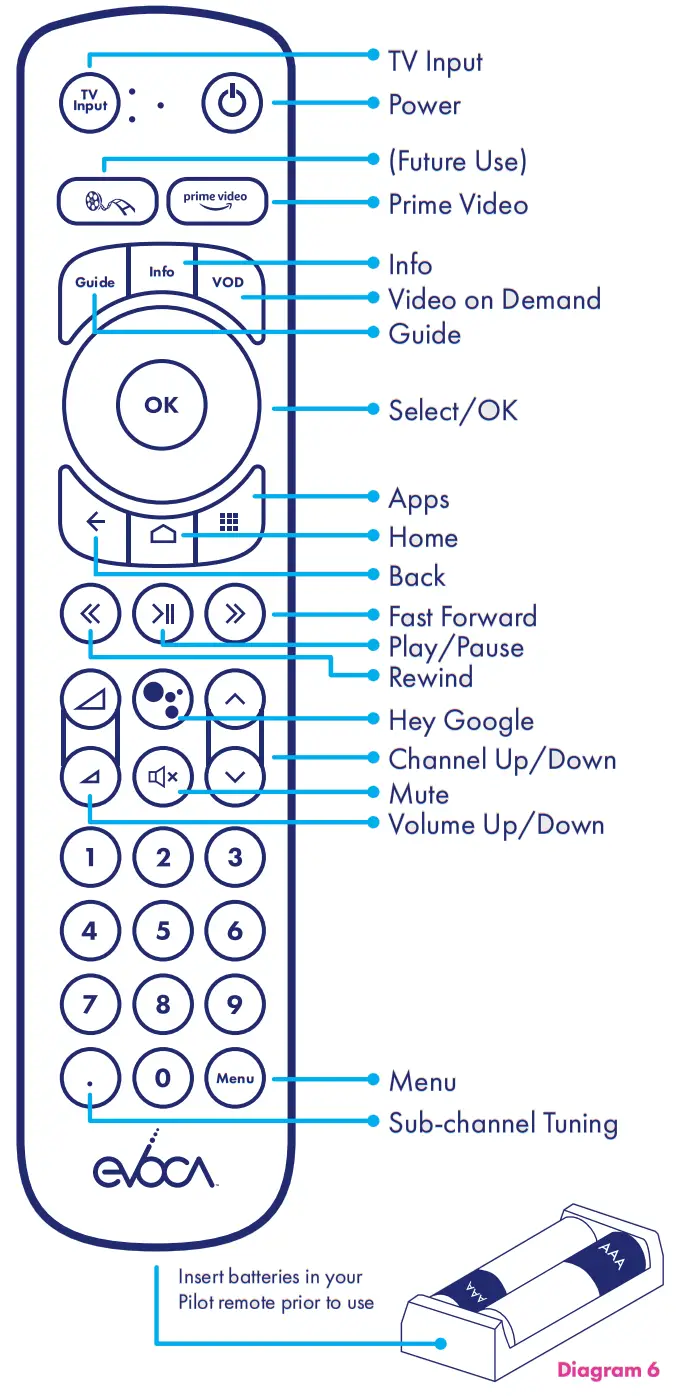
D. Insert the batteries supplied with your Pilot into the remote by sliding down the lower back panel of the remote and insert the batteries as in (Diagram 6). - Follow the on-screen instructions.
A. If everything is good to this point, you should see an Android TV logo on your TV screen.
The pilot will then fly you through the rest of the setup on screen.
B. If you don’t see the Android TV logo followed by instructions, make sure your TV is set to the HDMI input that Pilot is hooked up to. Then, make sure that your cables are connected. - Make sure Pilot has found your channels.
(Don’t worry, you are almost there).
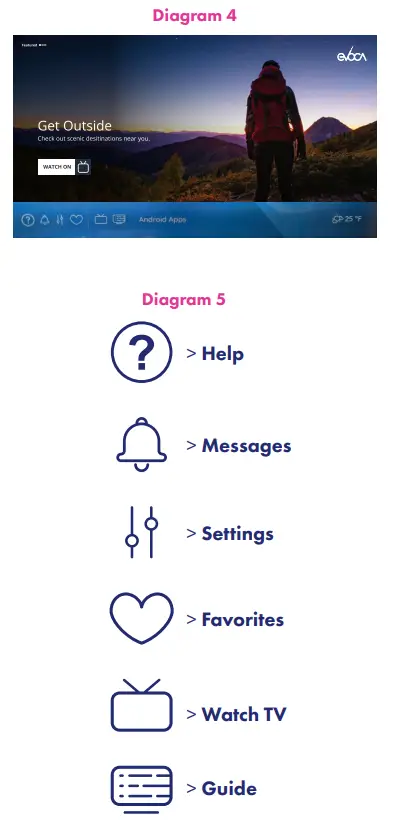
A. When all of the setup steps are complete, the bottom of your screen should look something like this (Diagram 4) with navigation including Help, Messages, Settings, Favorites, Watch TV, and Guide (Diagram 5).
B. Select Guide ( ) and scroll through the channels in your guide. Local channels you should expect to see include CBS, NBC, ABC, and Fox.
C. You should also see your Evoca TV channels, such as the Weather Channel, Bloomberg, and NFL Network.
D. If you see all of these channels, your Pilot should have a solid green light on the bottom and you should be all set to enjoy Evoca TV. If you didn’t get all of the channels that you expected, follow the instructions for re-scanning for channels.
PROGRAM YOUR EVOCA REMOTE.
A. Reference the remote codes on the back page of this guide and note the codes for your brand of TV.
B. On your new Evoca remote press the TV Input button (tv input ) and the OK button ( ok) together and hold for 2 seconds.
C. Once the light on the remote is solid, release those buttons and enter the three-digit code for your brand of TV.
D. Test the Volume and power buttons. If it controls your TV, you are all set. If it doesn’t repeat Step B with the next code for your TV.
Re-scanning for Channels
If you didn’t get all of the channels you were expecting in Power Up Pilot, Step 3, or at any time you aren’t receiving the reception you expect, try the following steps:
- Move your antenna to a new location (keep in mind that higher is usually better and a window is sometimes better than a wall).
- Using your Pilot remote, go to homescreen>settings>channel scan>channel scan and then scan. This will take a few minutes, but the Pilot will scan all available frequencies and look for all of your channels.
- If you have all of the channels you’d expect (see Power Up Pilot, Steps 3B & 3C), permanently mount your antenna where it is and you are done.
- If you still don’t have all of your channels, go back to Power Up Pilot, Step 3, and try again. Depending on the location and type of home as well as the type of antenna that you are using, it may take a few tries to get the best possible signal. If you get stuck, please visit www.evoca.tv/setup or call us at 877-EVOCATV between 9 am and 8 pm MST. For after-hours support, contact [email protected].
![]()


