![]()
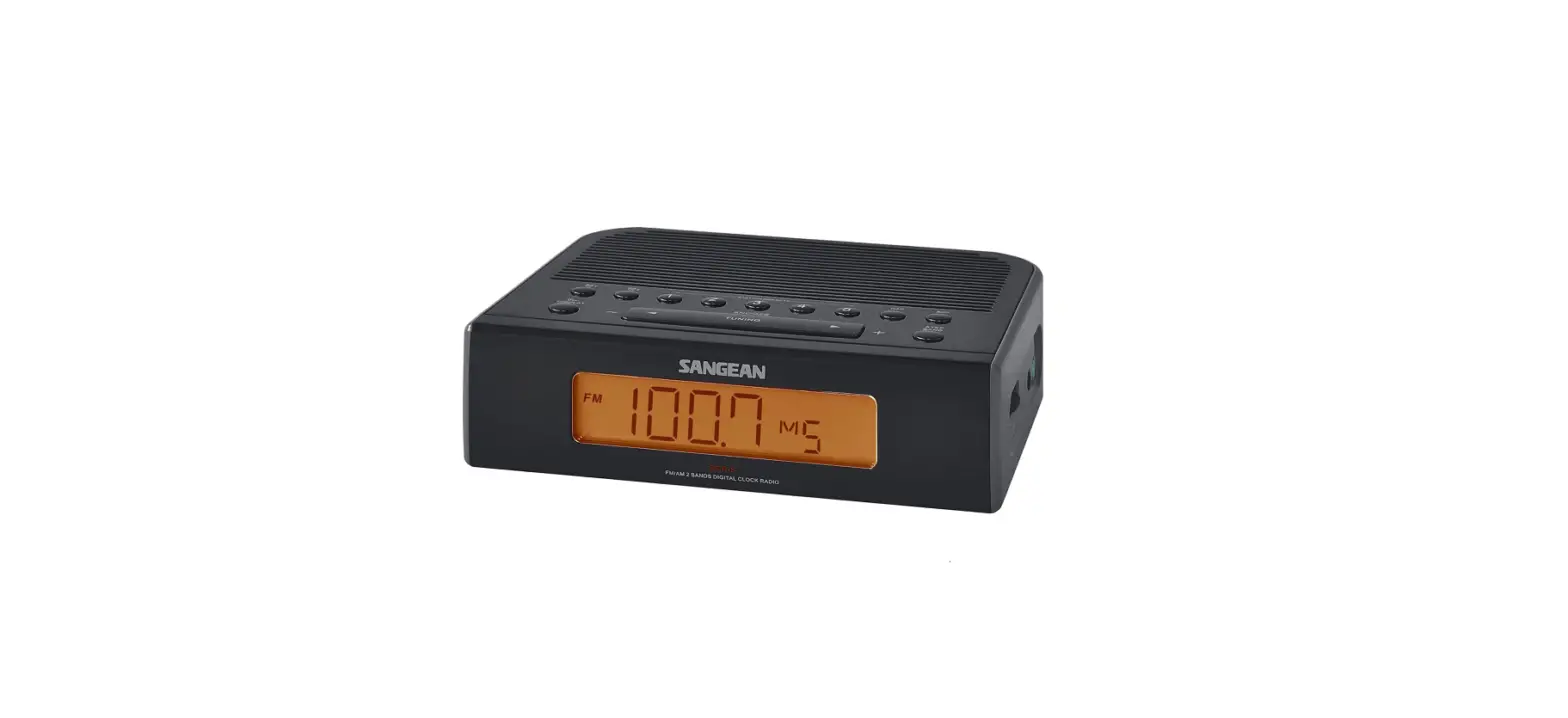
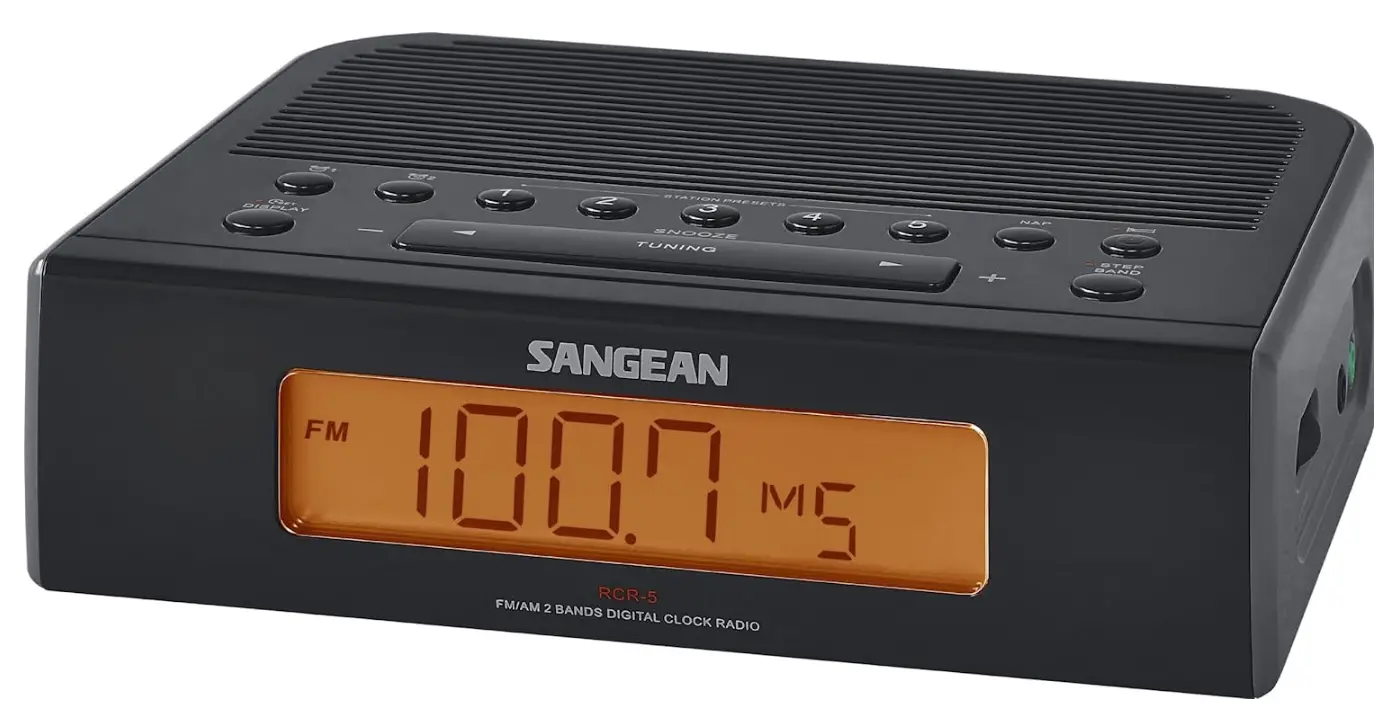
Sangean RCR-5BK FM Digital Tuning Clock Radio
IMPORTANT SAFETY INSTRUCTIONS
- Read and understand all safety and operating instructions before the radio is operated.
- Retain instruction: The safety and operating instructions should be retained for future reference.
- Heed warnings. All warnings on the appliance and operating instructions should be followed.
- Follow all operations and use instructions.
- Water and moisture: The appliance should not be used near water. Do not use near a bathtub, washbowl, laundry tub, kitchen sink, wet basement, swimming pool, etc.
- Unplug the radio from the AC power outlet before cleaning. Use only a damp cloth for cleaning the exterior of the radio.
- Do not place the radio on an unstable cart, stand, bracket or table. The radio may fall, causing serious personal injury and damage to the radio.
- Ventilation: This radio should be situated so that its location or position does not interfere with its proper ventilation. For example, the radio should not be used on a bed, sofa, rug or other soft surfaces that may block the ventilation openings. It should not be placed in a built-in situation like a cabinet that may reduce air flow through the ventilation openings.
- Power sources: The radio should be operated only from the type of power source indicated on the marking label. If you are not sure of the type of power supply to your home, consult your radio dealer or power company.
- Power cords: The power cord should be positioned so it is not walked on, pinched, or items placed on top of it. Pay particular attention to cords at plugs, convenience receptacles, and the point where they exit from the unit. Unplug the power cord by gripping the power plug, not the cord. Operate the radio using only the current type of power source indicated. If you are not sure of the type of power supply to your home, consult your dealer or local power company.
- Do not overload wall outlets or extension cords. This can result in a risk of fire or electrical shock. Never insert objects of any kind into the radio through the opening. The objects may touch dangerous voltage points or short out parts. This could cause a fire or electrical shock.
- If the radio is left attended and unused for long periods of time, unplug it form the wall outlet. This will prevent damage caused by lightning or power line surges.
- If the radio is left unattended and unused for a long period of time, remove the batteries. The batteries may leak and damage the furniture of your radio.
- Do not attempt to service the receiver yourself. Removing the cover may expose you to dangerous voltage, and will void the warranty. Refer all servicing to authorized service personnel.
- Object and Liquid Entry-Never push objects of any kind into this radio through opening as they may touch dangerous voltage points or short-out parts that could result in a fire or electric shock. Never spill liquid of any kind of product.
- The appliance should be serviced by qualified service personnel when:
- The power supply cord or the plug has been damaged.
- Objects have fallen or liquid had been spilled into the radio.
- The radio has been exposed to rain or water.
- The radio does not appear to operate normally or exhibits a marked change in performance.
- The radio has been dropped, or the enclosure damaged.

IMPORTANT:
The mains adaptor is used as the means of connecting the radio to the mains supply. The mains socket used for the radio must remain accessible during normal use. In order to disconnect the radio from the mains completely, the mains adaptor should be removed from the mains outlet completely.
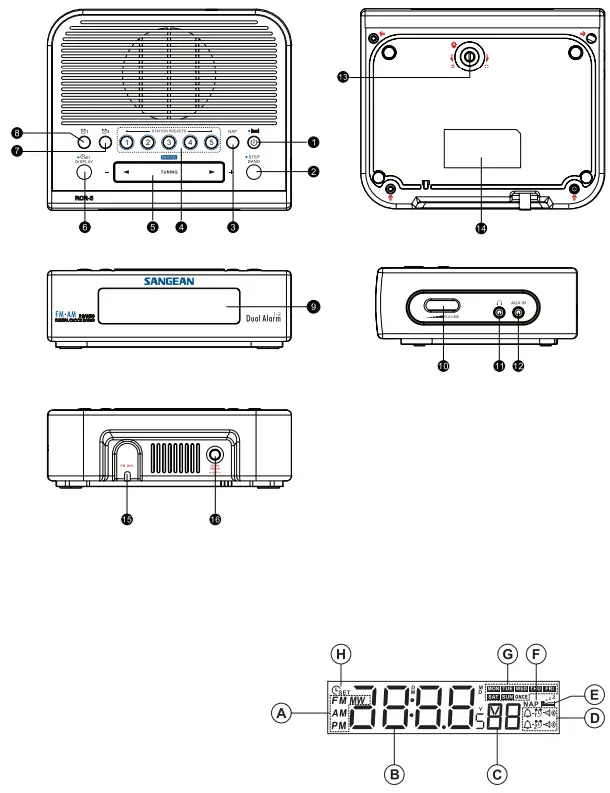
CONTROLS
- Power on / off and Sleep Timer button
- Band / Step button
- NAP TIMER button
- STATION PRESETS
- TUNING Up / Down and Snooze
- TIME SET / DISPLAY button
- Alarm 2 button
- Alarm 1 button
- LCD Display
- Volume Control knob
- Headphones socket
- AUX in
- Display the Backlight Adjustment button
- Logo and specification mark
- FM antenna
- Power socket
LCD DISPLAY
- Radio band and a.m. / p.m. display
- Hour and minute digits
- Second digits
- Alarm indicators
- Sleep timer
- Nap timer
- Weekday
- Clock set
OPERATION
CLOCK SETTING (date and time)
Clock time has to be set before the alarm setting.
- Press and hold the TIME SET button for more than 2 seconds, the display will show, and flash the year digits.
- Press TUNING Up/Down button to set the year.
- Press the TIME SET button, then use the same way to set the date. press and hold the TUNING Up/Down button for fast-forwarding or fast-backward.
- Press the TIME SET button to set the hour with the TUNING Up/Down button. Same way (press TIME SET then TUNING Up/Down) to the minute. The day of week is automatically set.
- After the minute is set, then press the TIME SET button to complete the setting.
- While setting, the setting will be cancelled after 10 seconds without pressing any buttons.
- After the time is under setting, the setting won’t be cancelled even you don’t press any button for more than 10 seconds. You need to press the TIME SET button to complete the setting, and the second digit will be set to 0 at the moment when you press the TIME SET button.
RADIO OPERATION
Turn on the radio with the POWER button.
Tune into desired stations
Station selection
- Press the TUNING up/down button, to tune into the frequency of your desired stations
- Scanning tuning- Press and hold the TUNING up/down button for more than 0.5 seconds and release, the radio will search for the next station.
STATION PRESETS
- Tune into the stations that you would like to store.
- Select a STATION PRESET button (1-5) and press it for more than 2 seconds until a beep sounds and the station is now stored.
Note:
When you store a new station in a preset, the station previously stored will be automatically erased.
Recall the station memories
To recall the station memories, simply press the BAND button to select the required bands and press the required STATION PRE-SET (1-5).
Volume
Turn the VOLUME knob to adjust the volume.
Alarm Clock
There are two alarms which can each be set to wake you to AM/FM radio or buzzer alarm. The alarms may be set while the unit is in standby mode or while playing. Ensure that the time is set correctly before setting the alarms.
- Before setting an alarm ensure the clock time is set. Press and hold any of the Alarm button to enter the alarm setting (e.g. Alarm 1 button to enter the alarm 1 setting).
- The hour setting of alarm 1, for example, will begin to flash. Press the Tuning up/down button to select the required alarm hour, and press the Display/ Time set button to confirm the setting. Press the Tuning up/down button to select the required alarm minute, and press the Display/ Time set button to confirm the setting.
- Then the display will show the frequency options for the alarm. Press the Tuning up/down button to select the desired option and press the Display/Time set button to confirm the setting. The alarm options are as follows:
- ONCE – the alarm will sound once
- DAILY – the alarm will sound everyday
- WEEKDAY – the alarm will sound only on weekdays (Monday to Friday)
- WEEKEND –the alarm will sound only at weekends (Saturday and Sunday)
- Press the Tuning up/down to choose the required alarm type, and then press the Display/ Time set button to confirm the setting. The alarm can be set to buzzer, FM or AM. When radio mode is selected, the radio frequency on the display will begin to flash. Press the Tuning up/down to adjust the required radio frequency or the required preset number for the radio alarm, then press the Display/Time set button to confirm the setting.
- Press the Tuning up/down to select the required alarm volume and press the Display/ Time set button to confirm the setting. The alarm has now been set. The symbol for active alarm (such as
 ) is shown on the display.
Note:
After the alarm is set, the alarm status will return to the clock time after 10 seconds.
When the alarm sounds
When the buzzer alarm activates, the alarm will start softly and gradually increase in level. It will sound for 1 minute and silence for 1 minute in repetition for 60 minutes unless canceled. When the other alarm types are set, the radio will sound non-stop at the selected time for up to 60 minutes.
When the radio alarm is activated, the alarm will go off in Humane Waking System. It will increase its volume in 0.5increments from 0 to your set volume.
To deactivate a sounding alarm, press the Power on/ off button to cancel a sounding alarm.
Disabling / canceling alarm setting
To cancel the alarm setting, press and hold the corresponding alarm button before the alarms sound off.
Snooze
To interrupt the sounding alarm (radio or beep tone), press the SNOOZE button. The alarm stops and begins again with intervals of 5 minutes. The alarm will continue for an hour whatever being interrupted.
Nap timer
With the NAP button, you can select the period for the short-term alarm in 5 minutes steps from 5-120 minutes.
The Nap timer starts when you release the key. NAP will appear on display. The alarm signal sounds after the period of time which you have set.
If you wish to turn off the Nap timer before the time is up, simply adjust the number of minutes by pressing NAP button to OFF and release. NAP will disappear from display.
SLEEP timer – auto shut off
Continuously pressing the POWER button will activate the sleep function, the radio will switch off automatically in 60,45,30,15,120,90.
The Sleep control begins when you release the POWER button and the display will appear the minutes.
After the minutes which selected, the radio turns itself off automatically![]() .
.
If you wish to turn off the radio beforehand, press POWER button. And the SLEEP timer symbol will disappear.
Calendar Display
Press the TIME SET/DISPLAY button to see the date, and press it again to see the year. The display will go back to the clock in 10 seconds.
24/12 time format/Date format/FM AM step setting
- Power off the radio.
- Press and hold the BAND button for 4 seconds and the current software version will flash on the display (e.g. P07)
- Continuing pressing and holding the BAND button until you hear the beep and the display will flash the current 24/12 time format. Press the TUNING UP/DOWN button to select the option. Press the BAND button to confirm the setting. Now the display will show the date format.
- Press the TUNING UP/ DOWN button to select the desired date format. Press the BAND button to confirm the setting. Now the display will show FM tuning step.
- Press the TUNING UP/DOWN button to choose between 50 KHZ or 100 KHZ and then press the BAND button to confirm the setting.
- After the setting of FM tuning step, the display will show AM tuning step. Press the TUNING UP/ DOWN button to choose between 9 KHZ or 10 KHZ and press the BAND button to confirm your selection. Now the setting is completed.
AUX IN socket
Plug in external audio devices such as CD player to the AUX IN socket (on the side of the radio), then play your device and press the BAND button repeatedly until you see “AU” on the display.
The radio will amplify and play out the signal form your device.
Headphones
The radio provides a Headphones socket to connect the head-phones set. When plug in the headphones, the speaker is disconnected.
Display backlight adjustment
Turn the Display Backlight Adjustment button to adjust the back light level.
Power
There is a battery back up for 10 minutes which means: when the power is unplugged or during a black-out, the clock and all the stor-ages will be lost in about 10 minutes.
Factory reset
If your radio fails to operate correctly, or some digits on the display are missing/incomplete or you simply just want to restore to original factory setting, carry out the following procedure.
- Power off the radio.
- Press BAND button and preset 5 button simultaneously until ‘dEF’ shown on the display and the beep sound is heard. Now the factory reset is completed.
Technical data
Power supply:
- 120 Volt/60 Hz (USA version);
- 230 Volt/50 Hz (Europe version)/ADAPTOR DC OUT 6V/0.4A
Frequency coverage:
- FM 87.5 – 108.0 MHz
- AM 520 – 1710 kHz (USA version);
- AM 522 – 1710 kHz (Europe version)
DISPOSAL
If at any time in the future you should need to dispose of this product please note that: Waste electrical products should not be disposed of with household waste. Please recycle where facilities exist. Check with your Local Authority or retailer for recycling advice. (Waste Electrical and Electronic Equipment Directive)
FAQs
Which Sangean RCR-5 radio is the best?
The Sangean is the finest choice if you’re looking for a cheaper alternative to the pricy Bose Wave SoundTouch Music System IV. It’s a wonderful bonus that it offers HD audio, and it’s possible that it’s the only HD clock radio now on the market.
How do I set up my Sangean RCR-5 radio?
To turn on your radio, press the Power button. To choose the frequency band you desire, click the Band button. To access the menu settings, press and hold the Menu button. Then, to choose “Region,” press the Tuning up / down button. To enter the setting, use the Select button.
Is Sangean a good brand?
For 40 years, Sangean has built a reputation for producing radios with the greatest performance and quality standards.
How do I set the clock on a Sangean RCR-5 radio?
Approximately 2 seconds after pressing and holding down the Time Set button, a beep will sound and the hours digits will flash in the display. 4. To set the necessary hour, press the Tuning Up/Down buttons.
What does AUX mean on a Sangean RCR-5 clock radio?
Use an audio cable to connect your auxiliary input source, such as an MP3 player, to the AUX IN jack on the back of the device (not supplied). In order to power on the device and choose the AUX mode, press ON (RADIO/AUX) twice.
How do you set AM and PM on a Sangean RCR-5 digital clock?
Click the switch next to the 24-hour clock after clicking the ••• to the right of the clock to alter the format of the time display. To keep the interface tidy, the AM/PM unit will briefly appear when you switch to the 12-hour format and then fade away.
How does a Sangean RCR-5 digital alarm clock work?
Digital clocks utilise an electronic timebase to count off the seconds and maintain the time accurately rather than a pendulum or an oscillating wheel. Digital clocks use a “counter” in place of gears, and, of course, the face of the clock uses an LED or LCD to display the numbers instead of hands and a painted surface.
How do you know if the Sangean RCR-5 clock is am or pm?
The first 12-hour block is referred to as am. It runs from 0:00 to 12:00. The second time frame, designated as pm, spans 12 hours from midday to midnight.
How do you use a Sangean RCR-5 digital clock?
Find the “Clock,” “Clock Set,” or “Time” buttons. Look for buttons with the labels “Mode” or “Settings” if your digital clock model lacks one of these buttons. Press the proper time-setting button, or press and hold it, until the numbers on the digital display begin to blink.
How is AM to FM changed on the Sangean RCR-5 radio?
Only the FM function of the radio is supported; the AM function is not.
Is it possible to use alarm 2 seven days a week or just on the weekends?
For the weekdays and weekends, distinct dual alarms can be set.
How do Sangean RCR-5 alarm clock radios work?
Clock radios are powered by AC through a wall outlet. Older electronic digital models used to lose its alarm settings and reset the clock to midnight in the case of a power outage (00:00). Even if the power is restored, this would prevent the warning from sounding.
How does the alarm function on the Sangean RCR-5 digital clock become turned off?
Start the clock app on your phone. Tap Alarm down at the bottom. The On/Off switch for the relevant alarm needs to be tapped.
How is an alarm set on a Sangean RCR-5 digital clock radio?
Use the volume up/down buttons to change the volume after pressing and holding the alarm button until you hear a beep to set the alarm. Press and hold the alarm button one last time after selecting your alarm time until you hear a beep. Push the power button once, and then release it to confirm your selections.
How long are the Sangean RCR-5 alarm clocks good for?
The 10 minute alarm is set by default on Android devices. Unlike the iPhone, an Android alarm’s ring timing can be adjusted. The “silences after” option can be modified on the alarm’s settings tab.


