![]() IDEAL POWER FOR IDEAL CHOICE
IDEAL POWER FOR IDEAL CHOICE
USER’S MANUAL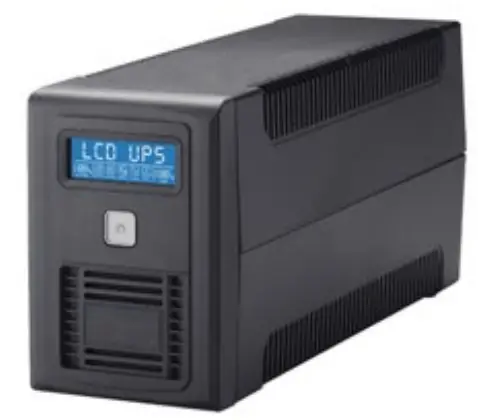
INV-7110 Line Interactive UPS
This manual provides safety. installabon and operation Instructions which will guide you
INTRODUCTION
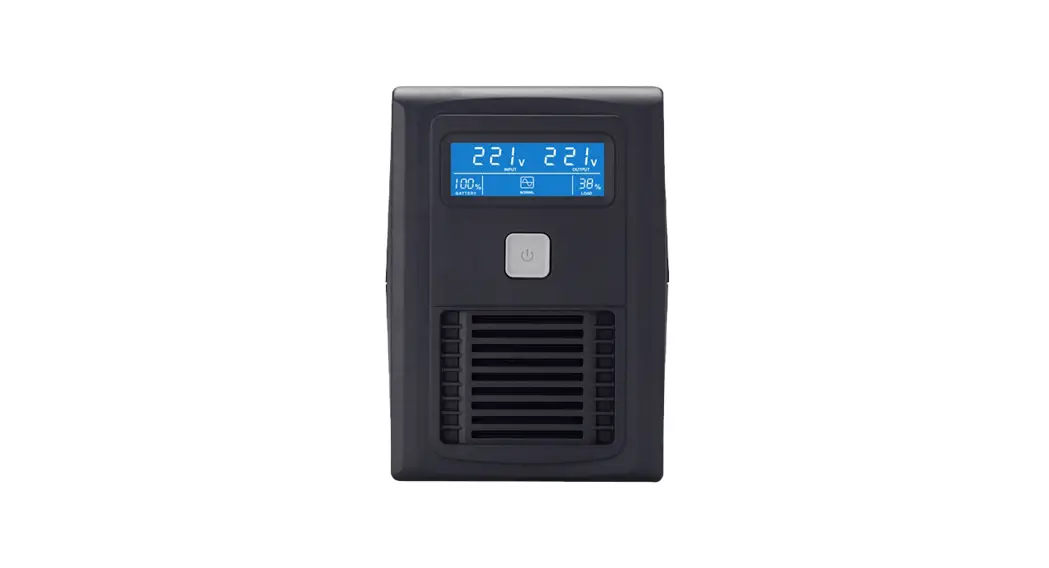
- System Description The Product is line mteractrve UPS provides guaranteed battery backup power during outage and unsafe fluctuation along with full protection from damaging surges and spikes The UPS integrated with microprocessor controller voltage stabilizer. LCD display in a stand-alone unit to provide the perfect protection to safeguard your critical devices and valued data
- Features
- Line interactive design with microprocessor controlled
- Auto restart upon AC recovery
- Equipped with 2
- Steps Boost & 1-Step Buck AVR to porde stable utikty voltage
- Built-in CCJCV battery charger and battery over-drain protection
- DC start function enable UPS started without AC power supplied
- Off mode charging enable UPS charge itself even power switch is OFF
- Provide lightning surge overload, and short circuit protection
- Battery easy replacement design (Optional)
- LCD status indicator
CAUTION
- The UPS contains electricity that is potentially hazardous Qualified or certified technician should proceed all repairs and maintenance.
- The UPS has its own internal energy source (battery) The output receptacles may be active even when the UPS is not connected to an AC supply
- The UPS is suitable for computers and electronic equipment with linear loads. not suitable for electronic equipment with non-linear loads. such as motors & fluorescent lamps
- Be sure to operate within the power rating of the UPS. Below112 or 1/3 of the rated power is recommended for longer backup time
- The UPS must be installed in a protected environment away from heating appliances such as a radiator or heater. DO NOT place the UPS near excessive humidity, under sunshine, or close to heating sources
- if the UPS is out of order, disconnecting the power cord and contact with your dealer right away.
- The unit should be supplied by a grounded source DO NOT operate the unit without a ground source
- The UPS should be installed neat to wall socket and equipment and be easily accessible
- DO NOT plug the liPS’s power cord into UPS ‘s output socket That will to the best performance of your lliulpeneitt Please read and keep this IIWIWI result in a safety hazard
- A qualified technician or electrician in accordance with local electrical code should perform installation.
- DO NOT connect a laser printer or plotter to the UPS. A laser printer or plotter periodically draw significantly more power than its idle status. and may overload the UPS.
OVERVIEW
Front Panel
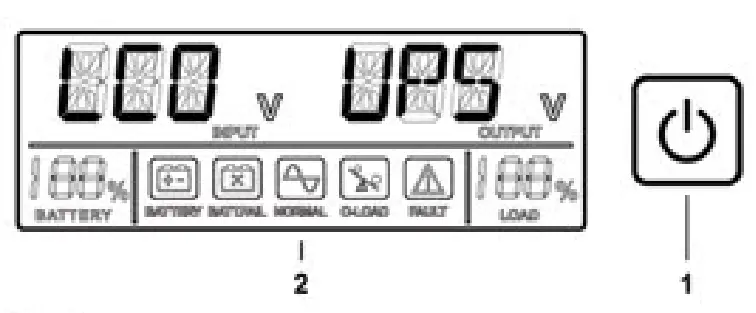
- Power Switch ON-OFF or silence button
- LCD screen

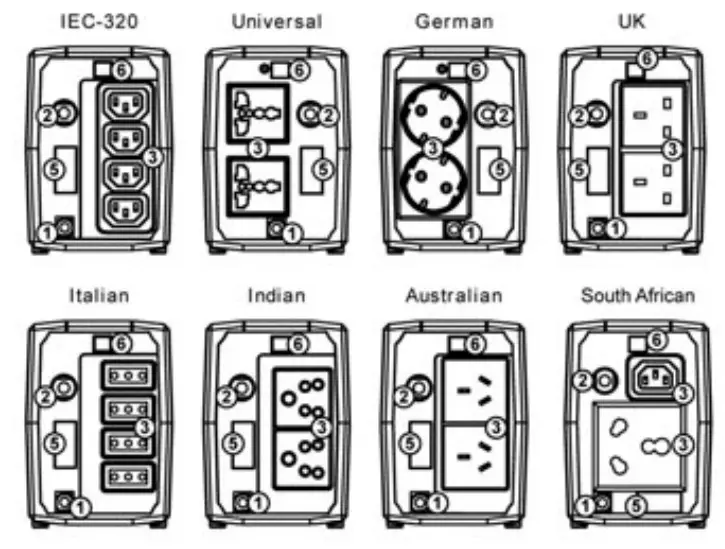
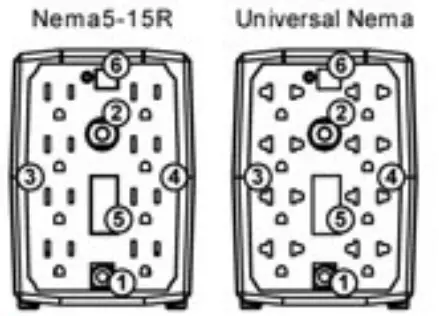
Rear Panel
- AC input line cord
- AC circuit breaker
- 8ackup1AVR/surge protection outlet
- Surge protection outlet
- Tel/Line/Modem surge protection RJ-45 port (Optional)
- Smart USE. cornmurecabon port (Optional)


OPERATION
- Turn 0N011 the Unit Turn on the UPS unit on AC mode by pressing the power switch for 1 second Turn off the UPS unit on AC mode by pressing the power switch for 4 seconds
- Connect to Utility and Charging Wien UPS is connected to AC power and power switch is on UPS wi7 charge battery automatically The UPS is designed w4h the function of OFF-Mode Charging. so UPS will charge battery continuously when power switch is off and AC power is supplied To power off UPS completely on OFF mode, please remove the input of AC power
- DC Start Turn on the UPS unit on Battery mode by pressing the power switch for 1 second Turn off the UPS lint on Battery mode by pressing the power switch for 4 seconds and UPS will be completely turned off in 10 SeCOnds Wan another 10 seconds to press power switch for 1 second if you want to turn on the UPS again
- Buzzer Buzzer will beep when UPS is on Battery mode or having fault situations Mute the buzzer by pressing power switch once Restart the Buzzer by pressing power switch once again
BATTERY CHARGING AND STORAGE
The UPS is shipping from Factory with internal full-charged battery. but battery power might be lost during the transportation. So please plug in the AC input line cord to wad outlet For best result, charge the battery for at least 10 hours before initial use.
| Storage Temperature | Recharge Period | Charging Duration |
| -15t to 30t (5*F to 86W) | Every 8 Months | 10 Hours |
| 301C to 45t (NW to 113W) | Every Month | 10 Hours |
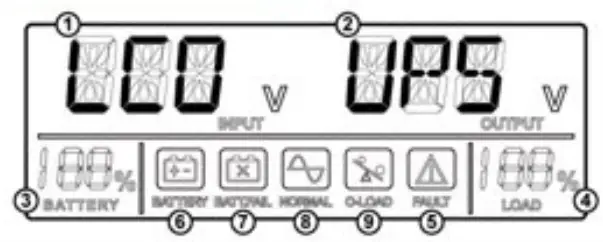
INDICATION TABLE
| Indicators | Description | |
| 1 | Input Voltage | Indicate input tine voltage |
| 2 | Oitput Voltage | Indicate Output voltage |
| 3 | Battery Capacity | Indicate estimated battery capacity The accuracy will be influenced by UPS operation mode and load capacity |
| 4 | Load Capacity | Indicate load level the percentage of UPS full load |
| 5 | Fault Icon | Icon is ON when UPS is fault Buzzer beeps constantly Or rapidly |
| 6 | Battery Icon | Icon is ON when AC power is abnormal and UPS is on Battery made Buzzer beeps twice every 8 seconds when battery and load are normal Buzzer beeps 4 times every second when battery row voltage |
| 7 | Battery Fail Icon | Icon is ON when UPS battery is abnormal. |
| 8 | Normal Icon | Icon is ON when UPS is normal |
| 9 | Overload Icon | kon is ON when UPS is on Buzzer makes constant lone |
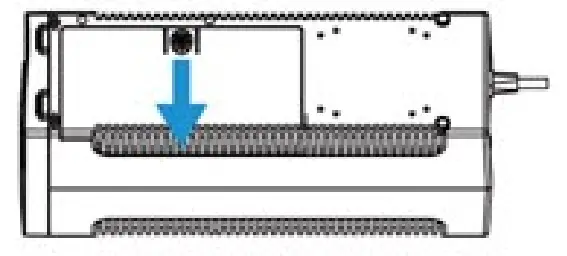
CHANGE BATTERY
Remark: Only available for battery easy replacement design model UPS.
Note: Small sparks may occur during battery connection, this is normal.
- Turn the UPS over and slide the battery compartment cover off the battery housing

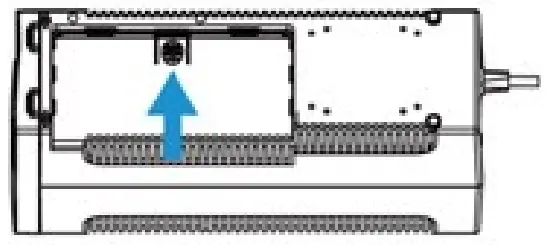
- LIFT the battery out of the compartment, and disconnect wires from battery Positive (• and negative (-) terminals Get a new battery and make sure to reconnect wires to positive and negative terminals correctly

- Aligned all arrows marks and slide the battery compartment cover back onto the battery housing Double check if battery compartment is well-locked


TROUBLESHOOTING
Check UPS with below steps when you face UPS failure problem
- Is the power switch of UPS turned on7
- Is UPS plugged into a working wall outlet?
- Is line voltage within the rating specified?
- Is Circuit breaker on the UPS back panel active/
- Is UPS overloaded7
- Is UPS battery not hay charged’)
Use the table below to solve the UPS operation problems. If the problems cannot be resolved, please provide model name. serial number. date of purchase, date of the problem occurred and full description of the problem including load status. UPS LCD status, UPS buzzer status. installation environment etc when can for service
| Problem | Probable Cause | Solution |
| UPS will not turn on and LCD is not ON | Battery voltage is less than I aVDC | Charge the UPS at least 5 hourS |
| PCB is failure | Call for service to replace the PCB | |
| UPS is always on Battery Mode | Power cord is loose | Reconnect the power cord properly |
| Circuit breaker is tripped | Reset the circuit breari• on the UPS back pane | |
| PCB is failure | Can for service to replace the PCB | |
| Backup time is Shortermng | Battery is not fully charged | Charge the UPS at least 5 hours |
| Battery defect | Replace the battery with same type of battery | |
| Buzzer continuously beekeeping when AC is normal | UPS is overloaded | Remove sane loads first Make sure the equipment plugged in to the UPS is not overloading the capacity of UPS |
SPECIFICATION
| INPUT | |
| Voltage Voltage Range Frequency | 110/115/120VAC or 2201230/240VAC Label swiped 50/60Hz auto-sensing |
| OUTPUT | |
| Capacity Waage Regulation (Battery Mode) Frequency Waveform Transfer Time | Label specified •1.10% 5060Hz */. I Hz &mutated scam* <6ms (tyPral) |
| BATTERY | |
| Voltage Recharge Time Safety Protection Advance Battery PAanagerners | 12VDC 5 hours to 90% after key discharged Over charge and over descharge protection Yes |
| INDICATORS | |
| LCD Alarm | Programmed LCD Buzzer ON for battery mode. low battery. overload fault |
| PROTECTION | |
| Short circuit Over-temperature Own/Under Voltage Surge Protection | Line Mode AC breaker and electronic arcurt Battery Mode electronic CaCutt Thermal switch Yes 175 Joules |
| SAFETY/REGULATORY | |
| SOON Approvals EMC Compliance | EN 62040-1 EN 62040-2 |
| PHYSICAL | |
| Operating Temperature Related Humidity Audible Norse Camension(D-W11) | WC to 40’C 1ST to 104*F) 0 to 45% non-condensing c 4008 at IM 315 5•100’141mm |
![]()


