![]() H61 PLUS Motherboard
H61 PLUS Motherboard
User Manual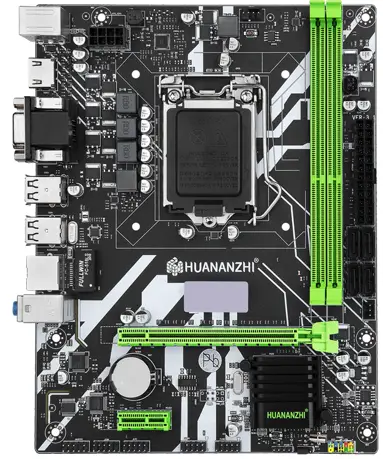
SAFETY PRECAUTIONS
- Products could probably be damaged due to electrostatic discharge(ESD). Please follow these steps below for a successful computer assembly.
- Make sure all parts are firmly connected; otherwise, it might lead to the failure of recognizing components or starting the computer.
- In order to prevent products from being damaged by ESD, please make sure to discharge your body static by touching other metal objects before taking the motherboard out of box.
- Hold the border of motherboard when taking it out. Do not touch the sensitive parts of motherboard.
- Please put the motherboard in an anti-static container or on anti-static pad if not needed.
- Before turning on the computer, make sure all parts inside the case are firmly connected without any loose screws or metal components.
- Do not start the computer before installation finished, otherwise it might result in permanent damage to the computer parts or even injury to the user.
- If you need any assistance in the process of installation, please contact our after-sales customer service or reach us on HUANANZHI official E-mail: [email protected] for professional technical support.
- Prior to installation or disassembly, please switch off the power and pull the power cable from the socket.
- Keep the motherboard away from moisture.
- Keep the user manual for future reference.
- Before plugging the power supply, please make sure the socket provides the corresponding voltage.
- In any of the following situations, please keep the motherboard and power cable in a safe place. Do not put anything onto the power cable.
- In the event of any of the following conditions, have the board checked by a service technician:
Liquid penetrated into the computer.
Motherboard is exposed to moisture.
Motherboard does not work even if you follow the instructions on user manual.
Motherboard fell off to the ground and got damaged.
Motherboard has clear signs of damage.
PACKING
Please confirm that the motherboard is properly packaged upon purchase of the product. If there is any damage to packaging or lack of accessories, contact us as soon as possible.
1.1 *HUANANZHI H61 PLUS Motherboard
2.1 *SATA Data Cable
3.1 *I/O Shield Back Plat
4.1 * User Manual
5.1 *Warranty Card
BRIEF INTRODUCTION
Features
CPU:
Intel ® LGA1155 13/15/17 2 th 3 th Intel ® Core ™
Intel ® LGA1155 processor 2 th 3 th Intel ® celeron TM
Intel ® LGA1155 processor 2 th 3 th Intel ® Pentium TM
RAM:
2*DIMM supports up to 16GB DDR3
1600/1333MHZ Non-ECCmemory
Two-Channel Memory Architecture
Actual memory data rate depends on CPU type and DRAM module
I/O effects:
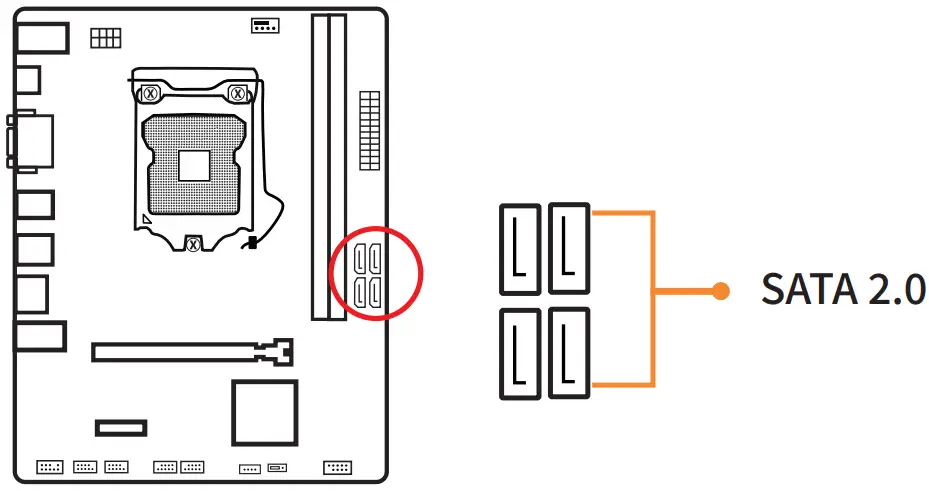
4 x SATA3.0
4 x USB2.0 ports
1 x RJ45 Network card interface
1 x PS/2 Mouse and Keyboard port
1x VGA
1 x HDMI-Compatible
1 x COM
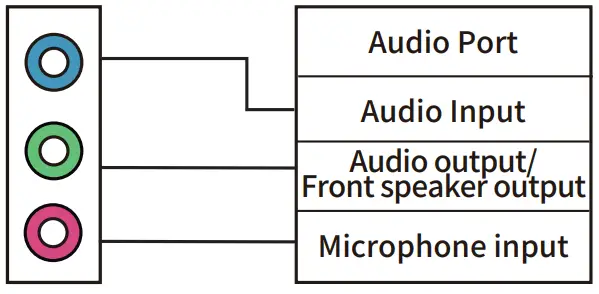
Audio:
Realtek Audio Trans coder
Realtek 5.1 Channel High Fidelity
Audio Audio output: Front Out/Front Speaker Out
Audio input: Microphone input, Audio input
Ethernet:
1 x Realtek PCIe 100MB LAN
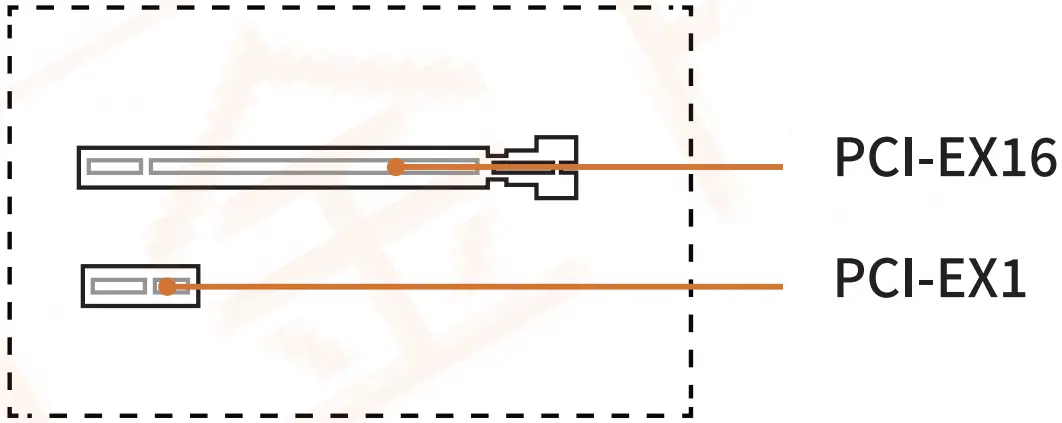
Expansion slot:
1 x PCIe 3.0 x16
1 x PCIe xl
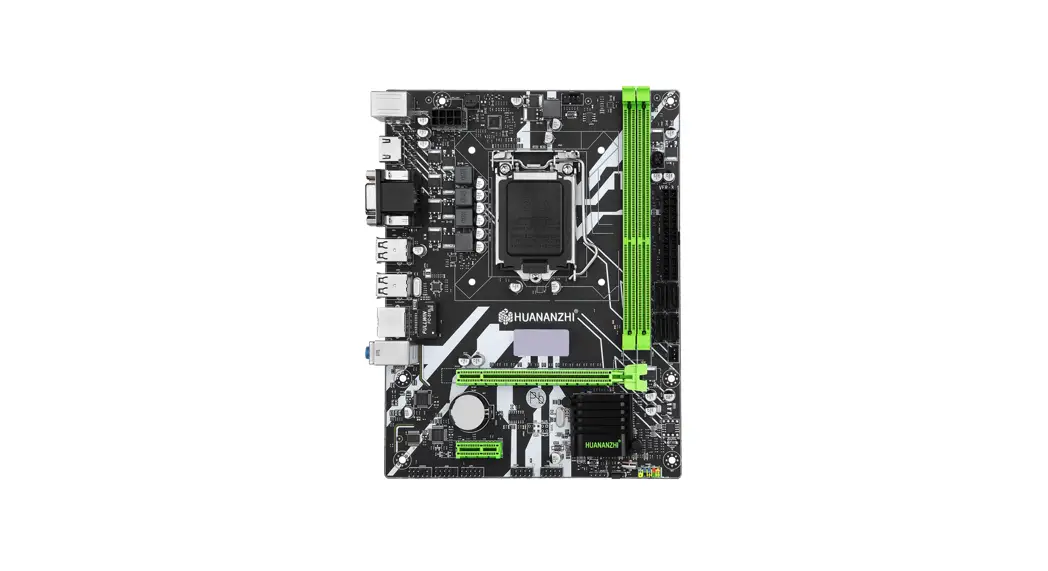
THE MOTHERBOARD DIAGRAM
1-1 H61 PLUS Mother Board Illustration

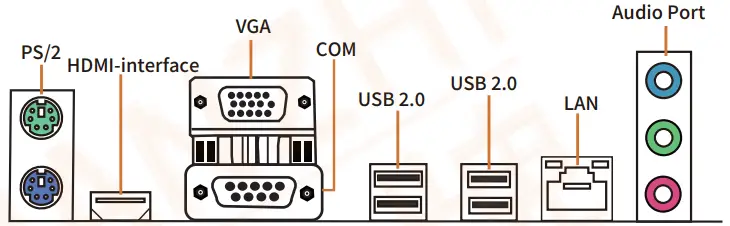
Rear I/O Panel
1-2 Overall Rear I/O Panel Display
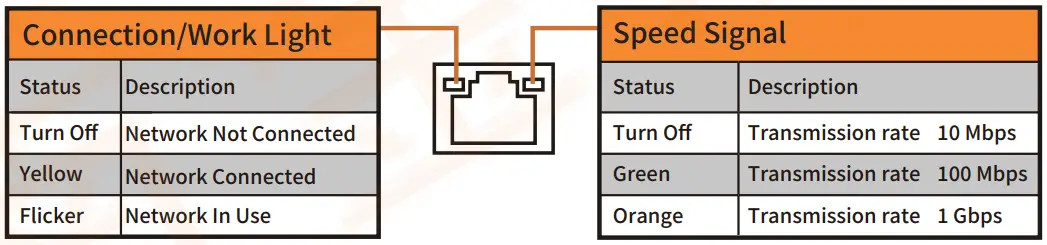
1-3 LAN Port Status Table
1-4 Audio Port Configuration
Installation And Settings
![]() NOTICE
NOTICE
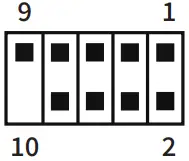
please check the motherboard where all pins marked with number “1” or white bold line are position “1”.
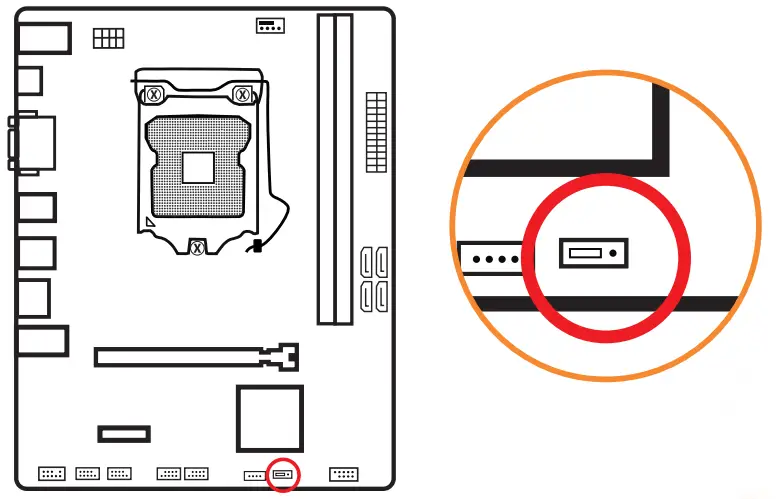
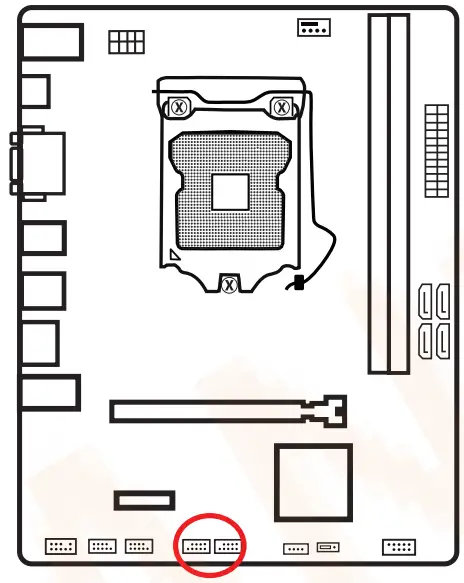
2-1 Clear CMOS Jumper CLR-CMOS
2-2 Front Audio Output Ports
 | |||
| 1 | MIC+ | 2 | Ground |
| 3 | Vbias | 4 | AuD_Vcc(AVCC) |
| 5 | L_R_Out | 6 | R_Out Back |
| 7 | N.C | 8 | Key |
| 9 | L_L_Out | 10 | L_Out Back |
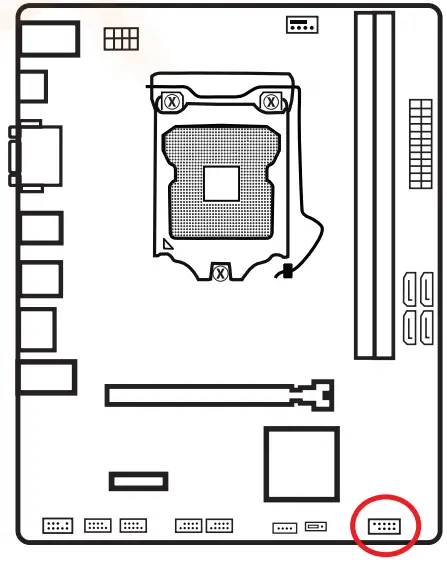
2-3 Expansion Ports
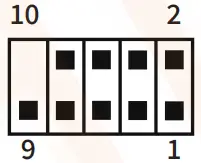 | |||
| 1 | VCC | 2 | VCC |
| 3 | D- | 4 | D- |
| 5 | D+ | 6 | D+ |
| 7 | GND | 8 | GND |
| 9 | KEY | 10 | N.C |
2-4 PCI-E Slot
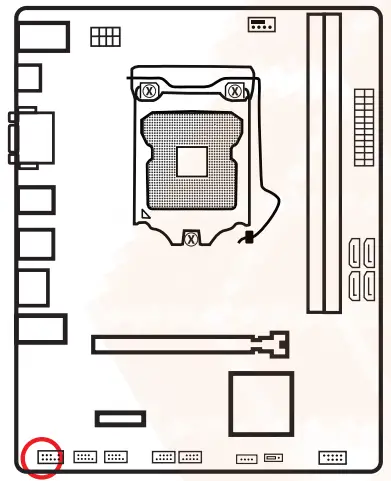
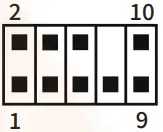
2-5 F_PANEL1 Ports
 | |||
| 1 | RESET_SW | 2 | PWR LED+ |
| 3 | RESET_SW | 4 | PWR LED- |
| 5 | HDD LED+ | 6 | POWER_SW |
| 7 | HDD LED- | 8 | POWER_SW |
| 9 | KEY | 10 | N.C |
Figure 2-6 CPU installation
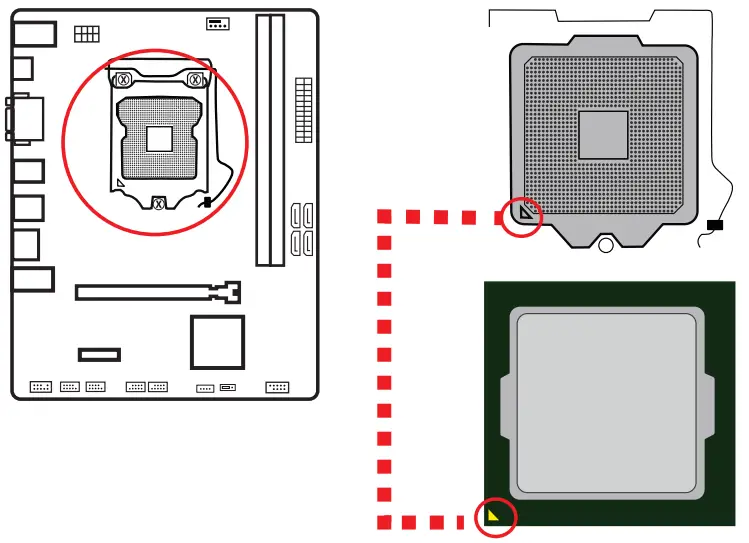
- To place the CPU properly on the motherboard, the SURFACE of the LGA1155 CPU has two pairs of starting points and a golden triangle. The golden triangle indicates Pin1.
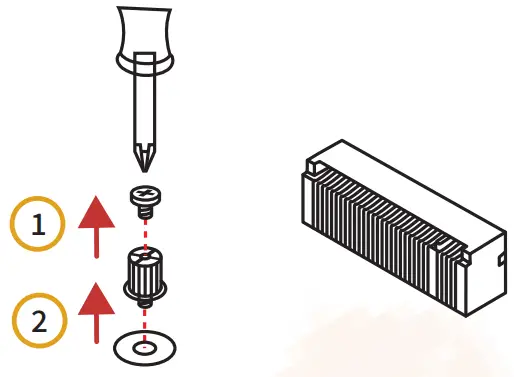
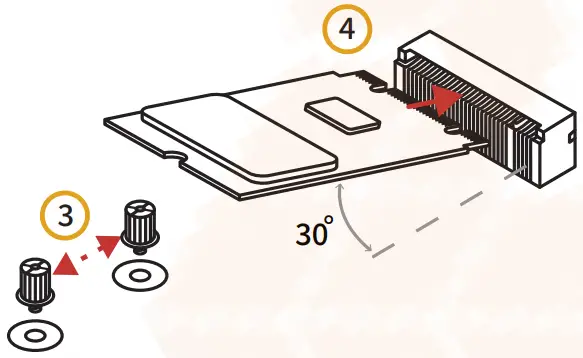
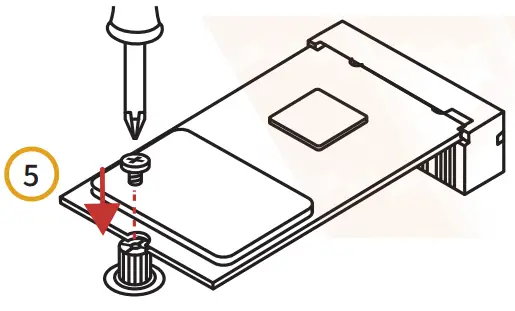
2-7 M.2 Interface Installation
- Remove the screw from the screw base
- Remove the screw base

- Tighten the screw base screwed into the length M.2 module to the M.2 interface distance hole
- Insert your M.2 module into the M.2 interface at a 30 degree angle

- Place the screw on the trailing edge notch of your M.2 module and tighten to the screw base.

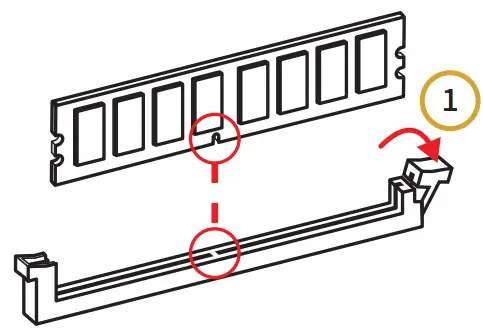
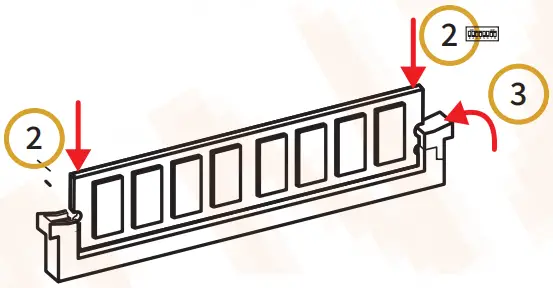
2-8 Memory Installation
- Pull the clips at both ends of the memory slot outwards, and the memory strip corresponds to the protruding position of the slot to determine the direction of installation

- Align the memory strip to the slot and press down 3. Make the clips on both ends of the slot spring up automatically.

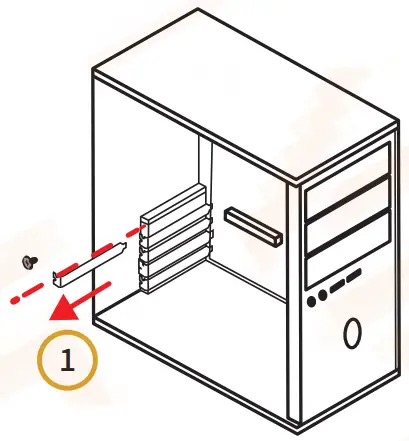
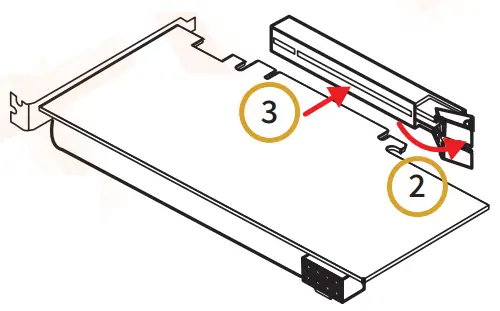
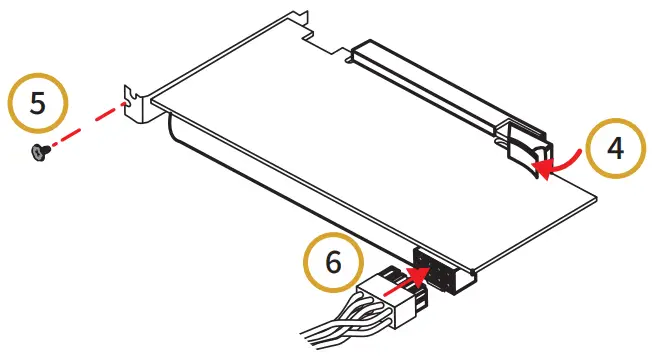
2-9 Graphics Card Installation
- Use a screwdriver to remove the bezel and screws on the main unit.

- Need to pick up the card slot of the card slot when installing the graphics card.
- Insert the graphics card into the card slot of the graphics card.

- After the installation is in place, the chuck will automati-cally return to its position.
- Secure the graphics card to the chassis with screws.
- Install the power cord.

2-10 SATA Interface
- Drivers installation
Driver Directory Driver Description Operating System H61Chipset Driver Intel chip information installation win7/win10 Tools\Directx 11 Directx 11 installation win7/win10 H61 Sound Card Driver Realtek series sound card driver installation win7/win10 H61 LAN Driver Intel chip NIC installation win7/win10 - Intel Chip Information Installation
Run “Control Panel – System – Hardware – Device Manager” Click the right mouse button to change the driver’s hardware device and proceed with the installation below:
Option: Property l – Update driver l – Not connect to Internet – Manually installation
Find the corresponding directory
Select “Next step” - Directx 11 driver installation
Run”driver installer”:1 Tools/Direct<11/DXSETUP
Click “Setup.exe” file to continue
Select “Next” to continue
Select “Finish” and restart the computer. The system will automatically find the devices. installation finished. - Audio driver installation
Before this installation, please check the model of the audio chip on the motherboard first(you may refer to this manual), Select the proper driver accordingly for installation.
4.1 Audio driver installation (take HD Audio series for example)
Run”driver installer”: / H61 SOUND CARD DRIVER/VISTA-WIN7-R267, take WDW-267 if OS is XP
Click on “next”to continue,and then”finished”
The system will automatically restart itself to finish the installation
4.2 Driver installation of external video card
Getting into Windows desktop, choose “setting.] “control”,and then “add/remove programs”. Later, choose “Realtek High Definition Audio Driver” in the menu and click on “add/remove”so that the driver will be automatically removed. - Driver installation of external video card
Run”driver installer”, take Setup.exe,
click on “next”- “yes”
-“next”
-“next”and”finished”
The system will automatically search for devices to complete the installation - Driver installation of network
Run”driver installer”: H61 LAN DRIVER/WIN7 XP click on “next”-“installation”-“finished” and restart the computer,the system will automatically search for devices to complete the installation.
BIOS Settings
In order to enable the computer to work well or execute specific functions, CMOS SETUP normally stores all kinds of data in CMOS SRAM of the motherboard. When the computer is shut down, motherboard’s battery will supply power to CMOS SRAM. When the computer is turned on and starts POST(Power On Self Test), press “Delete/Del” key to enter into AMI BIOS CMOS SETUP main page. Motherboard warm boot key is “F7”
Menu: please pay attention to every option in the settings menu. When there is a triangle shaped symbol on the left side of menu, it means that you choose this sub-menu,so a pop-up sub-menu will be available.
- Main Menu Function

 Main System Overview
Date/Time settings, HDD specs/Monitor type settings. Advanced
Advanced Settings
BIOS special function settings, such as virus alert, booting disk priority etc. Chipest
Advanced Chipest Settings Boot
Boot Settings Security
Security Settings Save
Save Setting Exit
Exit Options Exit settings include loading of optimized defaults value/loading of fail-safe defaults/discarding changes/exiting without saving.Exit settings include loading of optimized defaults value/loading of fail-safe defaults/discarding changes/exiting without saving.

![]() SZ HUANAN SANXIAN TECHNOLOGY CO.,LTD.
SZ HUANAN SANXIAN TECHNOLOGY CO.,LTD.
WWW.HUANANZHI.COM


