![]()
CORE 2 console
User guide
Guiding the way
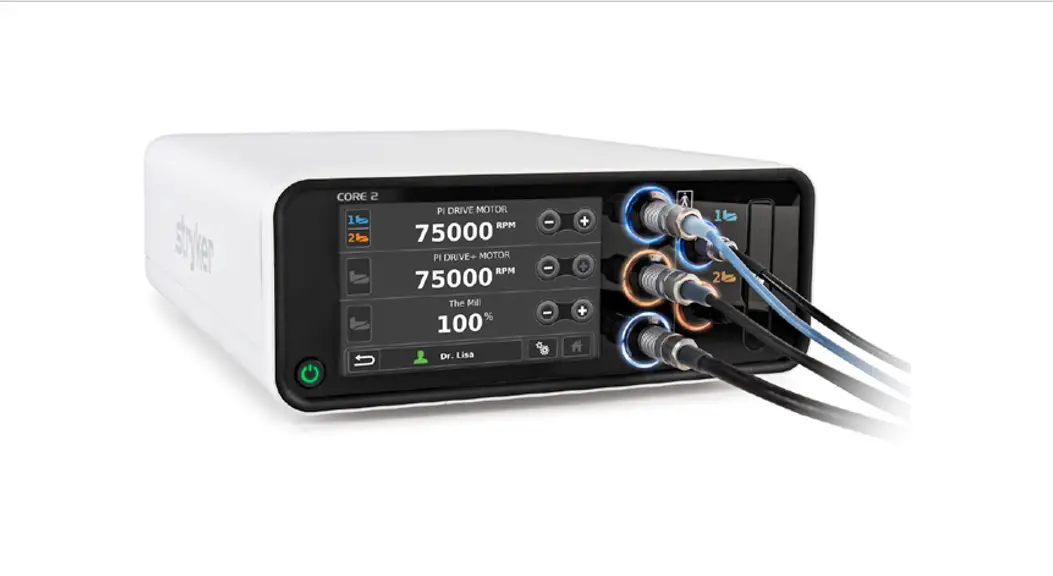
This guide summarizes some of the common features, functions, button-pushing, and menus of the Consolidated Operating Room Equipment (CORE) 2 console. The CORE 2 console powers a variety of devices, including:
- Small and large bone drills, saws, and drivers
- Small and large joint shavers
- ENT shavers
- Various foot pedals
- Bone mill
- Irrigation
Collectively, the console and its related accessories are intended for: - For use in a variety of surgical procedures, including orthopedic, dental, ENT, neuro, spine, and endoscopic applications.
- Cut, drill, ream, decorticate, shape, and smooth bone, bone cement, and teeth
- Place or cut screws, metal, wires, pins, and other fixation devices
 Unless specified, use only with Stryker-approved equipment and keep the console outside the sterile field. Among other safety directives, adhere to recommended duty cycles, and carefully select motor settings and irrigation flow rate for the attachments and procedure at hand. This user guide is not intended to replace Instructions for Use documents. It is purely provided to summarize commonly used features.
![]() For a complete list of warnings and cautions, operational details, troubleshooting tips, cleaning protocols and duty cycles, please consult the current Stryker CORE 2 console Instructions for Use (IFU Ref 5400-052-700-EN), and IFUs for any Stryker drill motor, foot/hand switch, attachment or another accessory you connect to the CORE 2 console.
For a complete list of warnings and cautions, operational details, troubleshooting tips, cleaning protocols and duty cycles, please consult the current Stryker CORE 2 console Instructions for Use (IFU Ref 5400-052-700-EN), and IFUs for any Stryker drill motor, foot/hand switch, attachment or another accessory you connect to the CORE 2 console.
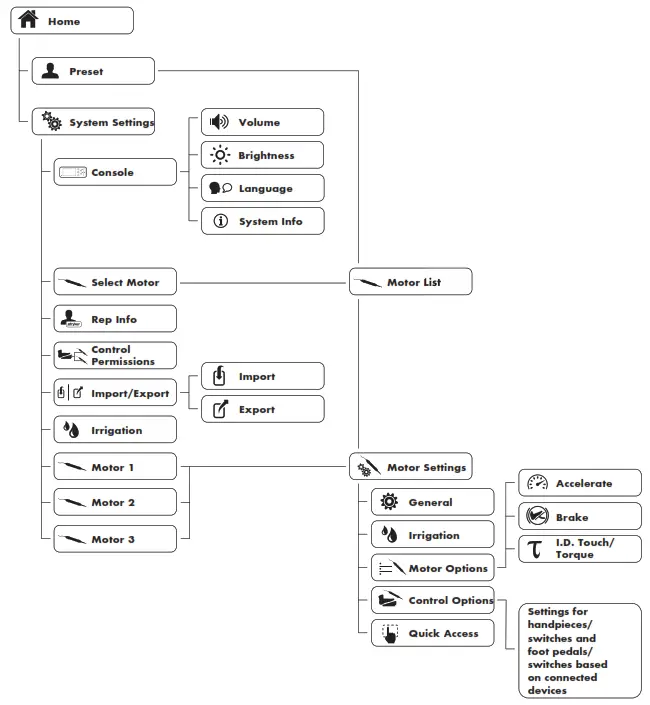
Key
features
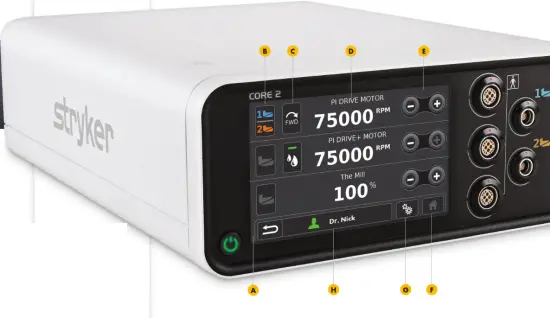
A Power button
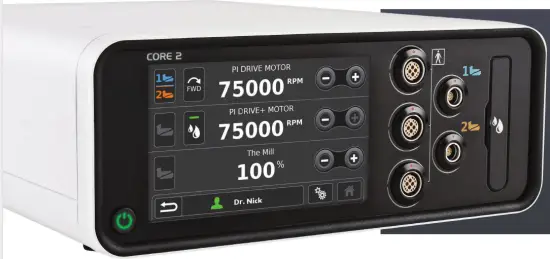
B 7” touch screen with 24-bit color and 170° wide viewing angle
C Port illumination rings (5) for constant, color-lit visibility of matched motors and foot pedals
D Stacking inserts (4)
E Motor ports (3); runs 2 non-heavy duty handpieces simultaneously. Port location refined to provide more room around the irrigation cassette.
F Foot pedal ports (2)
G Irrigation cassette port with simple, one-step insertion and removal
H Stacking feet (4)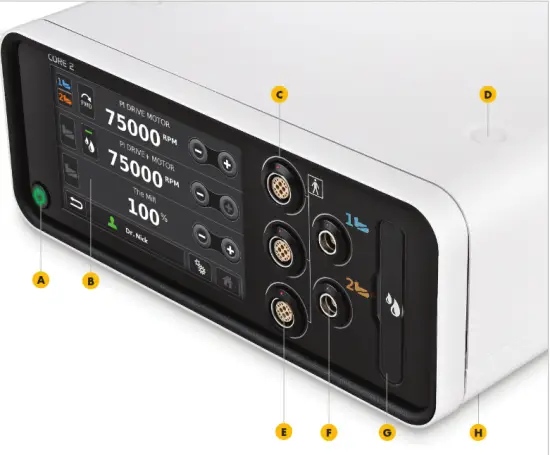
I Pole bracket for irrigation
P Internal audio with
J Ethernet port distinct tones for actuation, completion, reverse motor, notifications, errors and prohibited actions
K USB port
L Specification label
Q Passively cooled; no fan, no moving parts or associated noise
M Equipotential lug
N Fuse holder
O Power receptacle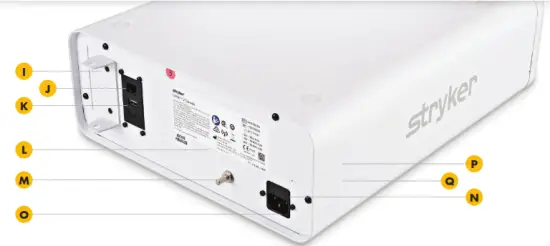
Getting
started
Quick and easy navigation
Our flattened menu structure lets you navigate anywhere in just a few clicks, or use shortcuts such as User Profiles and Forward/Quick Access to jump to your desired destination. Further simplifying the process are smart screens that automatically detect and display available options and settings based on the devices you connect.
Our flattened menu structure lets you navigate anywhere in just a few clicks, or use shortcuts such as User Profiles and Forward/Quick Access to jump to your desired destination. Further simplifying the process are smart screens that automatically detect and display available options and settings based on the devices you connect.
Powering up is simple
To turn on the console, follow these steps and you’ll have to boot up in less than 20 seconds.
Connect motors and foot pedals as desired
Press Power On![]()
Optional irrigation
- Place irrigation pole in the rear bracket
- Insert irrigation cassette
- Attach irrigation clips to the motor and connect tubing to the irrigation bag
- Press Initial Prime

Manage Profiles
to your liking
Manage System Settings
to your liking
Home is your hub
The Home Screen is where most interaction occurs and serves as your gateway to other screens and functions.
A Navigation bar – includes Reset, Profiles, System Settings, and Home
B Footswitch assignment – graphically shows foot switch assignment; touch to toggle
C Quick access area – allows users to set settings such as direction, irrigation and mode via the Home screen.
D Motor Settings – displays connected motors’ name and value settings by RPM or percent to power. To adjust, touch the number onscreen and a slider bar will appear.
E Increase/decrease – press to adjust motor value settings or use the slider bar described in “D.”
F Home key
G System Settings – push to access options for console, select motor, rep info, control permissions, import/export and irrigation
H Profiles – contains the default profiles and stored user preferences, plus allows creation of personal profiles which are permanently saved and transferable to other Core 2 consoles via USB
Customize
to your liking
Everyone has a preferred way of working, and this can change based on the procedure or patient at hand. To accommodate virtually any preference or need, the CORE 2 console gives you unparalleled customization options. Here’s a look at just some of the ways you can make your system your own.
Profiles/User preference screen
A Navigation bar – shows active preset in use along with save, confirm and home tabs
B Profiles list – includes default and existing user presets (stores up to 100+)
C Vertical scroll bar – scroll to find your existing preset
D Preset options – allow you to create, edit, copy, cancel or delete a preset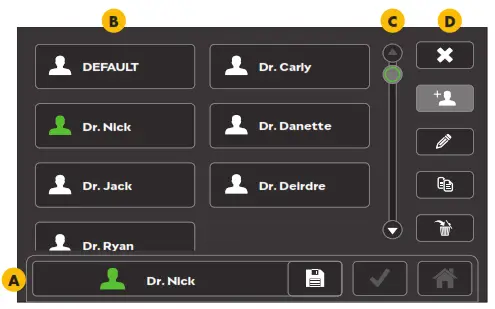
Creating, editing, copying and transferring
To create a Preset
- Touch Create +
- Enter a name for your profile and touch Next

- A list of motors will appear; touch the one you want

- Manage Motor Options to your liking
- Touch Next

- Touch Home

To edit
- Select the Profile file
- Touch Edit

- Select desired motor and manage Motor Options
- Touch Confirm

To copy - Touch the Profile file
- Touch Copy

- Enter a name and touch Next

To transfer via USB
- Insert USB, touch System Settings
- Touch Import/Export

- Choose Import or Export
- Touch the desired file or Select All
- Touch Confirm. a pop-up confirmation message will appear.
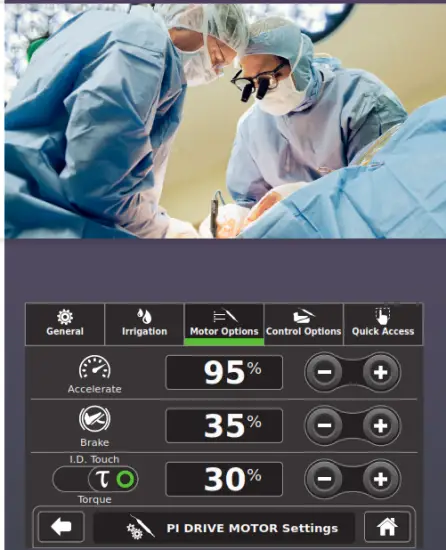
I.D. Touch software: Get the perfect feel
I.D. Touch software brings a unique level of optimization to Stryker electric motors such as πDrive and πDrive+. This software enables you to adjust torque from 0-100% to customize how your electric drill responds when pressure is applied during use — from low to high sensitivity. Acceleration and braking can also be regulated from 0-100%, collectively redefining drill performance to suit your personal style.
To set I.D. Touch preferences
Touch System Settings![]()
Touch Motor 1, 2 or 3![]()
Touch Motor Settings![]()
Touch Motor Options
• Set your preferences for torque/I.D. Touch, acceleration, and braking (0-100%)
Touch Home
Full control,
from feet to fingertips
In addition to customization options on the previous page, there are several other ways to control the functionality and performance of your system — backed by safety features such as illumination rings that enable you to work freely and with full confidence.
Managing motor settings
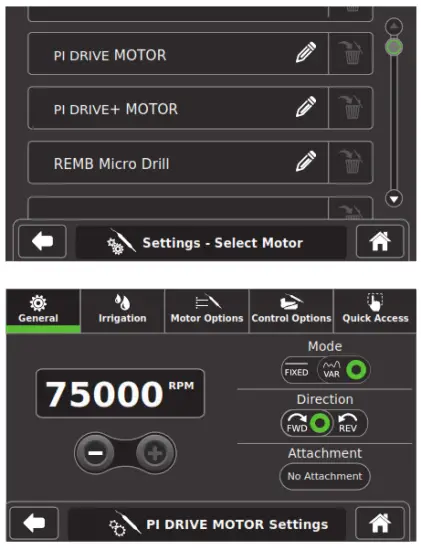
Select System Settings ![]()
Touch Motor 1, 2 or 3 ![]()
(Screen will vary, automatically displaying options available for each particular motor)
Adjust General settings to your liking, including RPMs, direction and fixed or variable mode
Optional irrigation
• Touch the Irrigation menu tab![]()
• Adjust flow rate to your liking (0-100%)
Adjusting control permissions and options
Select System Settings![]()
Touch Control Permissions![]()
Assign your preferred foot pedal(s) for each motor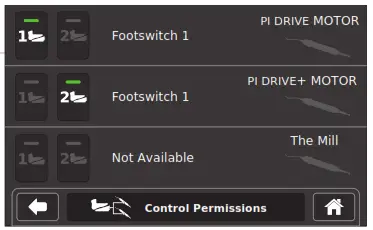
For enhanced usability, two-foot pedals can be assigned to a single motor
Port illumination rings provide constant, color-lit visibility of matched drills and foot pedals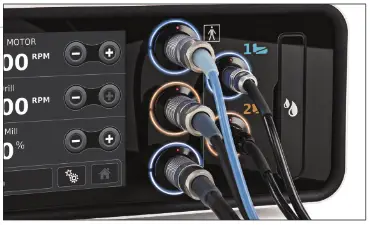
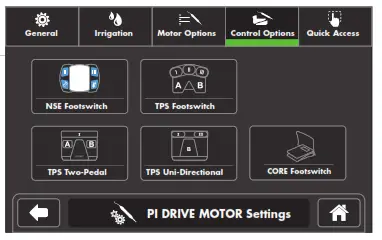
Select System Settings ![]()
Touch Motor 1, 2 or 3![]()
Touch Control Options![]()
Adjust settings to your liking; screen views and options will automatically vary based on the device connected
Touch Home to save settings![]()
Program to
perform
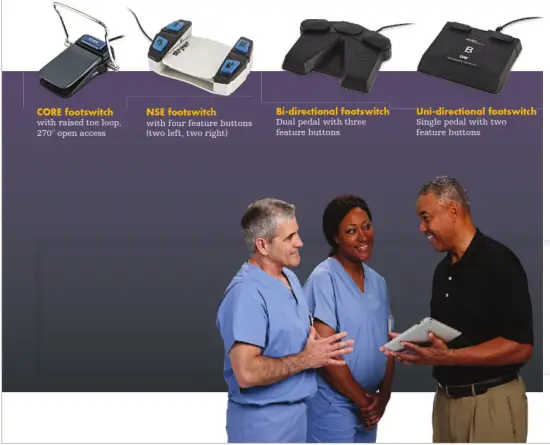
First-rate foot pedals
Just because they’re under the table doesn’t mean we’ve overlooked their design. Not only do we provide foot pedal choices, but each pedal has multiple extra feature buttons. Program these to perform the functions you want, including irrigation on/off, forward/reverse direction, change drill port assignment, change RPMs and more.
 Common
software icon
In addition to the icons inside, here are other icons you may frequently see. For a full listing, please see the Symbol Definition Chart (REF 0036-716-000) supplied with the console upon purchase.
 | Accelerate |
| Brake | |
| Control Options | |
| Create | |
| Export | |
| Footswitch 1 | |
| Footswitch 2 | |
| Handpiece |
 | Hand switch |
| I.D. Touch (Torque) | |
| Initial Prime | |
| Irrigation | |
| Motor Options | |
| Motor Settings | |
| Quick Access | |
| Rep Info |
Here to help
Your Neurosurgical sales representative is happy to help you get the most from your CORE 2 console, and help set it up with your specific needs and preferences. He/she can also facilitate corresponding implementation, training and service options. To learn more please call your Neurosurgical sales representative, 800 253 3210 or visit neurosurgical.stryker.com.
![]() Please refer to the current Stryker CORE 2 console Instructions for Use (IFU Ref 5400-052-700-EN) for a complete list of cautions, operational details, troubleshooting tips, cleaning protocols and duty cycles.
Please refer to the current Stryker CORE 2 console Instructions for Use (IFU Ref 5400-052-700-EN) for a complete list of cautions, operational details, troubleshooting tips, cleaning protocols and duty cycles.
Neurosurgical
This document is intended solely for the use of healthcare professionals. A surgeon must always rely on his or her own professional clinical judgment when deciding whether to use a particular product when treating a particular patient. We do not dispense medical advice and recommend that surgeons be trained in the use of any particular product before using it in surgery.
The information presented is intended to demonstrate Stryker’s products. A surgeon must always refer to the package insert, product label and/or instructions for use, including the instructions for cleaning and sterilization (if applicable), before using any of Stryker’s products. Products may not be available in all markets because product availability is subject to the regulatory and/or medical practices in individual markets. Please contact your representative if you have questions about the availability of Stryker’s products in your area. neurosurgical.stryker.com
Stryker or its affiliated entities own, use, or have applied for the following trademarks or service marks: CORE, I.D.
Touch, πdrive and Stryker. All other trademarks are trademarks of their respective owners or holders.
The absence of a product, feature, or service name, or logo from this list does not constitute a waiver of Stryker’s trademark or other intellectual property rights concerning that name or logo.
D0000023873 Rev. AA
G55/PS
Copyright © 2020 Stryker
Printed in USA
Stryker
1941 Stryker Way
Portage, MI 49002 USA
t: 269 323 7700
f: 269 323 2742
toll free: 800 253 3210


