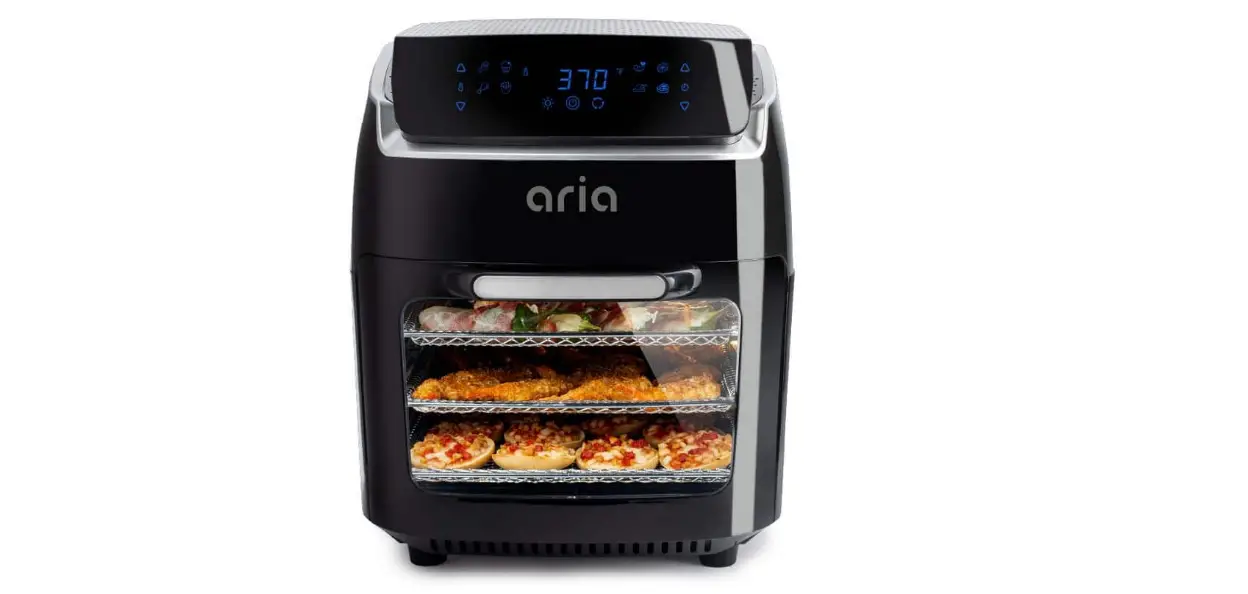
 Aria 10QT digital air fryer oven
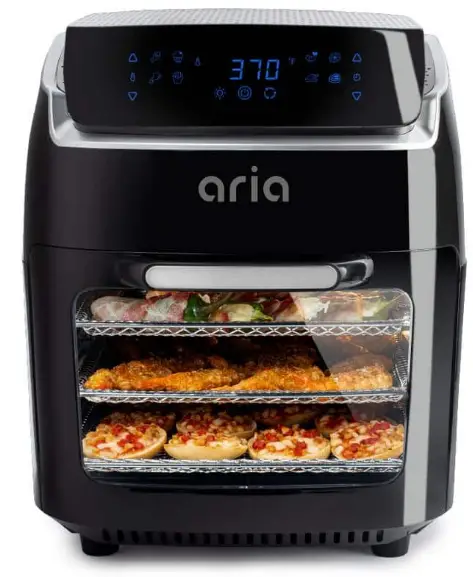
Congratulations on your new Air Fryer Oven and thanks for choosing Modernhome
Your Air Fryer Oven is a practical, multi-function appliance that uses incredibly hot air and rapid air circulation to evenly cook your food from all angles, without using extra oil or grease. This leads to deliciously crispy food in a snap with less fat, calories, grease, and harmful chemicals. Almost any food that can be prepared in a conventional, microwave, or convection oven can be fried, baked, roasted, or grilled in your new Air Fryer.
We worked hard to create our helpful companion app and dishwasher-safe accessories with a Lifetime Warranty, which lets you spend more time on the things that matter most like enjoying delicious food, spending time with loved ones, and taking care of yourself. Enjoy your new Air Fryer and the freedom it allows to create healthier lifestyles for yourself and those around you.
Presets/Functions
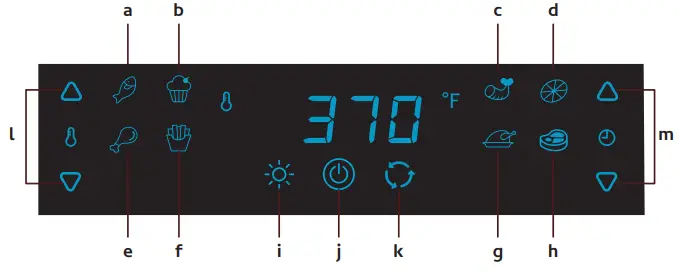
- A Fish
- B Baking
- C Shrimp
- D Dehydration
- E Poultry
- F Fries
- G Rotating Rotisserie Roast (this function automatically turns on the Rotation Function)
- H Steak
- I Oven Light
- J Power/Start Button
- K Rotation Function
- L Temperature Control
- M Time Control
Powering Air Fryer
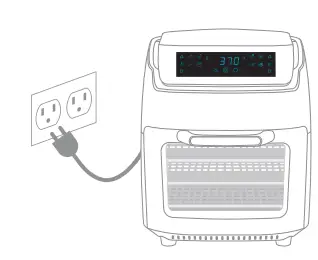
Place the Air Fryer on an even surface and plug into a grounded wall socket
Set Up Air Fryer with Presets
- After pressing the On/Off button select a preset

- Once a preset is selected hit the On/Off button to start Air Fryer


Setting Cook Time & Temperature Manually
- Pressing the On/Off button to turn on Air Fryer
- Tap the Arrows to adjust the Cooking Temperature

- Tap the Arrows to adjust the Cooking Time

- Once a preset is selected hit the On/Off button to start Air Fryer


Rolling Cage
- Open the Air Fryer Oven’s door
- Slide Drip Tray into the oven’s lowest grooves.
- Slide rolling cage into the oven’s grooves left side first.

- Select the desired time/temp and press the rotating function
- Press the On/Off button to start the Air Fryer
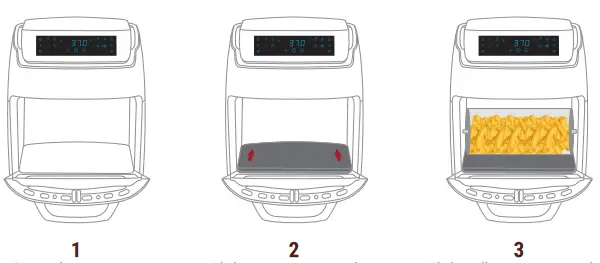
Grill Rack & Mesh Trays
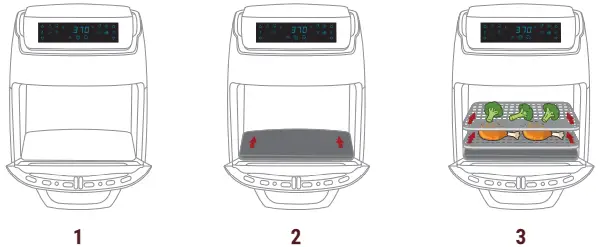
- Open the Air Fryer Oven’s door
- Slide Drip Tray into the oven’s lowest grooves.
- Place food on mesh tray then slide it into the Air Fryer Oven
- Place food on mesh tray then slide it into the Air Fryer Oven

Note:
This Air Fryer must only be used with the Drip Tray securely inside the appliance.
Do not attempt to use the Air Fryer without the Drip Tray securely inside the unit first. If using the Grill Racks, the Drip Tray must be used to catch excess oil and grease and protect the heating element at the bottom.
Loading Whole Chicken
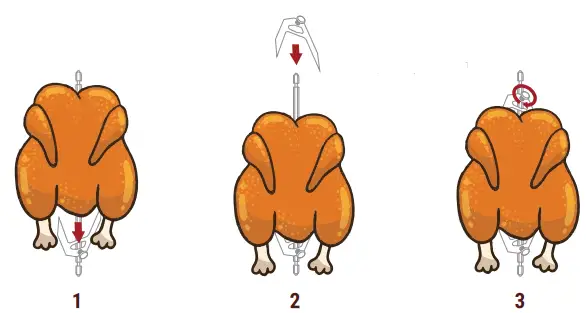
Note:
Bind the chicken together with twine if necessary.
- Push Rotisserie Skewer through the meat or food you want to cook.
- Slide Forks onto the skewer from both ends into the meat securely.
- Tighten screws into skewer to secure meat and forks from moving.

- Slide Skewer into the oven’s grooves left side first.
- Select the desired time/temp and press the rotating function
- Press the On/Off button to start the Air Fryer
Before First Use
- Remove all packaging materials, plastic, tape, and labels.
- Clean the Frying Basket, Racks, Trays and all accessories with warm water, soap, and a non-abrasive sponge. As the Frying Basket, Grill Rack, Stirring Arm, and accessories have a non-stick, food-safe coating, be sure not to use an abrasive sponge or metal scouring pad as this will damage the coating. (Tip: The accessories can also be cleaned in the dishwasher)
- Wipe the inside and outside of the Air Fryer with a dry cloth. Note: The Air Fryer may make some smoke or slight odor the first time you use it. This is normal. Ensure the heating element and fan inside the Air Fryer are both clean and clear from any obstructions.
Note: This Air Fryer must only be used with the Drip Tray securely inside the appliance.
Do not attempt to use the Air Fryer without the Drip Tray securely inside the unit first. If using the Grill Racks, the Drip Tray must be used to catch excess oil and grease and protect the heating element at the bottom.
CAUTION
- Some parts of the Air Fryer are extremely hot during operation such as the exterior, interior, trays, and all accessories. Do not touch hot surfaces, parts, accessories, interior or exterior while cooking. Use a heat-resistant oven glove instead of touching the Air Fryer or its accessories directly to avoid bodily injury.
- The Air Fryer contains both electronic and heating elements. To avoid electrical shock, do not immerse the power cord, plug, or housing in water or put them under the tap during cleaning.
- Prevent any water or other liquids from entering the Air Fryer.
- Do not cover the air ventilation inlet and air outlet of the Air Fryer while it’s in use.
- During cooking, hot steam is released from the air outlet openings. Be sure to keep your hands, face, and all other body parts away to avoid injury. Also, be careful of hot steam and air you open the Door or remove the accessories, Rolling Cage, Racks or Rotisserie Skewer.
- Do not fill the Frying Basket or internal chamber of the Air Fryer with oil or fat as this may cause a fire hazard. The appliance uses hot air to cook.
- Always allow the Air Fryer and all parts and accessories to cool down completely before handling or cleaning.
- Do not clean with metal scouring pads or abrasive sponges and materials.
- To prevent a fire, be sure to keep the Air Fryer away from all flammable materials, such as curtains, drapes, tablecloths, cloth, wallpapers, and walls.
- Do not place anything on the top of the Air Fryer or directly behind it.
- The Air Fryer is intended for household use only. Do not use the Air Fryer for anything other than its intended use or beyond the specifications of this manual.
- In the case of a fire, never attempt to extinguish the flames with water. Immediately unplug the appliance. If safe, close the lid and smother flames with a damp cloth.
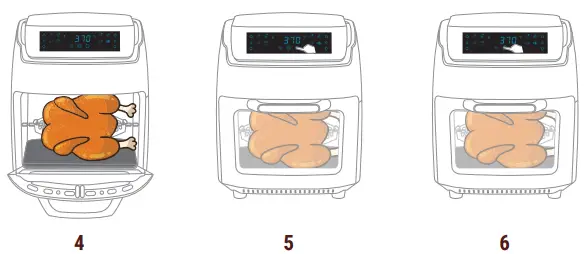
Cooking Using the Rotisserie
- Push the Rotisserie Skewer through the meat or food you want to cook. Bind the chicken together if necessary. Note: The total weight of frying chicken must be less 3 lbs
- Set the time and temperature to the desired amounts, then press the Rotate button on the Control Panel. The Rotate button will light up when the Rotating feature is enabled.
- Press the Start/Stop button to begin cooking and the machine will start warming up with the Rotisserie Skewer rotating. While the Air Fryer is cooking, the Rotating Rotisserie function can be started or stopped at any time by tapping the Start/Stop button.
Removing Rotisserie Skewer
First use the Rotisserie Handle to lift the left side of the Rotisserie Skewer upward and pull the left side outward and downward out of the slot. Then take out the right end of the Skewer from it’s notch on the right side of the Air Fryer’s interior.
Cooking Using Rolling Cage
- Open the Rolling Cage’s door on its Right side by compressing the latch and pulling it out.
- Load the Rolling Cage with your ingredients, being sure not to overcrowd the Cage with too much, and allow plenty airflow.
- Close the Rolling Cage’s door completely, making sure the latch is securely locking the door
- Looking at the L (Left) and R (Right) markings on the Cage, place the Left side into the Left slot of the Air Fryer, then the Right side into the Right slot of the Air Fryer. You’ll notice that the Left slot is the one that rotates the Cage so it’s easiest to place that first, as then the Right side will easily slide into the Right slot.
Tip: If there’s any difficulty securing the Cage into the slots, simply rotate the Cage until it fits in securely. - Set the time and temperature to the desired amounts, then press the Rotate button on the touchscreen. The Rotate button will flash when this feature is enabled.
- Press the Start/Stop button to begin cooking and the machine will start to heat up while your Rolling Cage begins to rotate. Tip: If for some reason the Rolling Cage isn’t rotating, safely lift the Rolling Cage out of the Air Fryer using the Handle and place it back in, ensure the Left and Right sides are correct, and both ends are sitting securely in each slot.
Removing Rolling Cage
With caution and oven gloves, slide the Handle underneath each side of the Rolling Cage and us the Handle to lift the Right side of the Rollling Care upward and pull the Right side out. Next, safely do the same with the Left side of the Rolling Cage.
CAUTION: Please keep in mind that the Air Fryer, and the heating elements are inner chamber gets very hot. When using the Rolling Cage, Handle, or any accessory, exercise extreme caution to prevent bodily injury.
CAUTION: Allow the Rolling Cage to cool down completely, as it will still be very hot from cooking.
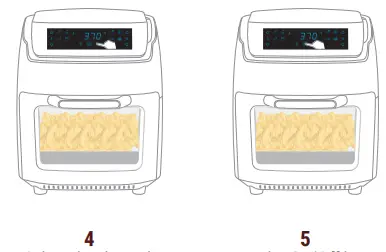
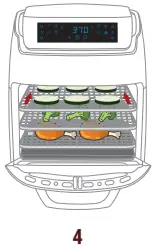
Cooking Using the Grill Rack
- The included Grill Rack can conveniently cook a variety of foods. When using, always be sure to use the Drip Tray at lowest possible slot to catch excess oil.
- After placing the Drip Tray to catch excess grease if needed, slide the cooking racks or trays at the next lowest available position in the Air Fryer and slide each securely and completely into the unit. The Mesh Tray can be used for cooking or dehydrating fruits and vegetables, while the Grill Rack can be used for meats, toasting bread, reheating food, and more. The Multipurpose Trays can be used for pizzas, desserts, as a drip tray, and a multitude of other ingredients.
Tip: As two Multipurpose Trays are included, we suggest using one for cooking and reserve the other as a dedicated Drip Tray.
Tip: When cooking using 2 trays, you may use a heat-resistant oven glove to switch the position of the trays midway through cooking for more even results. We do not recommend cooking with more than 2 trays at once.
Tip: When cooking using 2 slots, the higher rack will cook more quickly than the lower tray. Keep this in mind while cooking and also be sure not to overcrowd the higher rack, as this will block some airflow.
Note: The Drip Tray and Frying Basket protects the heating element at the bottom of the inner chamber and catches excess oil, fat, and grease that drips down. Do not operate the Air Fryer without the Drip Tray or Frying Basket underneath your food to catch this dripping oil.
| Food | Time | Temp (ºF) | Shake/Flip Halfway | Notes |
| Frozen Fries | 14-22 min. | 400 | Shake | |
| Handmade | 16-26 min. | 400 | Shake | Soak for 30 mins, dry, then add a half teaspoon of oil before cooking for crispiness |
| Beef / Steak | 10-20 min. | 360 | Flip Over | |
| Pork Chops | 15-24 min. | 380 | Flip Over | |
| Hamburger | 12-20 min. | 360 | Flip Over | |
| Sausage Rolls | 6-12 min. | 360 | Shake | |
| Chicken Breast | 15-25 min. | 380 | Flip Over | |
| Spring Rolls | 8-10 min. | 360 | Shake | |
| Vegetable | 10-25 min. | 360 | Shake | |
| Cake | 14-25 min. | 320 |
Note: Please keep in mind that these are general guidelines. Your ingredients my differ in size or thickness so we can’t guaranty the best settings for your specific ingredients. Please keep an eye on your food while cooking to insure the best results for you.
Dehydration
You can use your Aria Air Fryer to dehydrate and preserve your favorite fruits, vegetables, and meats conveniently at home, using your own ingredients that you trust. Make delicious fruit and vegetable snacks, create meat jerky, dry herbs, and more that you can store for later!
Tips for Best Results
- Be sure to consistently cut the fruits and vegetables as thin as possible, using a mandolin slicer if necessary.
- To maintain the white color of fruits like apples, we recommend that you soak the slices for at least 5 minutes in water with a bit of lemon juice to prevent the oxidization process.
- To ensure maximum air flow, do not overlap any pieces.
- Be sure to pat dry fruits and vegeta-bles before dehydration.
- Please be cautious that setting the time or temperature too high (please use the general guidelines below) may lead to your ingredients will not dehydrating properly, and moisture may be sealed inside your food.
| Food | Preparation Instructions | Time | Temp (ºF) |
| Apples | Remove the core and seeds, cut into slices about 1/8-inch thick, soak in water with a bit of lemon juice for 5 minutes, pat dry | 6-8 hours | 135ºF |
| Dried Herbs | Rinse clean, pat dry, and remove from stems | 3-4 hours | 135ºF |
| Mangos | Remove skin and pit, cut into 3/8 inch slices | 8-12 hours | 135ºF |
| Pineapple | Remove skin and core, cut into 3/8-1/2 inch slices | 6-9 hours | 135ºF |
| Beef Jerky | After marinating overnight, pat dry, cut into 1/4-inch slices | 4-7 hours | 150ºF |
Note: Your foods’ ripeness, source, and thickness will all affect the dehydration time, crunchiness, and chewiness – so please always check on your food during the cooking process to ensure it comes out just how you love it
Troubleshooting
- Problem
Air Fryer Not Working
Solution
Make sure the Air Fryer is plugged into a power outlet
Door isn’t completely closed - Problem
The Air Fryer is especially noisy
Solution
The motor or internals aren’t working correctly. Shut the Air Fryer off immediately and safely. Contact Modernhome Customer Care for warranty instructions. - Problem
Food not fully prepared when taken out
Solution
The Frying Basket, Racks, or Trays are overfilled with ingredients. Temperature is set too low Cooking time is set too short - Problem
Fried ingredients aren’t crispy enough
Solution
Use oven snacks or brush a thin layer of oil on the surface of the ingredients before cooking for crispier results - Problem
Home-made French fries are not crispy enough
Solution
Soak the cut potatoes in water for at least 30 minutes to remove the starch, but be sure to dry them properly before cooking. Add a brush of oil or cut the potatoes into thinner fries for crispier results. - Problem
Ingredients aren’t cooked evenly
Solution
In the middle of cooking process, carefully lift the Frying Basket out and shake it to separate the overlapped ingredients, then place the Basket back inside and close lid to continue. - Problem
The Air Fryer has shut down
Solution
The Air Fryer has an auto-off safety feature which protects it from overheating. Unplug the unit safely and allow it to cool down completely. Then plug it back in and restart cooking following instructions. - Problem
White smoke is coming out of the Air Fryer
Solution
The Frying Basket, Racks, Trays, Stirring Arm, accessories or inside of the Air Fryer still contain grease or oil from a previous cooking cycle. White smoke is caused by grease or oil. To prevent this, clean the Frying basket
Important Safety Tips
As your Air Fryer is a powerful electrical appliance with heating elements and fans, be sure to follow all safety precautions and read all instructions fully and carefully before using
Warning
Make sure that your outlet’s voltage corresponds to the voltage stated on the label of the appliance, and only use with a properly grounded outlet. As the plug is polarized (one prong is larger than the other), be sure to insert into a polarized outlet the correct way. If the plug does not fit, reverse the plug and try again, or contact a certified electrician. Do not modify the appliance in any way. Before using, check the power cord of appliance and the accessories. Do not use if any part shows any damage. Contact Customer Care if this is the case for warranty assistance. Before each use, ensure the heating element on top of the Air Fryer and the fan are both clean and clear from any ingredients or food from the previous cooking cycle.
Warning
- Keep out of reach of children – they should be supervised to ensure that they do not play with the Air Fryer.
- Do not use Air Fryer unattended while in use.
- Never use the Air Fryer without the Drip Tray in place.
- Immediately unplug the Air Fryer if you see dark smoke coming out of it. Wait for the smoke to stop being released before pulling out the Racks, Trays, or other accessories.
- Children over 10 years, anyone with a physical or mental disability, and anyone with a lack of experience and knowledge on how to use the Air Fryer should read the User
- Guide completely and be guided by someone who has prior experience with using the appliance.
- Do not let the power cord contact hot surfaces or hang over the edge of table or counter.
- Do not plug in the Air Fryer or operate the appliance or display with wet hands. Do not use this appliance with an extension cord as this can cause a fire hazard.
- As the Air Fryer gets extremely hot during use, prevent fire hazards and do not put plastic or metal dishes, bowls, tools, or protective film into the appli-ance.
- Do not place paper, cardboard, or any similar materials into the Air Fryer.
- If using parchment or baking paper, be sure to place your food securely on top of the paper before putting it in the Air Fryer. The extremely light paper could be lifted by the fan and touch the heating elements, causing a fire hazard.
- The Air Fryer should be placed on a horizontal and stable surface, away from water and all liquids when being used. Do not place it on plastic, any boards, or any other surface that can get too hot or damaged.
- Do not place the Air Fryer against a wall or other appliances. There should be a space of 12 inches all around the Air Fryer while it is in use or directly after its use (since it will be hot.)
- Do not leave the Air Fryer unattended.
- Once cooking is completed and you are taking out the Racks, Trays, or accessories, the heating element at the top of the unit will have a very high temperature. Do not touch it.
- If the preset time is too long the food will be burnt and dark smoke will be released from the air outlet. Unplug the Air Fryer immediately and allow it to cool completely.
- After it cools, clean the food and oil in the Frying Basket in addition to all the accessories.
- After using the Air Fryer, press the power button to turn the appliance off, then safely pull the plug from the socket. Avoid pulling the power cord too harshly to prevent damage and electric shock.
- Unplug the Air Fryer from the outlet when it is not in use or before cleaning it. Always allow the appliance to cool down completely first before cleaning.
- Do not use any 3rd party accessories.
- This appliance is intended to be used in a household. Do not use outdoors.
- If the appliance is used improperly, or for professional or semi-professional purposes, or if it is not used according to the instructions in the User Guide, the warranty becomes invalid and Skyline Brands Inc refuses any liability for damage caused.
- The Air Fryer has a few built-in safety features that won’t allow it to turn on unless the Frying Basket is securely inside the appliance and the Lid is fully closed and locked. Open the Lid, remove the Frying Basket completely and reinsert it securely into the unit. Then close the Lid until you hear a click, which indicates it’s locked securely.
- Always unplug the Air Fryer when it’s not being used.
Care, Cleaning & Maintenance
For optimal efficiency and long-term care, clean the Air Fryer after each use.
- Since the Air Fryer and internal parts get very hot during use, unplug the power cable and let the Air Fryer cool for at least 30 minutes before handling or cleaning any parts. Note: Open the Door and remove the Frying Basket and all accessories carefully to let the Air Fryer cool more quickly before cleaning
- Clean the Frying Basket, Grill Rack and Stirring Arm with hot water, a minimal amount of soap, and a non-abrasive sponge. To avoid damage to the parts, do not use a hard-wire cleaning tool.
- The Frying Basket, Grill Rack and Stirring Arm are dishwasher-safe for easier cleaning.
- Clean the inside of the Air Fryer with hot water and a non-abrasive sponge.
- Wipe the surface of the Air Fryer with a moist cloth. Do not use corrosive liquids for cleaning.
- Always keep the power cord of the Air Fryer dry and away from water to prevent electric shock and damage to the appliance.
- For long-term storage, unplug the Air Fryer, allow it to cool down, properly clean and dry all the parts, put the components into the box, and store it in a cool, dry place.
Warning
If the appliance is used improperly, or for professional or semi-professional purposes, or if it is not used according to the instructions in the User Guide, the warranty becomes invalid and Skyline Brands refuses any liability for damage caused.
Warranty Terms
This warranty applies to products purchased and used only in the U.S and Canada and does not cover wear and tear from improper use or not following instructions as specified in the print manuals. Furthermore, we exclude all claims resulting from misuse, special, incidental, and consequential damages. All liability is limited to the amount of the purchase price. After a period of 90 days, we will still repair or replace the product at no cost, however, may ask you to help pay for the shipping cost associated with the product.
Skyline Brands, Inc.
4801 Emerson Ave.
Palatine, IL 60067
To make a warranty claim, do not return this appliance to the store.
Please call 1.847.357.9077 in the U.S. or Canada between 9:00am – 5:00pm (CST) Monday through Friday.
or email [email protected]


