
 VENTRAY MOM Mini Oven Master
QUICKSTART GUIDE
Thank you for purchasing Ventray oven. In this guide, we will show you how to install and operate your new oven for the first time. To avoid injury, read and understand the important safety information included before using this appliance.
PRODUCT OVERVIEW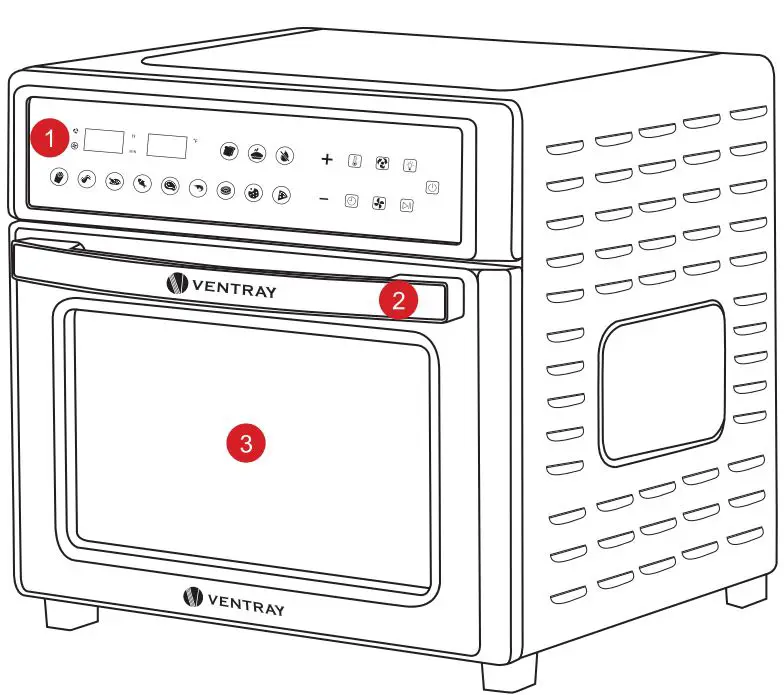
- LED Touch Control
- Door Handle
- Glass Door
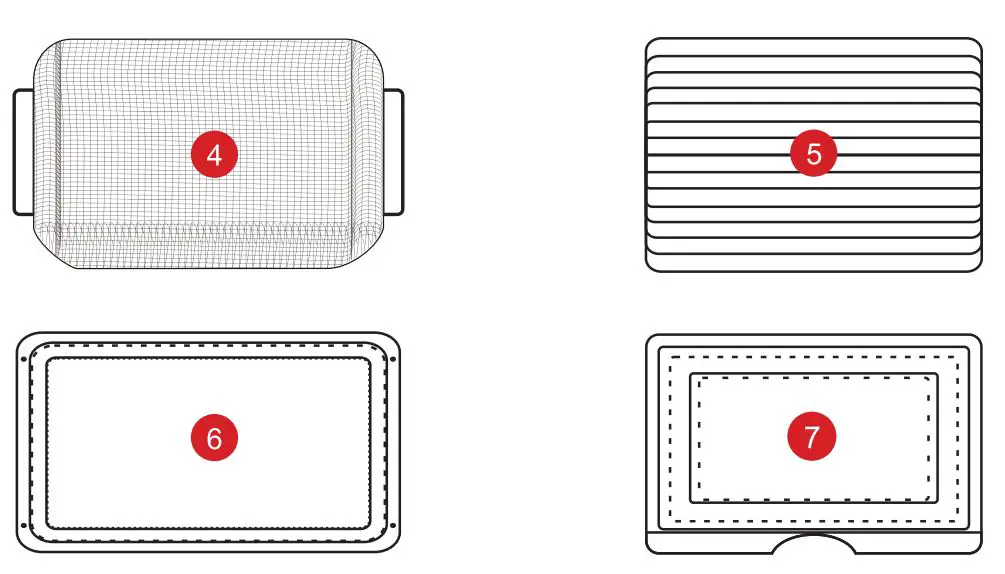 Standard Accessories
 - Fry Basket
- Baking Rack
- Baking Tray
- Crumb Tray
INDICATOR DISPLAY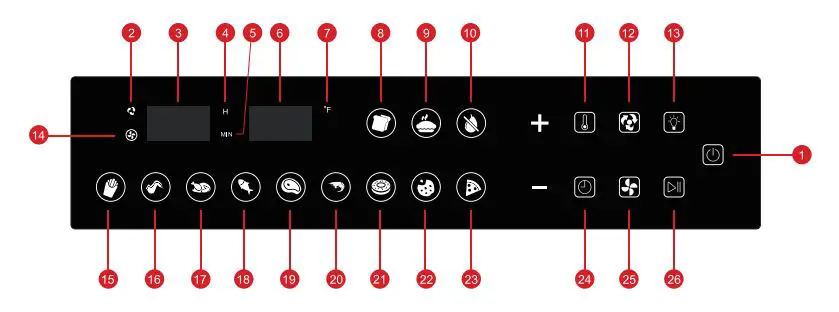
- ON/OFF
- Fan State
- Digital Time
- Hour
- Minute
- Digital Temperature
- Fahrenheit
- Bread
- Cake
- . Dehydrate
- Thermometer
- Rotisserie Rotating Control
- Oven Light
- Rotisserie Rotating State
- Fries
- Wings
- Chicken
- Fish
- Steak
- Shrimp
- Donut
- Cookies
- Pizza
- Timer
- Fan Control
- Start/Pause
STATE DESCRIPTIONS
- Standby State After powering on, the buzzer rings once. All indicators turn on once and turn off automatically. The
 icon always turns on.
 - Setting State Touch the icon to turn on all indicators. Initially, the default cooking mode is
 The icon flickers and other icons turn on. Touch any icon to set a cooking mode. Touch the
  icon to turn on the + and – icons. Touch the + or -icon to adjust the temperature/time.
 - Working State After setting a cooking mode, touch the
 icon to start the working state. The selected indicator turns on, and other indicators turn off. The oven beeps three times when the countdown is over.
 - Paused State In the working state, pause heating and countdown by touching the icon. In the paused state, the oven can return to the standby state automatically if there is no operation for one minute. In the standby state, touch the icon once to start work.
MAJOR OPERATIONS
- Power on Power on the oven by connecting the power plug to the power outlet. Keep away from wood and water sources.
- ON/OFF Touch the icon to turn on all function indicators and set the oven in the standby state.
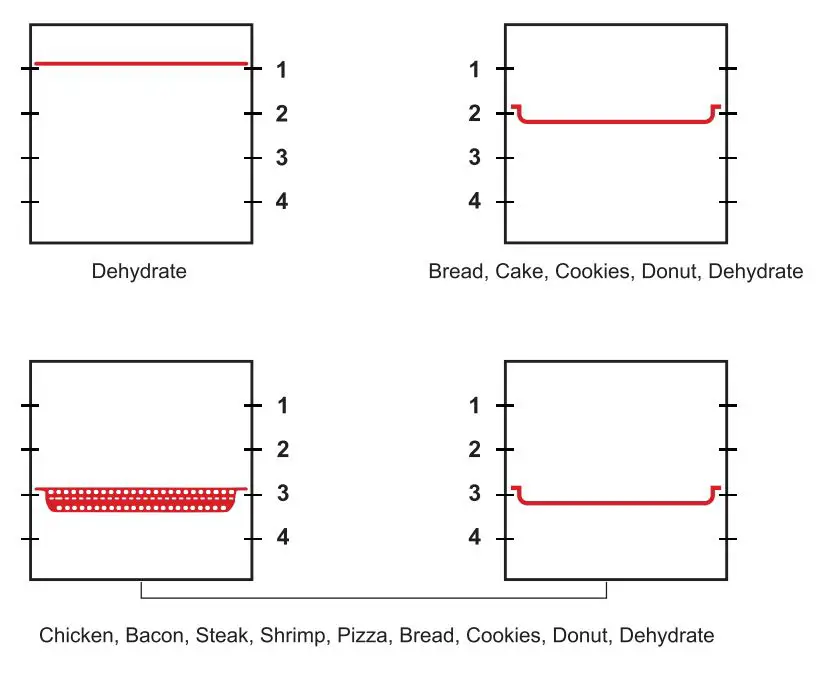
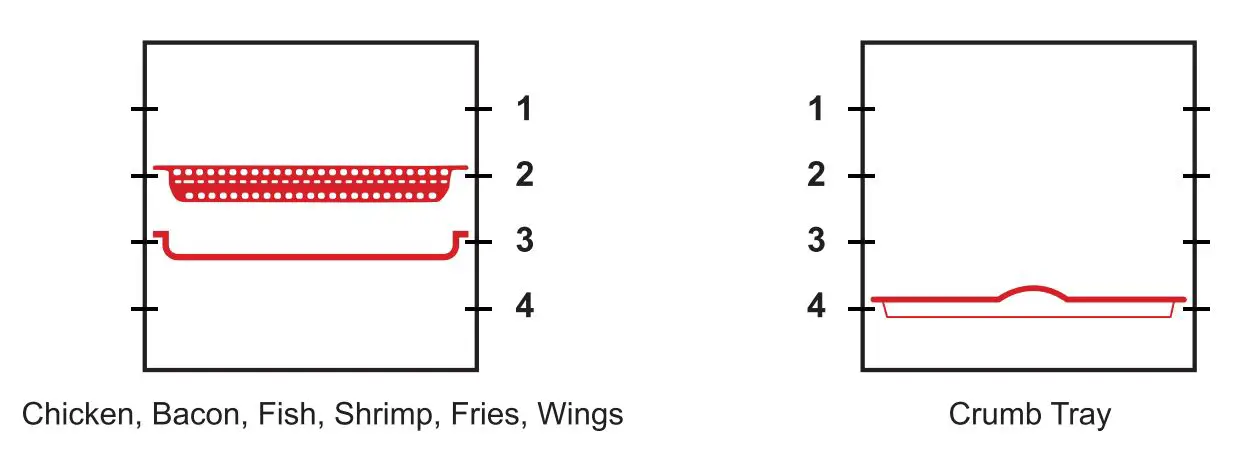
- Install Accessories Lay ingredients in/on the fry basket, baking tray, or baking rack evenly, such as chicken, potato slices, cookies, fish, and bread. Install specific accessories into the oven. Refer to the following Sectional Drawing to ensure the position is correct.
- Mode Settings
Set a cooking mode by touching the following icons, including Bread, Cake, Dehydrate, Fries, Wings, Chicken, Fish, Steak, Shrimp, donuts, Cookies, and Pizza. The selected indicator flickers and other indicator lights turn on. Touch the icon to start the work. The indicator of a selected function turns on during cooking. Other indicator lights turn off. - Time/Temp Settings Touch theto turn on the + and – icons. Touch the + or -indicator to adjust the time/temperature. Touch the icon again to confirm the time/temperature and start cooking immediately.
- Power off After cooking, the oven beeps three times and returns to the standby state. All indicators turn off the icon. Unplug the power supply to cut off power.
CLEAN & MAINTENANCE
WARNING
- Please unplug the power supply after the oven is turned off.
- Please cool the oven and all accessories thoroughly before disassembling and cleaning.
Clean the Exterior Body and Glass Door
- Wipe the exterior body with a soft wet sponge. A non-abrasive detergent or mild spray solution is available to remove stains. Before the cleaning, apply the detergent to the sponge.
- To clean the glass door, please apply a mild detergent on a soft wet sponge or soft plastic scouring pad. Do not use an abrasive detergent or tinsel scouring pad because it may scratch the exterior body.
- Wipe the touch screen with a soft wet cloth. Do not use a dry cloth or abrasive detergent because it may scratch the exterior body.
- Dry the oven thoroughly before connecting the power plug to a power outlet.
Clean the Interior Walls
The interior walls feature a non-stick coating for easy cleaning. To clean any splattering that may cause by cooking, wipe the interior walls with a soft wet sponge. Use a non-abrasive detergent or mild spray solution to clean stains. Before cleaning, apply the detergent to the sponge. Avoid touching the heating tubes.
Clean the Crumb Tray
- After use, slide out the crumb tray and discard crumbs. Wipe the tray with a soft wet sponge. Use a non-abrasive detergent to clean stains. Before cleaning, apply the detergent to the sponge. Dry thoroughly.
- To remove baked-on grease, soak the tray in warm soapy water and wash with a soft sponge or soft plastic scouring pad. Rinse and dry thoroughly.
- Always reinsert the crumb tray into the oven after cleaning and before connecting the power plug to a power outlet.
Clean Other Accessories
- Wash accessories in warm soapy water with a soft sponge or soft plastic scouring pad. Rinse and dry thoroughly. Do not use abrasive detergent, tinsel scouring pads, or metal tools to clean any of the accessories because it may cause damage.
- To maintain the life span of accessories, using a dishwasher is not recommended.


