new one AR390DAB FM/DAB + car radio with Bluetooth and USB/Micro SD User Manual
PRECAUTIONS
- Do not attempt to modify the unit, modifying the unit may cause an accident.
- Installation or servicing of the unit by persons without training and experience in electronic equipment and automotive accessories may be dangerous and could expose you to the risk of electric shock or other hazards.
- Stop the vehicle before carrying out any operation that could interfere with your driving.
- Keep the volume at a level which you could hear sounds from outside the vehicle.
- Do not work in extremely high or low temperature. Be sure the temperature inside the vehicle is between +60°C and -10°C before turning on your unit.
- When replacing the fuse(s), the replacement must be of the same amperage as shown on the fuse holder.
- Do not block vents or radiator panels. Blocking them will cause heat to build up inside and may result in fire.
- Using this unit without running the engine can result in battery drainage.
- Use only in cars with a 12 volt negative ground.
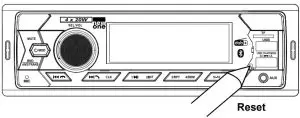
- After completing the installation or replacing the car battery, you need to reset the unit before using it. Press RST button on the front panel with pointed object (such as ball-point pen) to reset the unit to its initial settings.

UNPACK YOUR UNIT
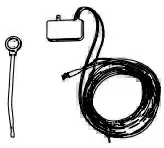
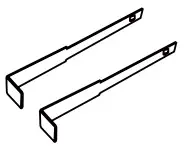
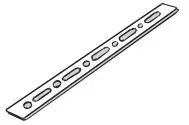
When you unpack your new car radio, make sure that you have removed all the accessories and information papers:
- Main unit
- User manual
- Accessories:
- Rear Mounting Bolt x1

- Spring Washer x1

- Plain Washer x2

- Hex Nut x1

- DAB Anteena x1

- Keys x2

- Steel Bar x1

- Mounting Sleeve x1

- Rear Mounting Bolt x1


CONNECTION
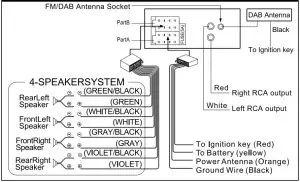
WIRING DIAGRAM (IDENTIFY BY COLOR)
Caution!
- Make sure to connect the color coded leads according to the diagram. Incorrect connections may cause the unit to malfunction or damage the vehicle’s electrical system.
- Make sure to connect the speaker (-) leads to the speaker (-) terminal. Never connect the left and right channel speaker cables each other or to the vehicle body.
- Make sure all the connections are completely correct before turning on your unit.
 Do not connect the ignition wire (red) and the battery wire (yellow), it may cause a short circuit, even result in fire.
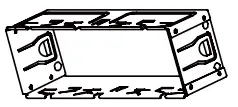
INSTALLATION
The unit is installed to be an anti-theft one. The chassis of the unit wears a sliding metal housing. Please do the connection of the power. Speakers and antenna are according to the requirement of the instruction book. Then install the sliding metal housing in the car as follows:
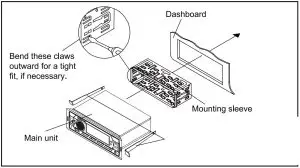
To take out the main unit, insert the two keys in the holes on each side between the main unit and mounting sleeve.
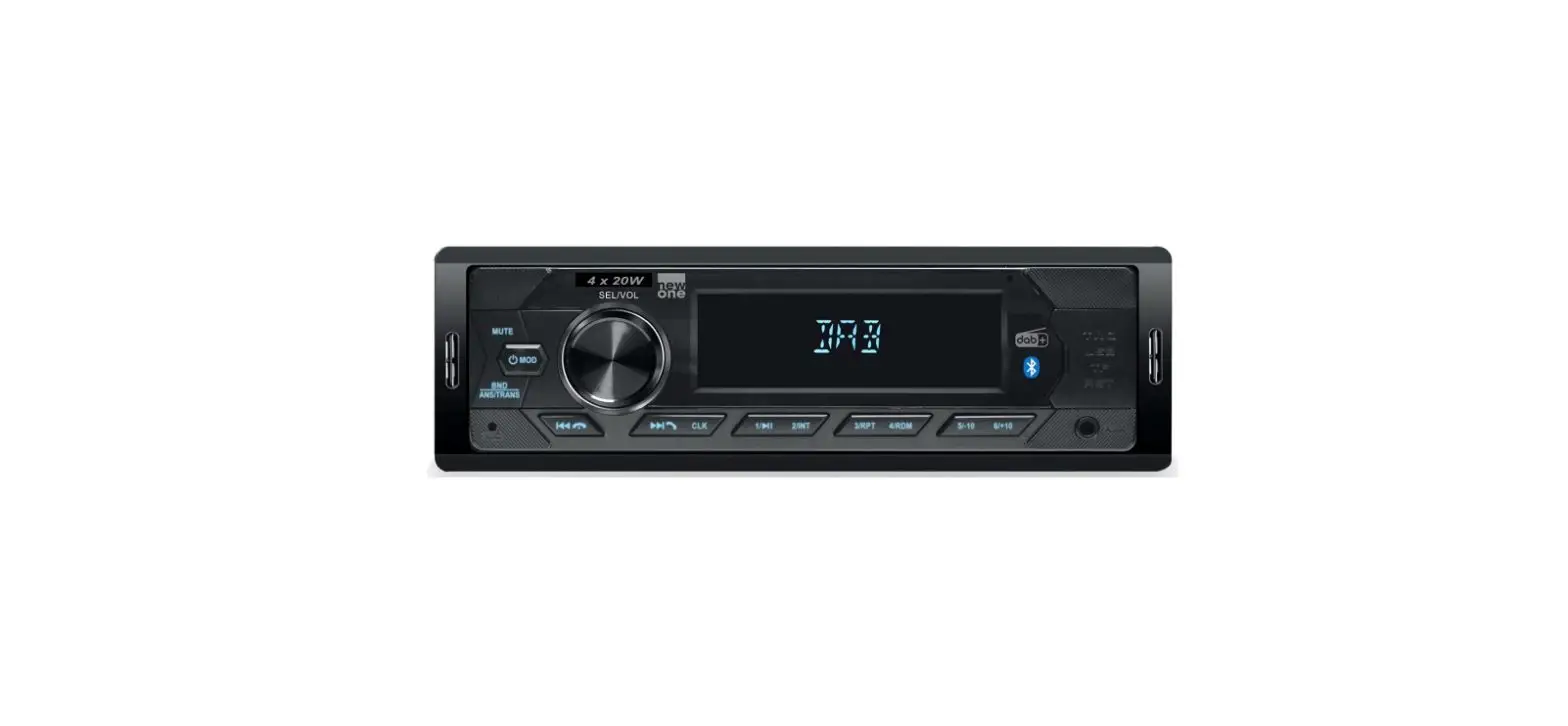
LOCATION OF CONTROLS
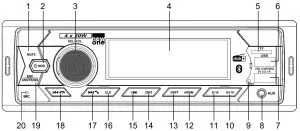
- MUTE Button: To mute or restore sound
 MOD button: To turn unit on/ off; To select function mode
- SEL/VOL knob: volume, select, enter knob
- LCD display
- Micro SD (TF) card slot
- USB port for MP3 playback
- Built-in USB charging port for smartphone or tablet
- AUX jack
- RST (RESET) button
- 6/+10 button: To select preset channel 6 in radio mode; To skip forward 10 tracks (mp3 only)
- 5/-10 button: To select preset channel 5 in radio mode; To skip backward 10 tracks (mp3 only
- 4/RDM button: To select preset channel 4 in radio mode; To start/ cancel random playback.
- 3/RPT button: To select preset channel 3 in radio mode; To repeat playback.
- 2/INT button: To select preset channel 2 in radio mode; To start/ cancel intro playback.
 button: To select preset channel 1 in radio mode; To start or pause playback.
- CLK (Clock) button: To set clock time
 Skip forward; To answer / redial the phone
-
 : Skip backward; To hang up the call
 - BND/ AMS/ TRANS: Band button (To select band: FM1, FM2, FM3 and DAB1, DAB2, DAB3); Automatic storing/ Search a track; Transfer call
- Built-in microphone
BASIC OPERATIONS
- Turn on/off the unit
PressMODbutton to turn on the unit. Press and hold this button again to turn off the unit.
- Selecting the mode
When the unit is on, pressMOD button repeatedly to select different source mode:
FM USB CARD AUX DAB BT
Note: USB, CARD mode can not be selected if no such source was plugged in the unit.
- Current time display
Press CLK button to display the current time when unit is ON. - Adjust time
- When the unit is on, repeatedly press SEL/VOL button to select clock format setting mode.
- Rotate volume knob anti-clockwise and clockwise to adjust 12 or 24 hour format.
- Press and hold CLK button to enter into setting mode. The hour digits will flash.
- Rotate SEL/VOL knob anti-clockwise and clockwise to adjust the hour value. Press CLK button again to confirm the hour value.
- The minute digits will flash, rotate SEL/VOL knob anti clockwise and clockwise to adjust the minute value. Press and hold CLK button to confirm
Noted
- It will confirm your setting if no key is pressed within 5 seconds.
- In 12H clock format, be sure to observe the AM or PM indicator to set the hour correctly.
Reset the unit
Operating the unit for the first time or after replacing the car battery, you must reset the unit. To set the unit to initial status, press RST button on the front panel with a pointed object. When some errors occur in display, you can also reset the unit, but it will erase the clock setting and some memorized functions.
SOUND FEATURES
- Volume adjusting
To increase or decrease the sound level, rotate SEL/VOL knob clockwise or anti-clockwise. - Muting the sound
When the unit is ON, press MUTE to mute the sound. Press again to restore. - Using SEL/VOL knob to select sound feature
Repeatedly press SEL/VOL knob
To select the desired mode for sound setting in the following order: “BAS”(BASS“TRE”(Treble) “BAL”(Balance) “FAD”(Fader) EQ OFF LOUD ON/ OFF STEREO/ MONO DX/ LOCAL CLOCK 12/ 24 AREA EUR/ USA - Preset equalizer (EQ)
When you are listening to pop music, classic music or rock music, use the equalizer to adjust the sound quality. Repeatedly press volume knob to select “EQ OFF” and rotate volume knob to select different equalizer mode in following order: EQ OF FLAT CLASSIC ROCK POP. - Switching Loudness on /off
By this function, you can increase the low frequency, which can improve sound sensitivity.
Noted: Please refer to “LISTENING TO THE RADIO” for others items operation.
LISTENING TO THE RADIO
- Selecting band
In DAB or FM radio mode, repeatedly press BND/ AMS/ TRANS button to select bands in following order: DAB1DAB2 DAB3 or FM1 FM2 FM3.
LISTENING TO DAB/DAB+ RADIO
- When the unit is ON, press MOD button repeatedly to select DAB mode. The unit will start automatic scan for DAB/DAB+ stations if it’s the first time to use. The display will change to “SCAN”.
A progress bar will show the progress of the scan and the number of stations found during the scan will also be displayed. - When the scan is complete, the unit will select the first available station and start to play automatically. Stations will be listed in numerical and then alphabetical order by default.
Note: When the DAB/DAB+ radio station list is stored, it will not search automatically again. Press and hold BND/ AMS/ TRANS button to search and list station. - Use
 or
or  to select through the list of stations.
Note
- If no broadcasts are found by DAB/DAB+ scan, “NO SERVICE” appears in the display.
- For a better reception, extend the antenna or do the full scan again in another place.
- During the search operation, the sound level is automatically muted.
LISTENING TO FM RADIO
Manual/ automatic tuning
- Manual Tuning
Press and holdor button until “MANUAL” shows on display, then press or continuously to select a station downward or upward. Press and hold orbutton to tune the station with a faster speed.
Note: it will return to automatic tuning mode if no key is pressed within 5 seconds. “AUTO” will show on display 2 seconds. - Automatic Tuning
Pressor button once, the radio automatically searches a station upward or downward
respectively and plays when it finds a station. Pressor buttons again to stop scanning. - Scanning and memorizing stations
This unit can store 18 FM and 18 DAB/DAB+ stations. - By BND/ AMS/ TRANS button
In DAB or FM radio mode, press and hold BND/ AMS/ TRANS button for 3 seconds to start scanning for stations and store them automatically in memory. All preset stations are scrolled during few seconds under your selected band. To remain on a station, press again the BND/ AMS/ TRANS button. - By number button 1- 6
- In DAB or FM radio mode, tune to a station by or or button.
- Press and hold one of the 1- 6 number buttons for 2 seconds until LCD shows the corresponding number, which indicates that station is stored in the corresponding number button.
- Press 1- 6 number buttons to listen to stored stations.
- When you are listening to a station stored on a number button, press and hold another number button for more than 2 seconds to store the station on this number button.
- In DAB or FM radio mode, tune to a station by or
- STEREO/MONO
Repeatedly press SEL/VOL knob to select “STEREO/ MONO” mode. FM listening is generally done in Stereo mode. However, if the signal is weak or reception is not as good as you would like, switching to Mono mode usually improves the overall sound quality. - DX / LOCAL (DISTANCE/ LOCAL)
Repeatedly press SEL/VOL knob to select “DX/LOCAL” mode. DX: The weak signal out-of-town stations may be received. LOCAL: The strong signal local stations can be received. - AREA (EUROPE/AMERICA)
To select different area.
LISTENING TO USB/ CARD
- To insert an USB device (not included)
Connect your USB device to the USB port on front panel. It will switch to “USB” mode and start playback automatically. - To insert a Micro SD card (not included)
Insert a micro SD card to the TF card slot. It will switch to “CARD” mode and start playback automatically - Basic player functions
Play/pause: Press the button to pause playback. Press again to resume playback. - Skip/fast search
- Press to skip forward to next song.
- Press button to play the previous song.
- Press and hold or to search quickly within a track.
- Press 5/-10 or 6/+10 to skip to 10 songs backward or forward.
- Long press 5/-10 or 6/+10 to select previous folder or next folder in MP3 mode.
- Press
- Intro scan
Press 2/INT button to play first 10 seconds of each track and “INT ON” appears on display. Press again
to cancel intro playback and “INT OFF” appears. - Repeat
Press 3/RPT button repeatedly to select a play mode: RPT ONE, RPT FOLD, RPT ALL - Random playback
Press 4/RDM button to play all files in random order, and “RDM ON” appears on display. Press again
to cancel this function and “RDM OFF” appears. - Searching a track in USB/ Micro SD
Press and hold BND/ AMS/ TRANS button, the display will show “NUM 0000“, then rotate volume knob to select the track number, press SEL/VOL button to start playback.
Note
- The total number of MP3 files on the USB device and Micro SD card should not exceed 9999.
- The device may not contain more than 99 directories.
- The reading time takes about a few seconds or more depending on the amount of MP3 files and folders on USB device and Micro SD card.
- Do not put anything other than a USB device to the port of this unit. Other objects may damage the USB mechanism.
- Do not put anything other than a micro SD card to micro SD card slot of this unit. Other objects may damage the card mechanism.
- The USB socket must not be connected to the computer directly, for that may damage the unit.
- There are many USB devices and micro card in the market. We cannot guarantee to support all different models. Please try another USB device and micro SD card if your device is not supported.
- The unit might not support all the multimedia files stored in USB or micro SD card because it includes some special playback procedure which might not be compatible with the procedure of this unit.
LISTENING TO AUXILIARY SOURCE
- Connect your auxiliary source (e.g. mp3 player) to the AUX jack.
- Press MOD button to turn the unit on.
- Press MOD to select AUX mode.
- Start playback from your auxiliary source.
- Adjust the volume to desired level.
- Disconnect your auxiliary source from the Aux jack, press MOD button to select other source.
USB CHARGING
This unit is equipped with a built-in USB charging port (Output: DC 5V 1A) for recharging your mobile device (e.g. Smartphone, tablet, etc.) Simply plug the USB charging cable (not included) into the USB charging port and connect it to your mobile device.
BLUETOOTH FUNCTION
The Bluetooth® word mark and logos are registered trademarks owned by Bluetooth SIG, Inc. and any
use of such marks by New One S.A.S is under license. Other trademarks and trade names are those
of their respective owners.
- Before operate the Bluetooth function, make sure your mobile phone supports Bluetooth function.
For different model of mobile phone, Bluetooth emissive power has some difference. To get the best conversation quality, it is recommended that the distance between the mobile phone and the unit is within 3 meters (Max.10 meters). - Don’t put any metal object or any obstacle between the path of the mobile phone and the unit.
PAIRING
- When the unit is ON, press MOD button repeatedly to select BT.
- On the Bluetooth device, enable Bluetooth and select “AR390DAB” from the Device List. (Refer to the user manual of the device to be connected for detailed operations.) If the Bluetooth device prompts for a pass code, use “0000”. Some Bluetooth devices will ask you to accept the connection.
You will hear an indication sound when pairing is successful. Then the LCD of the car audio system will display “BT READY”.
Noted: If you have made Bluetooth connectivity before, a list of the previous search results is displayed. Select “AR390DAB” and confirm.
Answer/ Reject a call
When there is incoming call, the phone number appears on display.
Press ![]() to answer a call, “TALK IN” will appear on the display. Rotate volume knob to adjust the BT VOL.
to answer a call, “TALK IN” will appear on the display. Rotate volume knob to adjust the BT VOL.
Press to reject a coming call.
Dialing a Phone Call
To redial the last number retained in the memory of the mobile phone, press and hold ![]() button.
button.
Transfer the call between mobile phone and the unit
During the talking mode, you can press and hold “BND/ AMS/ TRANS “button to transfer the phone call between the mobile phone and the unit. When making an outgoing call, it’s not possible to transfer if the call is not being answered yet.
BLUETOOTH AUDIO
The unit supports Bluetooth audio function. If your mobile phone can play stereo music, when pairing successful, press ![]() MOD to access Bluetooth audio mode, “MEDIA” appears on display. The audio file in your mobile phone starts to play via the car radio.
MOD to access Bluetooth audio mode, “MEDIA” appears on display. The audio file in your mobile phone starts to play via the car radio.
Play/pause: Press the ![]() button to pause playback. Press again to resume playback.
button to pause playback. Press again to resume playback.
Skip to next or previous track
- Press to skip forward to next track.
- Press to play the previous track.
Notes:
- This system will not operate or may operate improperly with some Bluetooth mobile phones / audio
players. - There are many mobile phones in the market. We cannot guarantee the compatibility of all mobile
phones together with the unit. - If you found the conversation is not clear, try to move closer to the microphone.
Hereby, NEW ONE S.A.S, declares that this NEW ONE AR 390 DAB is in compliance with the essential requirements and other relevant provisions of Directive 2014/53/EU. The declaration of conformity may be consulted at www.new-one.eu
MAINTENANCE
Precaution
- Clean the front panel with a soft cloth, or damp chamois leather. Never use solvents.
- Do not expose to rain or water;
- Do not drop or apply shock.
- Make sure that you keep your set away from high temperatures.
- The use of apparatus in moderate climates.
- Do not be exposed to dripping or splashing, and that no object filled with liquids, such as vases, shall be placed on the apparatus.
- No naked flame sources such as lighted candles should be placed on the apparatus.
Replacing the Fuse
Make sure the amperage matches the specified value when replacing the fuses. If the fuse is blown, check the power connection and replace with a new one. If the same problem occurs, it would be subjected to the malfunction in-house. In such cases, please consult the nearest service dealer.
TROUBLE SHOOTING GUIDE
| SYMPTOM | CAUSE | SOLUTION |
| No power. | The car ignition switch is not on. | If the power supply is connected t to the car accessory circuits, but the engine is not moving, switch the ignition key to “ACC”. |
| The fuse is blown. | Replace the fuse. | |
| No sound. | Volume is in minimum. | Adjust volume to a desired level. |
| Wiring is not properly connected. | Check wiring connection. | |
| The operation keys do not work. | The built-in microcomputer is not operating properly . | Press the RST button. Front panel is not properly fixed into its place. |
| The radio does not work. The automatic radio station selection does not work. | The antenna cable is not connected. | Insert the antenna cable firmly. |
| The signals are too weak. | Select a station manually. |
SPECIFICATIONS
- General
- Power Requirement::12V DC (11-16V allowable)
- Load Impedance:4 ohms
- Max. Power Output:20W x 4
- Tone Controls: ±7 dB, Bass at 100 Hz, Treble at 10 kHz
- Dimensions: Approx. 58 x 140 x 180 (h / w / l), Approx. 0.550 kg
- RADIO
- FM: 87.5 -108 MHz
- DAB+: 174.928-239.2 MHz
- Usable Sensitivity (-30dB): 12 dBuV
- Signal-to-noise Ratio: 40 dB
- Stereo Separation: 30 dB (1 kHz)
- USB/MP3 Section
- Signal-to-noise Ratio: 50 dB
- Separation: 40 dB
- Distortion: <0.5%
- Frequency Response: 20 – 20000 Hz
- BLUETOOTH
- Bluetooth Version: V5.0+BR+EDR+BLE
- Bluetooth: 2.402-2.48GHz
- RF Output Power: 2 dBm
- Working Distance: Up to 10 meters measured in open space (wall and structures may affect range of device)
Note: Design and specification are subject to change without notice.
SAFETY INFORMATION
Caution: Risk of Electric Shock Do Not Open.
ATTENTION: To reduce the risk of electric shock, do not remove the cover. There are no user serviceable parts inside the unit. Refer all servicing to qualified personnel.
 The lightening flash with arrowhead symbol within the triangle is a warning sign alerting the user of “dangerous voltage” inside the unit.
![]() The exclamation point within the triangle is a warning sign alerting the user of important instructions accompanying the product.
The exclamation point within the triangle is a warning sign alerting the user of important instructions accompanying the product.
WARNING – To reduce the risk of fire or electric shock, do not expose this appliance to rain or moisture. If at any time in the future you should need to dispose of this product please note that Waste electrical products should not be disposed of with household waste. Please recycle where facilities exist. Check with your Local Authority or retailer for recycling advice. (Waste Electrical and Electronic Equipment Directive)
NEW ONE S.A.S
10, Rue de la Mission, 25480 Ecole Valentin, France


 Dab+/ Fm Radio With Cd Player, Usb And Bluetooth User Manual")


