![]()
SR905acv
Quick Start Guide
Installation
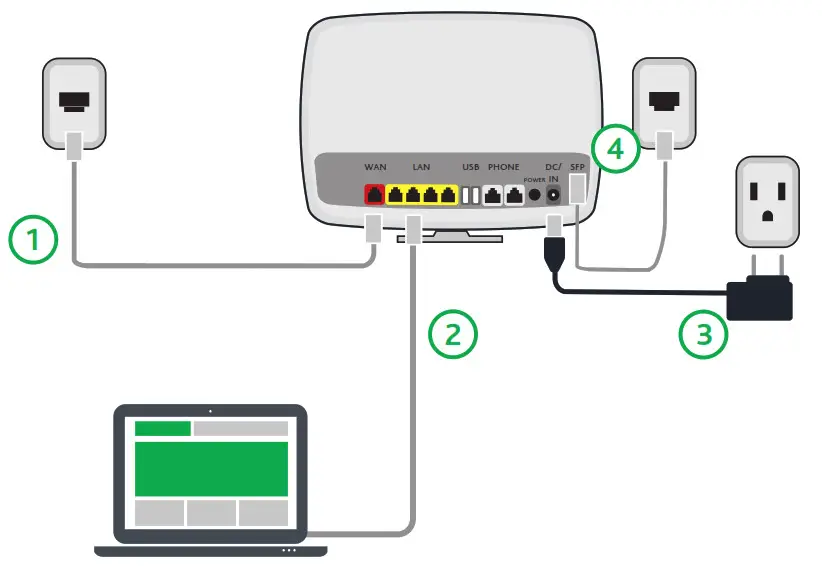
- Connect the gateway to incoming services:
For Ethernet services, connect one end of an Ethernet cable to the WAN port on the gateway and connect the other end of the cable to the wall jack installed by your provider.
For fiber services:
a. Slide open the small door at the right end of the gateway’s back.
b. Insert the SFP transceiver (included with the gateway) into the port.
c. Connect one end of the fiber cable to the SFP transceiver and connect the other end of the cable to the wall jack installed by your provider.
l For phone (DSL) services, connect one end of a phone cable to one of the Phone ports on the gateway and connect the other end of the cable to the wall jack installed by your provider. - Connect a LAN port on the gateway to your PC using an Ethernet cable
- .Plug the power adapter into the wall outlet and then connect the other end of it to the Power port of the gateway.
- Turn on the unit by pressing the Power button on the back of the gateway.
Your gateway is now automatically being set up to connect to the Internet. This process may take a few minutes to complete.
If you are unable to connect to the Internet, make sure that all cable connections are in place and the gateway’s power is turned on.
LED Indicators
Your SR905acv gateway has several status indicators (LEDs) on its top which are described below.
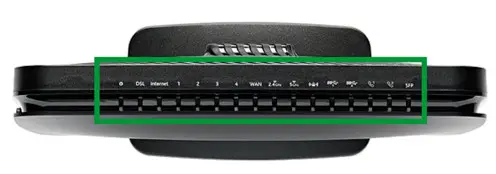
 | White |
 | White blinking |
 | Green |
 | Green blinking |
 | Red |
| LED | Action | Explanation |
| Power |
| Device in CFE mode Device powered on and ready for u |
| Internet |
| DSL sync acquired and gateway online Data being transferred Internet authentication / connection has failed |
| Lan 1-4 |
| LAN Ethernet-connected (at 1000 BASE-T) Data being transferred (at 1000 BASE-T) |
| LAN Ethernet-connected (at 10/100BASE-T) Data being transferred (at 10/100BASE-T) | |
| wan |
| Device online (at 1000 BASE-T) Device online (at 10/100 BASE-T) |
| Device online (at 1000 BASE-T) Device online (at 10/100 BASE-T) | |
| WAN Ethernet-connected (at 10/100BASE-T) Data being transferred (at 10/100BASE-T) | |
| 2.4 GHz 5 GHz |
| WiFi-enabled Data being transferred |
| (locked WiFi / WPS |
| WPS enabled Data being transferred |
| SS 1 & 2 |
| USB 3.0 device connected Data being transferred |
| Phone 1 & 2 |
| Phone line connected Phone line in use |
| SFP |
| SFP (fiber optic) connected Data being transferred |
Logging in to Your Gateway
To change the settings on your gateway, you must log in to the gateway’s interface. Make sure that you have completed the steps in “Installation” before you begin.
- Open your Internet browser and type 192.168.1.1 into the address line. The Sign-in dialog box appears.

- Enter the credentials shown below and click Sign in. Your service provider may use other settings. If so, contact your provider for details.
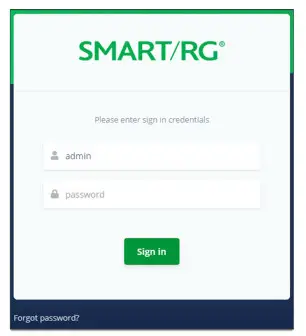
User Name: admin
Password: admin
To review the end-user license agreement, click the License Agreement link at the bottom right corner of the
browser window. The agreement appears in a separate tab.
Note: If you’ve forgotten your password, click Forgot Password and follow the instructions to reset your gateway to the
factory defaults. Then, enter the credentials provided with the gateway when you first received it.
Configuring the WAN Manually
If the automatic connect process is unsuccessful, refer to the “Ethernet WAN” section of the SmartRG SR905acv Gateway User Manual to manually establish a connection.
Wi-Fi Setup
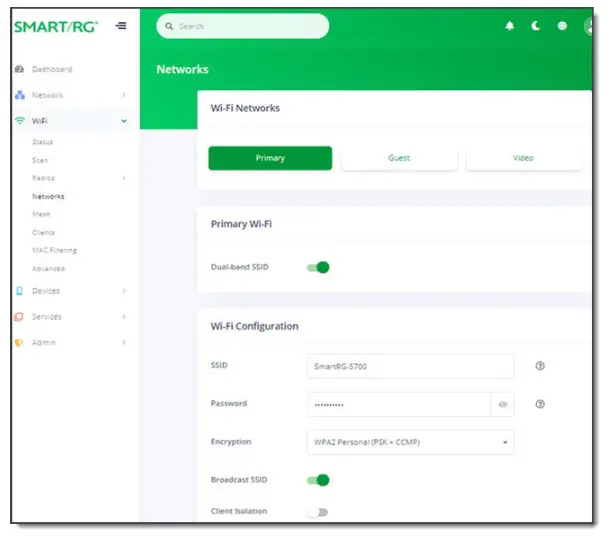
- In the left menu, click WiFi > Networks. The following page appears, showing information for the primary network. The dual-band option is enabled by default.

- Accept the default ID shown in the SSID field or enter the SSID for the network that you want to configure. You will need this ID for Step 8.
- Choose a passphrase and type it into the Password field. You will need this passphrase for Step 8.
- In the Encryption field, accept the default authentication type or select None. For security purposes, selecting None is not recommended.
- If you do not want this SSID visible to other users, click the slider button next to Broadcast SSID to disable it.
- Skip the Client Isolation field. If needed, you can change this setting later.
Click the Apply button in the Pending changes… dialog box to save your settings. - To enable a guest or video wi-fi network:
a. Click the GUEST or VIDEO button.
b. Click the slide button next to Enabled.
c. Fill in the fields following the instructions in Steps 2-6.
d. Click the Apply button in the Pending changes… dialog box to save your settings. - Follow the WiFi connection instructions provided with your client device to connect to the gateway. Use the SSID name you selected in Step 2. Then enter the passphrase that you created in Step 3 in the appropriate location on the network setup screen of your WiFi client device.
Optional Wall Mount
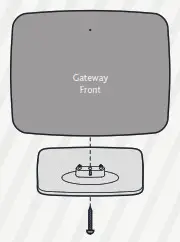
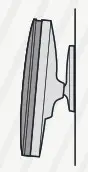
- Using a Phillips-head screwdriver, remove the mount from the bottom of the gateway.
- Insert the mount into the back of the gateway and tighten the screw located in the bottom of the mount.

- Using the template below, attach the two included screws to the wall. Using wall anchors is recommended.

- Slide the mount down onto the screws.


Record Your SR905acv Wi-Fi Settings
| Predefined wireless settings | If you change the wireless settings | |
| Primary WiFi network name (SSID) | ||
| Primary WiFi Network key (password) | ||
| Guest WiFi network name (SSID) | ||
| Guest WiFi network key (password) | ||
| Video WiFi network name (SSID) | ||
| Video WiFi network key (password) |
Additional Support
If you require further instructions, please contact your local ISP Support.
SmartRG Inc., an ADTRAN company. All Rights Reserved. © 2021


